In order to paint a geometric, tribal, ornamental design for your nails, you will need the following: base coat nail polish, hot pink nail polish, a gold/brass/copper nail polish, a dark nail polish, and a clear top coat or a shimmer.

In order to paint palm trees on your nails, you will need the following: white matte base nail polish and a variety of other colors. You will need toothpicks, if you do not have fine brushes in your polish.

In this tutorial, we learn how to draw a cartoon critter. Start out by drawing a little fat body with two arms and two legs. Next, draw on two large bunny ears on the head and create eyes that are giving a mean look. After this, create the mouth to be open with sharp teeth inside. Next, use a dark paint brush to outline the image and draw a gun in the bunny's hand. Draw details onto the critter by making hair and a belly button. After this, paint in any colors you would like, then save and pr...
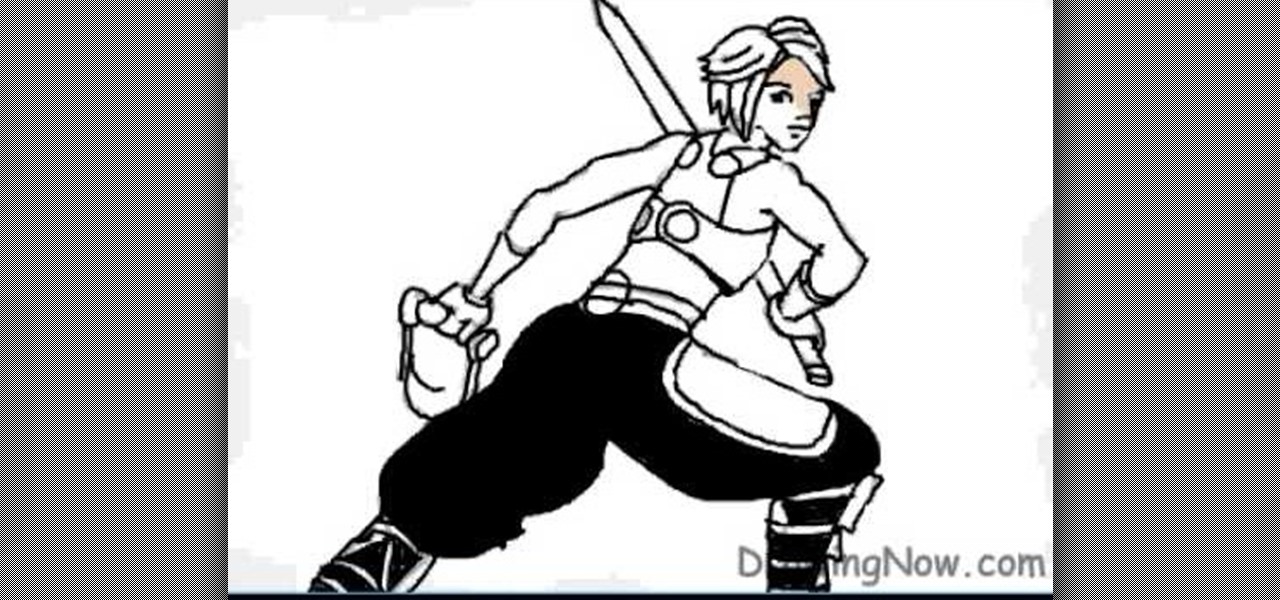
In this video, we learn how to draw a Final Fantasy character. Start out by drawing a rough outline of the entire body, starting with the head then doing the rest of the body and ending with the hands and arms. After this, draw over the initial markings with a black paint brush. Draw in eyes and hair, then start to draw in the details of the body armor and clothing. Make sure to draw on pants and make a sword that the character is holding. After this, fill in the painting with different color...
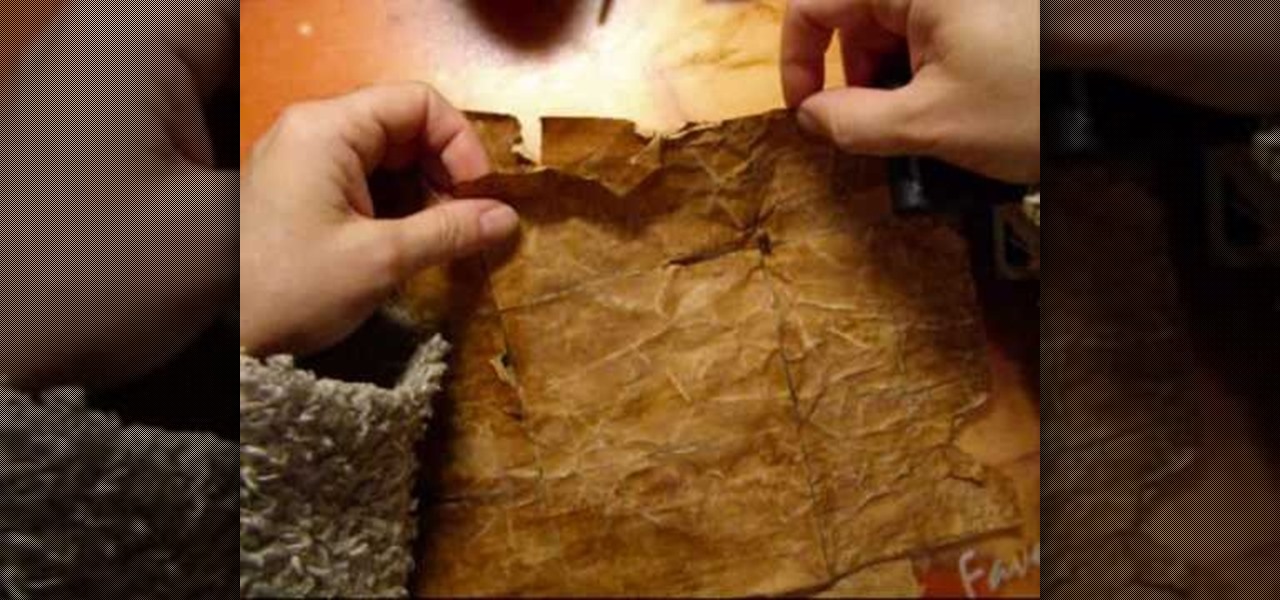
In this tutorial, we learn how to make paper look like it's 200 years old using coffee. First, take a regular piece of copy paper and then use a paint brush to paint a cup of coffee over the entire piece of paper. Use a blow dryer to dry the paper, then brush several more coats onto the paper until the brown looks like it' realistic. To finish, use distressed marks over the paper, then use a blow dry to dry off the entire thing. To finish, apply a couple more coats of coffee to the paper, the...
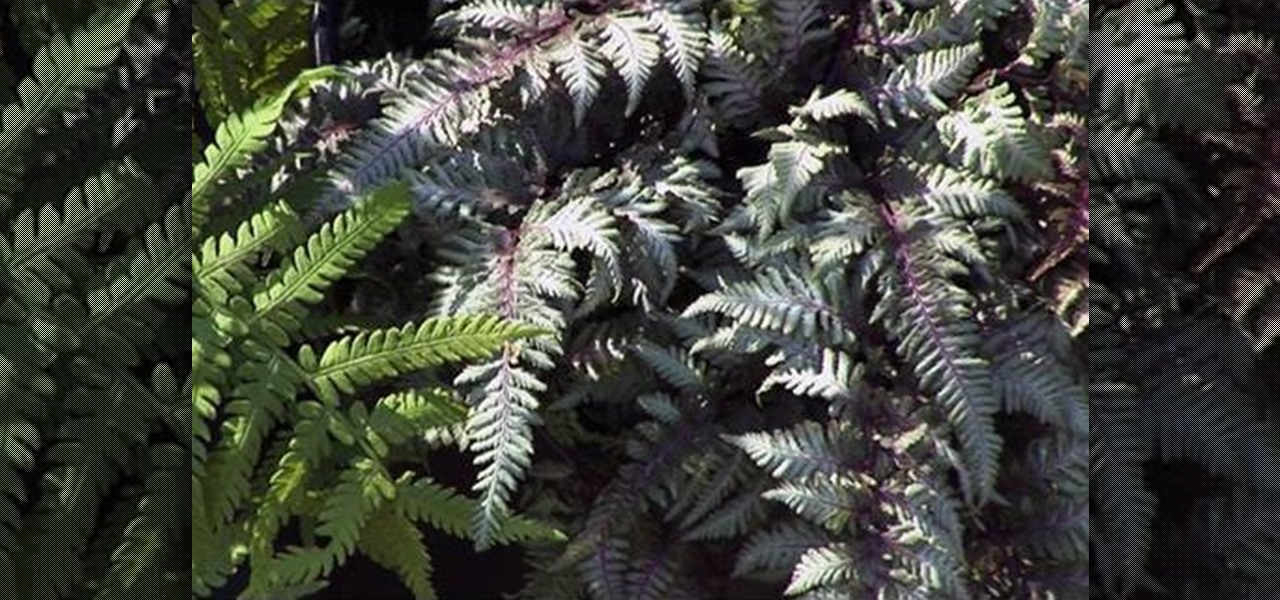
In the plant world, not all things are green. This also is especially true for ferns. These plants can grow in a variety of different colors and differ from many other types as well.

Though it's not typical for idrawgirls to focus on the male gender, don't count this tutorial out if you're looking for good instructions on how to draw a zombie. This male zombie is being drawn in MS Paint, and you can watch the drawing take place while listening to the commentary on what's being done and what needs to be done to create the living dead. But don't fret, there is a wonderfully drawn woman right next to the horrific zombie, so it's not that far of a departure for drawgirls.
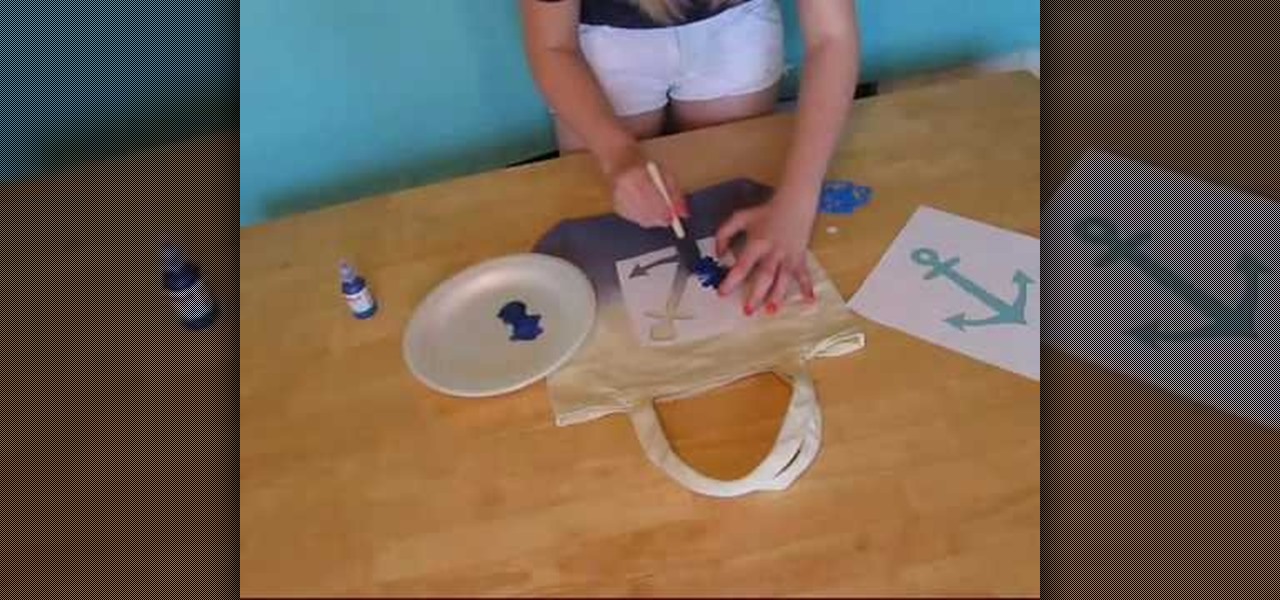
In order to make an ombre style custom beach bag, you will need the following: a canvas tote bag, dye, gloves, a paper place, sponge brush, stencils, fabric paint, containers, white vinegar, and water.
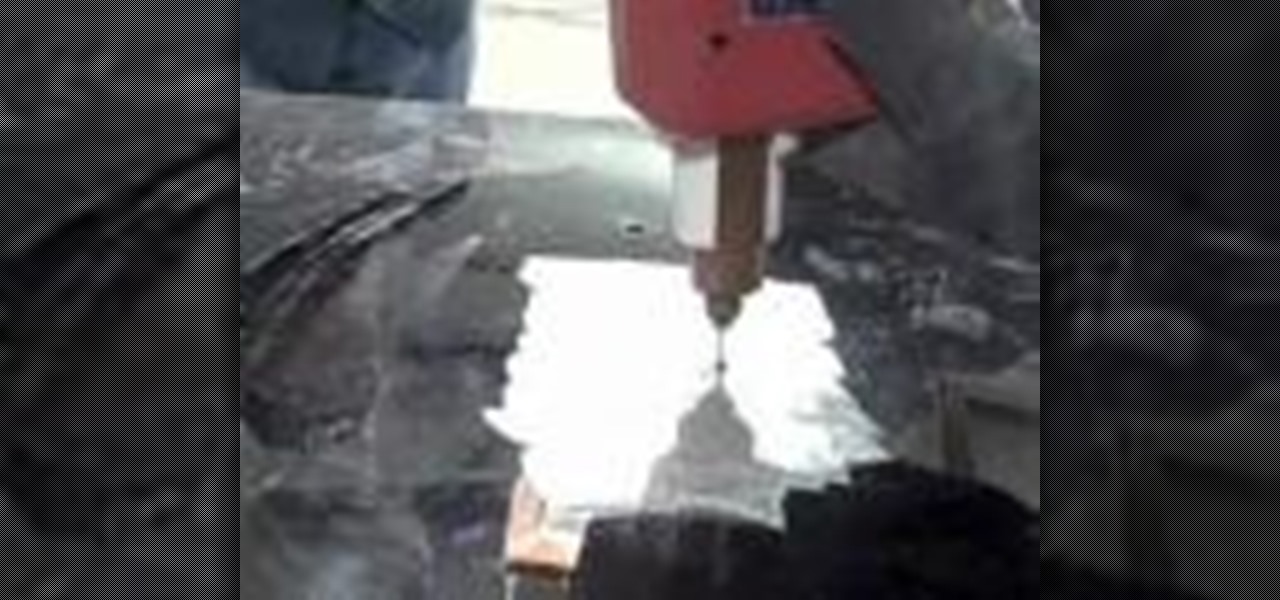
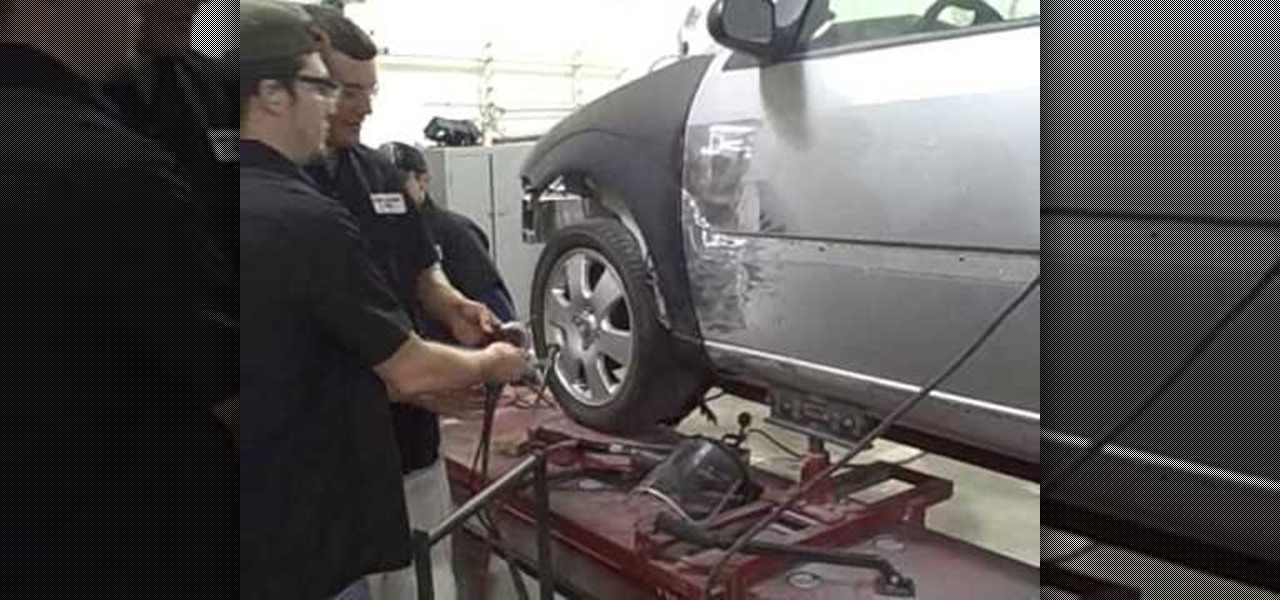
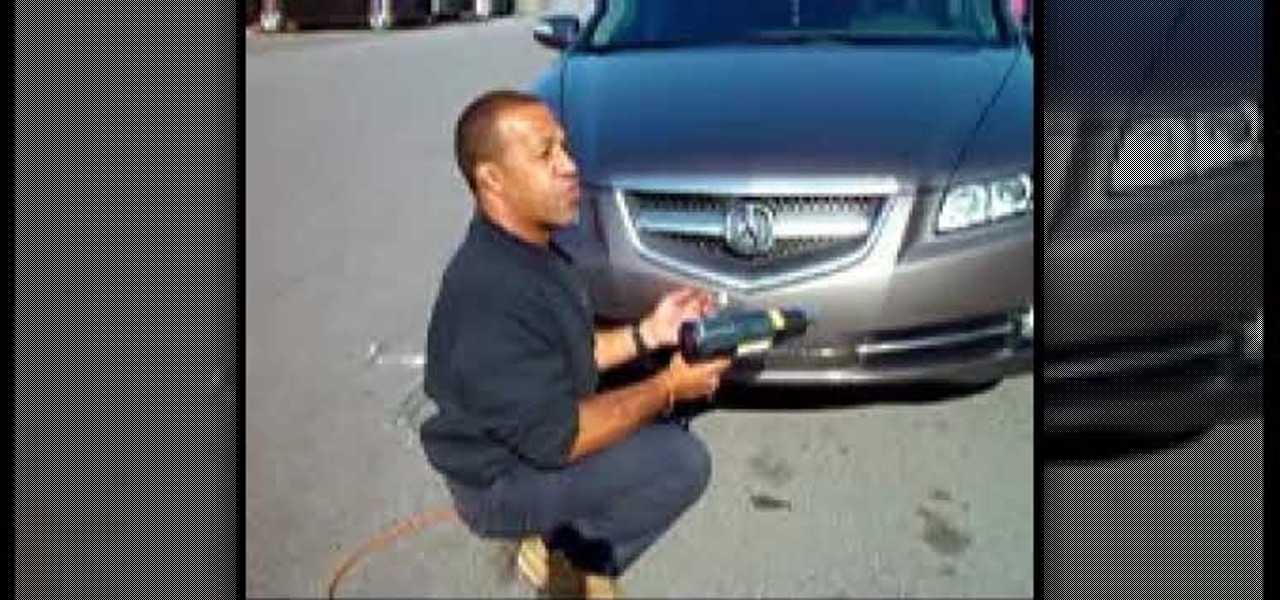
In order to repair a dent in a car with a stud nail gun, you will need the following: a stud nail gun, pliers, a grinder, protective gear, and a body hammer.
In this video tutorial, viewers learn how to make a sawed0off shotgun. The materials required for this project are: hot glue gun, duct tape, cardboard, utility knife, black marker, spray paint and 2 paper towel rolls. Begin by tracing a shotgun outline onto the cardboard. Make 6 layers and glue all the layers together. Then smooth the edges with sandpaper and tape the outside with some duct tape. Now tape the 2 paper towel rolls together and tape it on top of the shotgun. Finish by painting t...
In order to remove car dents with reusable electrode, you will need to remove all of the paint first. For this project, you will need a sander, an electrode, and a hammer or mallet.
This 45 minute video tutorial demonstrates a technique for adding and blending a real-time water effect to a landscape model in Blender 3D. It utilizes Blender's Node Editor. You will learn how to append an existing Blender file, paint a shore-line and paint transparency on to the 3D mesh. This is an advanced method that requires some prior knowledge of Blender's User Interface. Whether you're new to the Blender Foundation's popular 3D modeling program or a seasoned graphic artist just intere...
Over time, the siding of a home can become damaged and lose a bit of it's color due to many reasons. Weather, is usually a common factor, but whatever it may be, it's something that you don't want on your home. This can hurt the overall curb appeal to the outside of your home and can be taken care of easily.
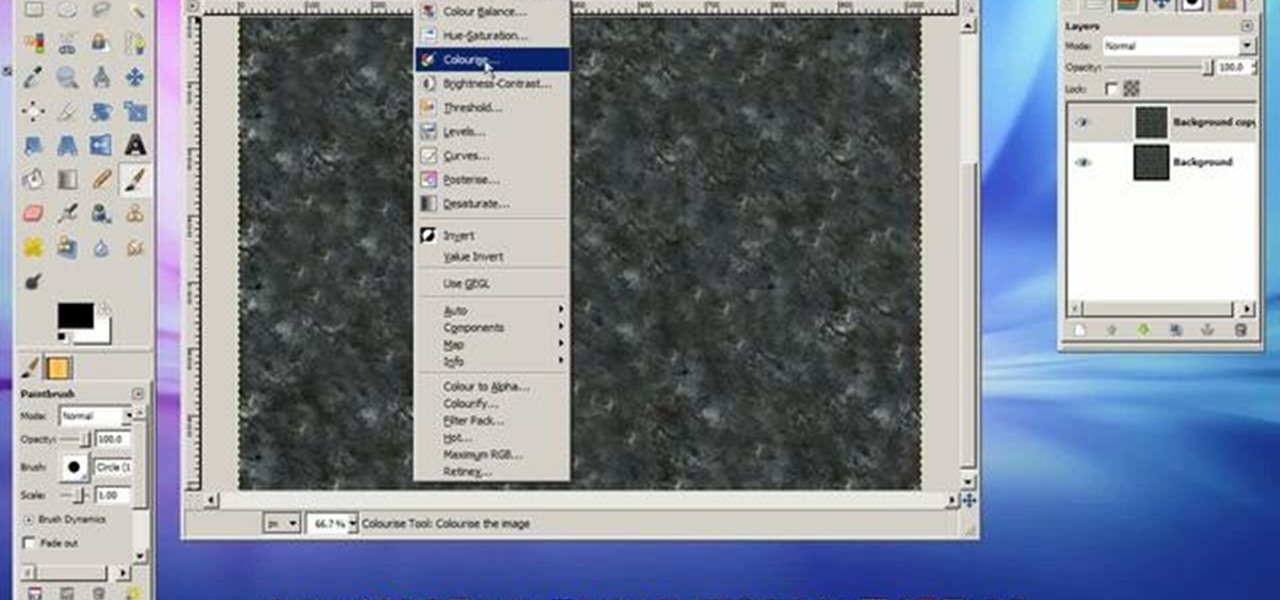
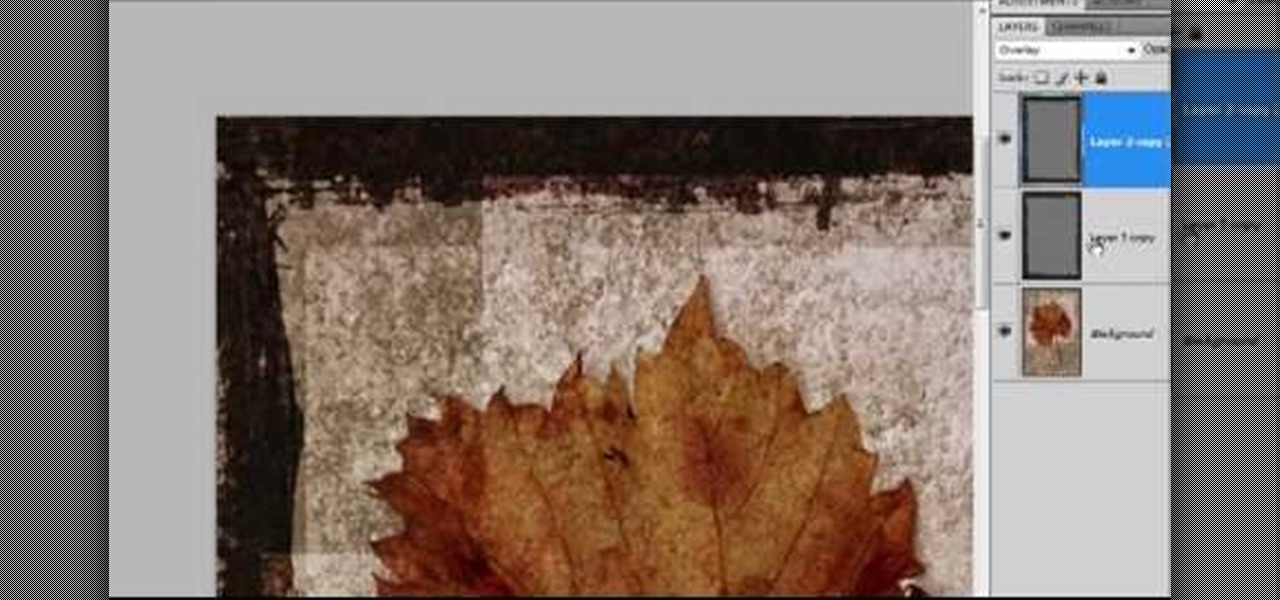
Photoshop is filled with all sorts of fun little tricks it can take hours just to use some of them. From the folded paper look, to a create an awesome stencil image, Photoshop can do so much! So in this tutorial, find out how to make a cool painted grunge border with the infamous software. Enjoy!
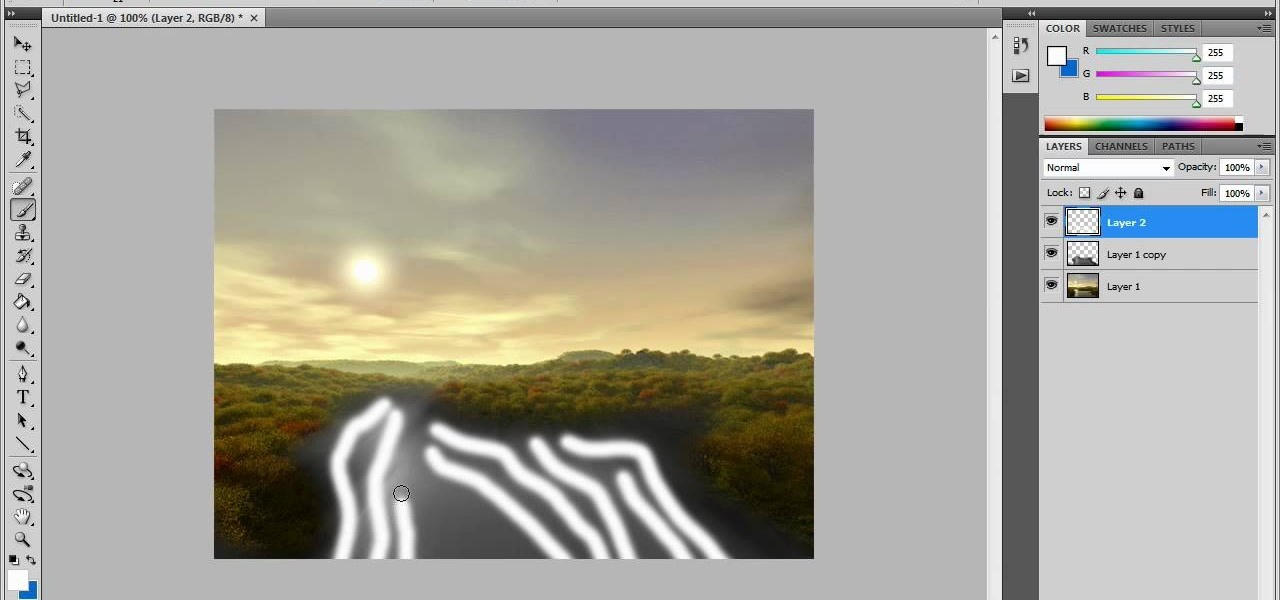
In this video tutorial, viewers learn how to create fog using Adobe Photoshop. Begin by importing the image into the program and duplicate the image. Now go to Filter, select Blur and select Radial Blur. Set the amount to 100, Blur Method to Zoom and Quality to Best. Now select the rectangular marking tool and select the sky. Then open the Hue/Saturation menu and set the Saturation to -100. Use the eraser tool to remove the gray from the edges. Now use the paint tool and paint white streaks o...
The first step is to select a photo of a black, glossy car. Using the Lasso- polygonal tool, select the outline of the car. Once the image outline is complete, the dots animate around the image. The next step is to deselect the areas on the car where the chrome paint is not required. To do this, follow the same procedure as above holding the ‘Alt’ key (a minus sign appears next to the cursor). Once the selections are done, go to ‘Image’ menu, select ‘Adjustments’ and click on ‘B...
In this how to video, you will learn how to remove 3M paint protection film, also known as a clear bra. This is used for protecting the front of a vehicle. To remove it, you will need to use a heat gun on the film so that it will peel off. This takes a while to remove, so be patient. The film itself is very useful, as it protects from rock chips and bugs while driving. Note that it is a lot easier to take off during the summer time since the car exterior is already hot. You should not worry a...
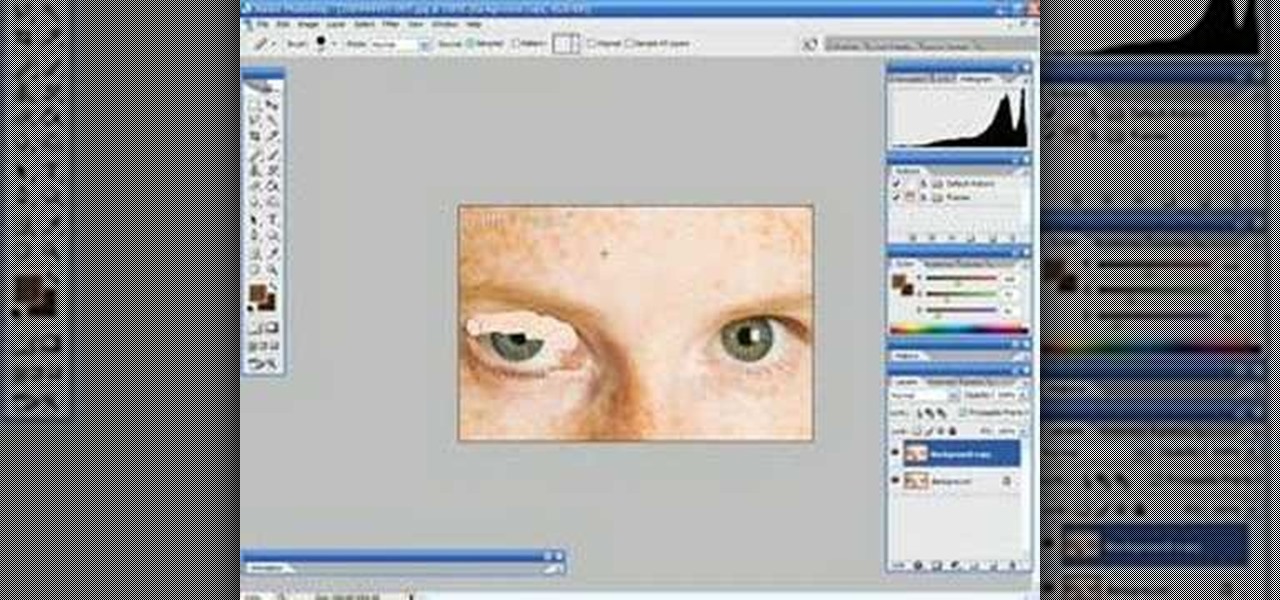
In this Software video tutorial you will learn how to make a winking animated GIF in Adobe Photoshop. Select a photograph of two eyes and duplicate the layer. Now copy the top eyelashes and paste them on top of the bottom eyelashes. Go to the eye drop tool and select a dark color. Then go to paint brush, choose a brush with size 1 and select darken in the ‘mode’ dropdown menu. Reduce opacity to 50%. Now darken the lower eyelashes as shown in the video. Then go to healing brush tool and se...
How to take screen captures on a PC with the Print Screen key
This video shows how to paint your nails with a very attractive red and yellow nail art design. Using a glitter nail polish, dip it in yellow glitter powder. Pat it on the nail, rather than brushing it on. Then apply large glitter shimmers randomly all over the nail, and this forms the background.
This video illustrate us how to draw professor E. Gadd in Mario paint. Here are the following steps:Step 1: Draw a circle and within the circle draw another circle at the center.Step 2: Now from the periphery draw another circle so that half of the circle is in the circle and the other half on the outer part of the circle .Step 3: Now draw another circle another circle in similar manner on the opposite side.Step 4: Now draw three circles within the two circles drawn so that they form a hazel,...
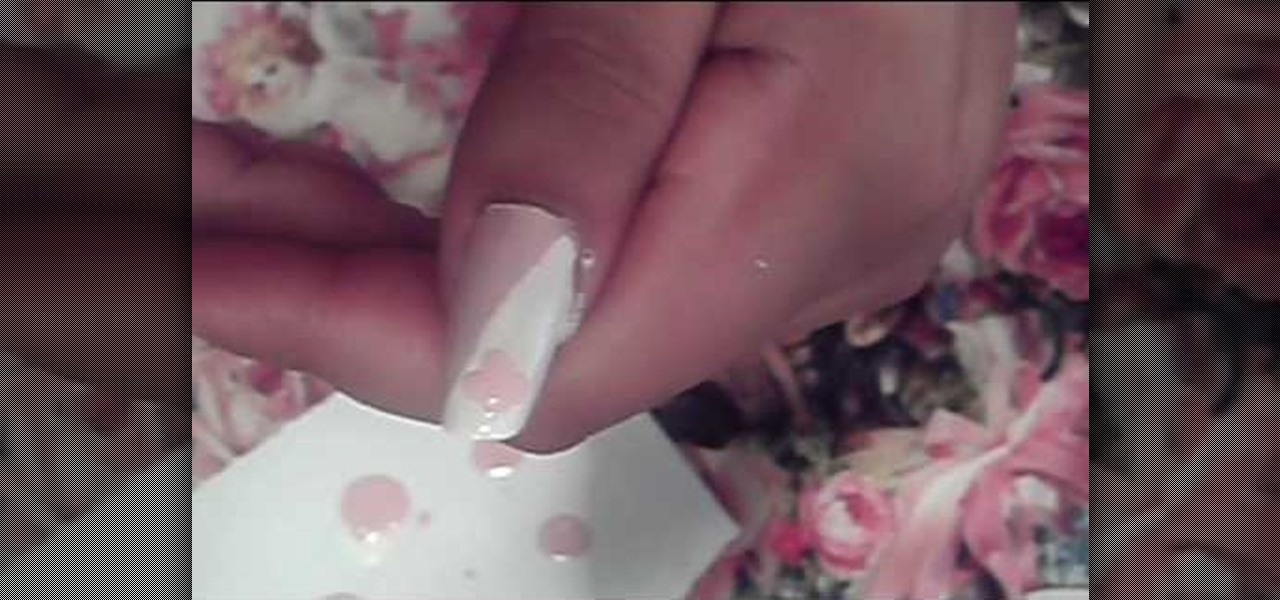
In this video it is demonstrated that how to Paint nails with a gold glitter flower design. First of all apply red glitter French tip manicure on your nails, now reapply red glitter nail polish on it so that tips get darker. Now take a golden polish and apply it to half way rest nails with the help of sponge. Now apply big and small glitter to your nails to become more shiny. Now to make flowers on your nails, take white nail polish, gallop paper and start making dots such a way that it looks...
Love4Nails demonstrates how to paint nails with a pink and white sparkly design. First, apply a hydrating base coat. On top of the base coat, apply the color of your choice like a light pink color. Then, create the side swipe which is about half of the nail. Create a straight side swipe in a white color. You may need to do two coats. Then, create a flower with the background color on the white polish. Add a pink rhinestone to the flower. Repeat the technique making a white flower on the pink ...
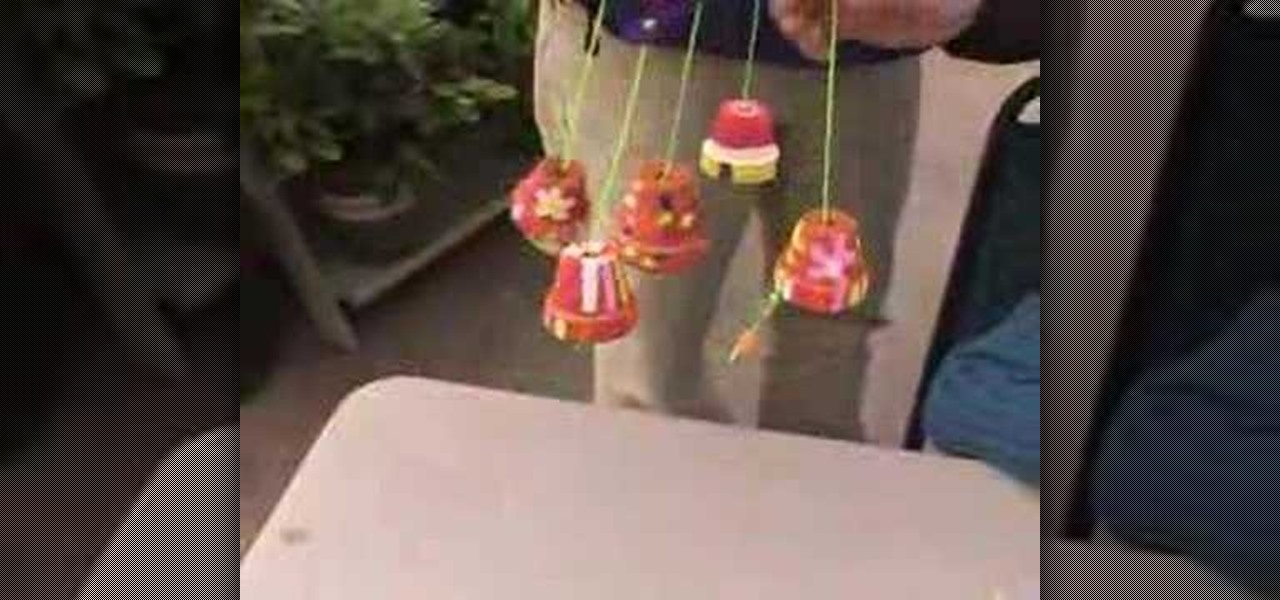
Lynn Snodgrass shows how to make chimes by using small clay pots and popsicle sticks. You can tie them together by using plastic string or regular garden string. The pots can be decorated with paint or you can apply stickers to the pots. 1. Use the sticks tied with the string as the base that holds the pots together. 2. Thread the string through the opening in the clay pots. The pots will have already been decorated with the stickers and the paint and will already be dry. The next step is to ...
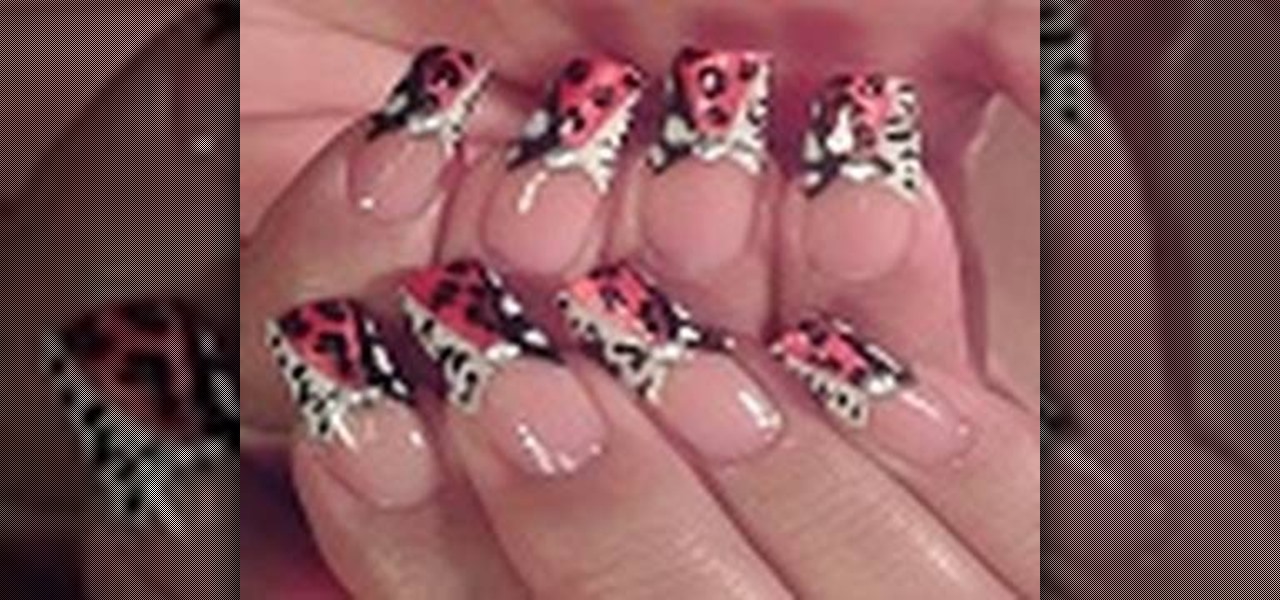
This video is a tutorial on how to paint your fingernails with a sassy animal print. The video begins with a an example of the finished nails being shown and the various alternatives used being explained. The first step completed is to dip the tip of the nail in a gray off white color and then use the color red to make small dots covering the entire surface of the nail. The red dots are then accentuated using the color black to give them a black shading. The final step taken by the nail artis...
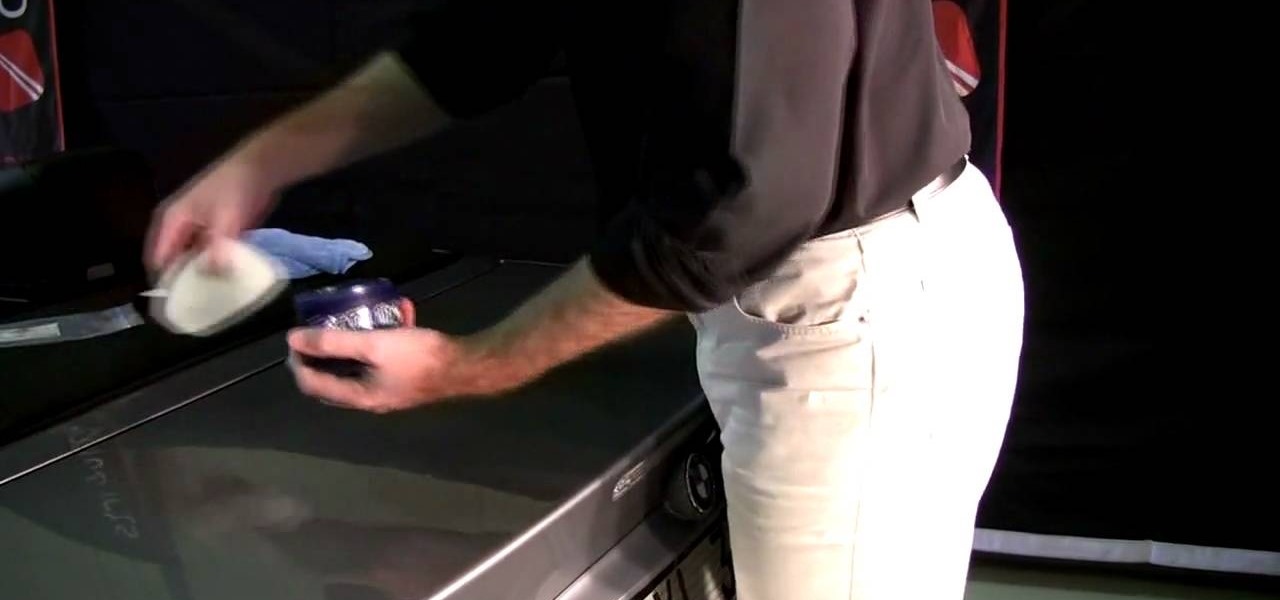
The video tells you have to protect your car using waxes and sealants. It begins by showing you how to apply a premium wax using Dodo Juice Paste Wax and a soft applicator by ensuring the wax is bonded to the paint sufficiently prior to removing an amazing finish can be created. A properly waxed car can show high shine and gloss and even improve the color of the car. The next segment of the video shows you how to apply synthetic sealants to protect the car, using Duragloss polish prep agent f...
This video illustrate us how to draw a graffiti character. Here are the following steps:Step 1: First of all take a paper and start drawing a semi circle and then from this semi circle draw another semicircle bigger then the previous one.Step 2: Now draw two oval within the semicircle and one small square showing the face and the belly of the character.Step 3:Now draw two lines sideways to the character and draw a small circle on these lines showing a tree.Step 4: Now write free hand letters ...
The narrator describes how to paint your nails with gold leopard print. Using two coats you can now have gorgeous, glossy nails within a short amount of time. First by making an x shape (like a French tip) then with a second coat going over with gold. Finally by "striping" and "spotting" your nails (like a leopards skin) it finishes off the look. This is a simple process that anyone can follow through with. The end results are fantastic nails resembling leopard pattern. What you need: Gold Sh...
In this tutorial, Jacob from AutoLavish shows us how to properly wash and maintain a car. First, clean the dirtiest parts of the vehicle first, this will make it so dirt doesn't spread onto the rest of the car while you're cleaning it. Then, clean the body wiping in round movements. Make sure to clean softly with your brush, the paint can easily chip depending on what type of car and paint job you have. Once you are done cleaning the outside move to the interior of the vehicle. Clean with top...
In this how-to video, you will learn how to identify and control problems with Ash and Golden Rain Trees. If there are discolorations in the tree branch, there may be a few problems. If you see a severe orange color, this will damage the tree. You can paint the tree with a white paint to avoid this problem. Pruning cuts that have been executed poorly will also cause discoloration and rot. If the leaves have tip burn, this may mean that the air is dry and arid. If twigs on Junipers look dirty ...
this short video shows how to paint nails in a black, pink, and white art design. The steps are simple and easy to follow. The first thing to be done is a regular black, French tip manicure. Once the black French manicure is completely dry, a pink thin tip nail polish is taken. From the middle of the nail , on the black tip, draw a V mark facing sideward on both sides. The next step is to fill the two "V"s, inside with the pink color. Once dried, with the white thin tipped nail polish, a line...
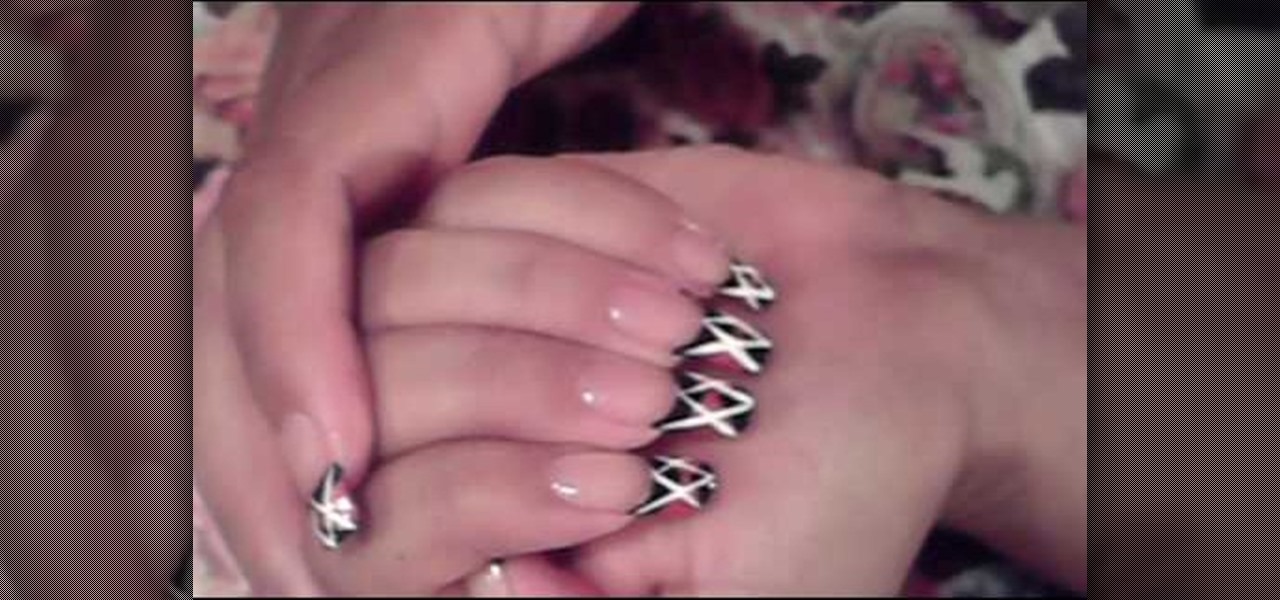
This video is about how to paint your nails with a colorful checker art design. The first thing that you will have to do is to apply the hydrating base coat on your nail. After putting the hydrating base coat on your nail, get a piece of paper for you to place the black nail polish. After placing the black nail polish on the paper, use the dotting tool and place a series of zigzags on the nail. The next step is to fill in the zigzags depending on the color you want. After filling in, make a s...
This video is a tutorial on how to paint nails with cheetah print and rhinestones. The tools shown by the instructor consisted of nail polish and makeup sponge. The first step taken where to cover the tip of the nail in a white polish with a burnt orange colored finish. A sharpened pencil is used as an art tool to shape round circles onto the corners and center back of the nail made of a dark brown nail polish. The instructor then takes a glittery gold color to make river like patterns runnin...
In this video we are show how you can make old furniture look softer. It looks really easy but dirty so old clothes and cloves would be advisable. First of all take your glazing color and mix it with a white. Then take mix and mix it with a glazing medium 1 part color and 3 parts glazing medium. After it is mixed well take a brush wipe on a thin layer of the paint/glazing mix. Wiped directly after with a sponge. What will give your old furniture a softer look. But you don't have to stop there...
In this short video tutorial you'll be shown how to build or create a LEGO fire extinguisher/spray paint can. The process only requires two LEGO pieces to complete the item. The first piece required is a 1x1 studded can LEGO brick. The second piece is a 1x1 nozzle LEGO brick. Each piece is clearly shown and described in the video to make the process easier. Simply attach the two LEGO pieces together, forming an item which resembles either a fire extinguisher or a spray paint can. The last ste...
In this video you learn to make a spooky tree with decorations for a Halloween lawn ornament. They start you off with getting a branch that has limbs going off to look like a dead tree. Next they spray it with glossy black paint. They found an urn to put the tree in but you can use any pot. Mix some plaster up after you measure how much you will need to fill whatever pot or container you have chosen. Then you fill it with the plaster, stick your branch in it and secure it with tape. While thi...
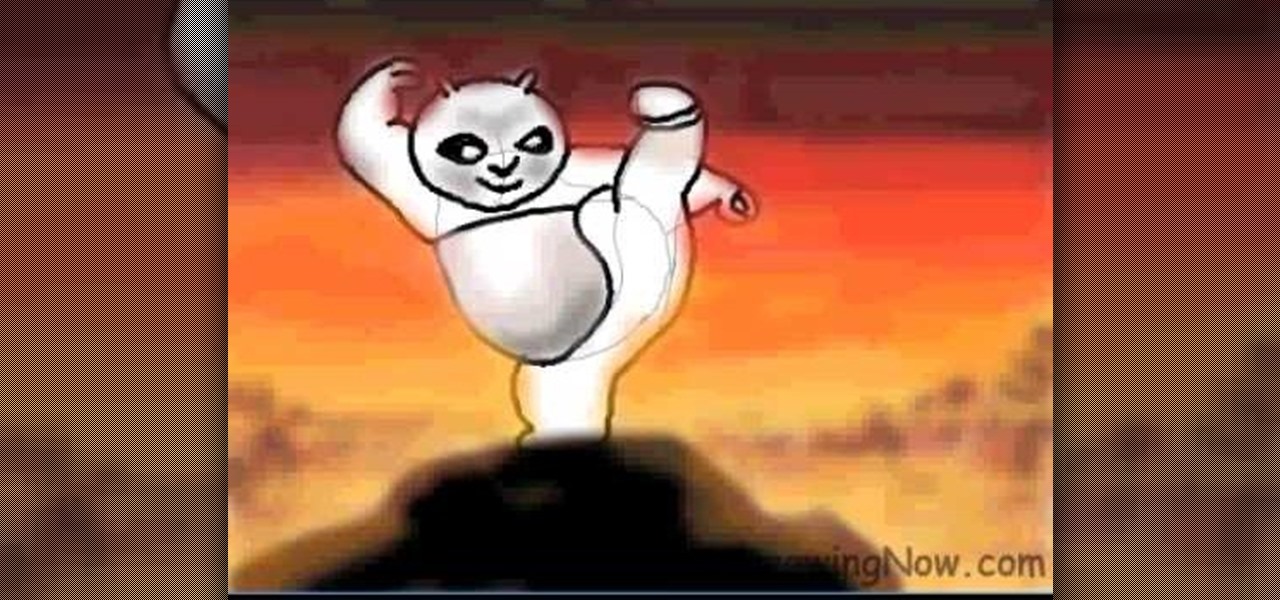
In this video you will learn how to draw a Kung Fu Panda on your computer. The first thing to do is to create the sketch using a crayon tool. After you've done that you need to take a brush tool and draw on the sketch with a black color. The next step is to paint the background using a spray tool or a bigger brush. To paint the Panda you will need a smaller brush and you have to be careful. After that, draw the details and the shadows. In the end, you will know how to create a beautiful maste...
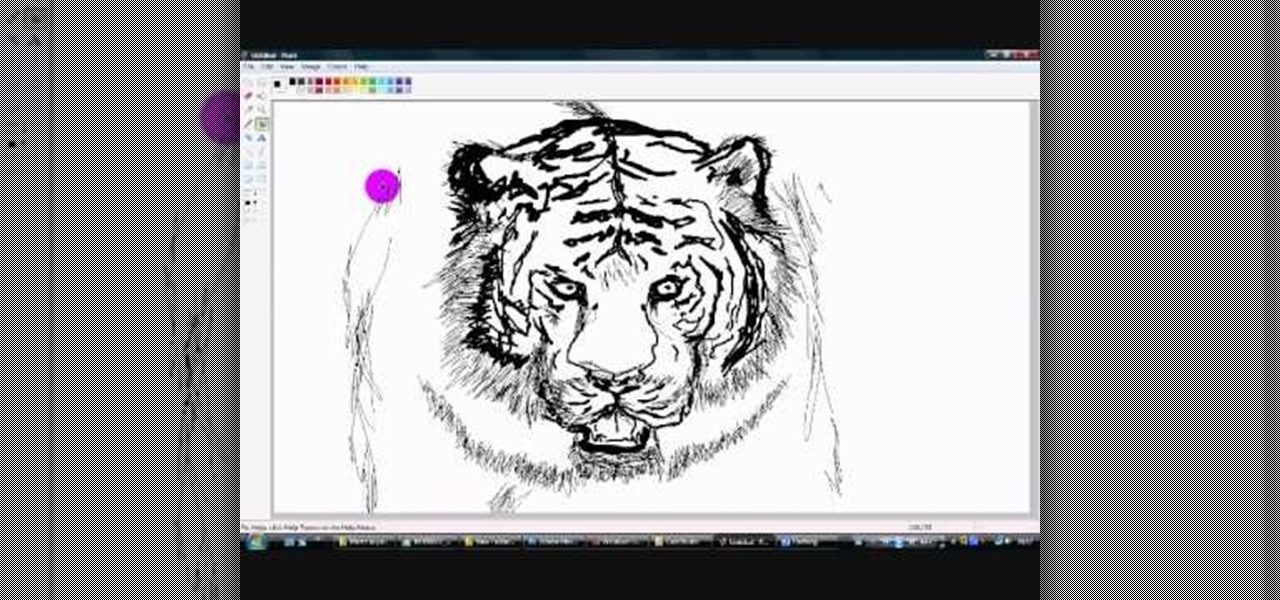
FreshLove8 teaches you how to draw a tiger in Microsoft Paint. Start with the thick pencil or paintbrush to first draw the whiskers and the nose. Connect this to the mouth that you will draw open, underneath. Continuing upwards you will draw pointed ovals for the eyes and then forehead. You can now start adding more details to the drawing, accentuating the contour. Draw the lines on the tiger's face and also add fur around it. Give it a menacing look and complete the head by adding ears. The ...
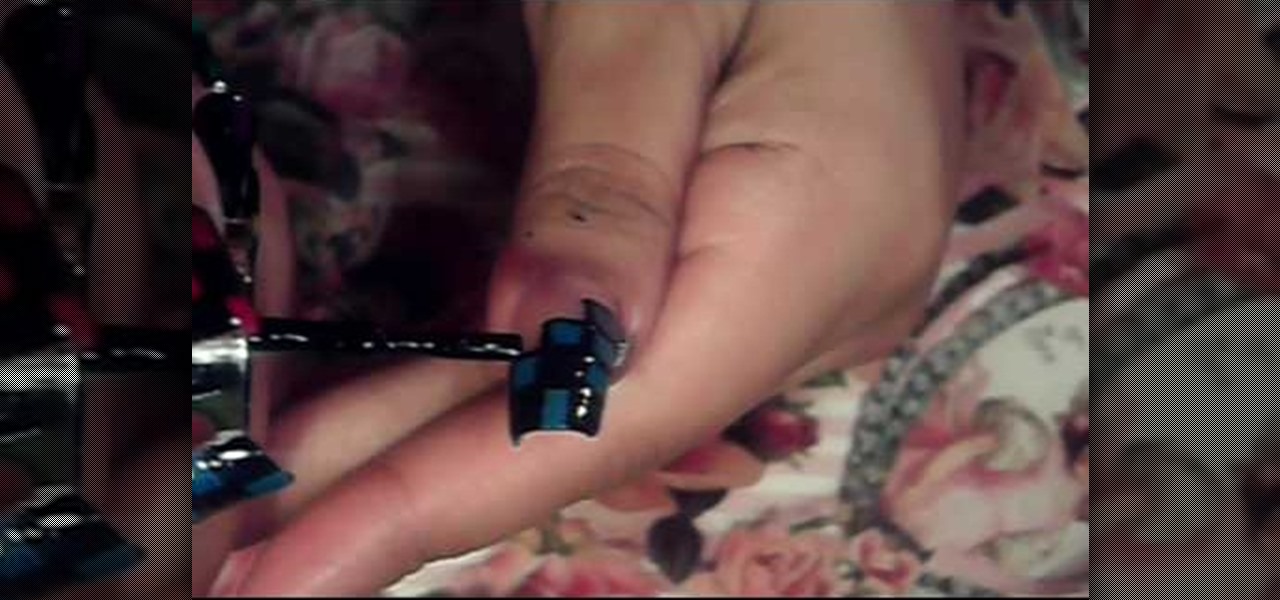
QueenofBlendingMUA teaches us how to paint our nails purple black and add rhinestones. For the rhinestone nail you only need to add black nail polish two times and then add rhinestones individually. For the diagonal silver nail you use the Art Deco 3D silver to draw a diagonal line from the top on your nail. You then color it in using a silver nail polish called Chrome. You then use the black Art Deco to create a diagonal line on the clean line, in the opposite direction. For the purple tip n...
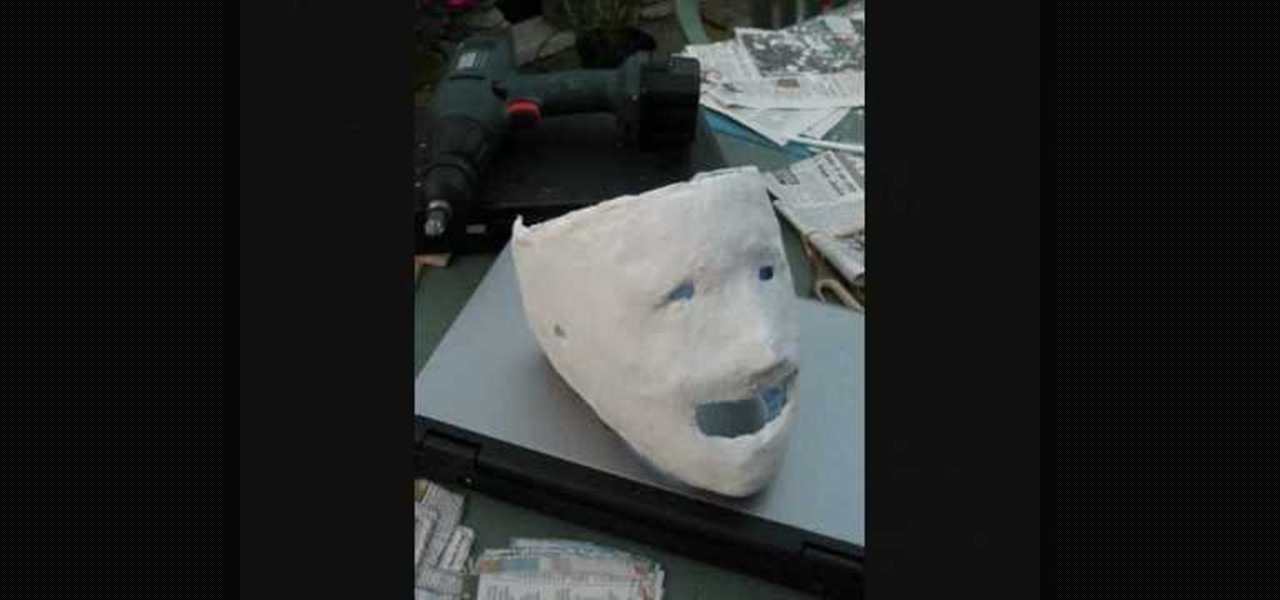
Will Wilks and Tom Couch demonstrate how to make a SlipKnot mask. You will need tights, newspaper, plaster of paris, paint and shaping tools such as knives. First, put the tights on your face. Then rip the newspaper into strips and have a friend apply it to your face with the plaster of paris. Wait for it to dry and then cut off the back of the tights to remove the mask from your face. Keep drying the mask overnight. Next, shape the mask to the desired form. You can use more plaster of paris....