Remember when you were a kid, and you were always fascinated with buses? Every kid is fascinated with those big wheels, and spacious aisles. In this Korean language tutorial video, relive those memories as we go out for a picnic in Korea with Keith and Seol! And of course we'll be taking the bus in Korea. This instructional Korean language video shows you how to pronounce bus related vocabulary words. This video provides another great way to learn Korean, and continues with the Picture/Video ...

Plug this baby into your FiOS-powered computer and simulate the real-time climate of any location in the country -- rain, lightning, fog, sunshine.

This tutorial will let you hack into a wide selection of web cams and online security cameras. The hack is actually quite easy, and is best done with a browser like Mozilla Firefox. Navigate to Google in your browser, and then type in "inurl:viewerframe?mode+refresh". This piece of code will open up a list of active webcams. Then just surf through your choices and watch whatever you want. You can even change the camera angle and zoom in and out of the picture!
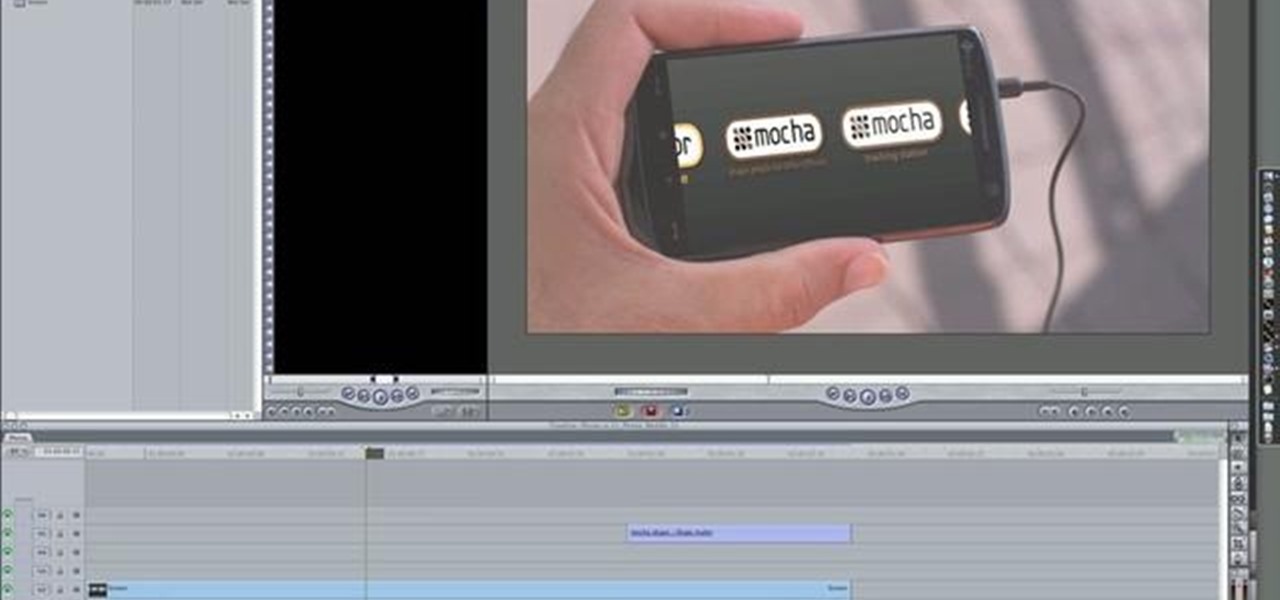
The first part of this tutorial will show you how to track and roto with foreground obstructions using Final Cut Pro. Then, you're shown how you can use Mocha Shape to import matte data into your video for a higher quality picture.
Use your [/topic/myTouch-4G] myTouch 4G as a digital camera! With the phone's built-in 5 megapixel camera, there's no reason not to. This clip will teach you everything you'll need to know. Whether you're the proud owner of a T-Mobile myTouch 4G Google Android smartphone or are merely toying with the idea of picking one up sometime in the near future, you're sure to be well served by this brief, official video tutorial from the folks at T-Mobile. For complete instructions, watch the video!
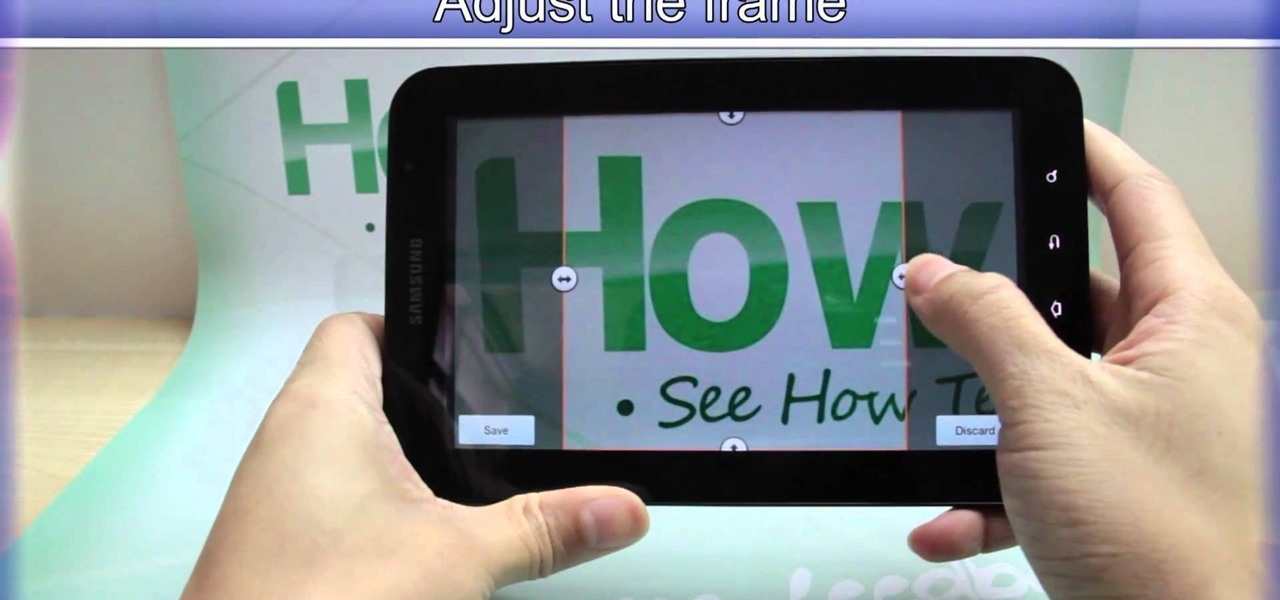
When you're searching for a contact to message, sometimes it's a little better to see a face than a name. But it's even better to have both! With the Android OS on the new Samsung Galaxy Tab, adding photos to your contacts is a breeze. Select APPLICATIONS < CONTACTS and select your preferred contact. Choose EDIT and tap the blank photo space in the upper left corner. Press TAKE PHOTO or ALBUM to add the picture. See how in this video.

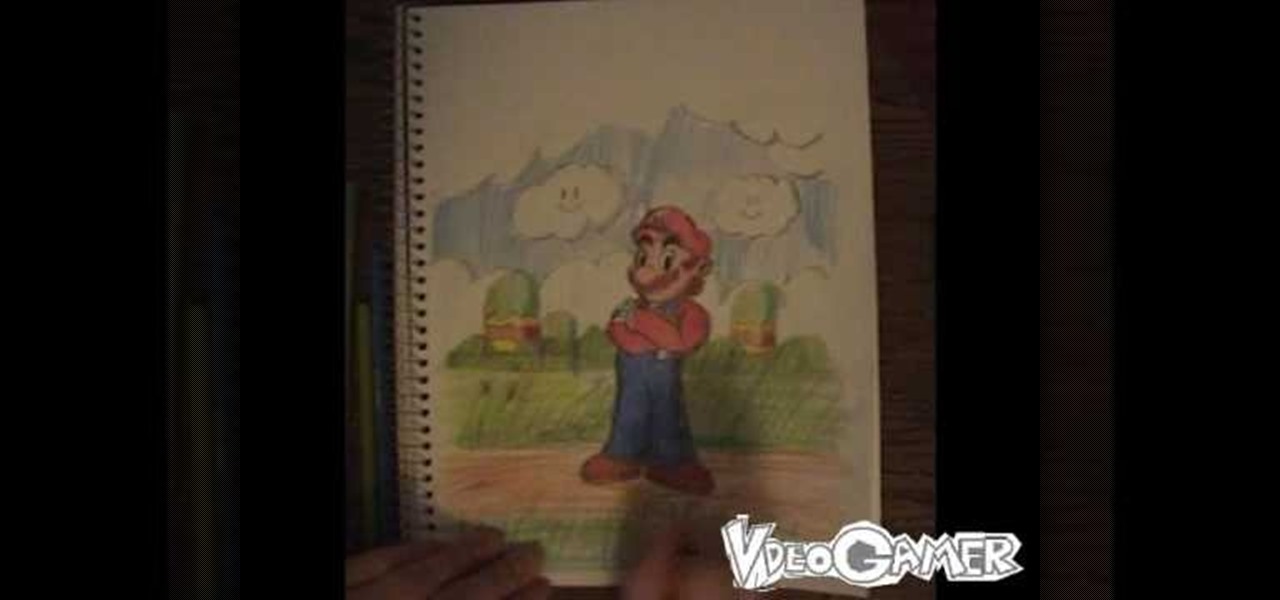
The video begins by explaining the characteristics of the video game character Mario. The narrator begins by finding a sample picture to use as a starting point to mirror for accuracy. The first part of the character Mario drawn is the head and facial features. After finishing a simple outline of Mario's Face is to begin the outline of the characters body. After the basic outline of Mario is finished the excessive lines must be erased to give me lively hood to the drawing. One of the last ste...
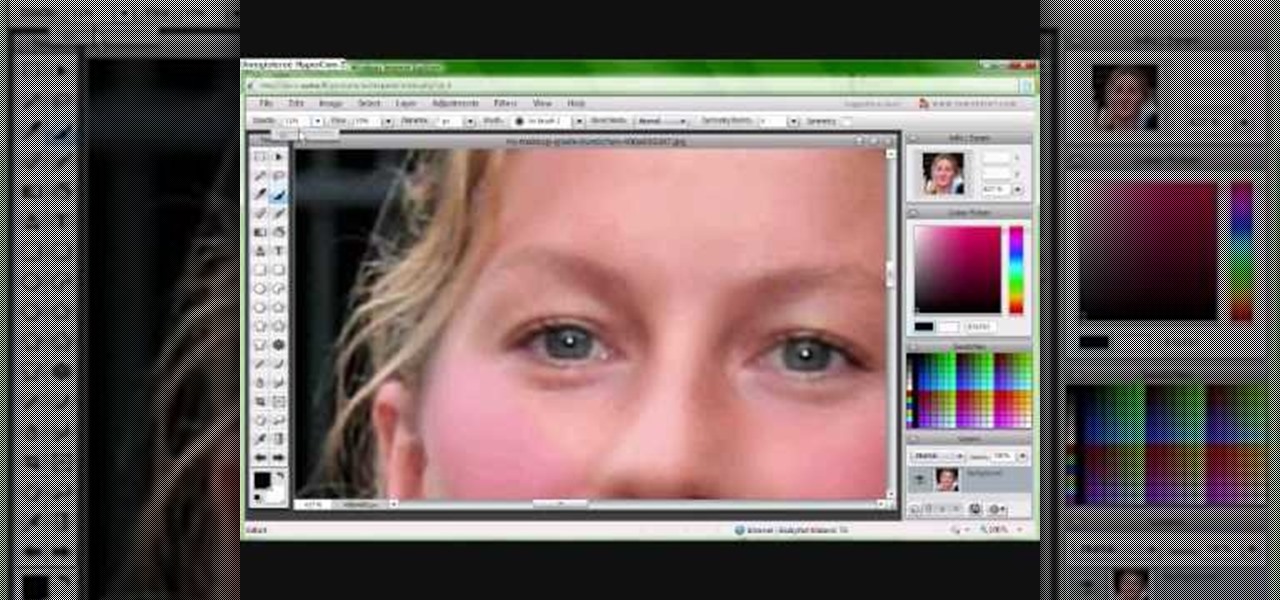
In this tutorial, we learn how to put makeup on photos with Sumo Paint. First, load your photo to this website and then open up the editing options. You will see a display of different colors on the right hand side that you can use to color the photo. On the left hand side are the tools you can use to do different effects to the pictures. Use the smaller drawing tools to apply makeup to the eyes on the photo and make different things appear. When you have finished the photo and adding on diff...
This video is basically a detailed round-up of the Samsung Omnia II i920 camera. All its features as well as the overall picture quality of the camera is shown in the video.
In this tutorial, we learn how to make an iron on transfer for a t-shirt. The materials you will need are: a printer, an iron, hard surface, transfer paper, and t-shirt! To start, find the art that you want to put on your picture and then you will need to transfer it onto the paper for your shirt. Once this is fully transferred with the scanner, load it to your computer. Then, print it out on transfer paper. After this, you will place the paper down on the shirt and iron it for a few minutes....
In this video from clickherephotography we learn how to take great photos by using depth of field. In a picture of a bird he used an aperture of about 5.6 which increased the shutter speed on a 300mm Canon lens. With depth of field you can blow your background out. If you used a higher aperture, a lot more of the bird would have been in focus and a bit of the background would have been in focus. By using an F-stop and this aperture, you really bring the bird or whatever object is in the foreg...
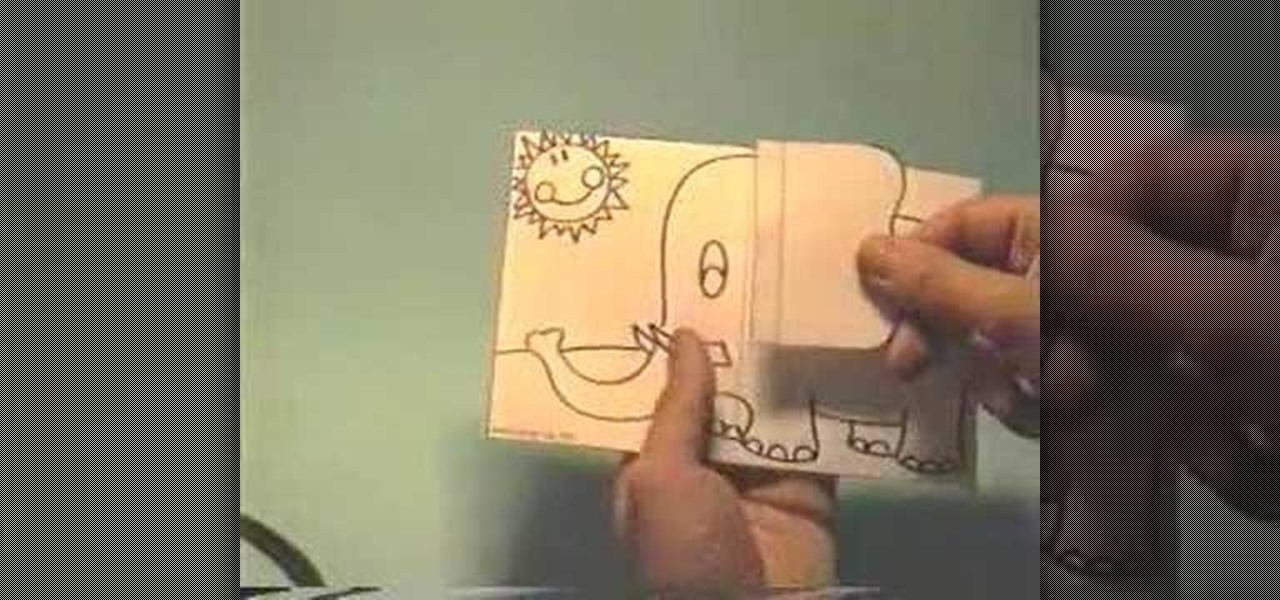
In this video we learn how to make an elephant pop-up card. First, draw a picture of an elephant on a 4x6 card. You can make this anyway that you want and put whatever other characters on it as well! After this, clip a small piece of paper into the shape of an ear. Then, glue the side of it and place it onto the elephant. The other half shouldn't be glued so it will flap up! Then, put this on the inside of a card and color it. When the person receives it, it will be a pop up card, enjoy!
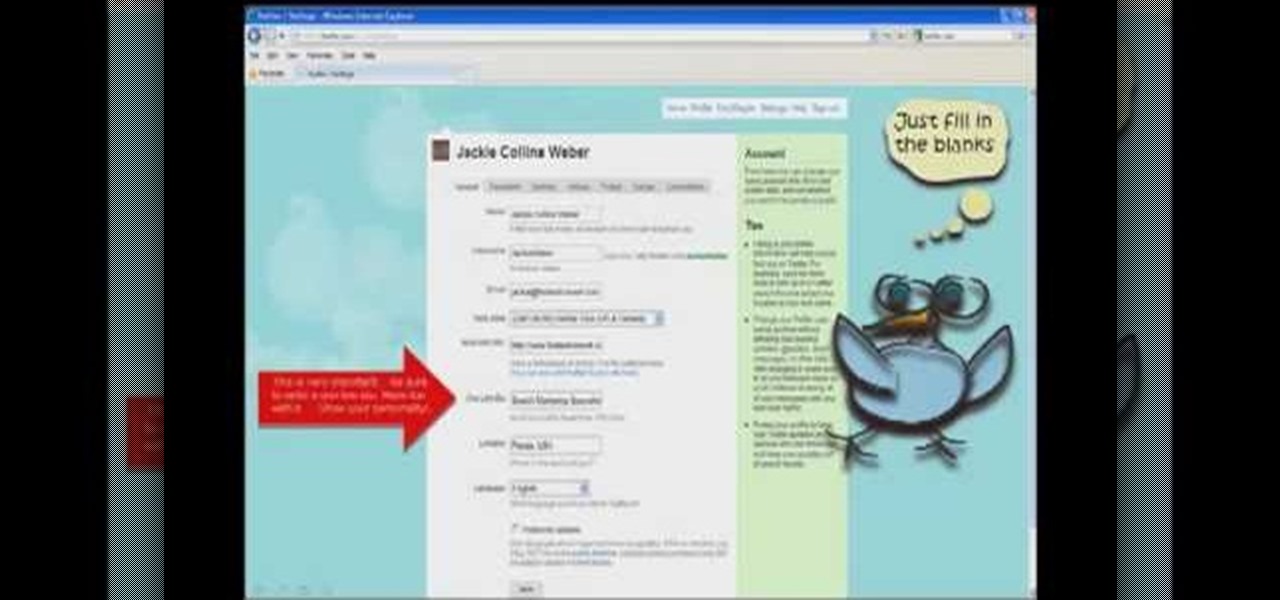
In this tutorial, we learn how to start a Twitter account. First, go to Twitter, then click on 'get started'. From here, fill in the blanks and hit 'create account'. After this, you can scan your e-mail contact list to see if anyone you know is on Twitter. Now you can personalize your account by going to the settings section and then adding a picture. You can also type in where you live, a short bio, and hometown information. Once finished, you can start to add friends to tweet with! This fun...
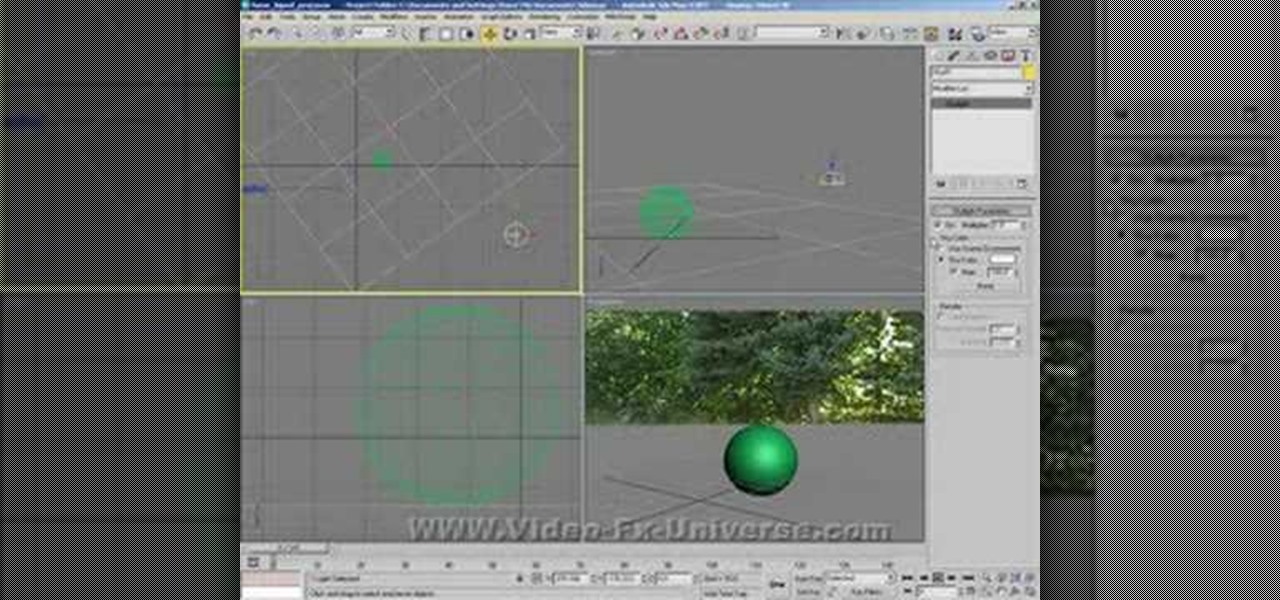
In this tutorial, we learn how to create a 3D shadow matte in 3ds Max. If you have a scene where you need a realistic looking background, you can trick doing this by using 3ds Max. First, go up to the rendering and go to environment. Add an environment map and then click on bitmap and find the image that you want to use. From here, make sure your map is highlighted, then right click and show the background. If you render this out, you will have a picture of the background you want. After this...
If you have a folder that contains many images (say anything in excess of 200) and you open it in Windows Explorer with the thumbnail view turned on. You would notice that it takes some time for all the thumbnails to load completely.
In this tutorial, we learn how to make a half/quarter easel card. First, grab several pieces of colors of card stock that you like. After this, fold the main one up into a square. After you have folded this, fold the edges into the middle and push the creases down. From here, you will glue the bottoms of the other pieces and glue them onto each other so they are backgrounds. After this, you will create a border around the front main picture. When finished, fold this up and then you will have ...
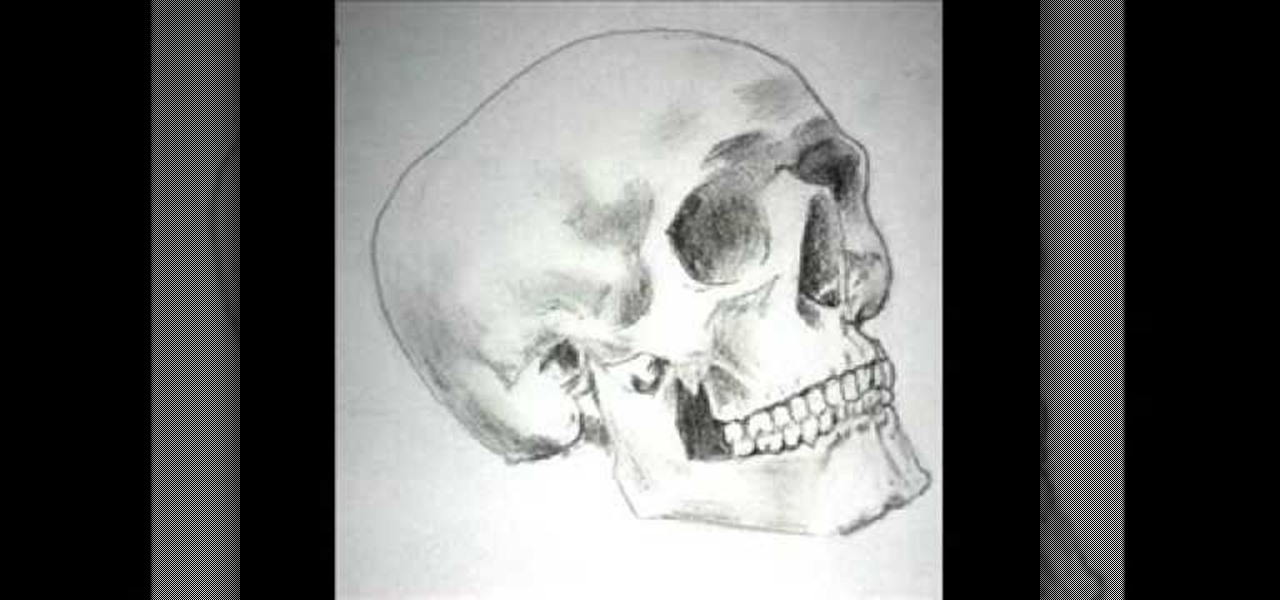
In this tutorial, we learn how to draw a skull. First, select a picture of a skull that you want to draw. Then, sketch a few lines so you know where you are going to position the sockets in the eyes. Also do this for where you're going to position the nose and mouth cavities. Then, erase any unwanted background lines. From here, you will draw over your original sketch and then tone the eyes and the sockets. From here, you will tone and add shading to the rest of the skull and the areas behind...
In this video, we learn how to use the camera on the iPhone 3GS. From the home screen, tap the camera icon. From here, the camera will appear on the screen with what you can take a picture of. At the bottom of the screen you will see the camera icon, thumbnail icon, and photo/video switch icon. You can tap the screen to do a focus and you can tilt the camera sideways to take a landscape portrait. To take a photo, tap the camera icon and then the photo will be saved to the thumbnail. Enjoy usi...
In this video, we learn how to make a prop Michael Myers knife. You will need: six pins, a pen, a sharp knife, black paint, hot glue gun, cardboard, thin cardboard, and medium foil. First, print out a picture of the knife that's given in the video. After this, cut out the pieces and tape them together so it looks like a real knife. Then, cut off the points from the pins and draw the handle of the knife out on the regular cardboard, making two layers. Then, cut out the large part of the knife ...
In this video, we learn how to use the desktop/SMS background app on the iPhone. First, you will go to your photos and then go to any photo you want. Then, press the box to use as wallpaper. From here, you will see a left "i" and a right one. Choose which one you want for your SMS or your desktop background. From here, go back to your springboard and it will be there on your screen! You don't have to re-start your phone to do this, it's just that simple. To remove it, go back to your photos a...
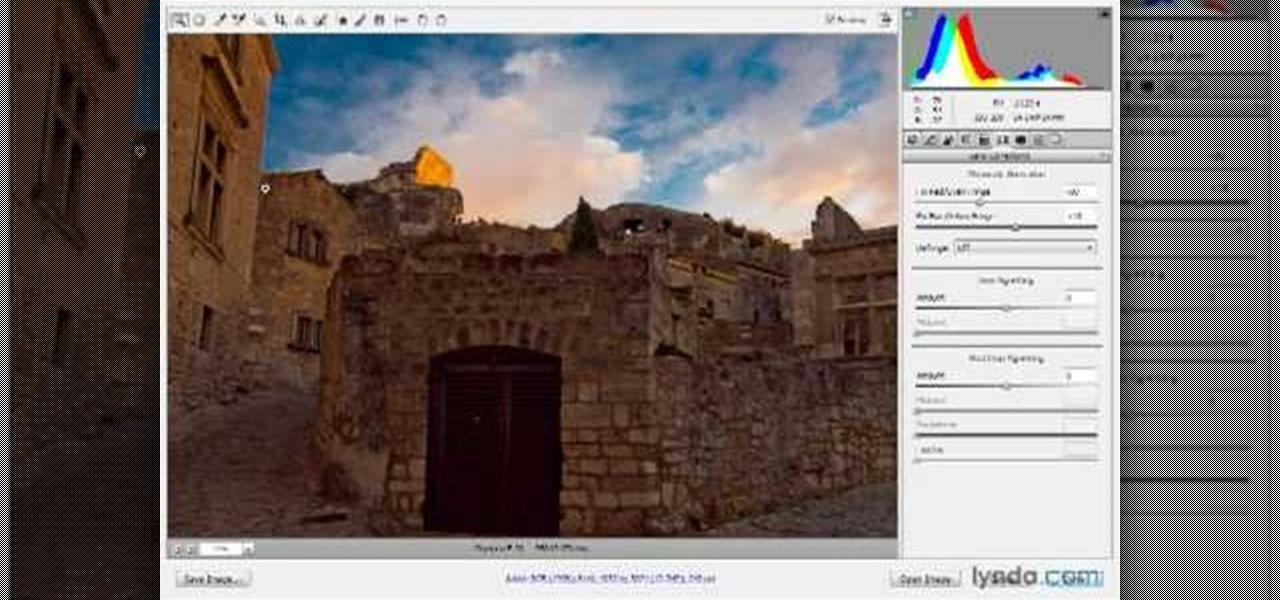
In this video, we learn how to use Camera Raw in Photoshop. This is a great program to use with your SLR digital camera that will make your photos come through more clear than ever before. After you have downloaded this application, you will load your photos to it and open up your desired on to edit. On the right hand side you will see a toolbar allowing you to edit and change different effects on the photo. Move the bars from left to right to edit how the photo looks to your liking. On the t...
In this video we learn how to use the Mirror Lock Up on the Canon 40D. First, press the shutter and lock up the mirror. Second, press down on the exposure. Do this with a remote if you have one or use the timer mode. To do this, turn it out of focus then turn it on two or ten second focus. Then your single press will open it up and then take the exposure so you don't have to press it twice. This should make your exposure turn out correctly, use this whenever you would like and enjoy taking pi...
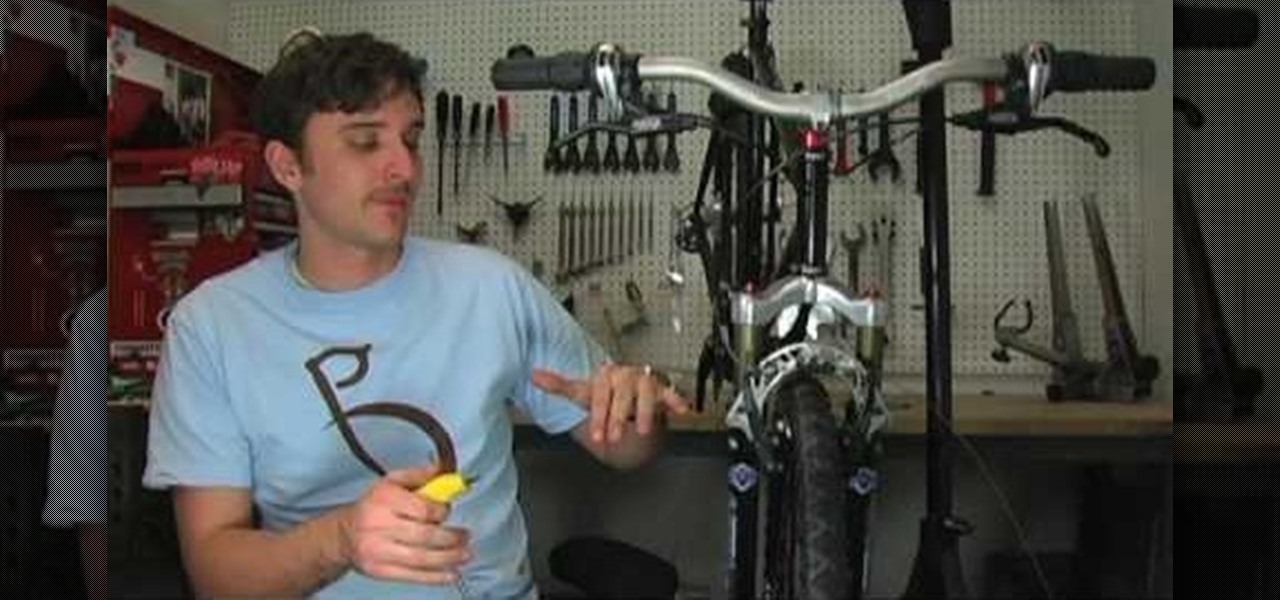
This video tutorial is in the Sports category which will show you how to adjust your front brakes on your bike. The brake pads are very adjustable. It has 360 degrees rotation which helps in installing it on the bike easily. First install the brake arms. Then loosen up the brake pad screw and lower it to bring it in line with the rim of the wheel. Now hold it in place and tighten the screw. Thereafter you can any vertical and horizontal adjustments. You can then repeat the same procedure for ...
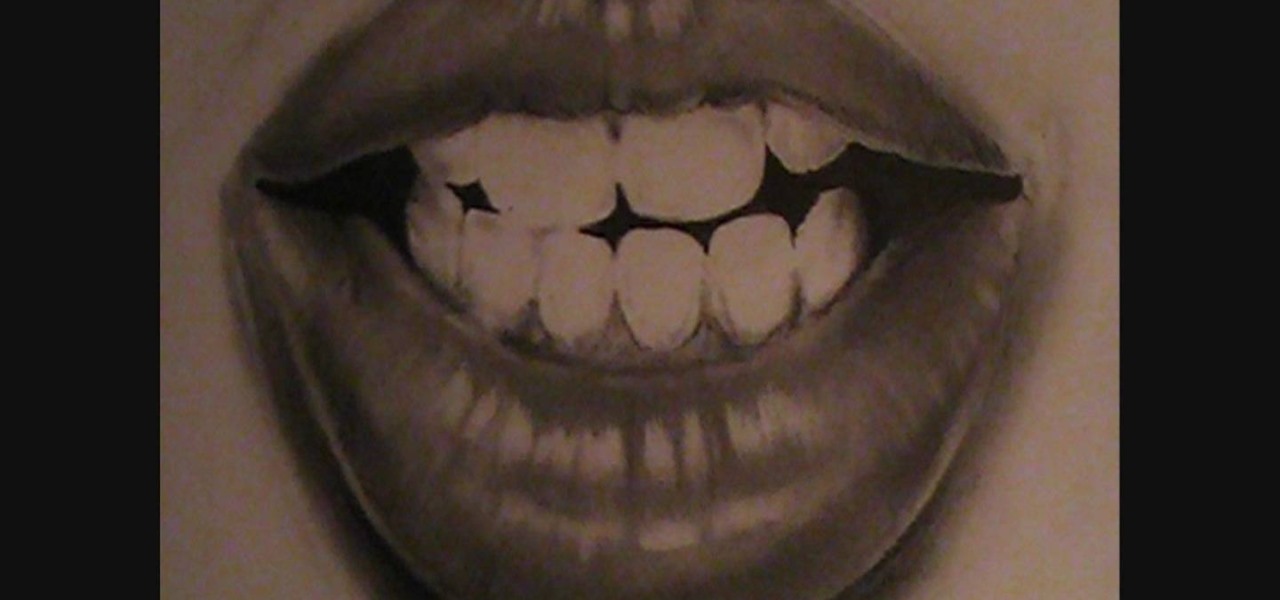
In this tutorial, we learn how to draw lips and teeth. First, you will need to draw the sketch or outline of the picture. You will need to make sure you take your time to create realistic lines for the lips and the teeth as well. From here, you will add in more lines on the lips to make it look more realistic. Then, add in the teeth in the middle of the lips and shade in the areas that are in between them. When you are finished with this you can add in more shading and lines into this and you...
In this video, we learn how to ink and color in Photoshop. First, you will want your background and sketch in two layers. Make a new layer which will be the layer you ink your art on. Move the opacity down on this, then zoom in and start inking your art. Use a normal brush in whatever size will fit your art the best. Take your time, then start a new layer when finished. Color the areas of the picture, then when you join these layers together, you will have an entire drawing finished. Make sur...
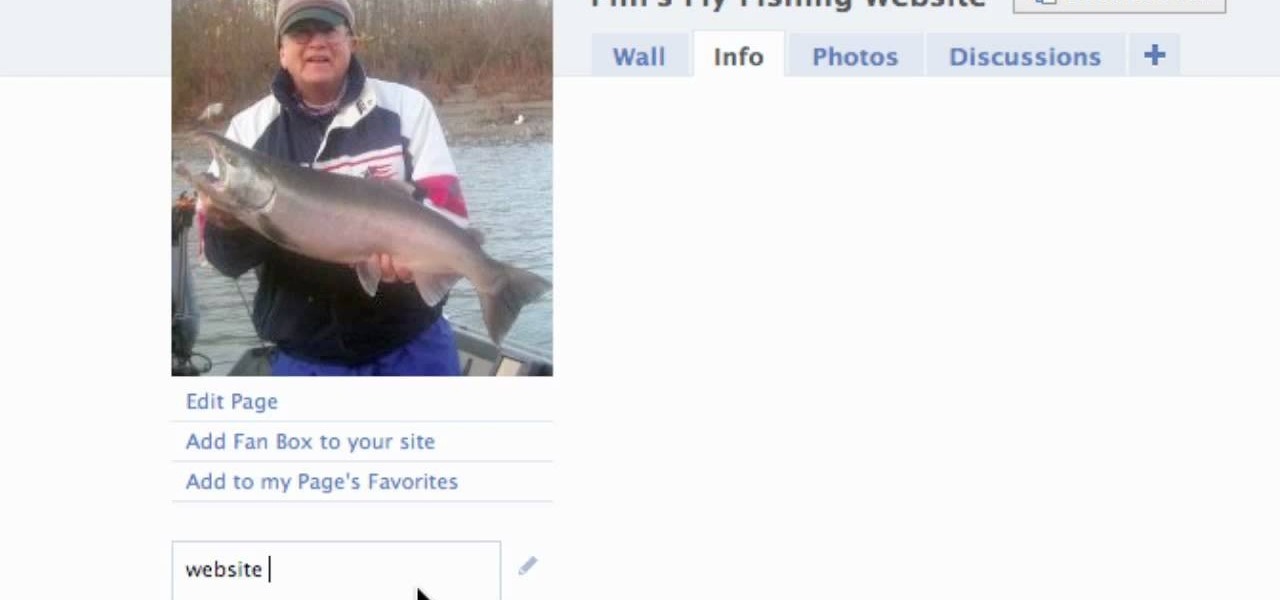
In this video we learn how to create a Facebook fan page or business page. First, log into your Facebook account and go to the bottom of the screen where you see the Ads manager. Then, click on the pages selection underneath this and find the link that says "create page". Once on here, enter in all the information for the business along with the name and everything else. When the page is create, add in a picture and then the rest of the information on the page. From here, you can find new fan...
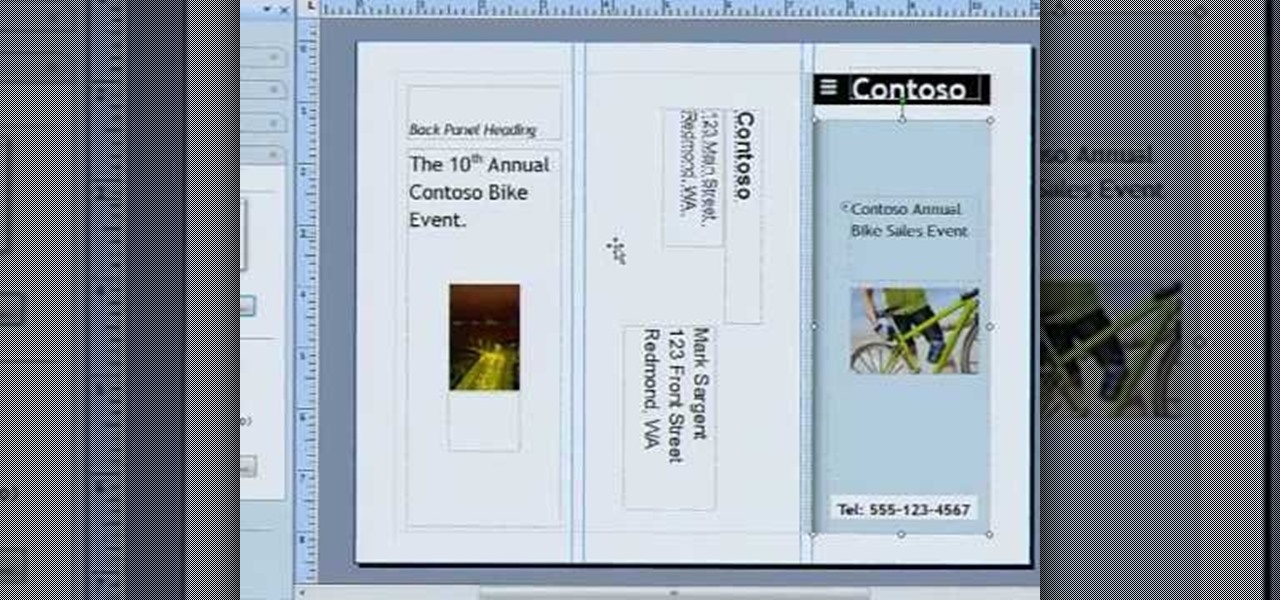
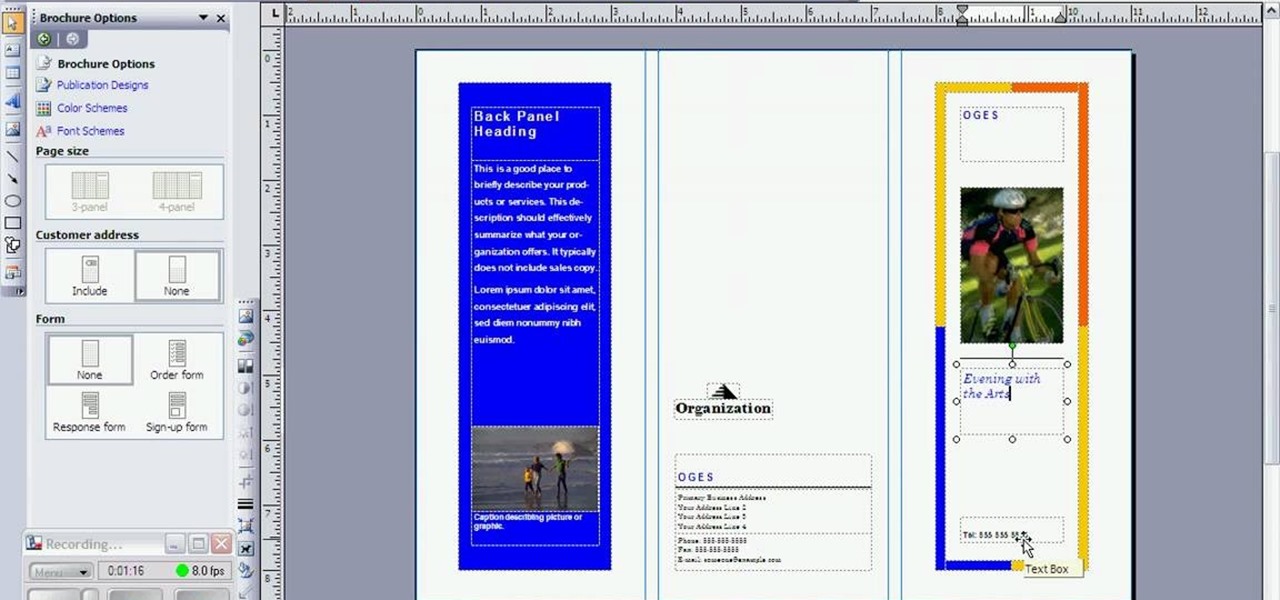
In this video, we learn how to create a brochure with Microsoft Publisher 2007. A brochure says a lot about your business, and you can make them yourself easily! Find the brochure templates first in the program. Choose a design and a color scheme along with the page size, font, and information you want to include. Once you do this, add in pictures and images to your template after clicking "create". Then, you can create a range of publications that adapt to different form functions. Click the...
In this tutorial, we learn how to meditate with a guided journey. First, lie down and get comfy while listening to relaxed and peaceful music. Feel your muscles relax and let your thoughts be peaceful. Try to clear your mind when different thoughts come to your mind. Meditation will take you on a journey where your mind is completely clear and you are not thinking about anything. There are no stresses or pressures while you are meditating, it is completely your time. Relax your body and let t...
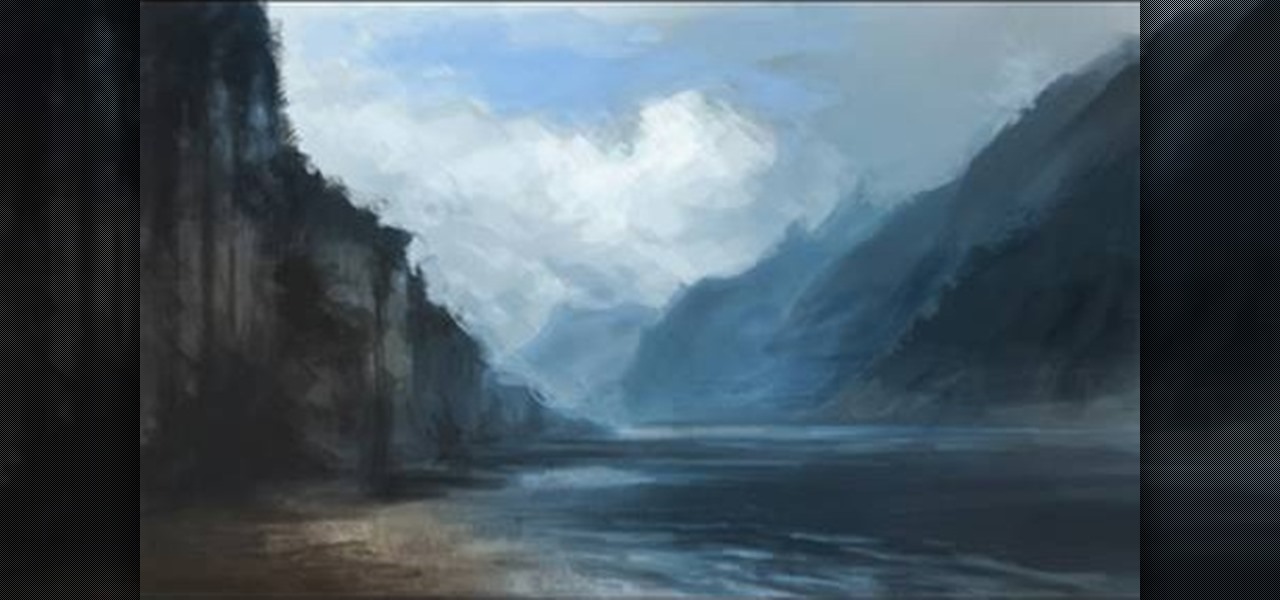
Want to draw a quick scene in Photoshop that contains mountains, clouds and water. Just watch this video.
In this video, we learn how to draw a sports car. Start out by drawing the wheels and the base of the car. After this, draw the rest of the body of the car and the windows. Then, add in the wheels, tail lights, and the rest of the details of the vehicle. Once you have finished this, add in shading and lines to create a more defined vehicle. Continue to draw using this same method, drawing different types of cars and vehicles that you like. Make sure to look at a picture of different cars as y...
In this video, we learn how to use FastStone Image Viewer: the basics. After you have downloaded and installed this software, open it up. Now, go to the settings section of the software and move between the tabs to change and explore the different settings. When you select an image, it will automatically zoom in, you can move between different images, then you can set it as wallpaper, edit it, save it, and much more. You can upload picture and images by going through the file menu, then editi...
In this video, we learn how to draw a cherry fairy. First, sketch the entire picture before you start to draw in any detail. After this, draw in darker lines where you want the features of the body to go, then start to add in features of the face. Next, add in color to the face and to the outfit of the fairy. Make sure you give her hair and bangs that are surrounding her face as well. Once you have the color completed, create a white light coming from the bottom of the fairy and going up into...
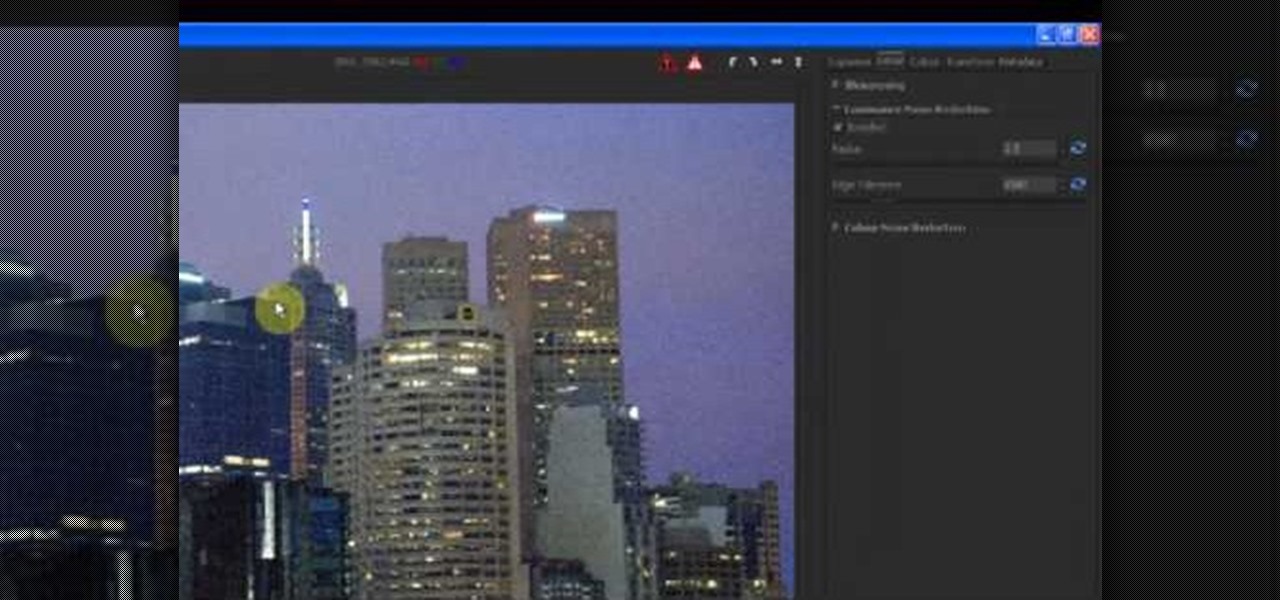
In this tutorial, we learn how to reduce noise in RAW Therapee. First, open up your photo in the software that you want to reduce the noise on. Then, open up the detailed view of the photo and click on then click on the detail button. Through here, you can sharpen the image or you can change the noise reduction for the color and luminance. Click on the drop down menu for the luminance and then enable to checked section. Then, move the edge tolerance to its maximum to see the full effect on th...
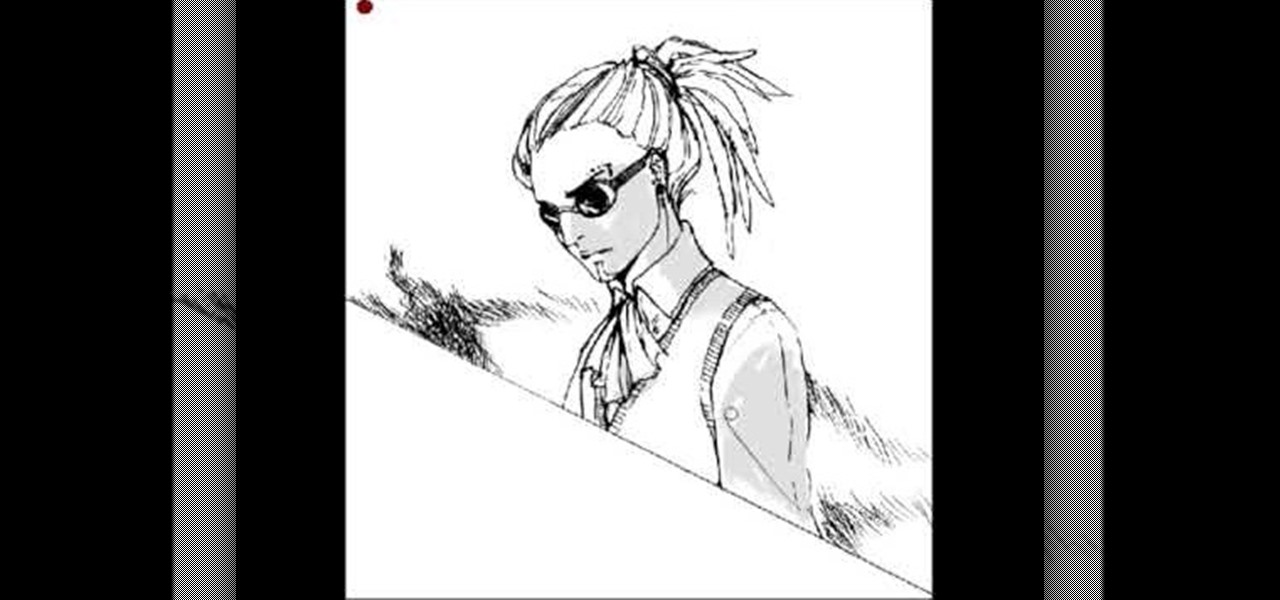
In this video, we learn how to draw shadows in manga. When you are drawing shadows, you want to think in 3D. When you show the lights and shadowing, it's like you are drawing something you see a photo of instead of just a drawing on a piece of paper. Draw the shadows where you want the position of the light to be opposite of. If the shadow is on one side of the face, this would mean that the source of light is coming from the opposite side of the face. Use real pictures to figure out how to s...
A simple tutorial video that demonstrates the procedure for creating a brochure quickly and easily using the Microsoft Publisher program, which is shipped as a part of the Microsoft Office Suite.
In this video, we learn how to draw Maplestory Bigfoot. Start out by drawing the outline of the character, then start to draw on the details. Once you have finished the outline of the entire character, start to use a darker pencil or pen to make it darker. Add in shading on different parts to make it look 3D, then add in lines to make the character look more realistic. Add as many details as you would like, then when you are finished you can color in the picture as you would like. You can rep...
We don't think we're overexaggerating when we say that "Gossip Girl" singlehandedly started a massive hairband trend. Or, rather, that Miss Blair Waldorf started this fashion accessory love. For the greater portion of us, though, who haven't worn headbands since we were forced to do so for picture day in 4th grade, slipping one on seems incongruent and childish.
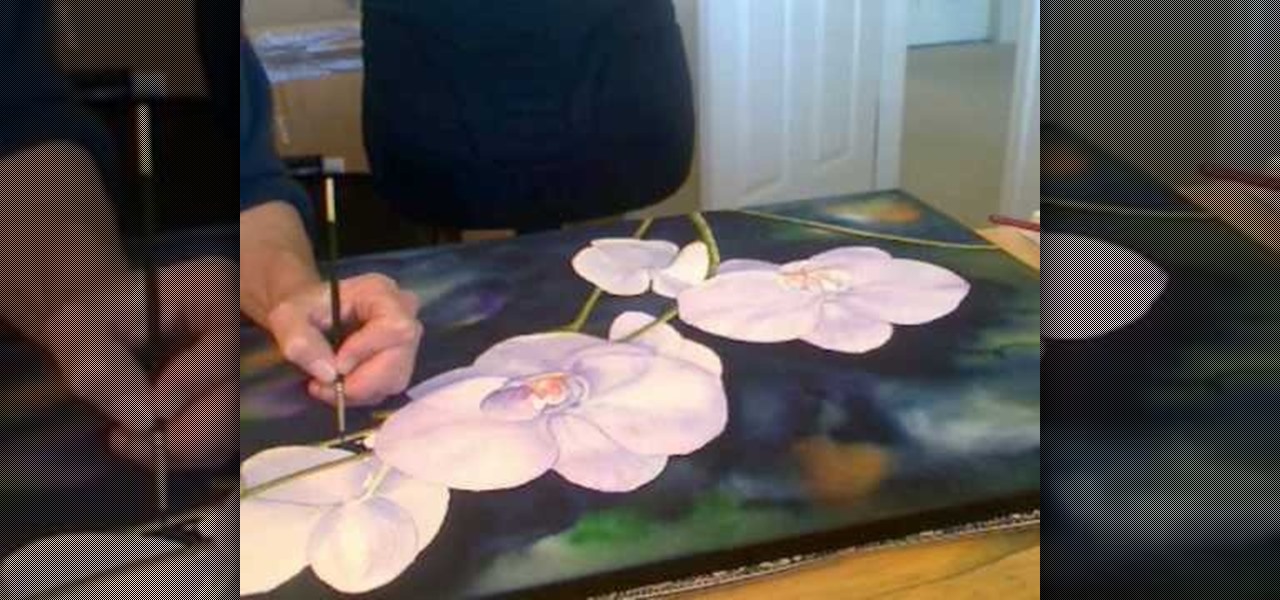
In this video, we learn how to pain orchid flowers with watercolor paints. Start out by using a light lilac color on the petals. Use a thin brush to push the colors around on the picture so you have slight shading around the different petals. Use a darker purple color in the middle of the flower. Then, use a yellow color in the very middle. Add in a green leaf and stem on the bottom of the flower. Use a paper towel to smudge any excess moisture or water off of the flower to make it more prist...
This video will show you some methods to create a fake Loch Ness monster photo. You will need a camera or a camera phone for this project. One method of faking a sea monster picture involves creating a clay model of a head and a neck of a sea monster and holding it underwater. The outline of your hand holding the clay will serve as the body of the monster. Another method which can be used to fake a sea monster can be done using a clothes hanger and holding it underwater. The hook of the hange...
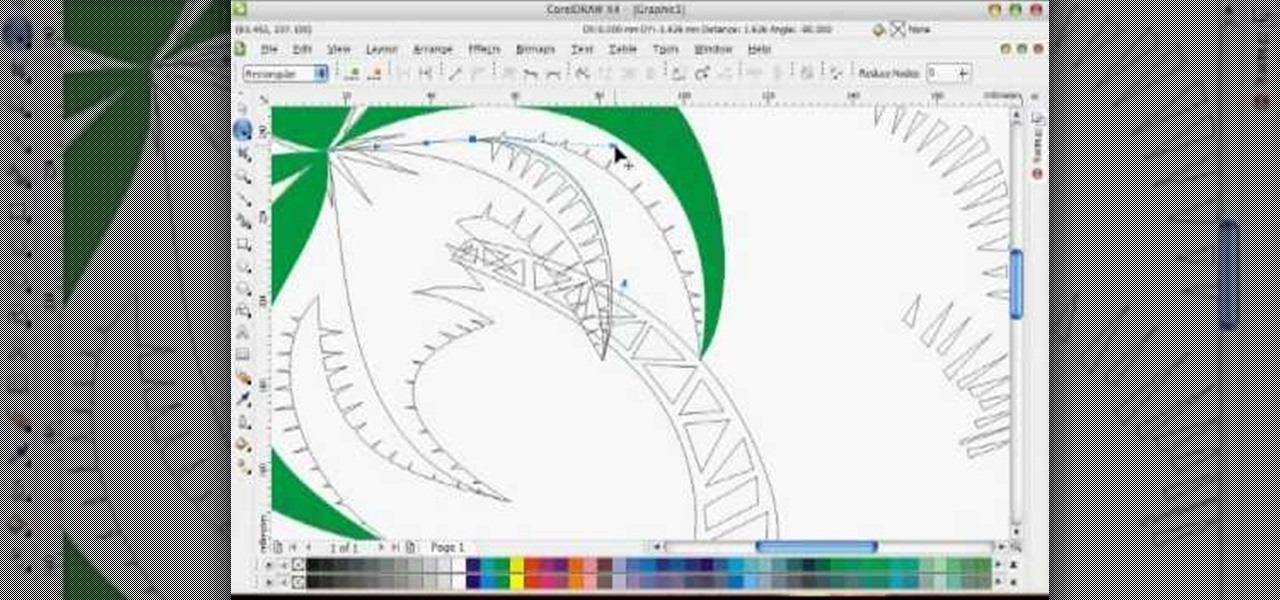
In this tutorial, we learn how to draw a vector art palm tree in CorelDraw X4. Start off in the CorelDraw program and create the base of the tree with a drawing tool in black. After this, draw small triangles inside of the base of the tree and then draw the leaves and branches of the palm tree. Fill this in with small spikes and then erase the middle nodes. From here, use a shaping tool to make the spikes on the palm tree more rounded and lifelike. After you do this, start to color in the ent...