In this video, we learn how to create a picture frame on a photo using PhotoShop. First, open up the program and open the picture that you want to change. Next, select the rectangular marquee tool from the toolbar on the side. Now, create a selection of what you want to frame. Then, click with the right key and select "inverse". Click again with the right key and choose "layer via copy". Now, click 2 times on the layer to open and the layer style menu will show up. Now put the contour to crea...

In this video, we learn how to turn a photo partially black and white using PhotoShop. First, open up the program and open up the picture you'd like to change. Now, click with the right key above the layer and choose duplicate "layer". Now click above the eye icon to hide the layer, then select the layer. Now you can go to image, adjustments, then black and white. Now make the second layer visible and select the eraser tool. Wave your brush over everything but what you want to keep colorful. ...
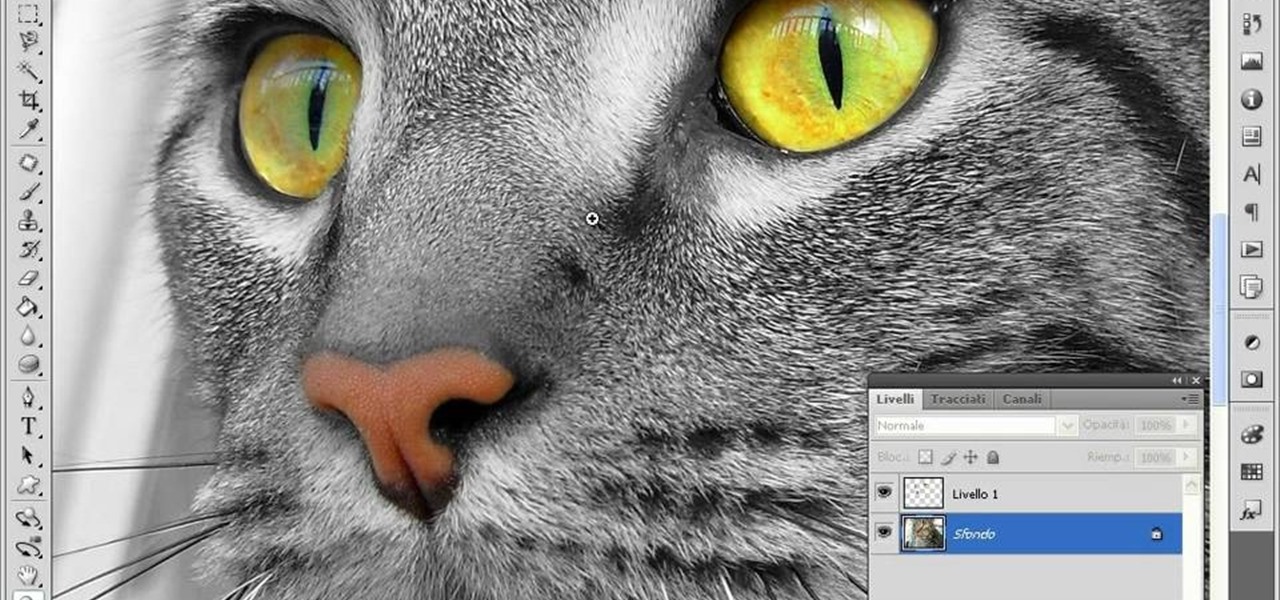
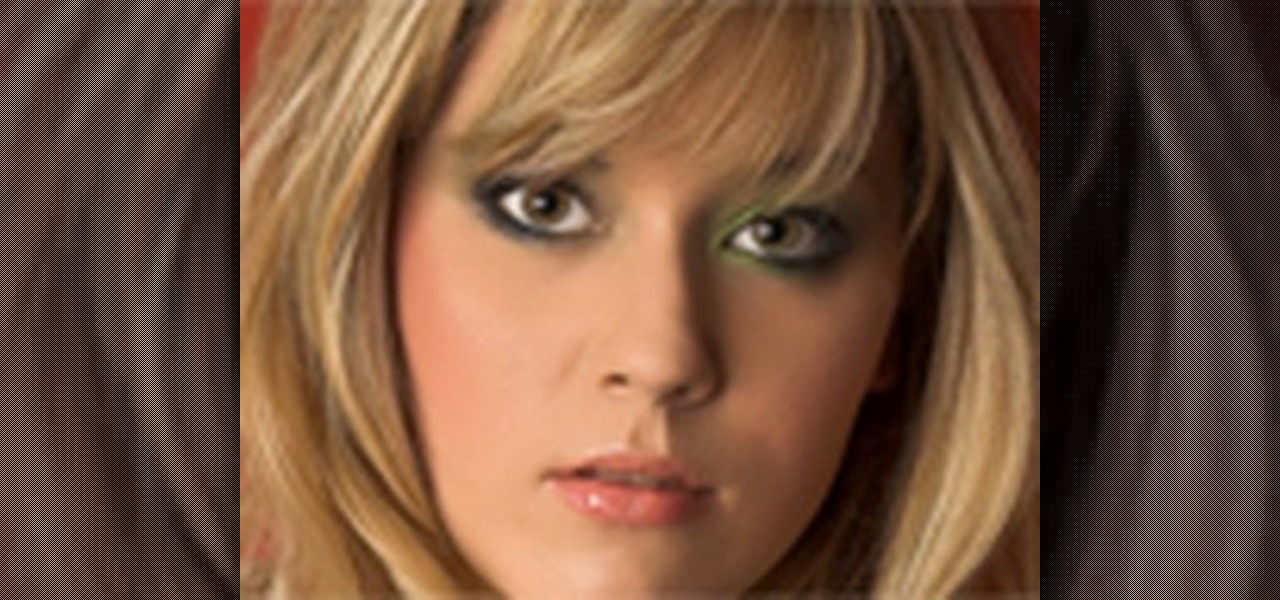
This video teaches us to make a photo black and white with coloured parts in Photoshop. This procedure consists of many steps. In the first step, we choose the magnetic lasso tool from the application. This is followed by the second step. In the second step, we draw the contours of the places we want to stay colored in the photo. Press the 'Shift' key to keep the contours selected while drawing contours across multiple places in the image. After drawing the contours, go to step three. Right c...
This video shows us how to turn parts of a color photo into black and white and keep the colors for the parts we choose. Start by choosing the polygonal asso tool in the tool box. Now create borders for the parts of the image that you want to keep the colors. Hold the ALT key while clicking to draw borders around a second or third object. Once all the borders are created, right click on your selection and click "select inverse". Now go to "image menu, highlight "adjustment", and then click "b...
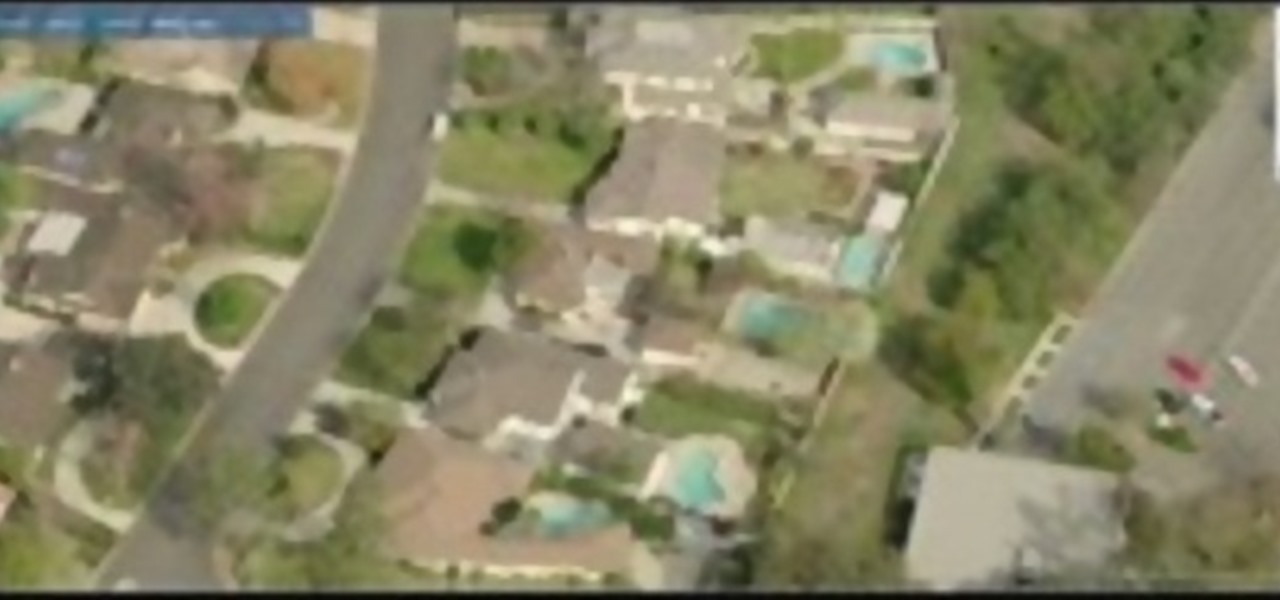
In this how-to video, you will learn how to see high quality pictures of your own house. First, go to your web browser and click on Maps and Directions in the directory on the MSN website. Next, click on locations and type the address of your house or whatever place you want to see. Once this is done, click on bird's eye to get a closer photo of the area. Next, click zoom in until you get an even larger image. You can also click on the picture and drag to move around the image. This video sho...

Every time you download a game, movie, etc to your computer, you make changes to the computer. Sometimes, these downloads can make your computer unstable. By default, Windows Vista creates restore points in the background. What this means is every time you make these changes to your computer, Vista takes a snapshot of your computer before the changes are made. This enables you to go back in time and restore your computer to an earlier time. Documents, photo's and emails will still be saved. O...

In this how to video, you will learn how to liquify an image using Photoshop. First, open the image in Photoshop. Next, go to filter and select liquify. Use the forward warp tool to press pieces of the photo. Use the reconstruct tool to bring the image back to the original state. The twirl clockwise tool can be used to twirl pieces in the photo. You can adjust the pressure to twirl more. The pucker tool can be used to push sections into the image. The bloat tool can be used to pinch sections ...
In this how to video, you will learn how to make a reflection in water using Photoshop. First, open the image in Photoshop. Select the crop tool and select the whole photo. Click and drag the lower part down. Select the rectangular marquee tool and select the picture. Click on the selection and select layer via copy. Click the move tool and drag the upper point in the picture to the bottom of the document. Go to filter, blur, and select motion blur. Choose a -90 degree angle with a 35 pixel d...
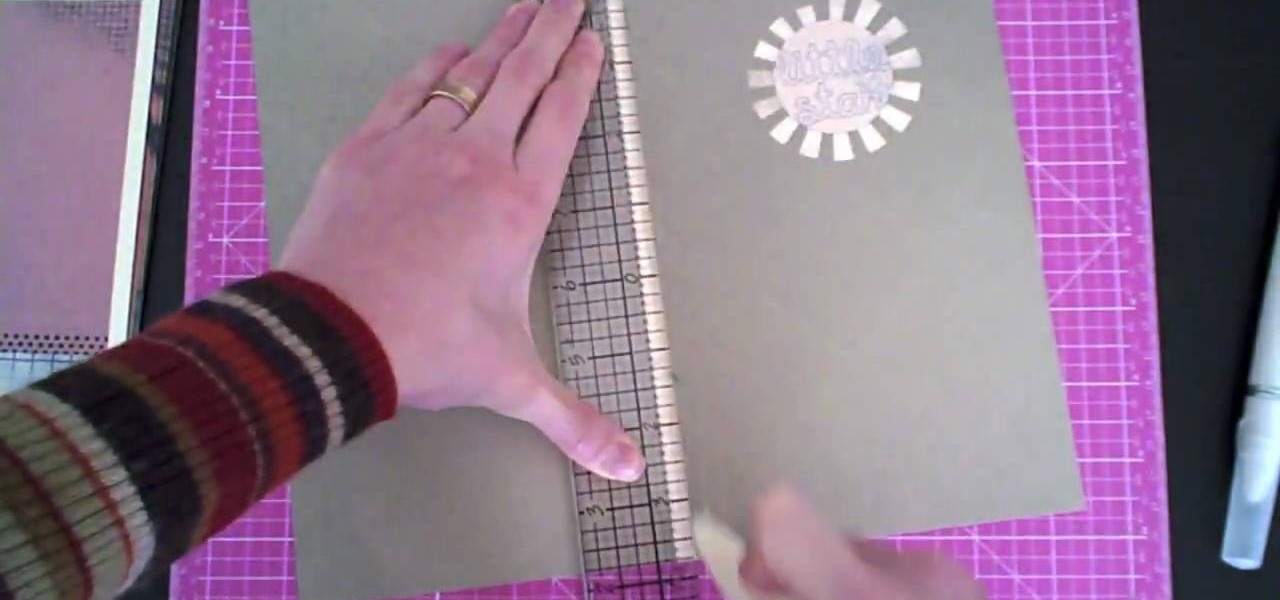
Creativity Prompt demonstrates how to make a hybrid board book. First, select printed paper of your choosing. Cut off the excess paper with a cutting blade and crease the paper for the spine. Fold and burnish the paper. Apply a generous glue stick layer to a recycled board book and adhere the paper to it. Burnish the paper with a brayer to strengthen the adhesion. Let the glue dry and trim off the excess paper. Cut the rest of the paper for the board book pages. Cut out photos and titles for ...
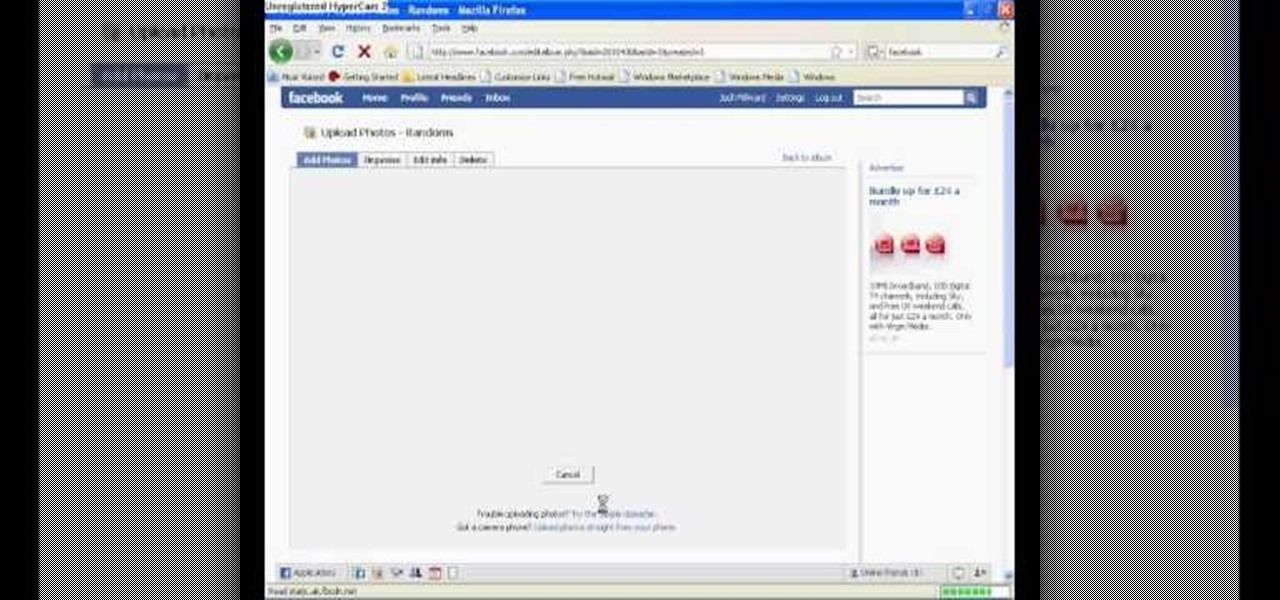
In this tutorial, Josh Millward teaches us how to post pictures onto a Facebook account. First, log into your Facebook account. Once you're logged in, click on your profile and click "photos". Choose where you want to upload the photo to, you can upload it to an existing album or you can upload to a new album. You can choose which uploading tool you'd like to use. Browse through your files and choose the pictures you want to load into your album. Now click "upload" after agreeing to the terms...
In this Arts & Crafts video tutorial you will learn how to make a stained glass picture frame. This video is from Artists Resource. You will need a Marabu GlasArt kit, some white spirit, a china graph pencil, scissors, a ruler, sheets of scrap paper, lead tape and a picture frame. Take the frame and remove the clips. With the ruler and china graph pencil mark off and draw 6” squares. Rub off the center lines with a tissue. This is where the photo will fit. Next you fill the squares with the g...
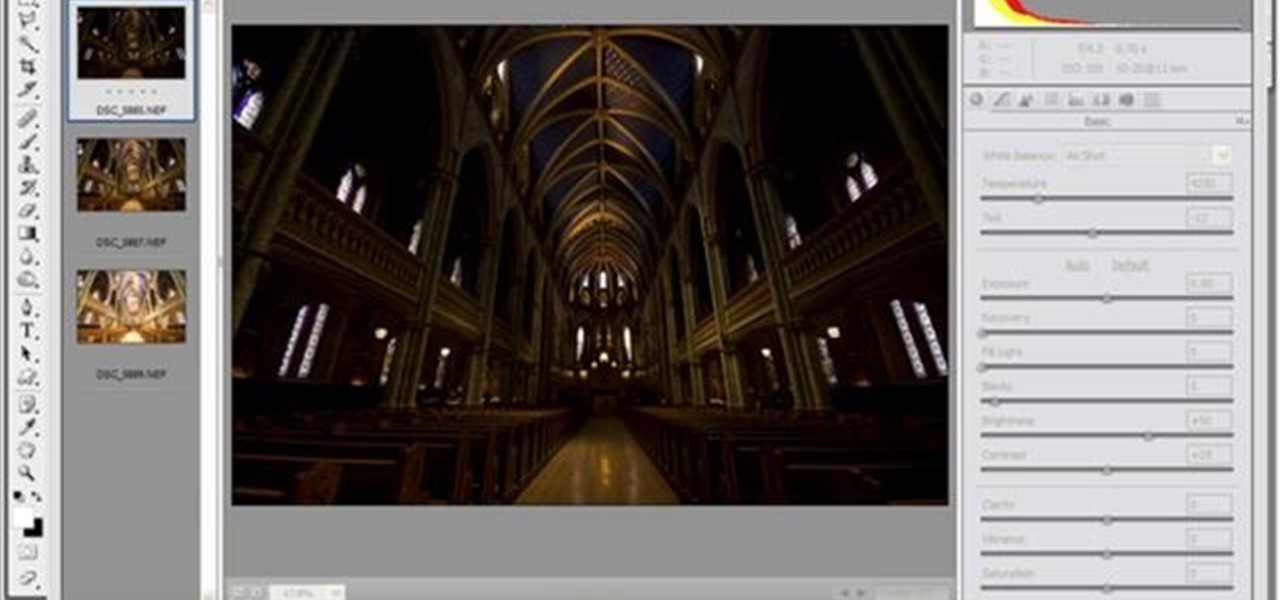
Yanick's Photo School demonstrates how to use Photoshop to make HDR images in Photoshop CS3. This tutorial first explains that HDR means "High Dynamic Range" which is a process to get details from a photo from both the highlights and shadows of a particular scene. The first thing that is necessary is to take multiple views of the same image with different exposures. To start off, you will take three exposures: one that is two stops down, one that is normal exposure, and one that is two stops ...
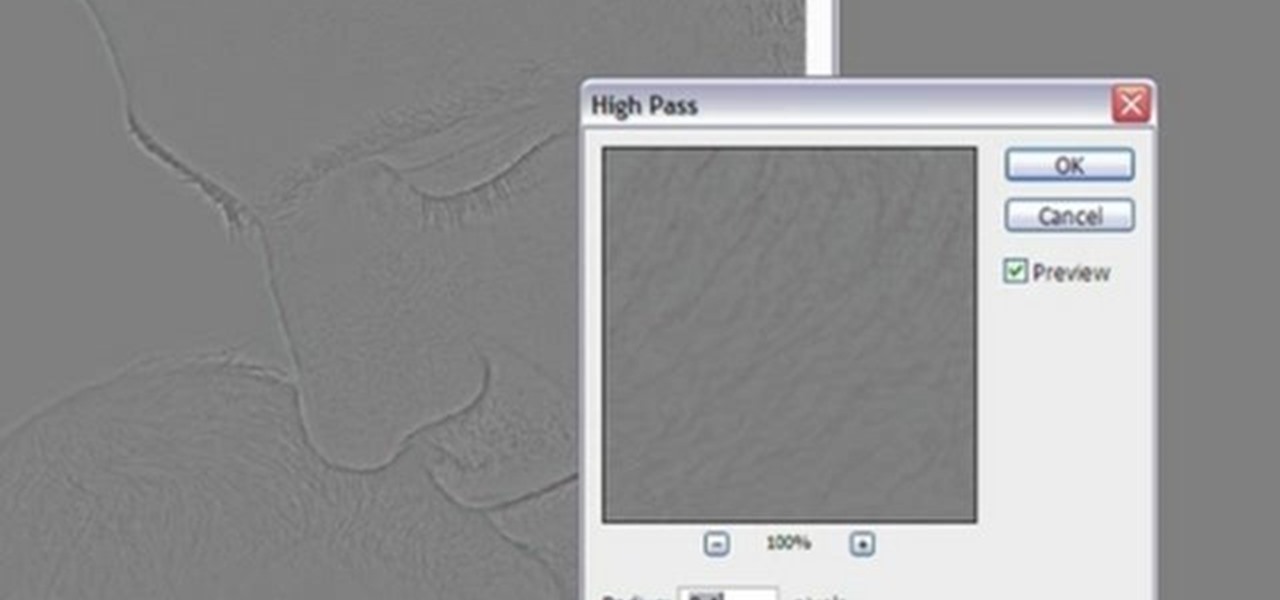
In this video tutorial, viewers learn how to sharpen photos in Adobe Photoshop CS3. Begin by opening the image in the program and duplicate the image layer. To duplicate, press the control and J button. With that images, go to Filter, choose Other and select High Pass. The images will now be covered entirely of gray. It is recommended to set the radius as 5-6 pixels and then press OK. Change the layer blending mode to overlay, soft light, hard light, vivid light or linear light. This video wi...
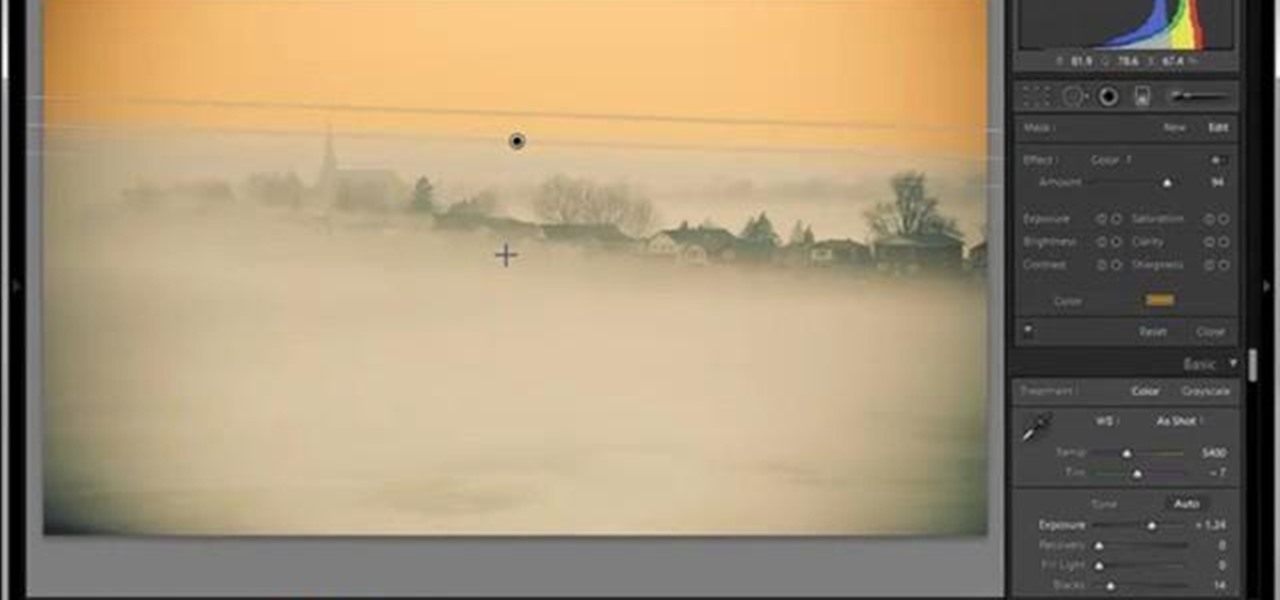
In this tutorial, Yanik Chauvin teaches us how to create an old-style looking photo starting from a grayish, underexposed one, using the software "Lightroom". He starts by creating a virtual copy of it, and then he adds a Camera Calibration preset named Camera Landscape and increases the exposure. After that, he crops the image removing the blank parts of the photo, and adjusts Contrast, Blacks and Clarity to strength the image borders.
In this video tutorial, viewers learn how to take pictures with an iPod Touch. iPod Touch is a portable media player, personal digital assistant, and Wi-Fi mobile platform. The iPod Touch does not have a built-in camera, but it is able to take screenshots. Begin by going to any option or application that you want to take a screen shot of. Then hold power and home button at the same time until you see a white flash. The picture is located in the Saves Photos folder in the Photos application. T...
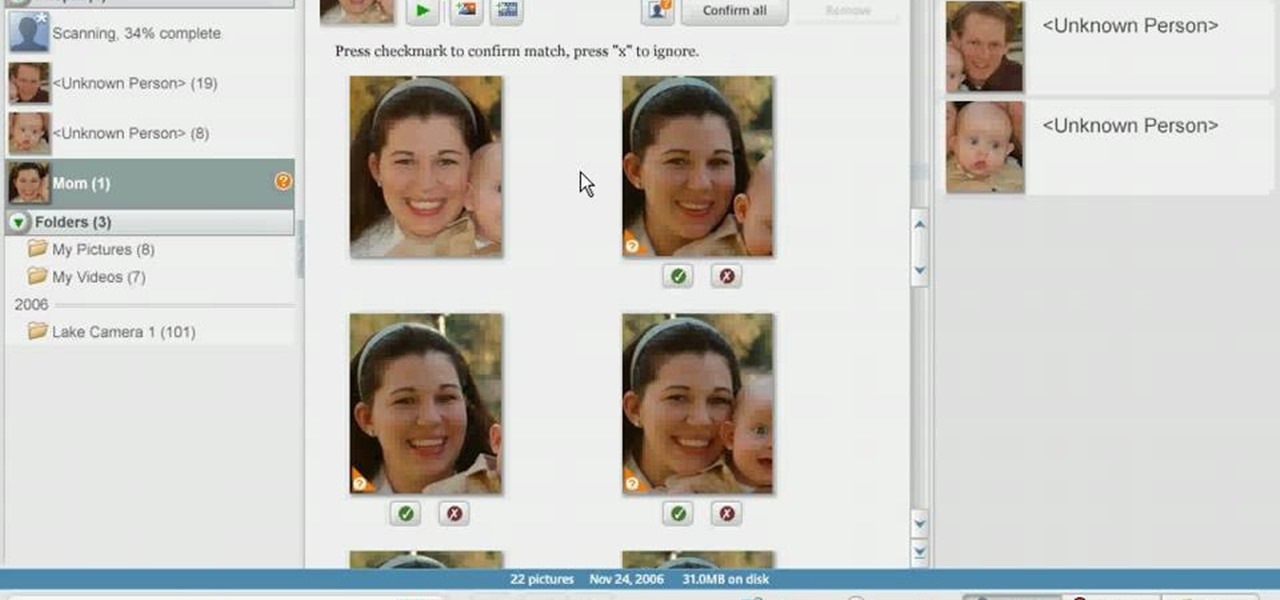
In order to use Picasa's face recognition feature double click on an image that you would like to edit. It will automatically identify each person. Then label the first person that it identifies. Then hit the enter key, and click on the new person button then click on the okay button. Now go back to your library and on the left hand side of your library you should see the label that you made for your first photo. Click on that label and Picasa will automatically find all of the photos that th...
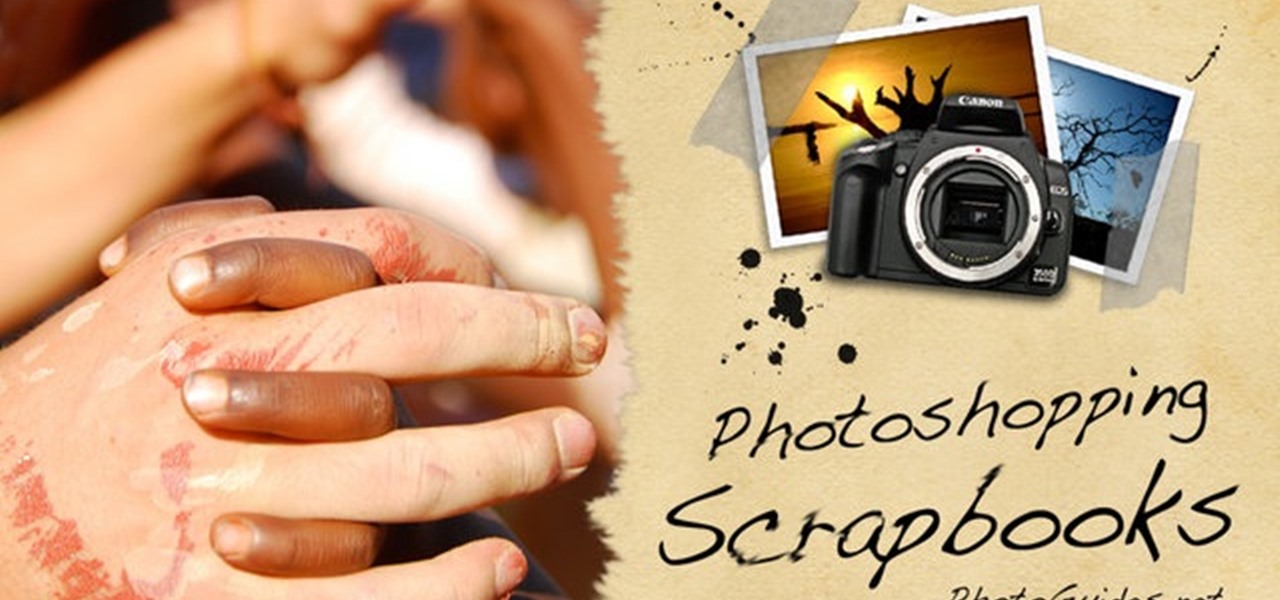
This Software video tutorial shows how to create scrapbooks in Photoshop. This video is presented by Ash Davies from PhotoGuides. This tutorial has 4 components including how to tear the paper, how to add sticky tape, how to hand draw and how to spill ink. To complete this tutorial you will need to download the Paper file and the Sticky Tape file from PhotoGuides. It is available to all members. Open up the paper fie in Photoshop. Open the photos you want in your scrapbook and drag them onto ...
First of all go to Google and then type in 'candy bar wrapper image' and then enter and go to image results. Select the 'crunch' image and right click and then 'copy' and then go to word document and paste it there. But if the image is big then right click and select 'hyperlink' and select 'remove hyperlink' to remove it. Now select the image again by clicking on to it and you can change the size of the image. Pick out the corner of the box that appears on the image and drag it inside to make...
In this video from DontPokeMeSoHard he shows how to take a picture of your iPod Touch's screen. If you hold the home button and press the power button, it will take a picture of whatever is on your screen at that moment. It will save the picture in your photos under Saved Pictures. If you're trying to remember a page on the Internet, it's a great tool for that. Just take a picture of it and it will save on your photos forever. You can view web pages now without being connected to the internet...
You can convert any color photo to black and white photo. In Photoshop CS3, There are 4 ways to do it.
This video shows the method to create a photo montage in Sony Vegas. Go to 'Options' menu & Preferences. Go to the 'Editing' tab & 'New still image length (seconds)' and put the corresponding value and hit 'OK'. Open the pictures from explorer and you have a montage in which pictures last for a few seconds when another one comes up. Go to 'Tools' menu and 'Scripting' option. Click on 'ApplyTransition_1_2'. Choose 'Standard Cross Fade' from the drop down menu. Fill in 'Overlap Frames' which te...
In this video from Dom Bower Photography, he demonstrates how to make it look like a person is levitating in a photo. He sets the timer on the camera and takes the picture of himself. It takes a few tries to get a picture where he is airborne when the picture is taken. The trick is to try to pose while jumping so that it doesn't look like you're jumping. It might take a few tries, but if you use some of the tricks shown in this video, you'll be able to take a picture that makes it look like a...
This video shows us how to burn files to a disc using Windows Vista. Insert the blank disc in your computer's recordable disk drive. Autoplay will automatically appear. Choose "Burn Files to disc using Windows". Click next when "Burn a disc" dialog box appears. Empty folder window appears. Choose files that you want to copy and drag them to the window. For example, if you want to copy a photo, click Start menu and open the Pictures folder. Select photos and drag them to the window. Photos are...
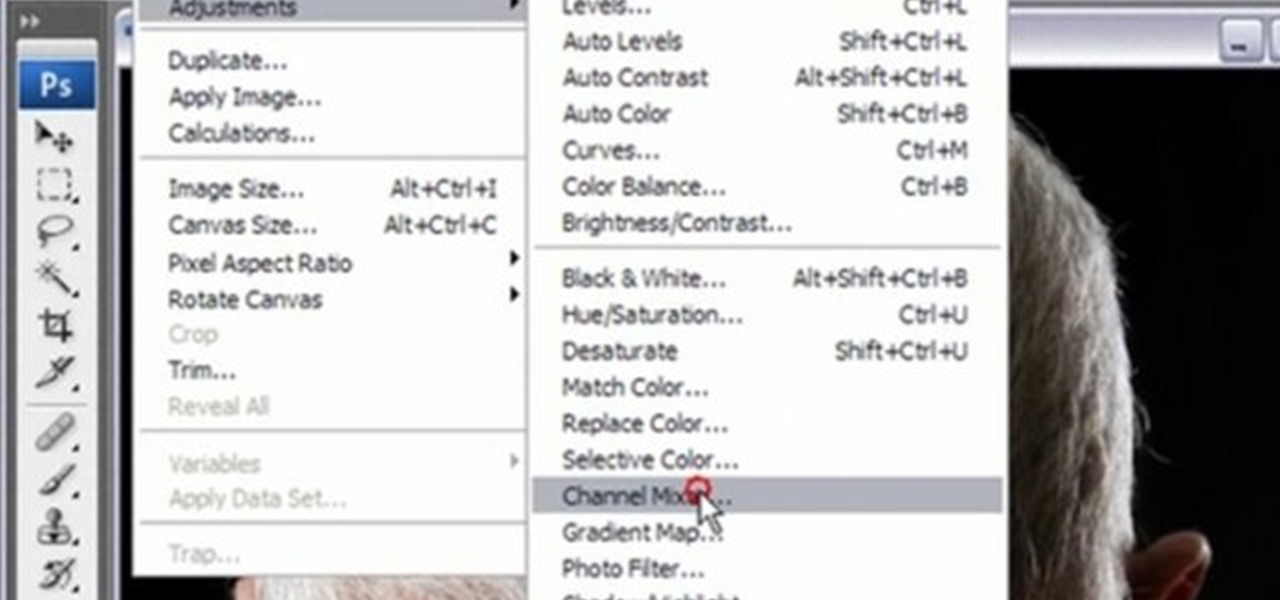
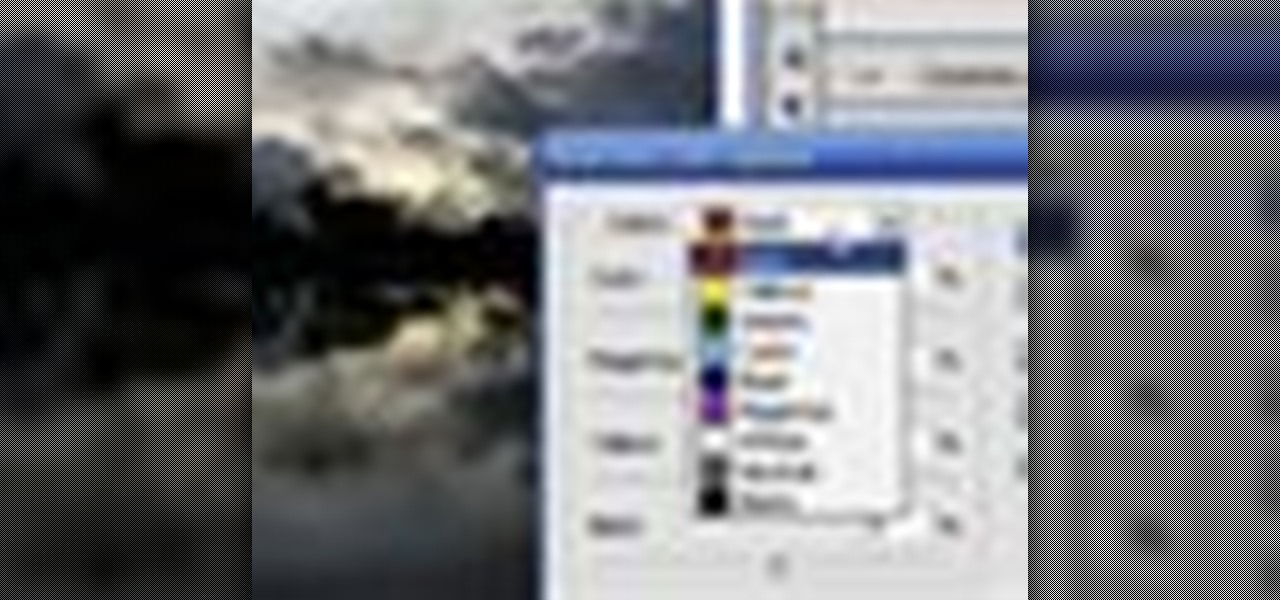
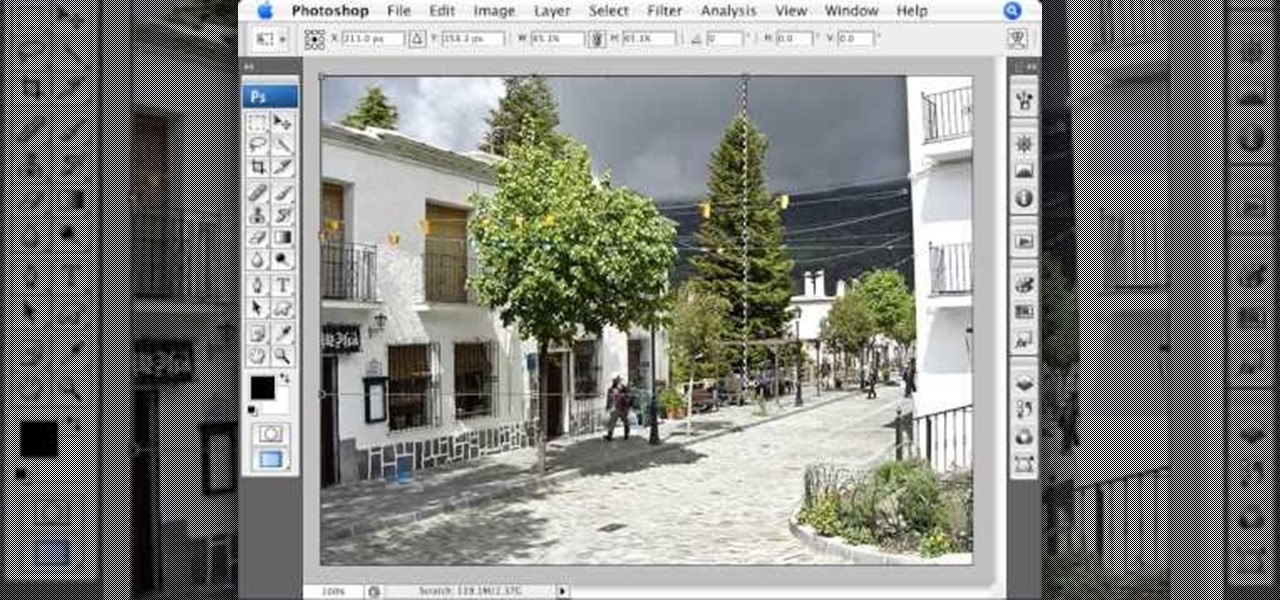
Learn how to edit a picture to alter the color of the sky using Photoshop's selective color adjustment layer. This tool allows you to change a color in a photo. A good example of what this tool can do is to change a sunset to a sunrise in a photo. To begin with, you will need to open the selective color adjustment layer under the layer tab. Under the color menu, select the color that you want to alter. The tutorial goes over how much of each color to add or remove to get the desired effect. W...
In this video from solvingtime we learn how to remove objects from photos using Paint. To get this program go to to install it. He uses the clone stamp tool to remove things. First he zooms in on the object he wants to remove using the magnifying glass. Then click the stamp which will switch to the clone stamp tool. Use the bracket keys near the letter P on the keyboard to adjust brush size. Then while holding the control key click once on an area near the object you wa...
Pixelated photos are always a site for sore eyes. When you crop your photos in Photoshop you can keep your aspect ratio to stay wayward of the "pixelation desecration". When you hold down Shift during your crop it will retain the aspect ratio so you have nothing to worry about. There are also some more commands to help keep aspect ratio during zoom, crop, moving, or anything else of that matter. This video will demonstrate exactly how to retain aspect ratio when cropping in Adobe Photoshop.
This video tutorial is about removing makeup in a photo using Photoshop. To do this, first of all, open the photo. Then zoom in on the area where you want to remove the makeup. The tool that is to be used to remove makeup is the brush tool. It can be selected from the left pane. After that, on top there will be an option which says mode. Click on the option just near to that and a drop down menu appears. From that list, select the hue option or color option. Both the options serve the same pu...
Joann of "Paper Crafting" shows you how to create a CD mini album. What it is, is actually a pop up photo album that you create using a CD case. The materials needed are 1) a CD case. 2) various decorations to put on the outside/inside depending on your taste. 3) cardstock type paper that can be folded around 8 times: on each "fold" you will put a photo- preferably the album will have a theme. Then you fold it up and put it in the Cd Case and embellish the front however you like.
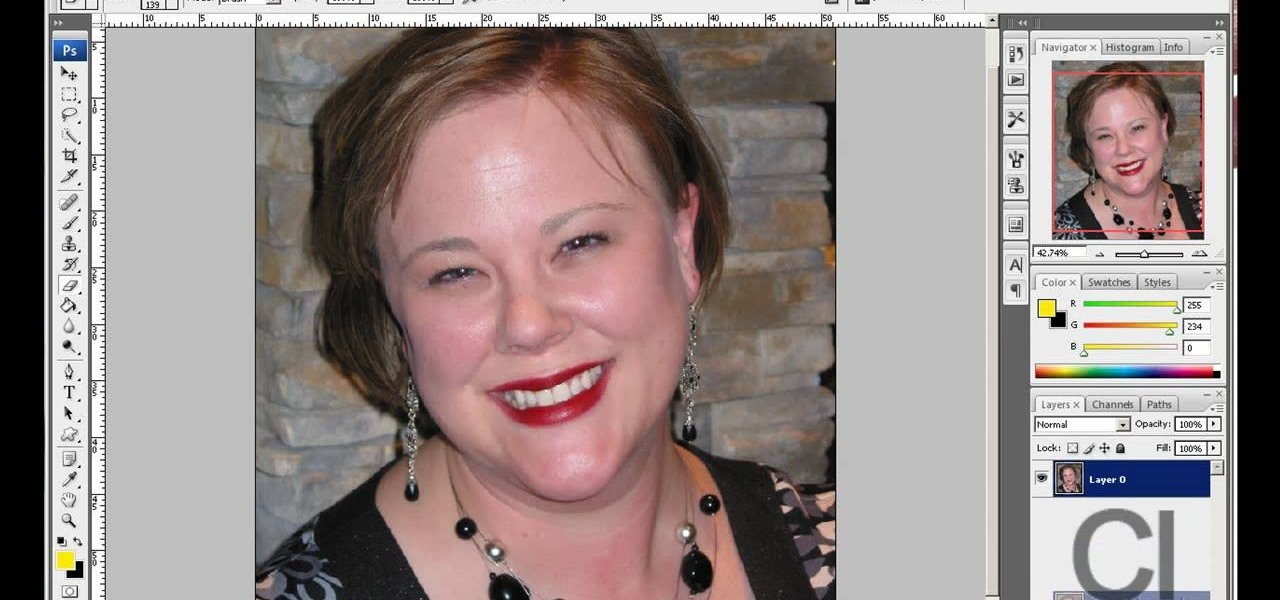
The author of this video takes us through the process of smoothing the skin in Photoshop. The video helps you to conceal blemishes in your photos. It is an easy way to soften and smooth someone’s skin in a photo without blurring out any important image details. One would definitely look few years younger after this editing. Though the sound quality for the video was somewhat less, the explanation was so clear that one could understand the entire process very easily.
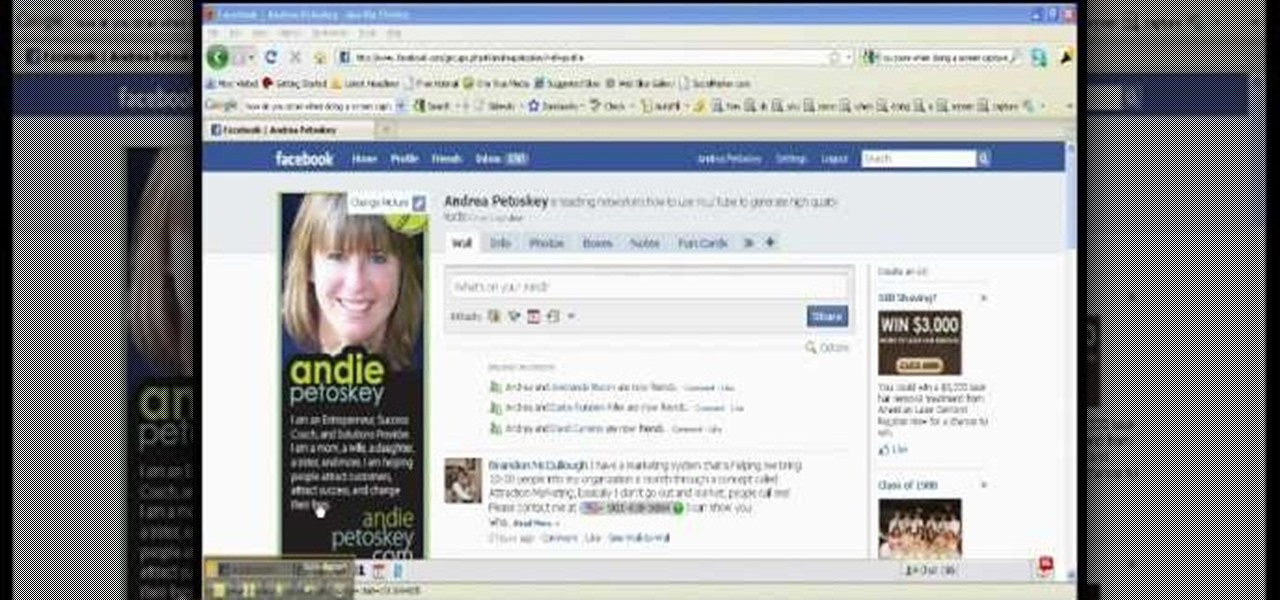
This video is about creating a group on Facebook. Groups on Facebook join friends and people with similar interests. Go to the dialog box and choose groups, create new. You then bring up the form. Choose a name and describe the name. Scroll down and choose the group type. Click create group. You can also add a photo of the group. Scroll down and choose enable photo, video or links. Then you decide who has the responsibility for making changes to the group-members or an administrator. Decide w...
Beechbum06 shows how you can create a Khloe Kardashian makeup look. Use the colors you have and achieve this look inspired by Khloe's photo shoot. A Coastal Cents palette is used. Build your colors in neutral tones. Blend some browns in the creases. Apply some dark shades to your outer corners for some depth. Add some blush, mascara, and lipstick to complete the look. You too can be photo-ready in minutes. Remember to blend so you look flawless.
This video is a tutorial on how to catch your spouse cheating on the computer if you are on a Windows computer. The camera is at a very low angle pointing towards the computer so the viewer can watch everything that is happening. The narrator talks the viewer through each step and offers various hints and tips. He shows the viewers how to do searches for photos, website history, videos, and music files. He suggests to check out the photos and website history as the computer finds them.
Does your model have an unsightly blemish that you'd rather not have in your final photos? Is this blemish dark and hard to ignore, like a mole? No problem! Check out this tutorial and learn how to use Photoshop's healing brush to remove any skin imperfections including moles. This video will show you step by step how to accomplish this and produce cleaner photos. Learn secrets of the pros in this video and be on your way to more professional looking images.
This video is about the concept of "foofing" when shooting flash photography. For this, you need a camera with a flash that can be directionally adjusted. The process involves simply pointing the flash at either a wall or the ceiling, to avoid having the light from the flash strike the subject directly. This can create several different lighting and shadowing effects, giving photos a less "harsh" look, and also giving them a more "professional" look. The color of the wall or ceiling used will...
The citizenship card is a document that naturalized Canadian citizens use to prove that they are Canadian citizens. This card is needed to get certain documents such as a Canadian passport. It never expires but it can be updated to include a new picture or name change. Citizens born in Canada do not use the card, they use their birth certificate to prove citizenship. Naturalized citizens can apply for this card and so can people with parents of Canadian descent. People who have previously had...
You have many great memories to share. Why not collect them all in one book? Learn the fun and meaningful craft of scrapbooking. In this video how-to, learn how to get started on your scrapbooking adventure.
Have you ever wanted to make your own personal coloring book? With the Epson Artisan all-in-one printer, a project like this is a snap. Make some coloring books based on your digital pictures. Have your kids color in their memories of the last trip to Disneyland, or the silly photo of themselves goofing off in the bathtub. These personalized coloring books make great gifts for everyone!
Hak5 isn't your ordinary tech show. It's hacking in the old-school sense, covering everything from network security, open source and forensics, to DIY modding and the homebrew scene. Damn the warranties, it's time to Trust your Technolust. In this episode, see how to hide secret data inside a photo.
Hak5 isn't your ordinary tech show. It's hacking in the old-school sense, covering everything from network security, open source and forensics, to DIY modding and the homebrew scene. Damn the warranties, it's time to Trust your Technolust. In this episode, see how to build a mini multi-touch table and photo stitch.
In this video you will see how to transfer a photograph onto a piece of flannel fabric. You will have to treat the flannel with Bubble jet Set 2000 to help the photo stay on the fabric longer. Use an inkjet printer to make sure the ink soaks into the fiber. Tape the treated flannel onto the printed picture and run the paper through the printer again. The printer should print directly onto the fabric without trouble!