In this clip, you'll learn how to adjust your privacy settings to prevent your friends from sharing your personal information on Facebook. Share pictures with your friends by making photo albums on Facebook. This clip will show you how it's done. Whether you're completely new to the Facebook's popular social networking site or simply require a small amount of clarification on how to perform a particular task on Facebook, you're sure to benefit from this helpful video guide. For more informati...

Want to enhance the a drab sky in one of your digital pictures? With Adobe Photoshop, it's easy! This clip will teach you what you need to know. Whether you're new to Adobe's popular raster graphics editing software or a seasoned professional just looking to better acquaint yourself with the program and its various features and filters, you're sure to be well served by this video tutorial. For more information, including detailed, step-by-step instructions, watch this free video guide.
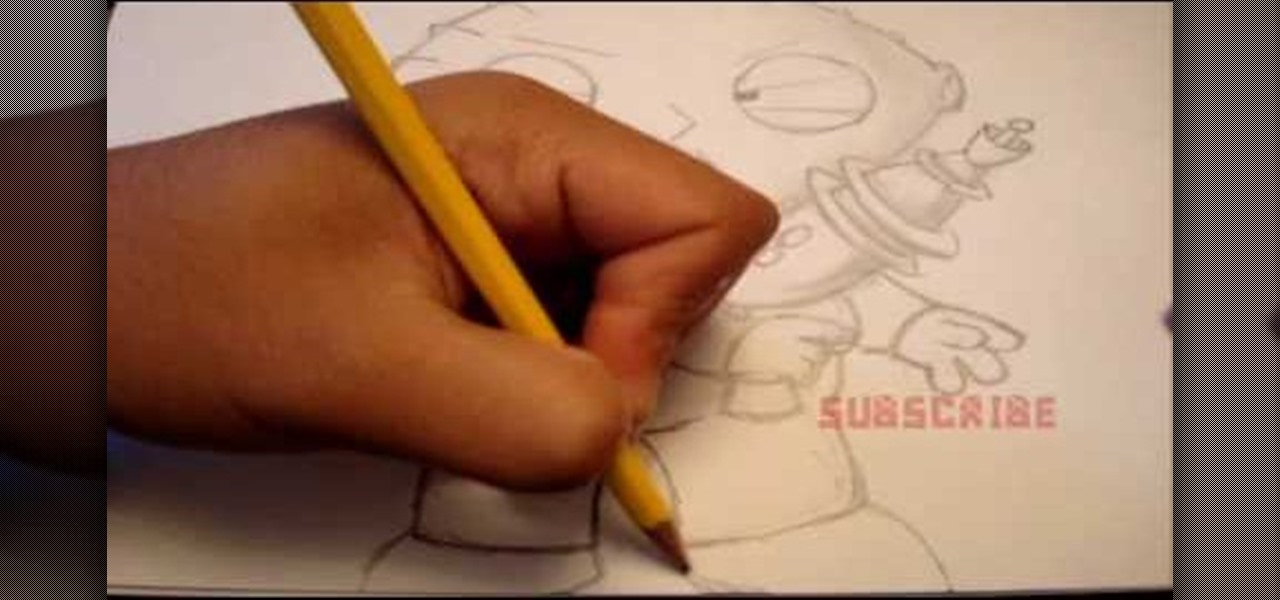
In this tutorial, we learn how to draw Stewie Griffin from Family Guy with a pencil. Start off by drawing the ears, then the football shaped head around the ears. next, draw the arms with the shirt on it, and make the hands. Also, draw a rocket with Stewie holding it. Keep drawing downwards, making the arms around the rocket and the body with pants and a bib on top. Draw in the details of the face, giving the character large eyes and a triangle shaped nose. Give the character narrow eyebrows ...

In this tutorial, we learn how to draw Ironman. Start off by drawing the feet to Ironman, making sure to pay close attention to the detail that is on the outside suit. Make sure to include bolts and screws to make the picture more lifelike. Use shading on the outside of the sides to make it darker and more realistic. Continue working your way up on Ironman until you reach the torso and the rest of the upper body. Then, draw the head onto the top followed by the large mechanical arm and the he...
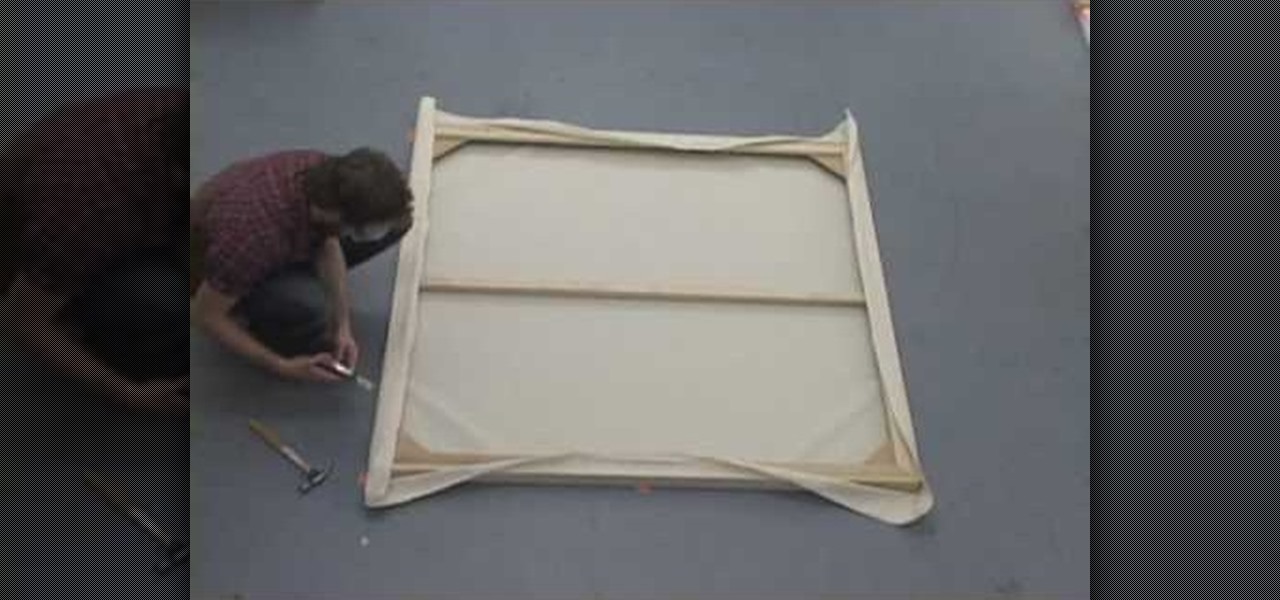
In this tutorial, we learn how to stretch the perfect canvas. First, measure the canvas. After this, center the canvas and make sure there are no wrinkles. Then cut the canvas and staple it to the frame. This will take several minutes, and you will work your way from the inside to the outer corners. After you are finished stapling hide the folds on all of the corners with the stapler gun. When you are finished with this step, you will be done and ready to paint on your new canvas! These steps...
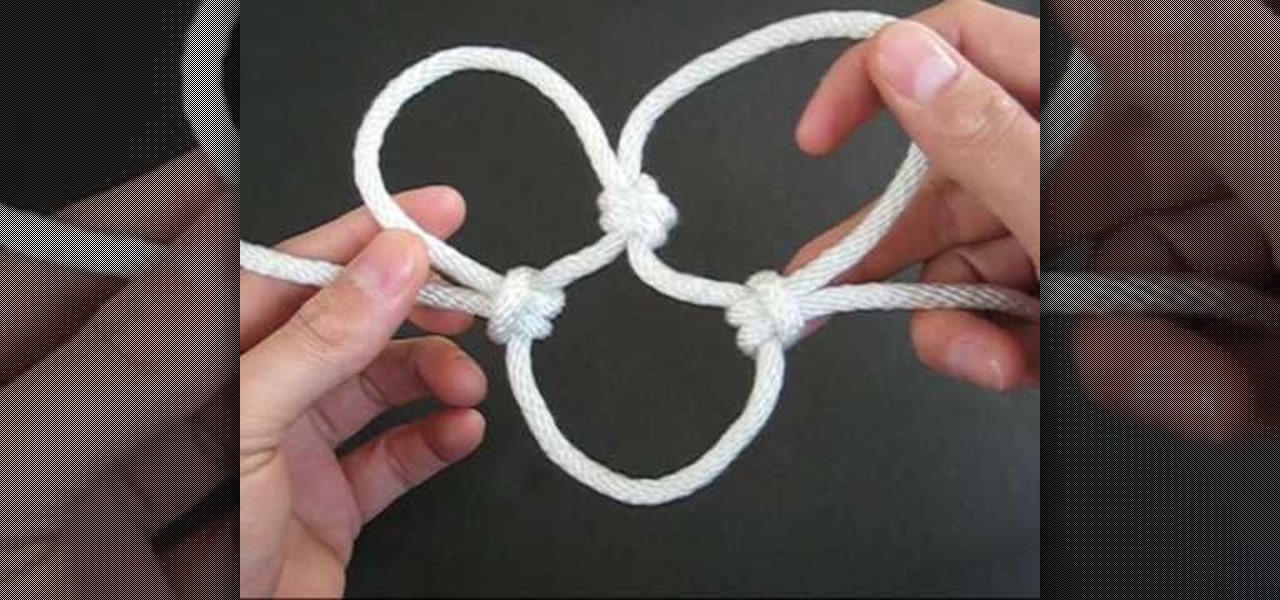
In this video, we learn how to tie the basic knot design of a cargo net. First, tie a double overhand knot on a rope bent into two. After this, make cow hitching on the first loop that you created. Next, make a second double overhand knot followed by cow hitching the second loop. After you do this, you will be able to size up for use! To make this, you must have some prior knowledge of how to tie different knots. If you don't, you won't know how to make the shapes. Use a picture as a referenc...

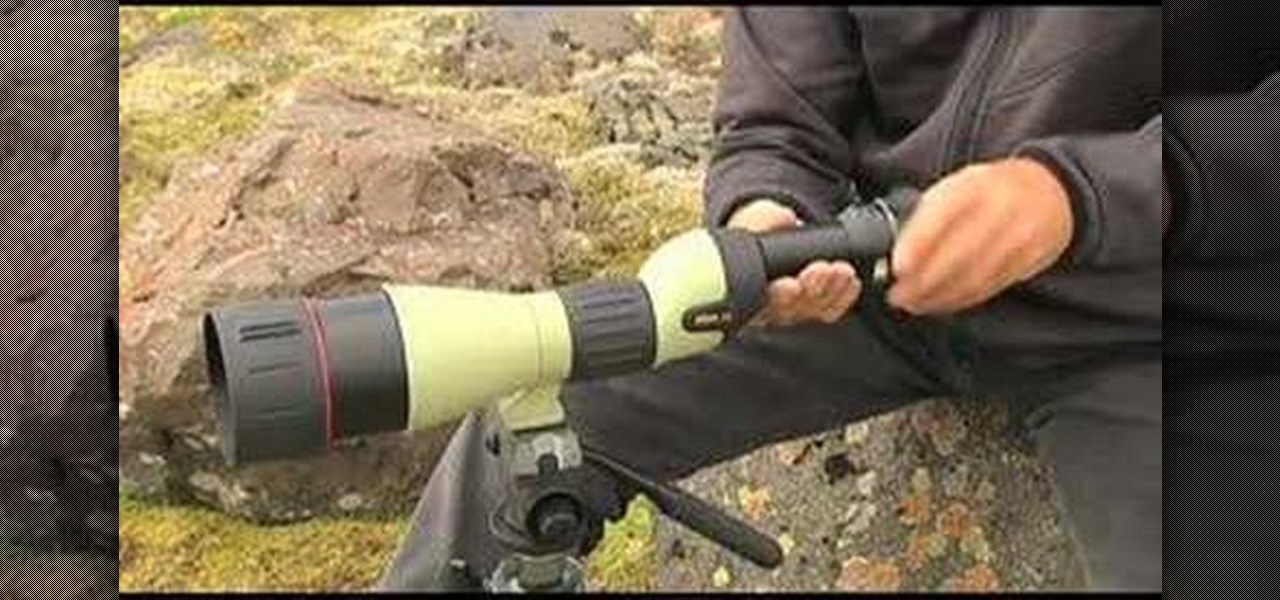
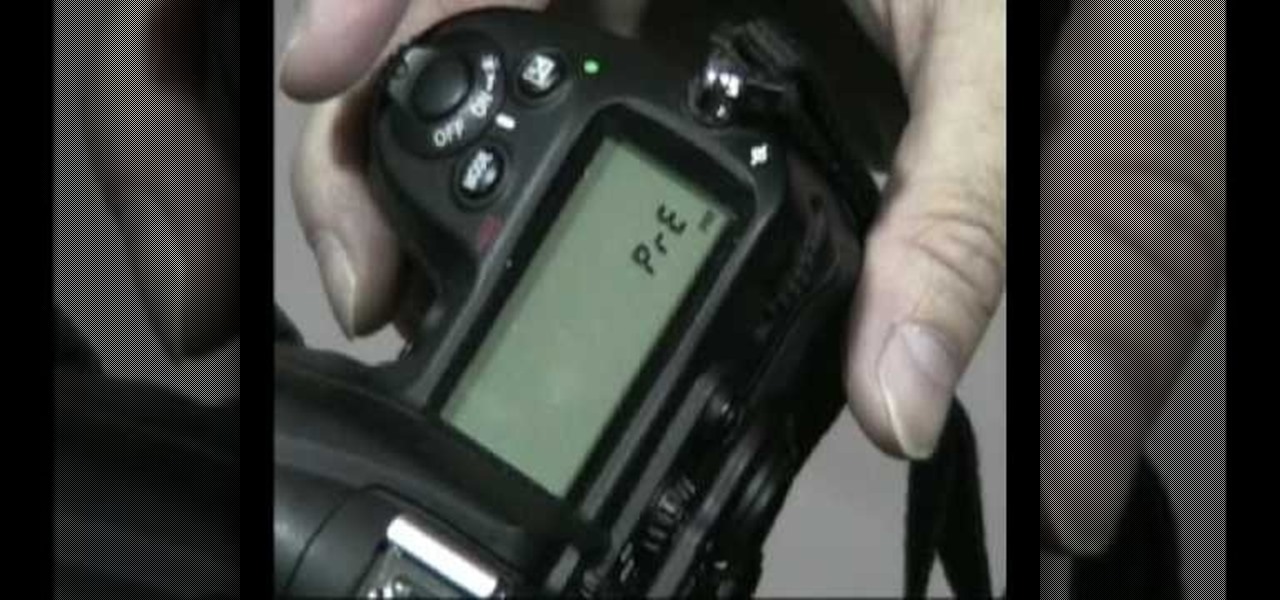
In this tutorial, we learn how to use Nikon digiscopes. This means taking digital pictures with a digital camera through a lens. You can use two different versions of lenses with the Nikon Coolpix camera. You will need an eyepiece to use the camera with these lenses. You can get up to 75x magnification while using these, but risk of camera shake is greater. First, mount the camera on the triPod and apply the lens adapter, then the Coolpix camera. After this, use the view finder to see through...
If you are interested in tying knots just for show and are looking for a challenge, this next tutorial might be what you need.
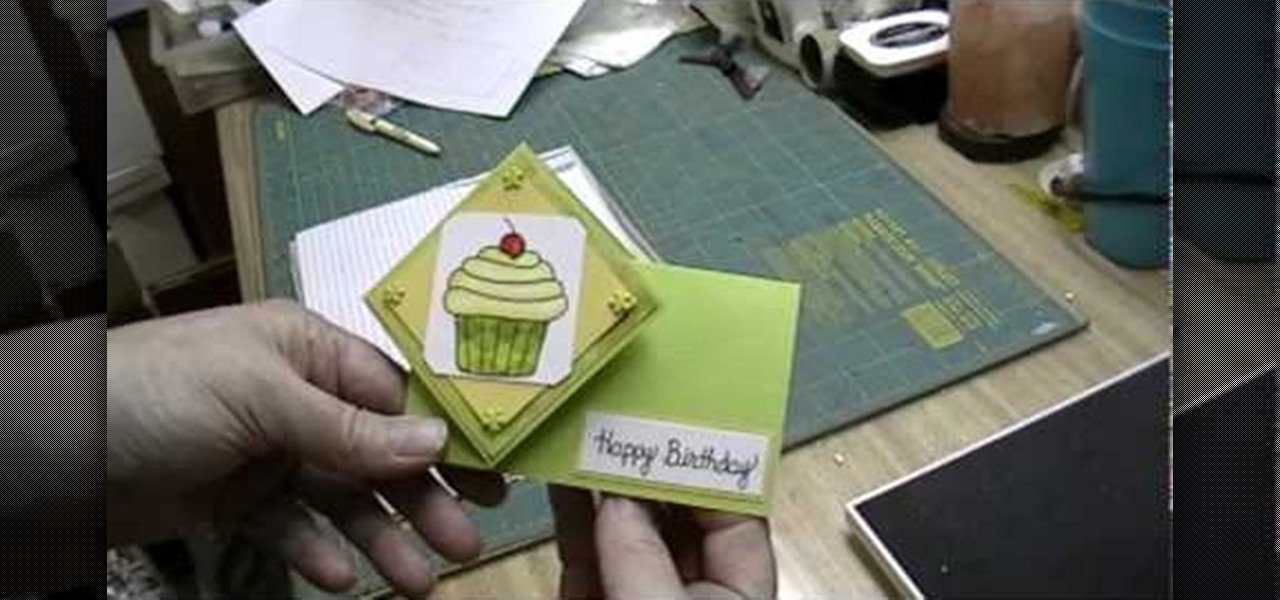
In this video, we learn how to make a twist turn style card. The card will open with a neat pop out image on the front of the card! First, get an 8 1/2 x 5 1/2 piece of card stock and then score it 2 and 3/4 inches from the left edge and 4 inches over from the left edge. Then, turn the card the other way and find the center, then score from the right end to the very first score line. Then flip the card over and score the rest of the center line up to the first line. Now, make a score line fro...
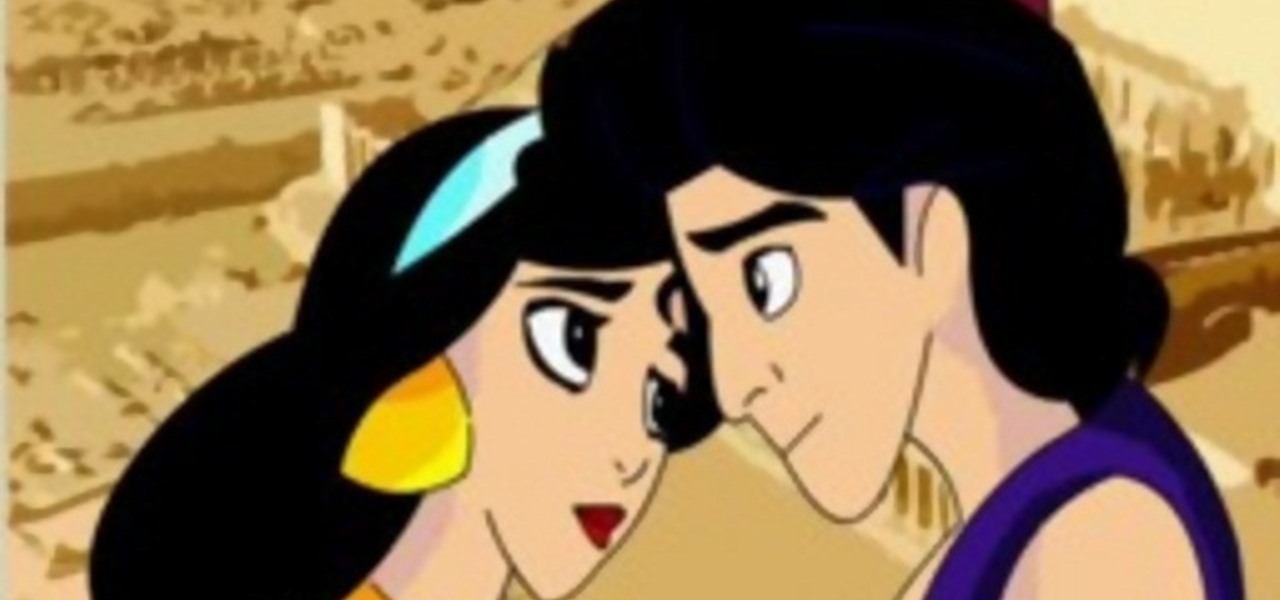
In this tutorial, we learn how to draw Aladdin and Jasmine. Start by drawing Jasmine, draw her hair on first, then start working on her face and head. Add on her earrings, eyebrows, and mouth. Make sure to pay attention to details and use a picture as a reference to what they should look like. Fill in Jasmine with the colors she wears in the movie, and then start to work on Aladdin. Draw in his hair to start, then make sure to draw on his hat on the very top of his head. Draw his face, giving...
New to Microsoft Excel? Looking for a tip? How about a tip so mind-blowingly useful as to qualify as a magic trick? You're in luck. In this MS Excel tutorial from ExcelIsFun, the 637th installment in their series of digital spreadsheet magic tricks, you'll learn how to create a dynamic two data series line chart for blood pressures — how to look up a chart using defined names, a data validation list, and a formula using the INDIRECT function inside a picture of a chart.
The iPhone has some pretty awesome video capabilities. Whether you are working with Cycorder from a jailbroken 2G or 3G, or Apple's own video camera in the 3GS, you will get pretty great picture resolution in a handy pocket size. In this tutorial, learn how to create your own tripod, on the cheap, for use with your otherwise handheld device. This will help you keep your image steady and stable and take great shots.
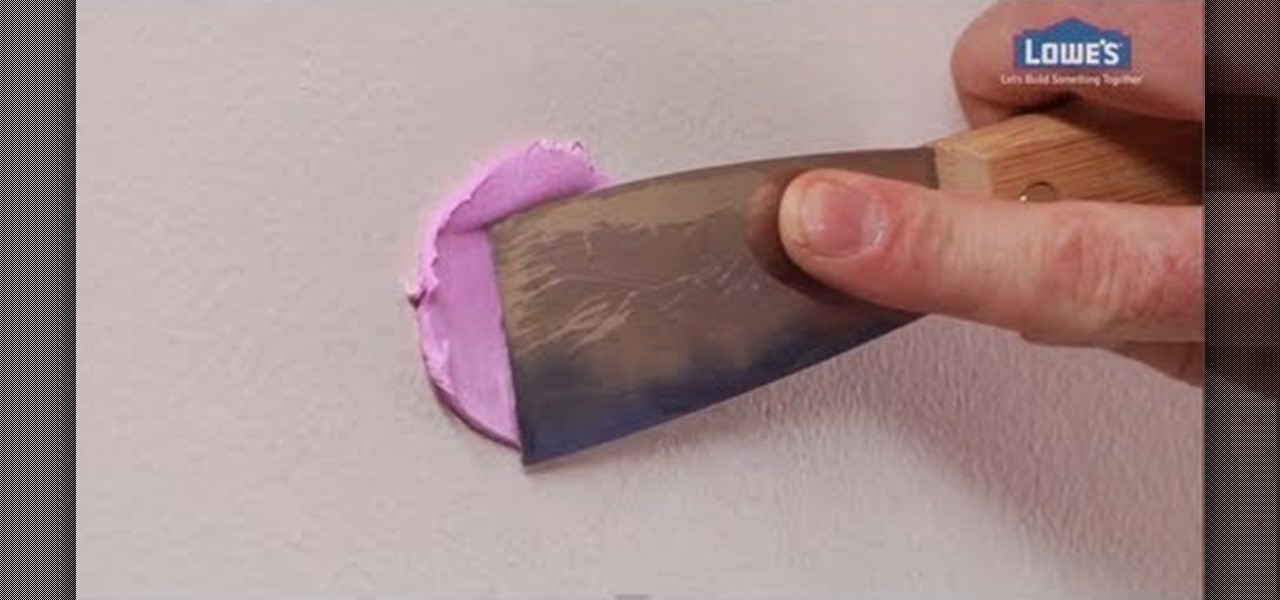
Having tons of pictures hanging in one single room can be a beautiful site to look at. But if you plan on moving or changing the style of that room, you're bound to have a few holes in your wall. Not to worry, those holes are easy to take care of and will take you less than a day to complete. In this tutorial, you'll find out how to properly spackle and patch holes in your wall. It's an easy task that anyone can do in a snap! So good luck and enjoy!
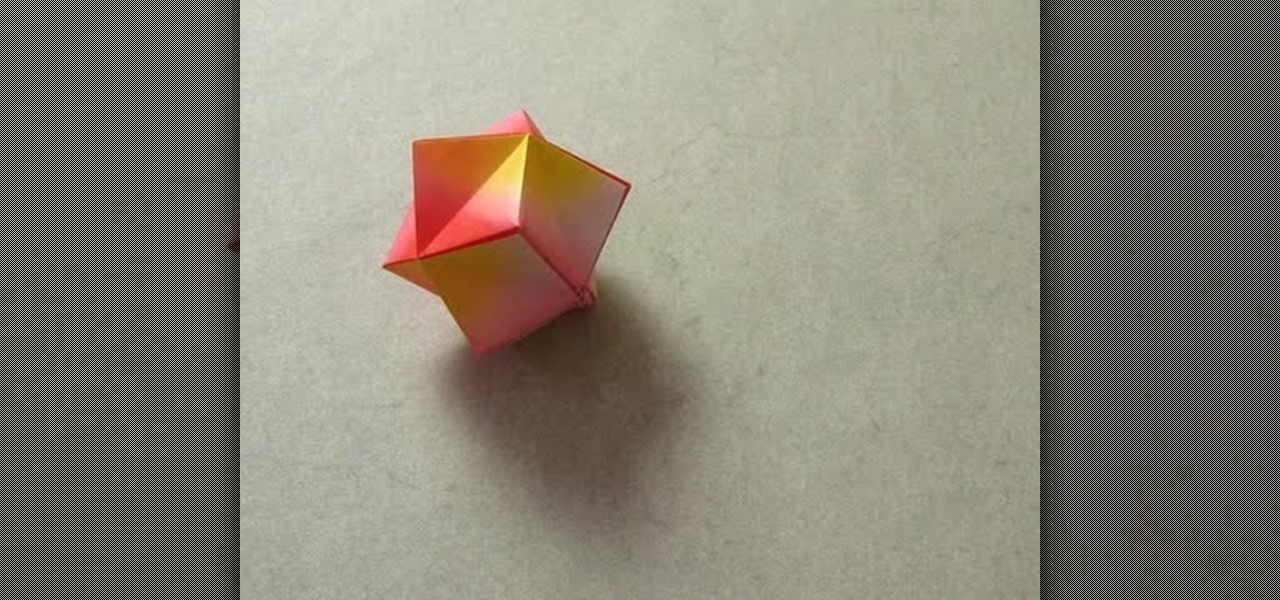
These adorable origami stellated octahedrons commonly provoke fits of jealousy within real stars, who envy their smooth folds and pretty peaks.
Taking professional photographs at night poses a whole new set of problems relative to taking pictures during the day. This four-part video is here to help, in great detail. It covers several topics, including subject selection, tools necessary, deterring depth of field, and all of the other things that you will have to do to take really good-looking photos at night.
This four-part video describes, in great detail, how to develop black-and-white 120 film. With photo labs becoming rarer by the day, knowing how to do this yourself will become increasing important if you want to continue to take and develop pictures with film. Developing 120 is a bit different than developing 35 millimeter, so if you can already do that still watching this video! Thankfully, the presenter demonstrates the process in full light. Bear in mind it will be very dark when you do t...
White balance is an important aspect of photography. Balance your camera correctly and you will take impressive pictures, balance it poorly and your photos will appear washed out or blurry.
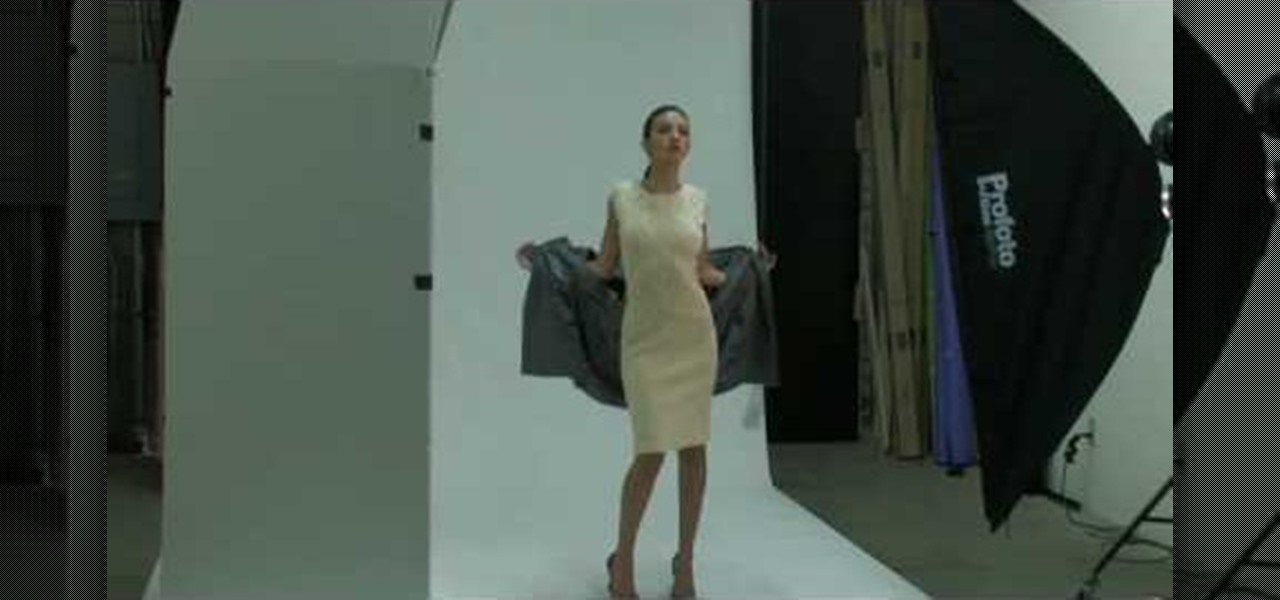
Lighting is very important to photography. The proper lighting can make your subject or scene appear in a totally new way. Whether you are adding, or eliminating shadow, using light to manipulate the way something looks, or just setting up for a flattering portrait, you will need to know some light basics. In this tutorial, Mark will show you how to set up lighting for a fantastic picture. You will learn seven different setups to make sure you have the right arrangement for your particular ne...
In this video, learn how to remove purple fringing from an image using Photoshop. Most people would not even notice this distortion in a photo but if you are a professional, you will need to know how to recognize and remove this tint.
In this Software video tutorial you will learn how to create a vector RSS icon in Illustrator. Open illustrator and open a new document. Select the ‘rounded rectangle tool’ from the rectangle menu. Click and drag to draw a rounded square. Select the gradient fill on the left side and change the color to orange on the right side and make it dark to light from top to bottom. Next grab the corner and turn it around 180 degrees. Move the picture to one side and select the ellipse tool. Draw a...
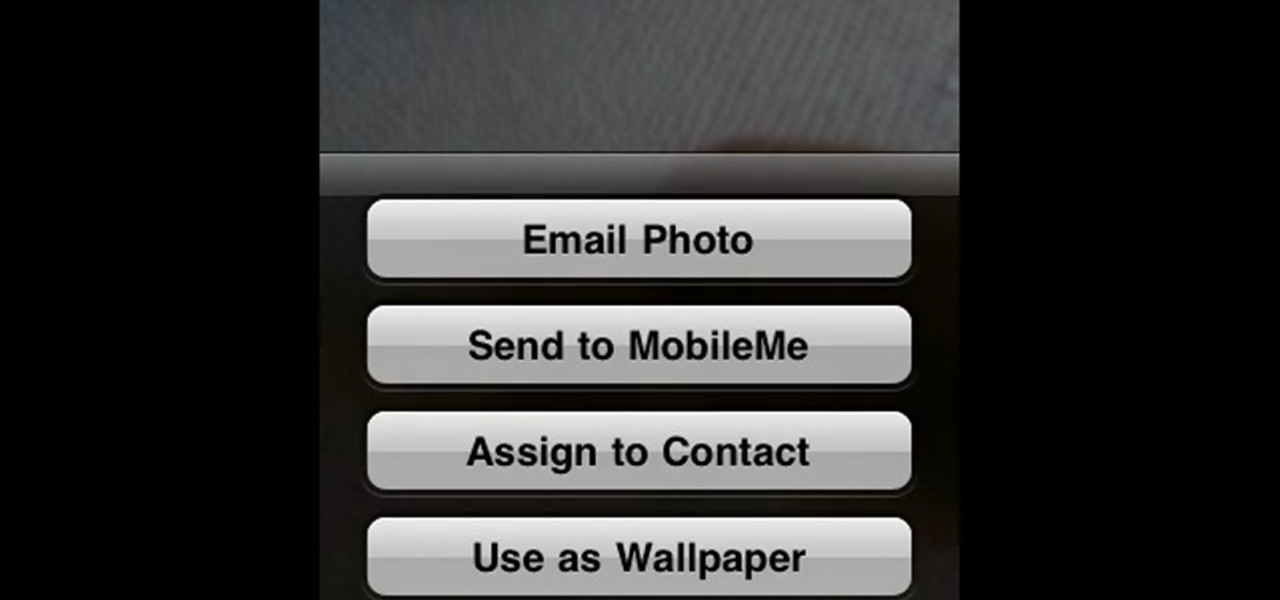
In this Electronics video tutorial you will learn how to Email photos from your iPhone. This is really very easy and simple to do and takes practically no time. On your iPhone go to the camera icon and tap on it. Then find a picture that you want to email. Then tap on the little icon on the lower left of the screen as shown in the video and then select email photo. Then you put in you want to send the photo to, type in a subject and add some text if you want. And the final step is to tap ‘s...
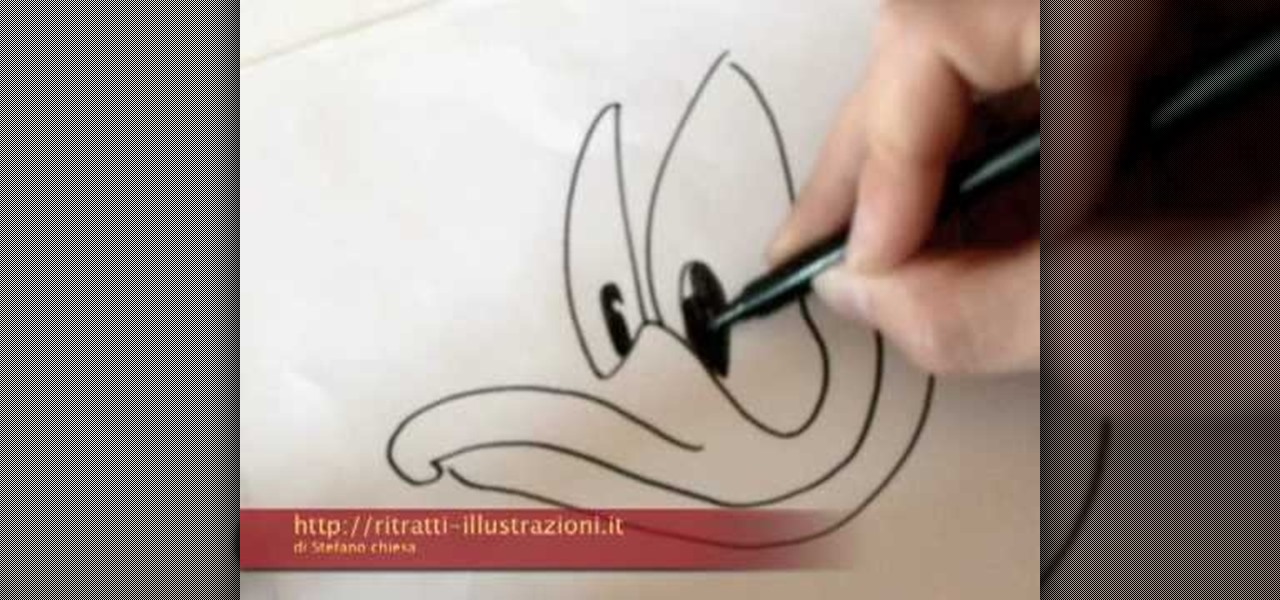
This video illustrate us how to draw Donald Duck. Here are the following steps: Step 1: First of all take sheet of paper, pencil and colors.
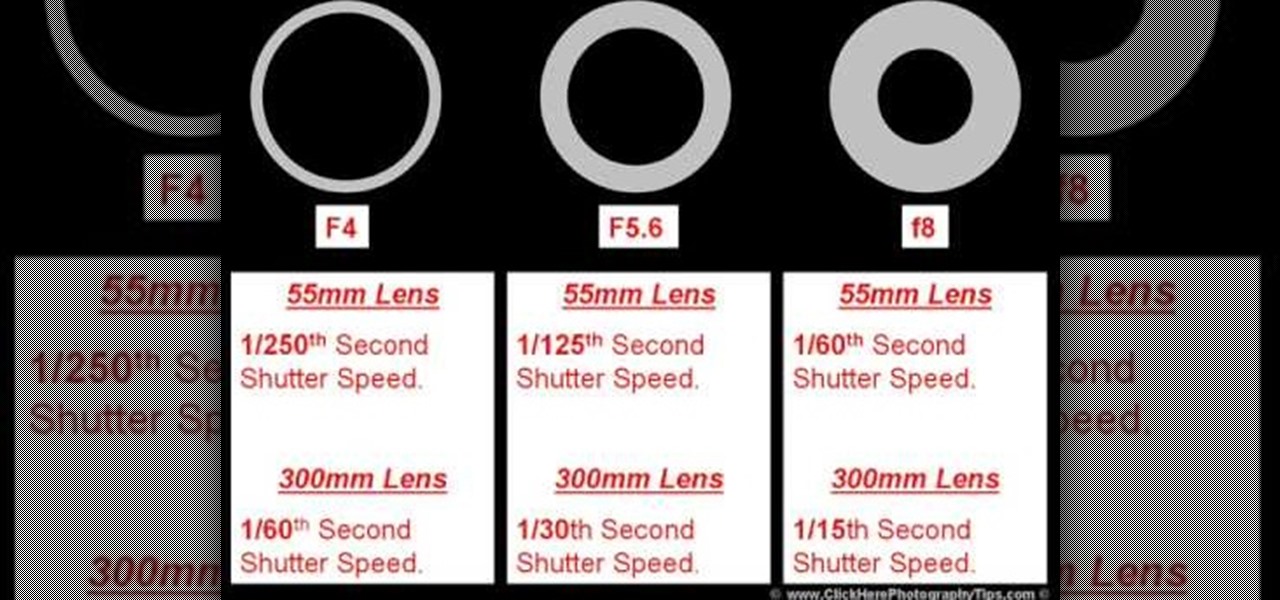
To understand and use depth of field you should realize that depth of field is the area behind and in front of your focusing point - the thing or object you are shooting. Depth of field is determined by apreture or f -stop, the shutter speed of your camera and the focal length of the lens. If you have the right combination of shutter speed and the f-stop, your picture will have the right exposure. If you change either the f-stop or the shutter, you need to remember to adjust the other! Differ...
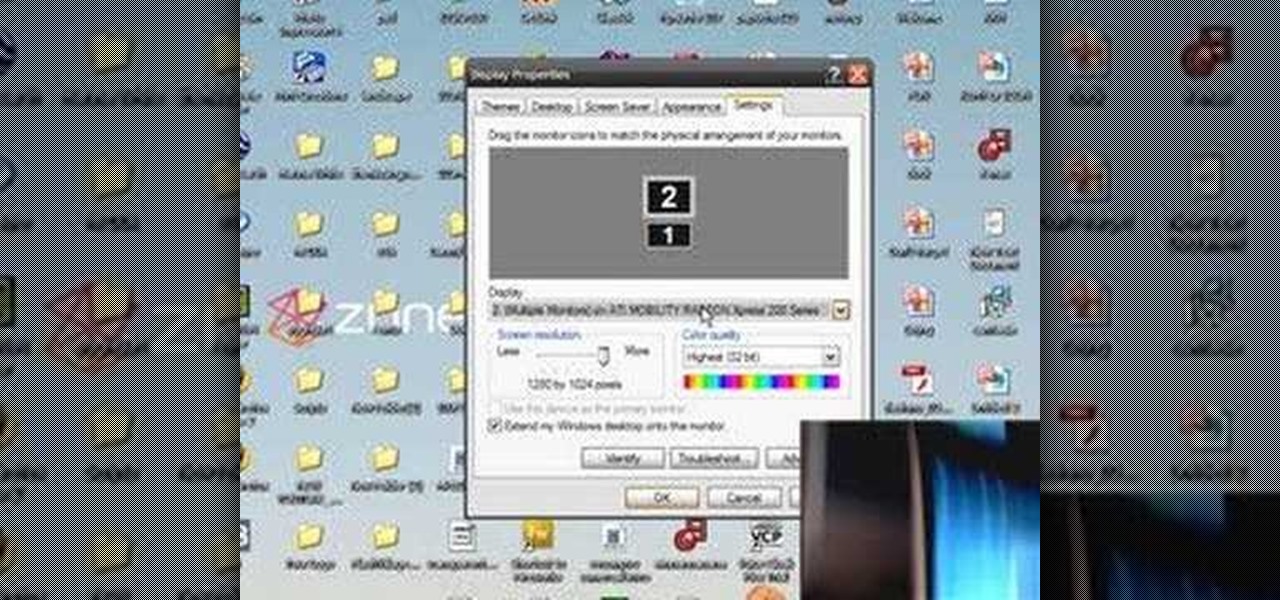
In your computer you can setup up two monitors on the same screen. This is the dual monitor setup which will give you more space to work with. So if your desktop is cluttered with icons and other program shortcuts, then you can use dual monitors. To setup a dual monitor system, the first thing you will need is two monitors. Now right click no your desktop and select properties from the menu. In the properties window go to the settings tab. If you see two monitor screen pictures over there the...
This video illustrate us how to draw 3D cartoon shark. Here are the following steps.step 1: First of all take a sheet of paper and pencil.Step 2: draw a U shape structure and again draw a U shape structure above the previous on representing the body of the shark.Step 2: Now from one end of the double U draw a V shape representing the front body of the shark, within the face draw two eyes and jaws of the shark.Step 3: Now at other end draw a tail and from the side of the body draw a triangle a...
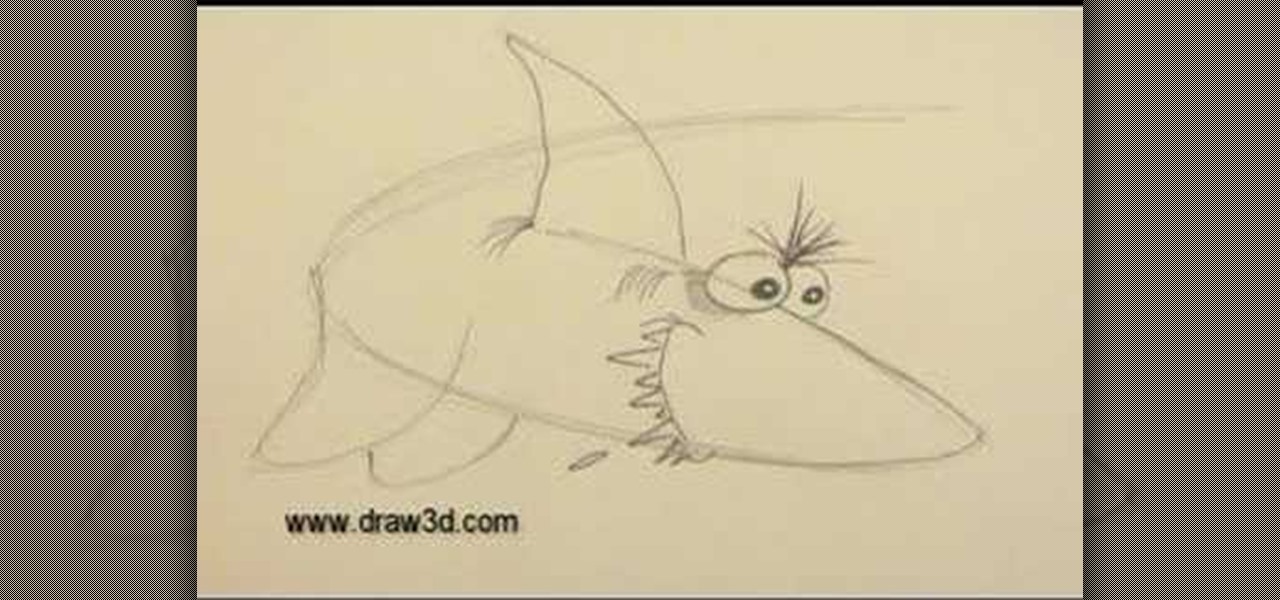
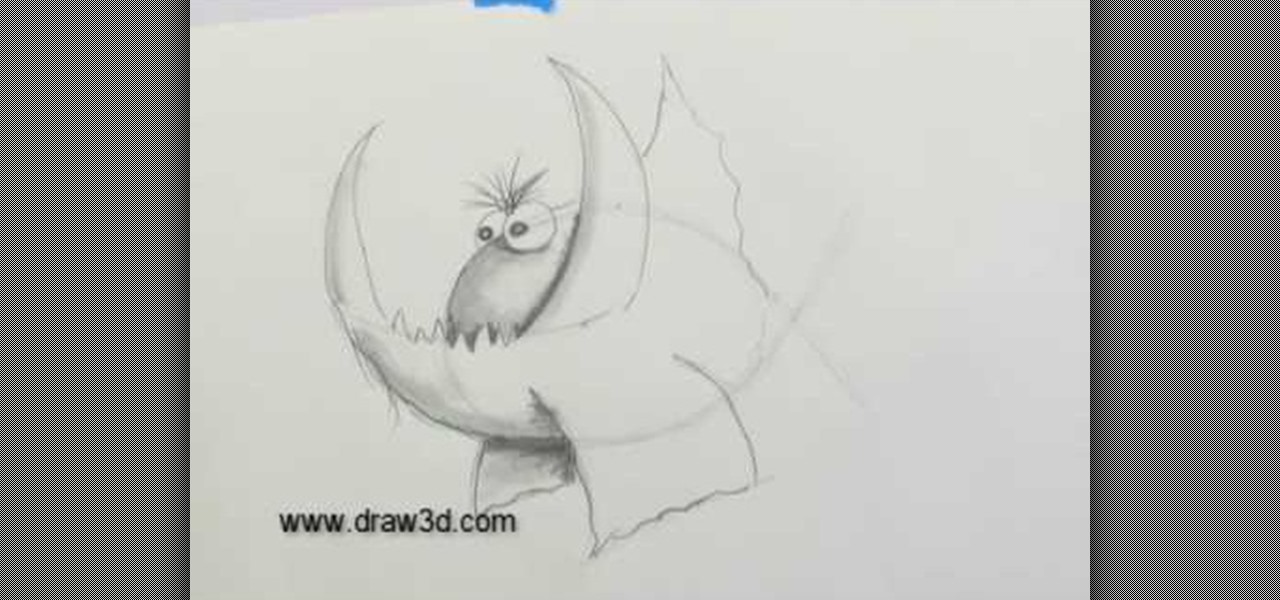
This video illustrate how to draw a 3D fanged fish. Here are the following steps.Step 1: Take a sheet of paper and pencil and start drawing a circle forming the face of the fish.Step 2: Now in the middle of the circle draw an wavy line showing the jaws of the fish.Step 3:Now draw two small circle on the boundary of the circle forming the eyes of the fish.Step 4: Now from the jaws draw two fins in opposite direction to each other.Step 5: Now draw Two fans beneath the face showing the back fins...
In this how-to video, you will learn how to make a paper snowflake. This is great for the winter. The best way to make a good snowflake is with the way you fold it. Start off with a square piece of paper. Fold the paper into a triangle. Now, fold the triangle along the height into another triangle. Take one of the lower corners and fold it 60 degrees. Fold the other side the remaining 30 degrees. Snip off the trails with scissors. Now, cut patterns into the sides of the paper. Unfold and then...
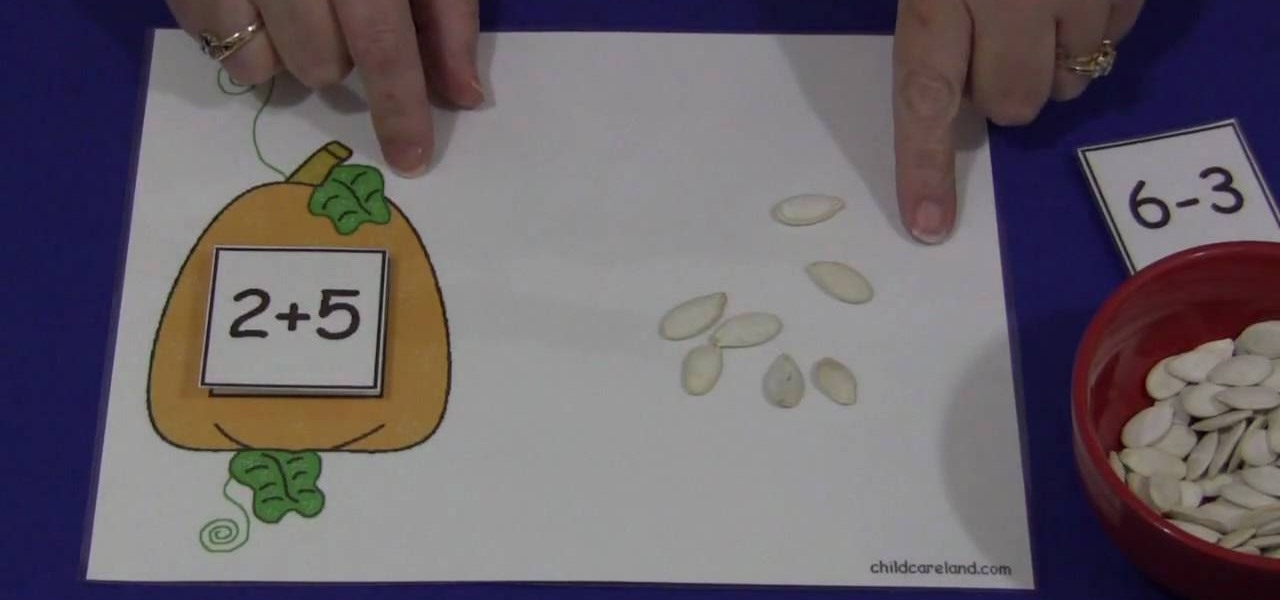
In this video, we are shown how to create and utilize a pumpkin-themed mat and some pumpkin seeds in order to teach young children how to count. Using a mat with a picture of a pumpkin on it, as described in the video, you should have a few squares with numbers on it which the children can put on the mat. Then, using a bowl of pumpkin seeds, have the child pick up the seeds and place them on the mat, having them pick the correct number of seeds as correspond to the number of the square they c...
Watch this video and learn how to protect your identity on the internet. This clip will help you learn how to blur out your face and alter your voice when posting videos on the web, where your identity is an important secret. Stay anonymous while portraying your opinions. This software can also be used to avoid release issues with strangers in the backgrounds of your videos. Preventing passers by from having there picture posted with your opinions opening you up for legal action. This can als...
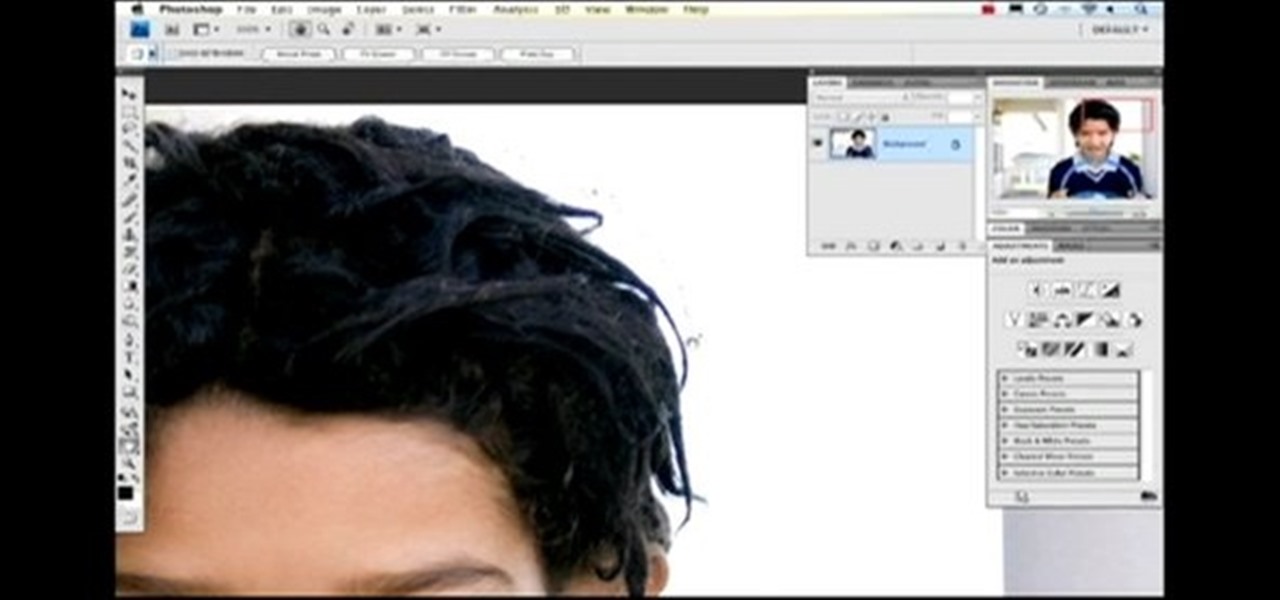
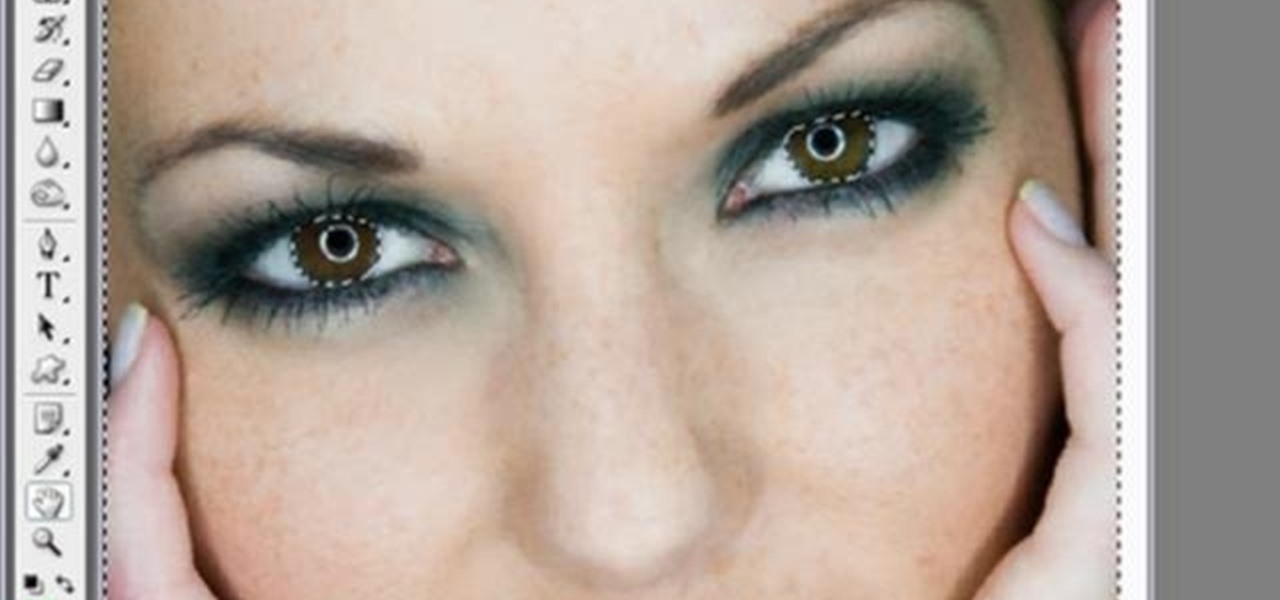
Yanik Chauvin continues his online photo school with this video on how to change eye color in Photoshop. Yanik makes this complicated program seem simple as he shows exactly what steps to take to make realistic color change in the eyes of a person. He creates a layer that will be used to edit the eyes, then zooms in on and selects them. He picks a nice green color to use, shows what settings to use to make it look realistic, then applies final touches by changing the opacity of the new color....
In this video tutorial, viewers will learn how to change text alignment and formatting in Microsoft Word 2007. To format or align the text, you must high light it first. Once highlighted, users are able format the text in many ways. The formatting options are: font type, font size, bold, italics, underline, strike-through, subscript, superscript and change case. The alignment options are: right align, center, left align and line spacing. Users also learn how to add pictures and position the t...
Now you can easily animate gradient image using Flash. For this you need to open flash, and then import an image which you want to work with. Create a new layer. Draw a rectangular. Go to color option and choose liner. You have to keep alpha in one side of gradient. Ad few key frames and use motion tween. Now go to your picture. You also make the same key frames of that. So it will be regular. After watching this tutorial you will be able to make nice gradient animation using Flash.
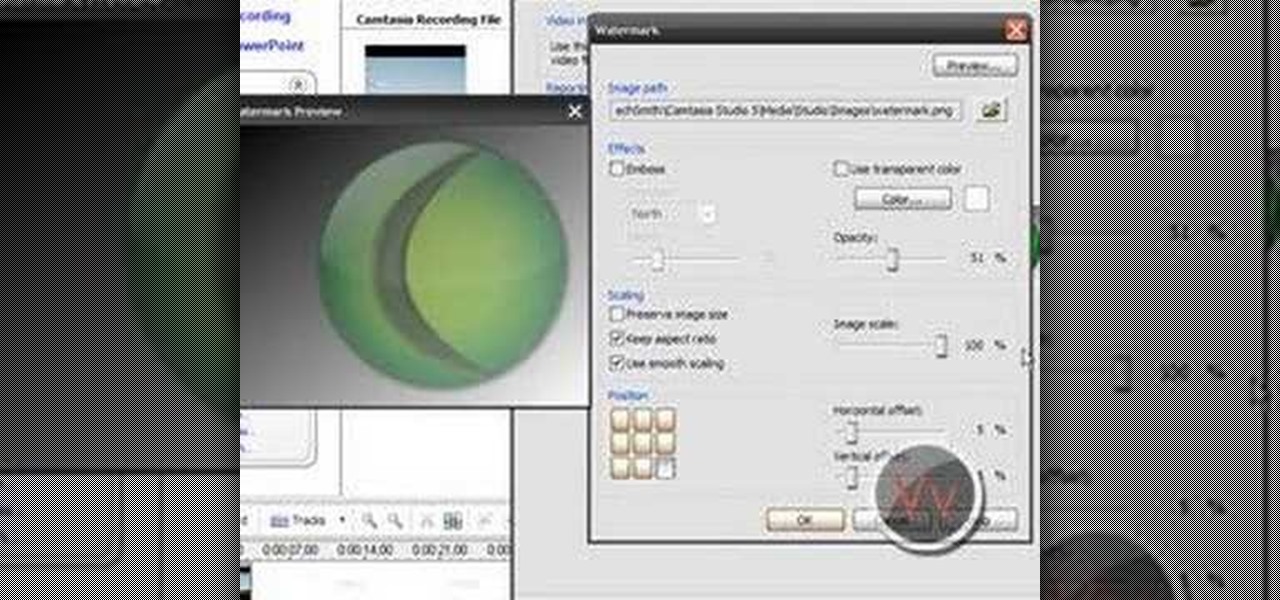
If you frequently use Camtasia software for Windows this is a great video for you! Camtasia is a screen video software program made for both Windows and Mac This video shows step-by-step how to upload a photo and create a moving profile image. It shows how you can upload your photo, how to open the photo in Camtasia, and how you can use Camtasia to create a moving profile picture. Also discussed is how you can upload your Camtasia videos onto Youtube! Just a wonderful video for those who use ...
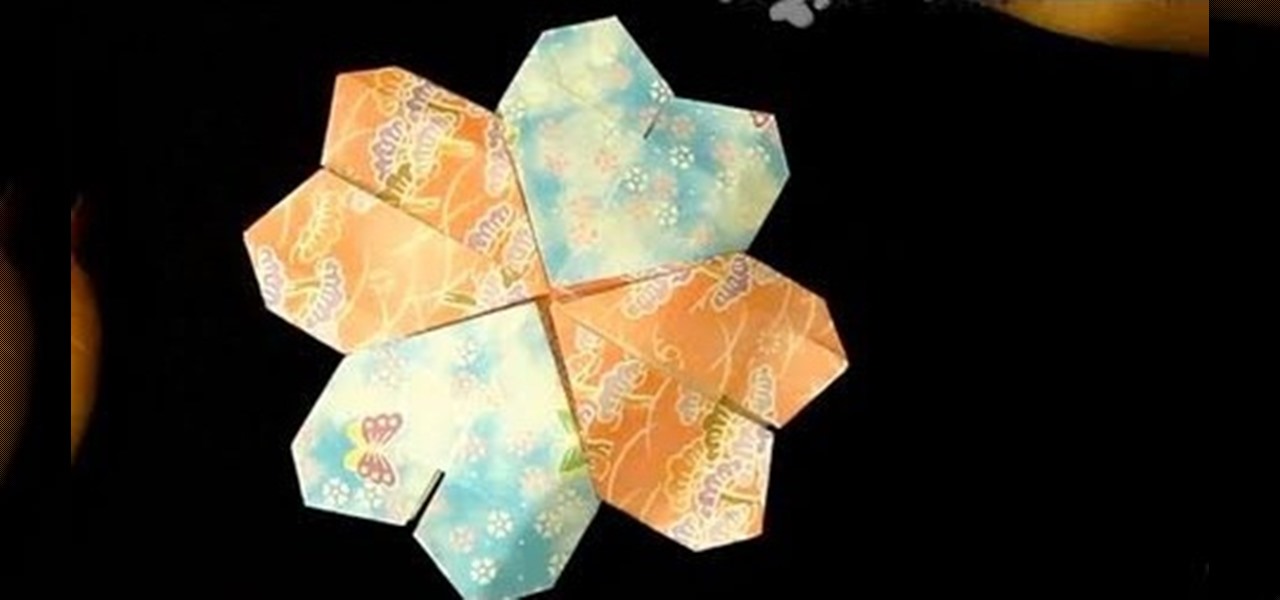
To fold an origami mandala heart you need to follow the steps below. First cut 2 triangles out of the paper you have, fold one of the triangles in half. Then, unfold the folded in half triangle and fold the top of the triangle down about two thirds of the paper. In this stage you will be making folds 3 and 4. Next, fold both of the side corners of the paper up to the top, creating the picture below. Now you will make folds 5 and 6. Then, turn the paper around. Now just fold the top flaps into...
In this quick video, you are shown (and told) in a very simple way how to change your background or screen saver on your Mac computer that runs OS X. This is very simple to do, just click the apple, go to System Preferences, then click Desktop and Screen Saver. From there, you will be able to customize your background or screen saver, whether you choose to use the ones that came with your Mac, or your own pictures or downloads. This is a great video for new or inexperienced Mac users.
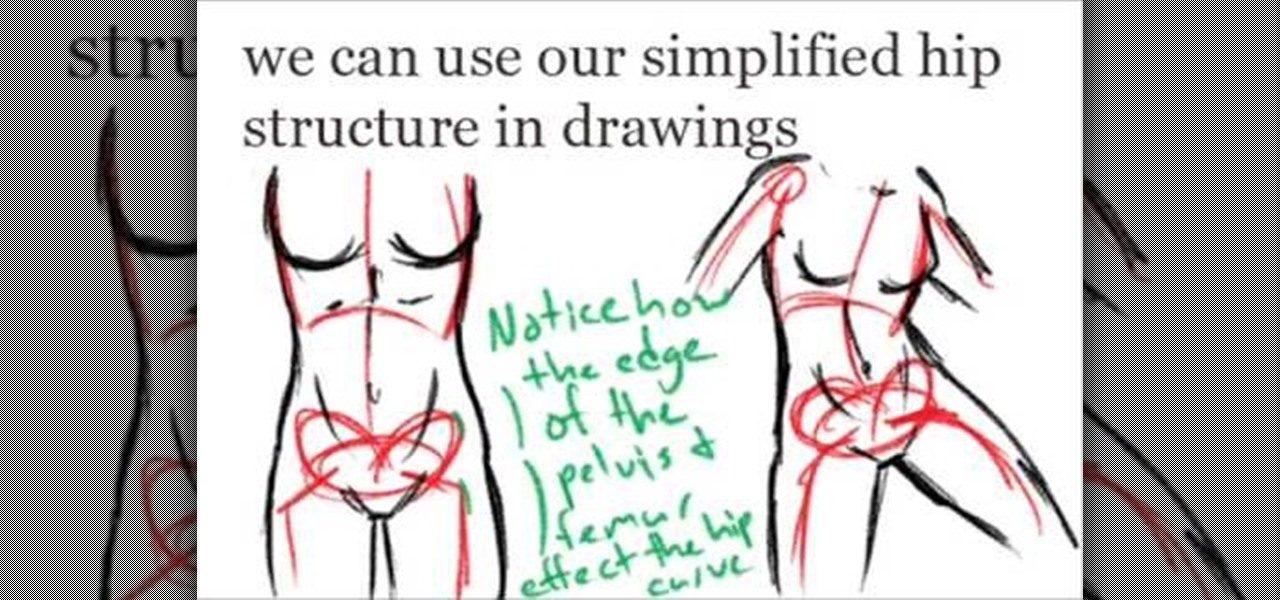
This video, which gives tips on drawing realistic hips, is helpful to people learning to draw the human form. The video starts by showing examples of bad drawings of hips and explains that these are how you should not be drawing them. It then shows a realistic black line picture of the pelvis bone on which the presenter has drawn a simplified version of it in a contrasting red color. He gives a simple description of his drawing, saying it is like an oval with butterfly wings coming from it. H...
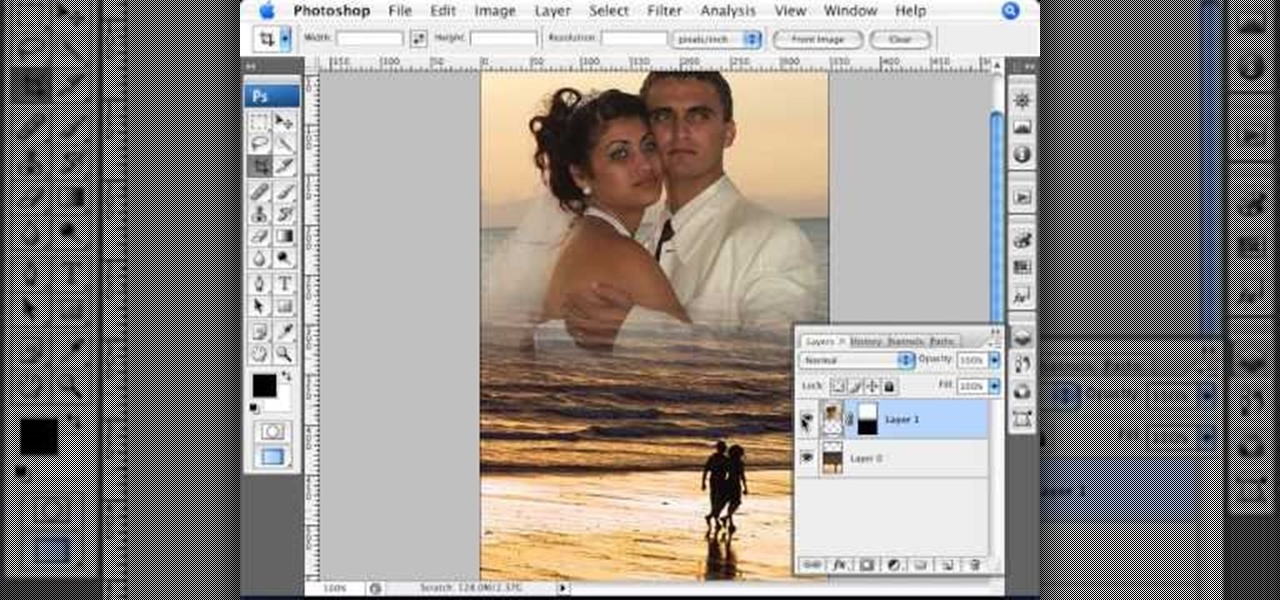
This video shows step by step instructions on how to make a movie poster on Photoshop. The author merges two pictures together beautifully of a newly wedded couple on the beach. It goes very into debt and is easy to follow, even for beginners. This Photoshop tutorial is mostly for Mac users. The language is very simple and not very complicated. The video is not that long, around seven minutes. At the end he even puts in his own finishing touches of color that makes the poster come alive.
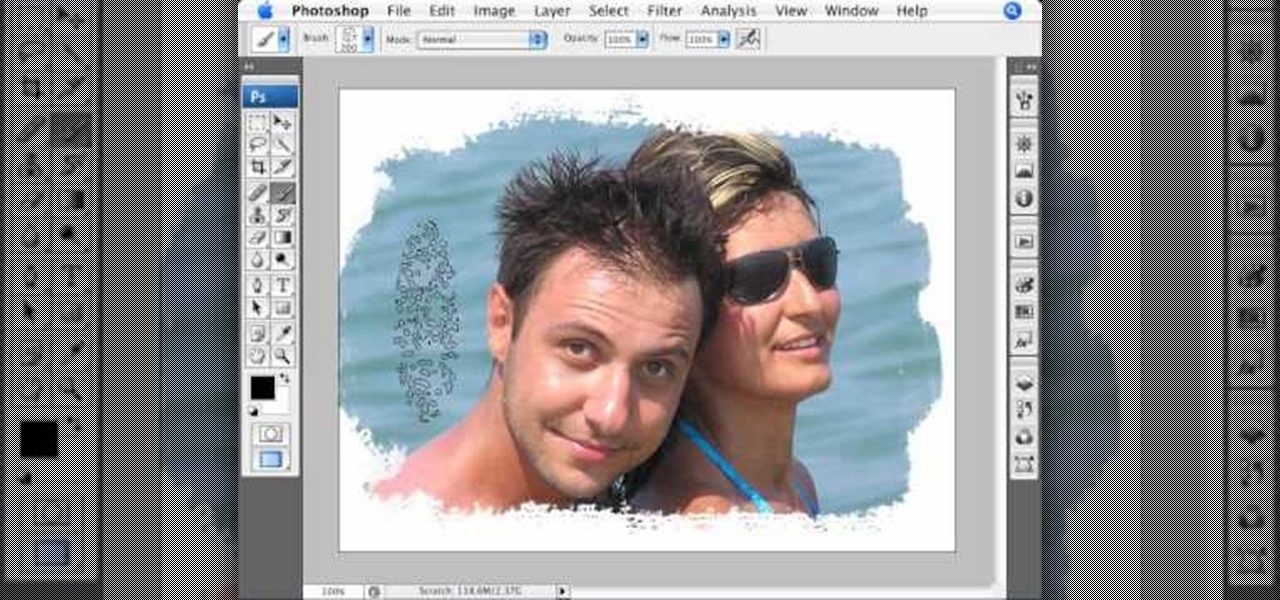
In this Photoshop tutorial, learn how to convert regular photos into works of art that create a painted on effect. By using the right brush tool, a regular picture can be made to look as though it was painted onto a canvas with real brush strokes. This tutorial shows us how to use different types of brush presets loaded in Photoshop in conjunction with a new layer to create a canvas effect. The result is photo converted into a painting.
In order to secure a PDF with a password when opened in Adobe Acrobat 9 Pro, press the secure button and go into password security settings. Here you can change on what versions of this software the file will run on, the next option asks which portion of the document is to be encrypted when a password is placed. Further below here is where you actually choose the password, this ensures that only people who know the password will be able to see the contents of the document. Below this is the d...
Watch this video to learn how to make a tank top or shirt with lace and a print. You need a template with the picture of your choice, some lace, some fabric glue and fabric pins or safety pins, and a flat board about the size of a meal tray. Slide the board into the shirt. Put the template on top of the lace, then pin it in place. Next cut out the lace along the lines of the template. Arrange the lace on top of the shirt in the desired shape and glue it in place. Wait 48 hours before washing....