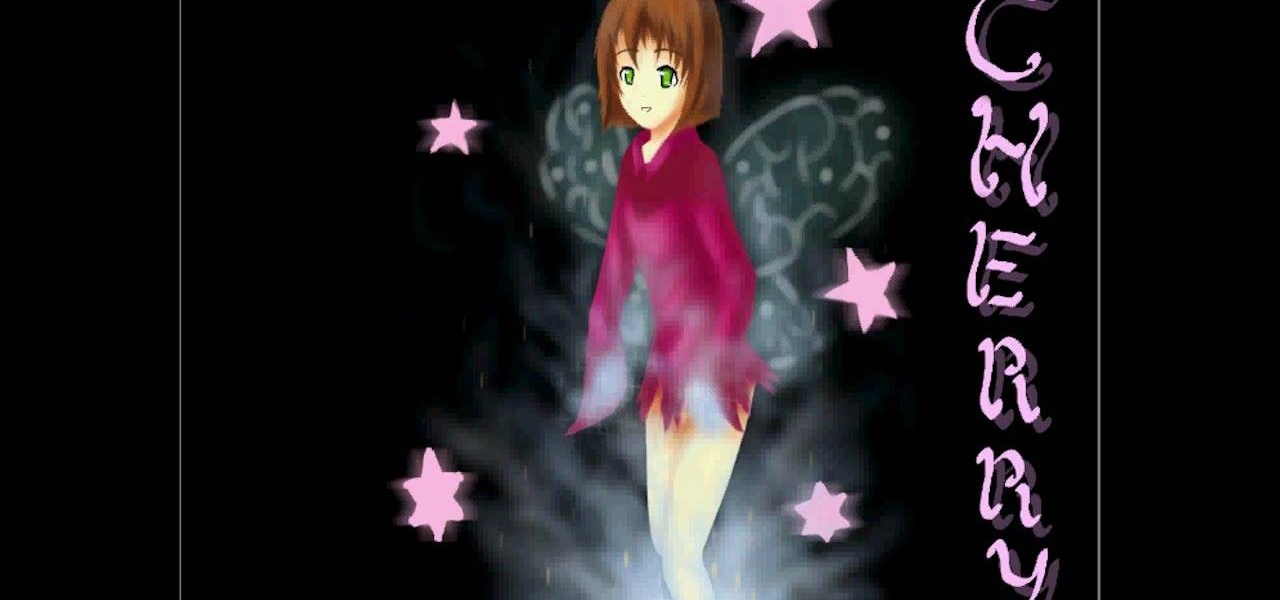
In this video, we learn how to draw a cherry fairy. First, sketch the entire picture before you start to draw in any detail. After this, draw in darker lines where you want the features of the body to go, then start to add in features of the face. Next, add in color to the face and to the outfit of the fairy. Make sure you give her hair and bangs that are surrounding her face as well. Once you have the color completed, create a white light coming from the bottom of the fairy and going up into...
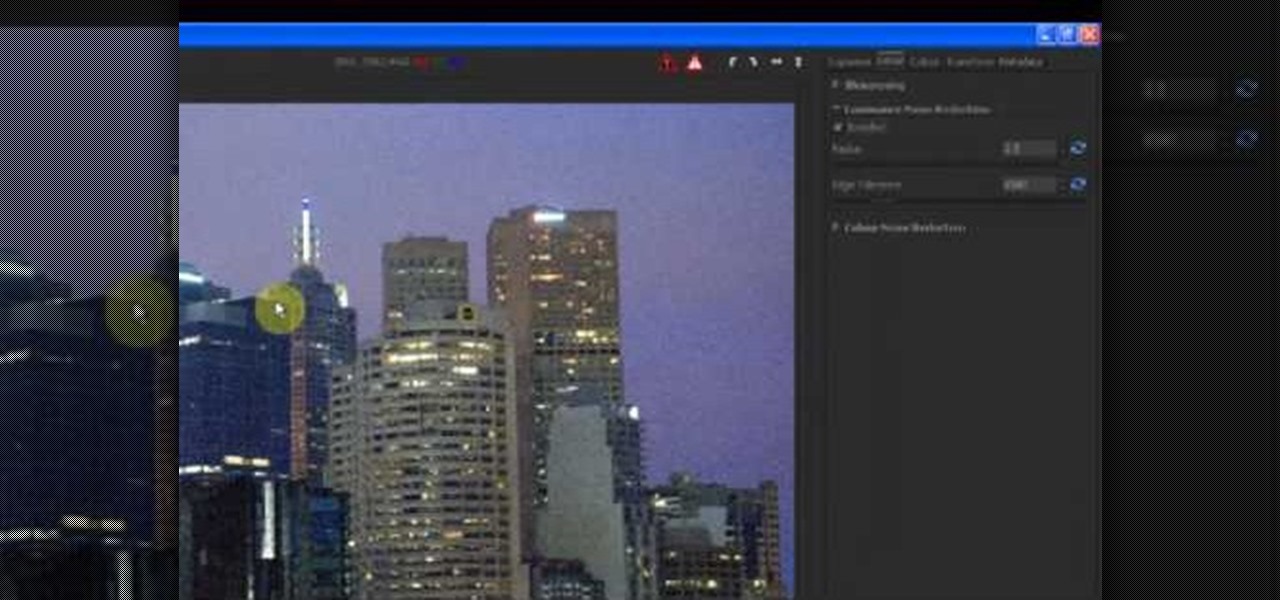
In this tutorial, we learn how to reduce noise in RAW Therapee. First, open up your photo in the software that you want to reduce the noise on. Then, open up the detailed view of the photo and click on then click on the detail button. Through here, you can sharpen the image or you can change the noise reduction for the color and luminance. Click on the drop down menu for the luminance and then enable to checked section. Then, move the edge tolerance to its maximum to see the full effect on th...
In this video, we learn how to draw shadows in manga. When you are drawing shadows, you want to think in 3D. When you show the lights and shadowing, it's like you are drawing something you see a photo of instead of just a drawing on a piece of paper. Draw the shadows where you want the position of the light to be opposite of. If the shadow is on one side of the face, this would mean that the source of light is coming from the opposite side of the face. Use real pictures to figure out how to s...
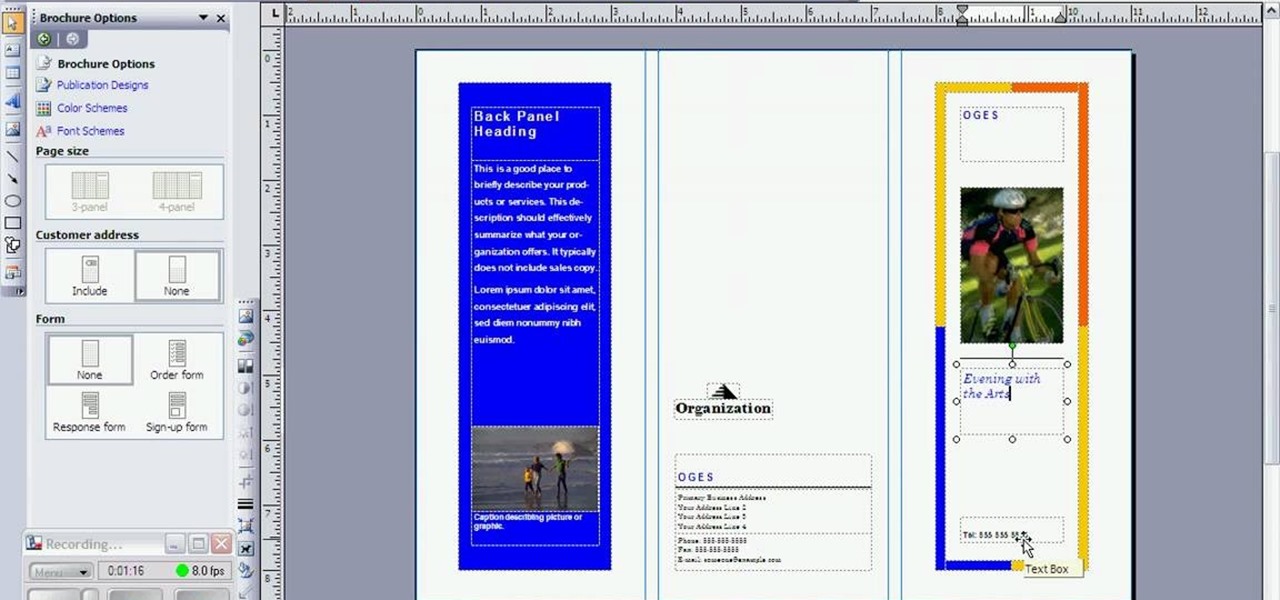
A simple tutorial video that demonstrates the procedure for creating a brochure quickly and easily using the Microsoft Publisher program, which is shipped as a part of the Microsoft Office Suite.

In this video, we learn how to draw Maplestory Bigfoot. Start out by drawing the outline of the character, then start to draw on the details. Once you have finished the outline of the entire character, start to use a darker pencil or pen to make it darker. Add in shading on different parts to make it look 3D, then add in lines to make the character look more realistic. Add as many details as you would like, then when you are finished you can color in the picture as you would like. You can rep...
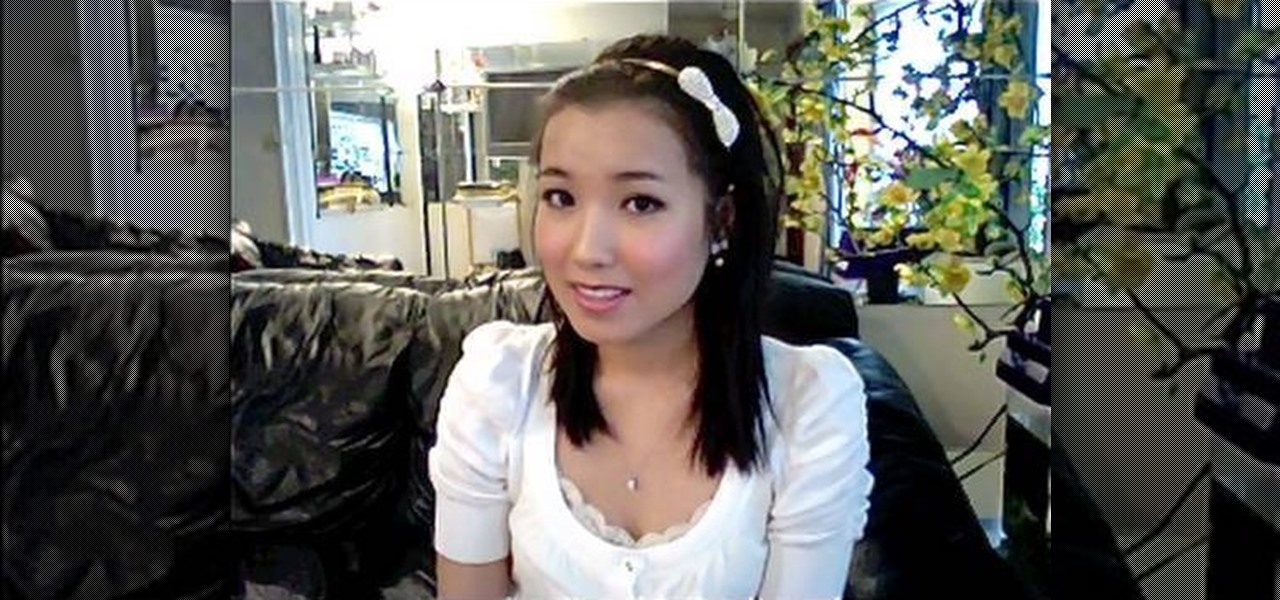
We don't think we're overexaggerating when we say that "Gossip Girl" singlehandedly started a massive hairband trend. Or, rather, that Miss Blair Waldorf started this fashion accessory love. For the greater portion of us, though, who haven't worn headbands since we were forced to do so for picture day in 4th grade, slipping one on seems incongruent and childish.

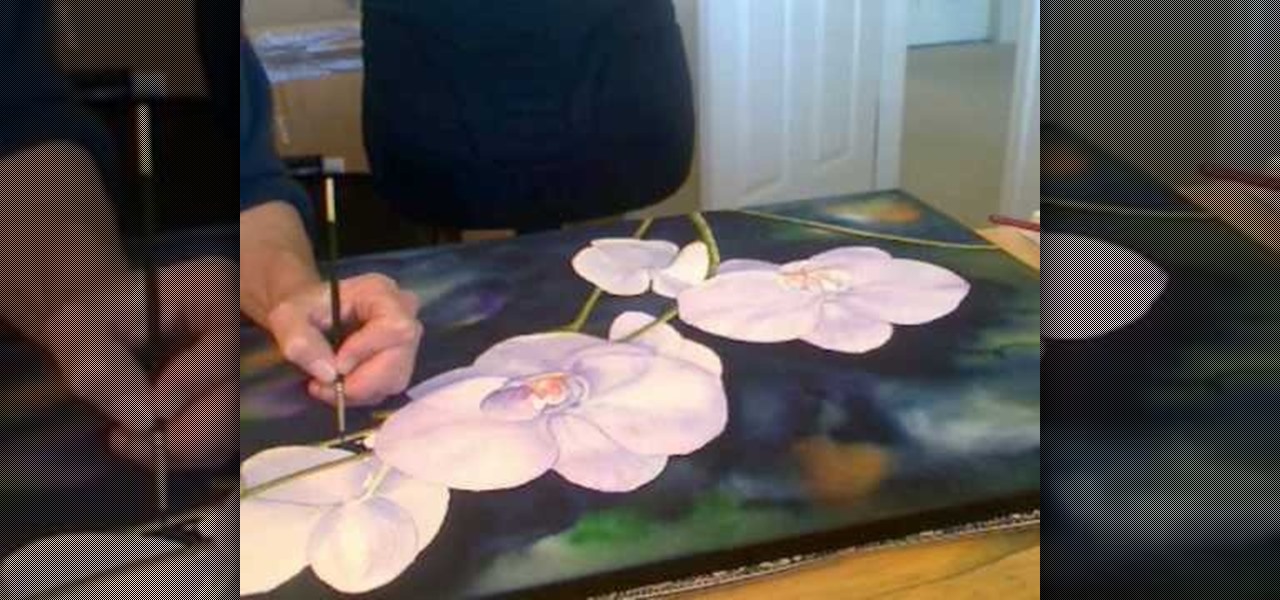
In this video, we learn how to pain orchid flowers with watercolor paints. Start out by using a light lilac color on the petals. Use a thin brush to push the colors around on the picture so you have slight shading around the different petals. Use a darker purple color in the middle of the flower. Then, use a yellow color in the very middle. Add in a green leaf and stem on the bottom of the flower. Use a paper towel to smudge any excess moisture or water off of the flower to make it more prist...
This video will show you some methods to create a fake Loch Ness monster photo. You will need a camera or a camera phone for this project. One method of faking a sea monster picture involves creating a clay model of a head and a neck of a sea monster and holding it underwater. The outline of your hand holding the clay will serve as the body of the monster. Another method which can be used to fake a sea monster can be done using a clothes hanger and holding it underwater. The hook of the hange...
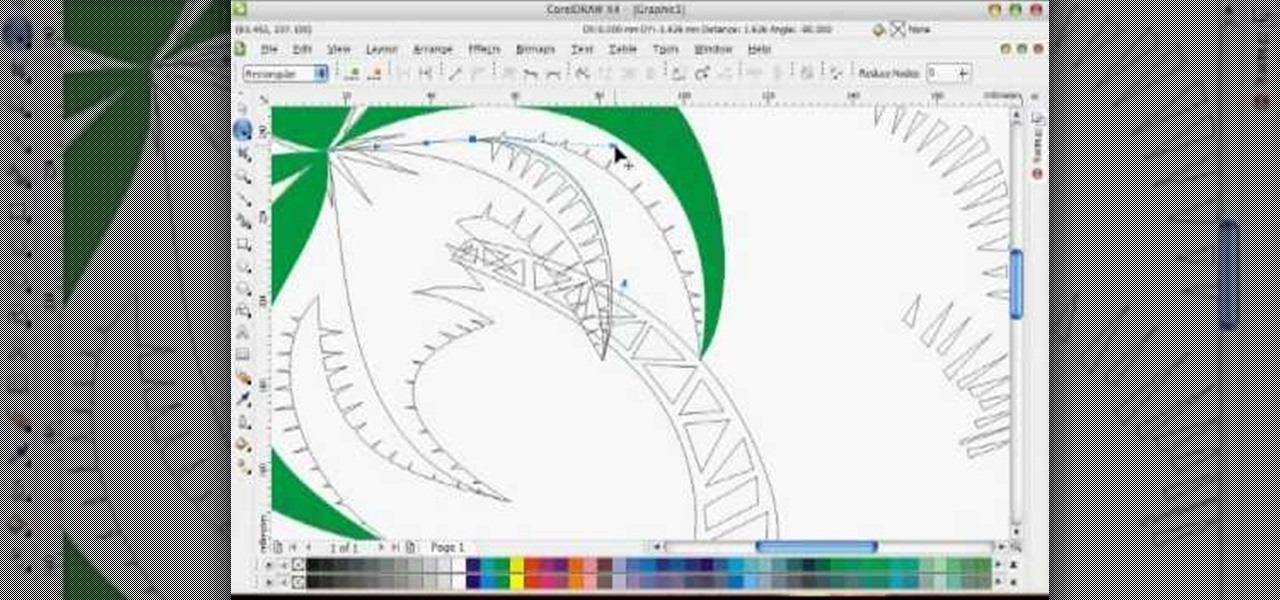
In this tutorial, we learn how to draw a vector art palm tree in CorelDraw X4. Start off in the CorelDraw program and create the base of the tree with a drawing tool in black. After this, draw small triangles inside of the base of the tree and then draw the leaves and branches of the palm tree. Fill this in with small spikes and then erase the middle nodes. From here, use a shaping tool to make the spikes on the palm tree more rounded and lifelike. After you do this, start to color in the ent...
In this tutorial, we learn how to create a Lomo effect in Photoshop. This is a contrast that gives the photo a "cool" vibe and change up the effect that you see. First, load up your picture into Photoshop and then go to adjustments, then curve. From here, add a slight s-curve and then add a green channel with the same s-curve that you just created. Go to the blue channel and create the opposite s-channel from the others, then click "ok". Now, go to layer, new adjustment layer, then gradient m...
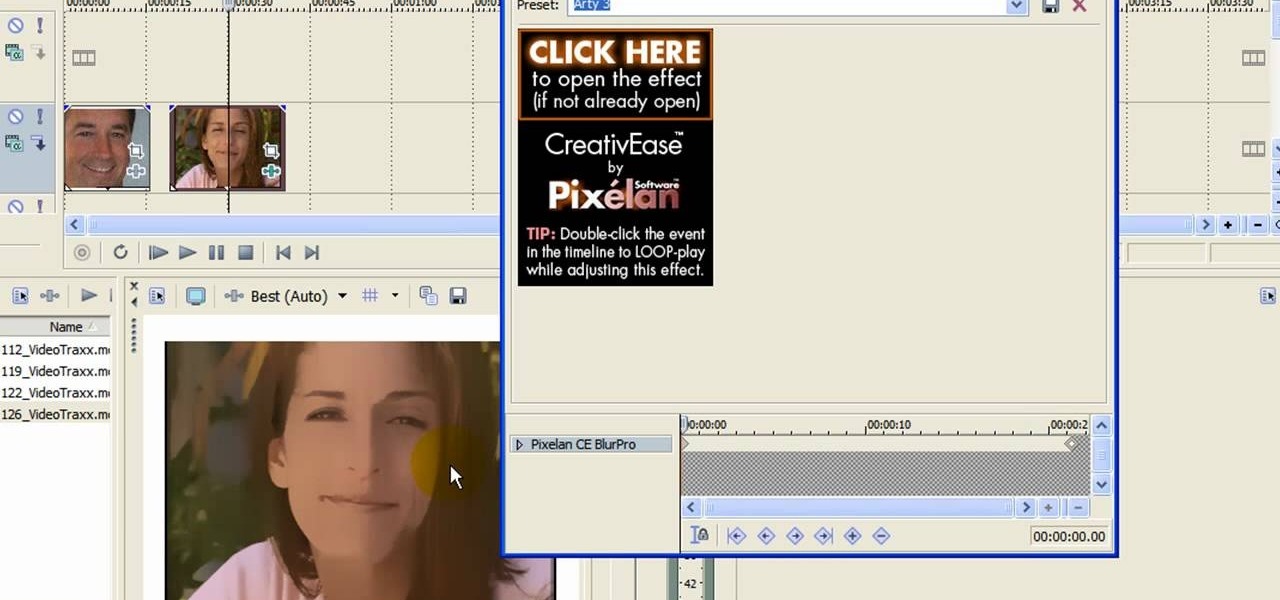
First click on Video Event Fx, it will let you select the plug-ins that you have. Now select pixelan CE blurpro and click on OK. Now select remove blemishes 1 in preset menu. It will remove the first set of blemishes from the video now go for the blemishes 2 and then go for the blemishes 3. Now you can see the difference by playing that video. If you choose arty 3, it will make the pictures of the video as cartoony. Now go again for the blemishes 3, it will make the video even more better. Yo...
Kim Kardashian knows her way around a smokey eye. Like, sister could put her makeup on in the dark and still be the hottest thing on the red carpet. So it goes without saying that we often find ourselves oogling her pictures and finding inspiration in them for our own smokey eyes.
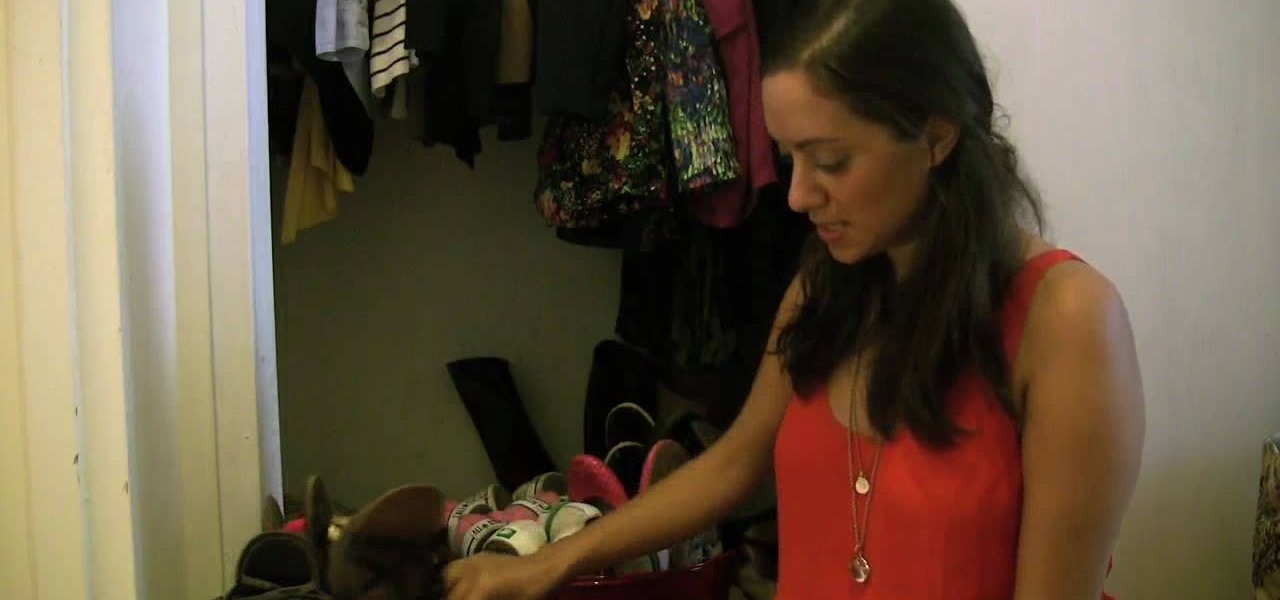
When you live in a small apartment with a nonexistent closet it's easy for organization to go out the window and your shoes and clothes to go anywhere they land after you take them off. But there's a better way to store your shoes, ladies.
When you think about french fries, you probably start picturing greasy strips of potatoes, deep fried and crispy to perfection. But who ever said french fries had to be made out of potatoes?
Michael Jackson might be the single most recognizable singer in history. Whether pre or post-Vitiligo, you still know him and have some reaction the second you see a picture oh him. The same applies to this cool Xbox 360 Avatar, which this video will show you exactly how to create.
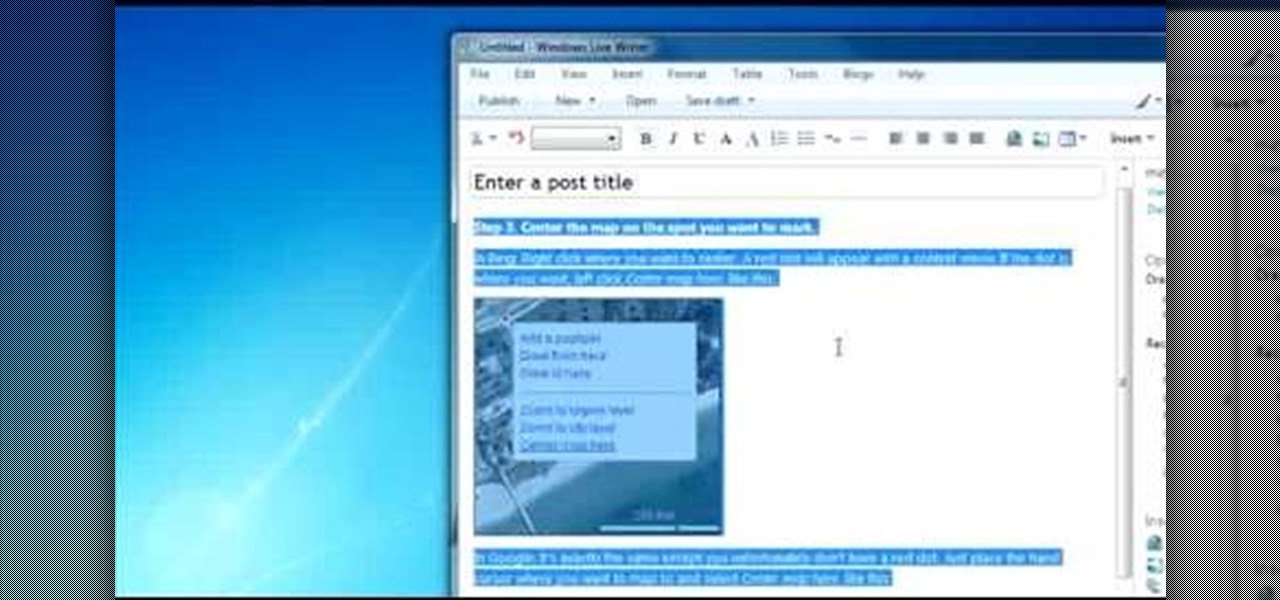
How you can use paste special. So when you copy anything from a web browser inclusive pictures and when you paste it like in OpenOffice writer then you will see it is pasted as same as was in web browser but with some lines and some unwanted stuffs so if you don't want these things, you have to paste it special. So to this go to edit and choose paste special now there will be four options to choose like unformatted text, html format etc. so if you choose
You can use MMS and Tethering on the iPhone 3GS. So first go to the settings and there you have to click on general and then go to network. there you can see Cellular data network, VPN, internet tethering etc.
In this video, we learn how to convert an image into a sketch in Photoshop. First, open up Photoshop and open the picture you want to convert. Now, click the layer and unlock the background. After this, go to "image", "adjustments", and remove all the saturation from the photo so it's black and white. Then, duplicate this and invert it by going back to the adjustments section. Now, go on the top of the layers tab and select "color dodge" from the drop down menu. Now, go to "filter", "other", ...
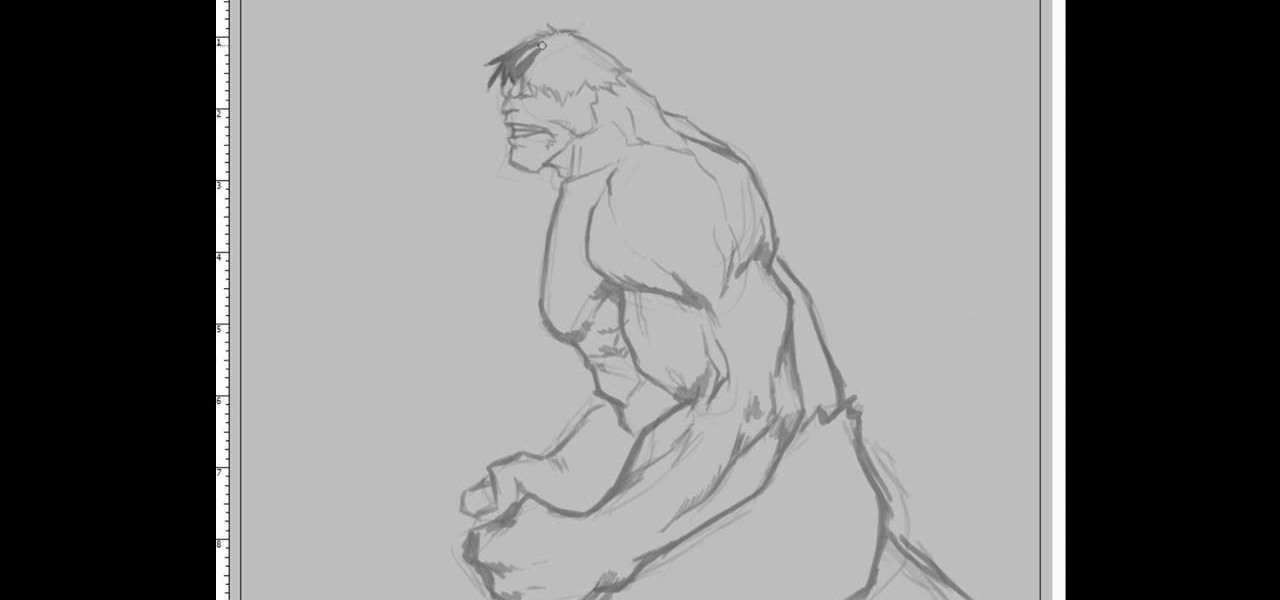
The Incredible Hulk, the result of Bruce Banner being exposed to an intense amount of Gamma Rays. Gets stronger the more you hurt him, and can break tanks in half no sweat. Wouldn't you like to be able to draw the green giant? In this video you will learn how to draw The Incredible Hulk from a side view, watch him start from the outline all the way down to the coloring of the finished picture.
Have you ever wanted to prank your friends by showing pictures of them naked? By learning these easy graphics editing techniques in Photoshop, you can quickly make people shirtless or nude in fake photos.
Desktop shortcuts are a great way of making the programs you use a lot more accessible, but today many PC users overuse their desktop space and have icons covering over half the screen, including the one for a picture of a dog they looked at six months ago once. This prank is a great way to teach such a person a lesson, or any PC user who you have a problem with. It entails creating a new desktop shortcut with the name and icon of a commonly used program (the web browser works great) that ins...
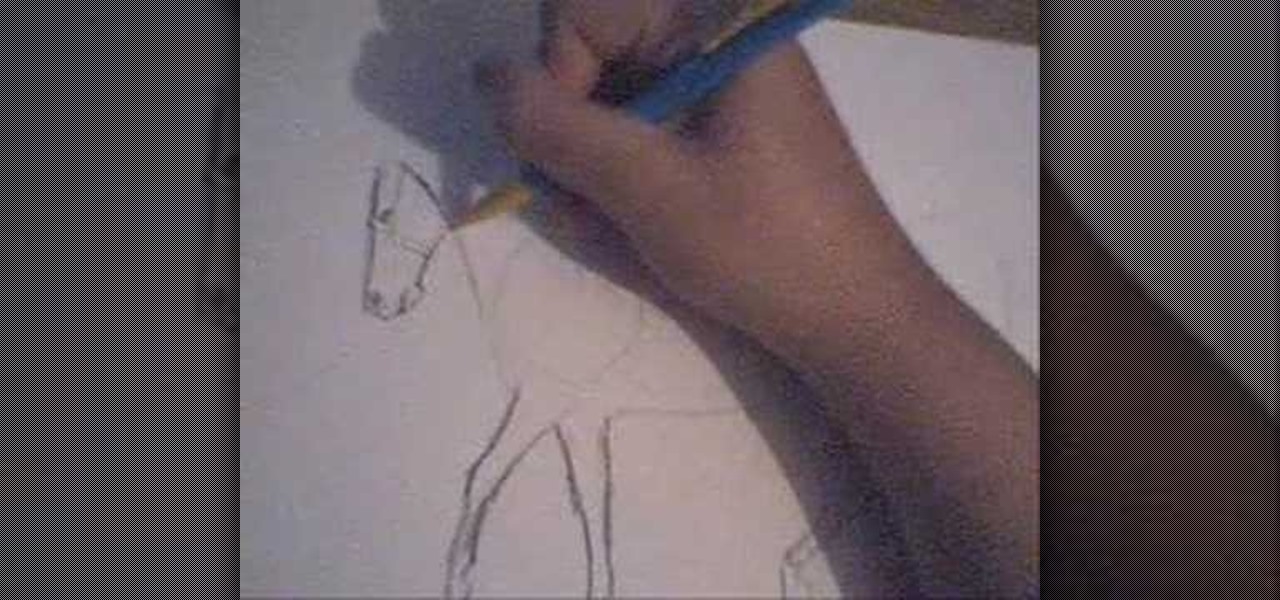
In this video, we learn how to draw a horse. First, draw the outline of the horse's body. Start with a circle for the head and wispy lines for the rest of the body. Make large shapes that connect to see where the mass of the body will be. Next, draw in the head, tail, back, and legs of the horse. After you have the outline finished, erased the lines inside of the picture. Now, draw in details on the horse. Add in lines to show where the hair is, then draw in the nose and eyes to the face. Als...
In this tutorial, we learn how to start using Twitter. First, you will want to log onto Twitter and click on the "sign up now" button. Enter in your information and then start your account. Now you can start to follow people and have them follow you as well. Enter in your status update in 140 characters or less. You can start to make friends and learn what the new trending topics are around the internet! Be careful to stay away from the spam accounts and change your background along with your...
If you'd like to play a nice little prank on someone, this next tutorial will show you a quick and easy one. This involves messing around with someone's computer and in no way will it harm or crash the computer. But, if the person you are playing the prank on gets mad easily, then you might think twice. It involves taking a picture of the shut down, restart, standy-by screen and placing it as the desktop screen. Check out the video and enjoy!
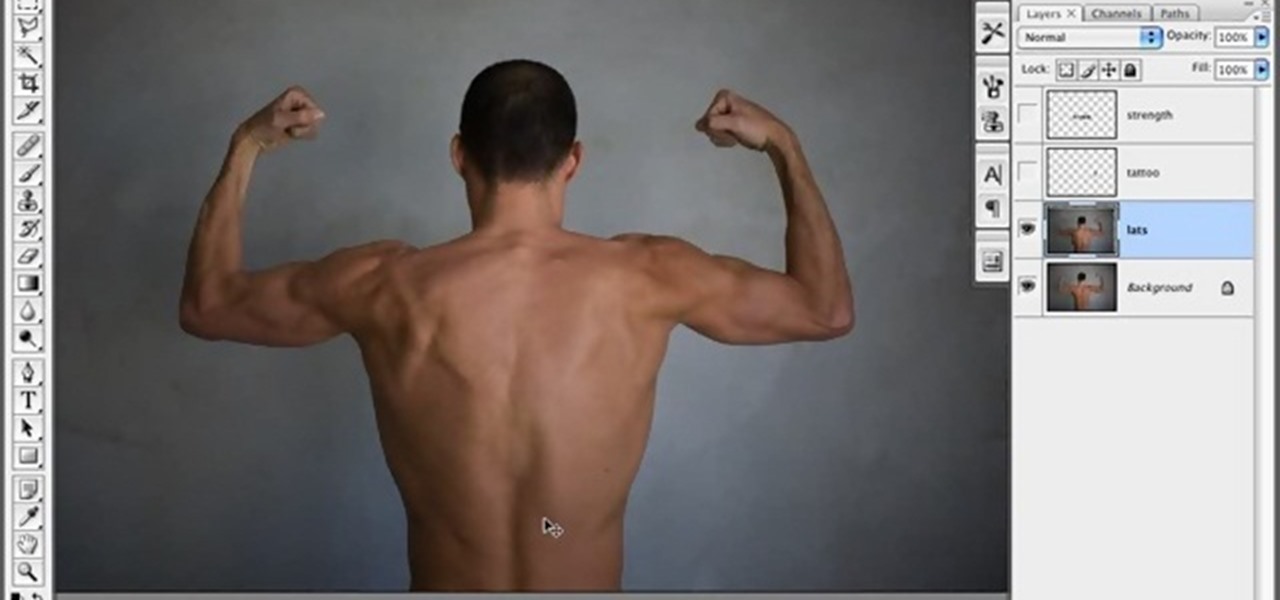
In this tutorial, we learn how to create a muscle man in Photoshop. Start off by opening up a picture with a man who has his back to the camera and is flexing his muscles. Now, use your tool to make his back look more broad and add more skin to the body. Copy the muscles that are on his back and reapply them to the sides. Use the blending tool to make this all look like the same body part. Add more definition to the abs, then apply more muscle to the upper arms as well. When you are done, the...
In this tutorial, we learn how to tune your car in Photoshop. First, open up the image of your car and then add in a picture of different wheels. Then, place these wheels over the existing ones on the car and blend them in, then change the color as you prefer. Do this for the wheels that you are able to see on the image. After this, lower the car and add in a bumper to the front of the car, importing images in from various sources. Continue to add in parts to the vehicle, using shading and bl...
In this tutorial, we learn how to draw a daffodil for St. David's Day. Start off by drawing a circle to measure out where all of the different petals are going to go, then draw a circle in the middle you know where the middle will go. Next, start to draw out the petals onto the circle. After this, draw the middle of the daffodil with the seeds that are in the middle. After this, draw the lines that are in the middle of the leaves. You might want to use a real flower for a reference picture on...
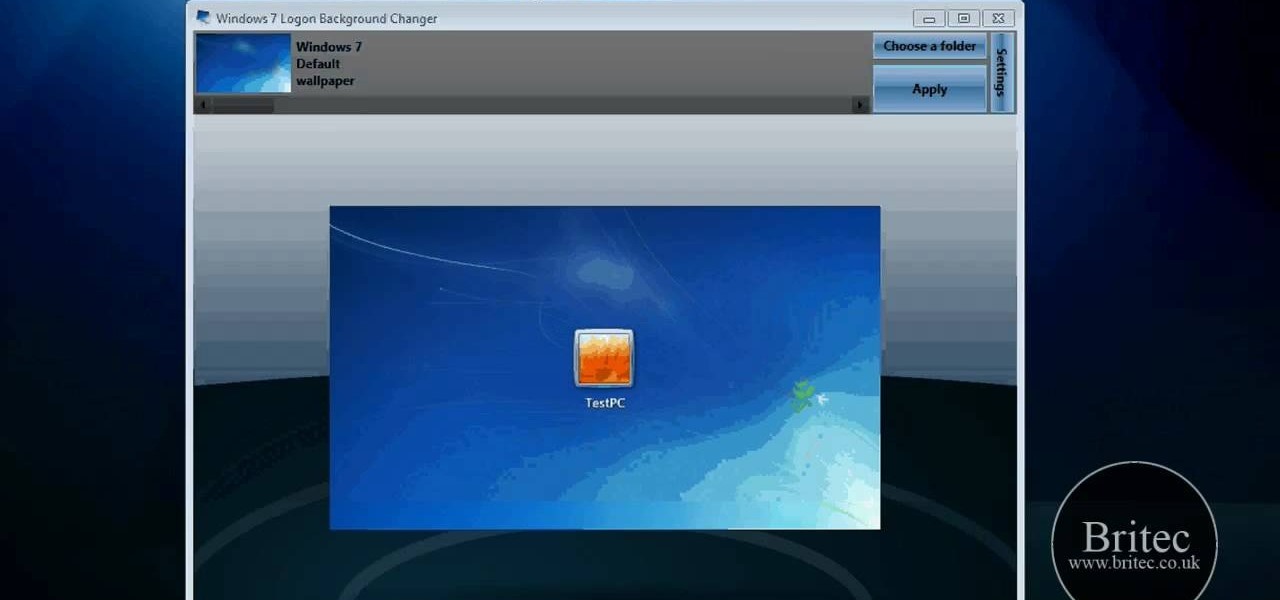
In this tutorial, we learn how to change your Windows 7 login screen. First, click on browse, then you can choose the picture you want for the background on your login screen. If you decide you don't want this, you can go back and change the background when you don't want it any longer. After this, you can go onto the Windows website to download different backgrounds. After you do this, you will have access to a lot of different backgrounds for the computer! This is a great way to dress up yo...
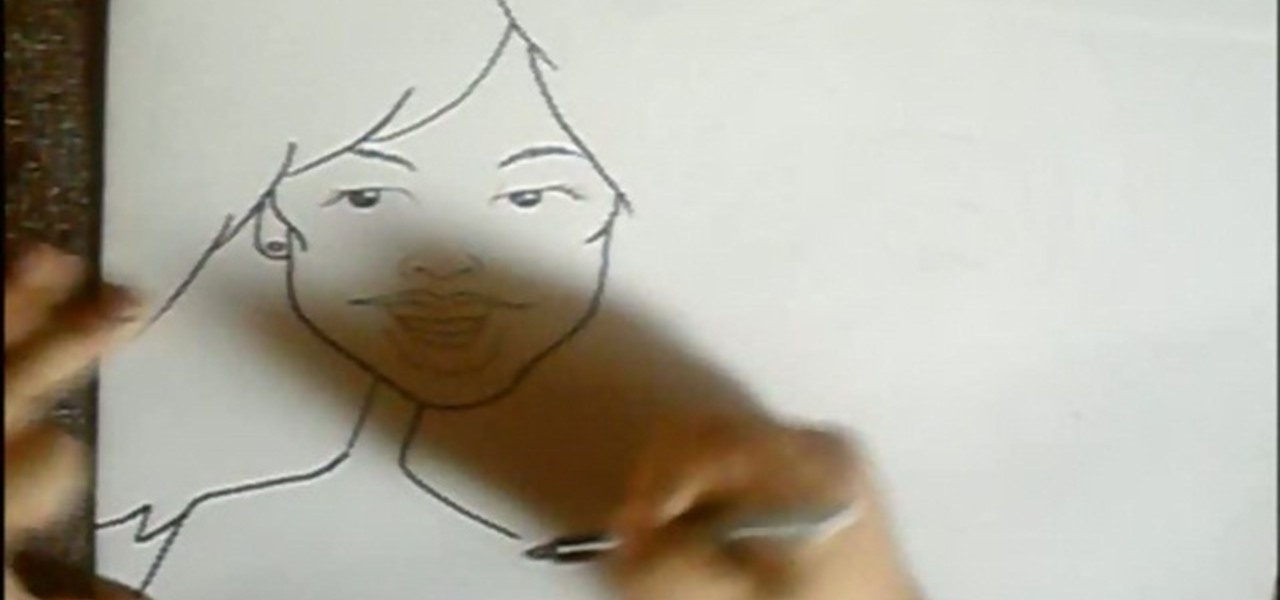
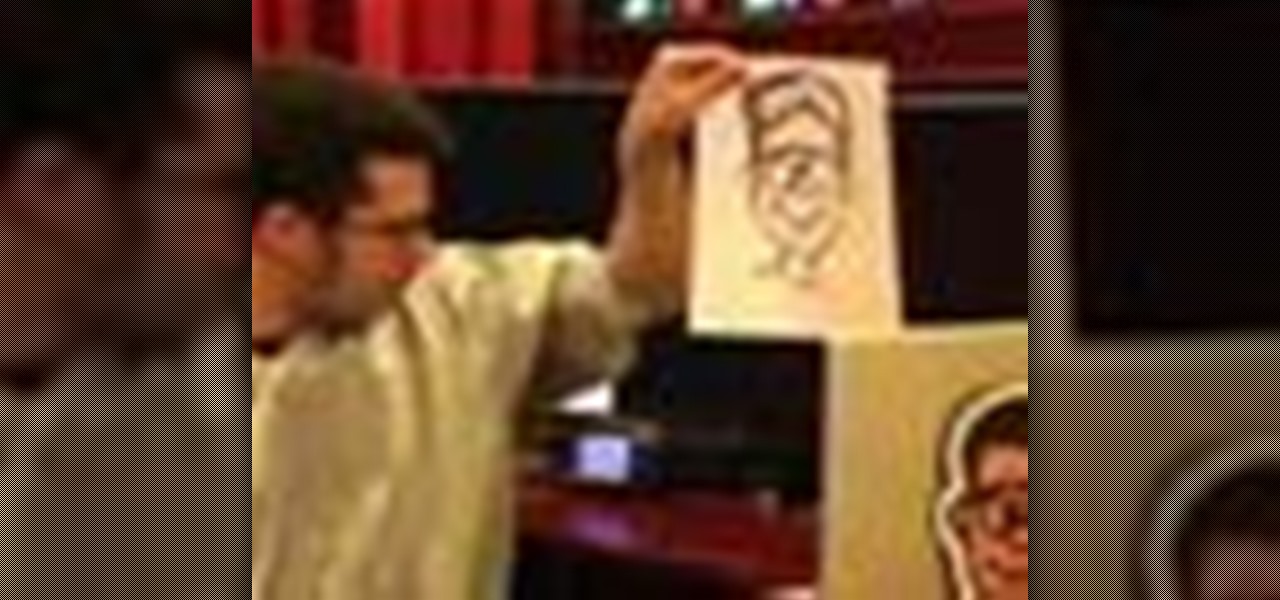
In this tutorial, we learn how to draw cartoon caricatures. Start off by drawing the eyes and the eyebrows. Next, draw in the hair on the forehead and then start to make the face surrounding the hair. After this, you will need to draw in the ears and make a note to draw in any prominent features that the person you are drawing has. Make sure to draw larger lips and a small neck, making the head look larger. For men, do the same thing and give each of the pictures a bit of personality! Don't b...
In this tutorial, we learn how to draw a rose, step by step. start off drawing the petals of the rose, making the inside of the flower first. After this, start to draw in more details and draw around the inside of the flower, making the rose larger and larger. After you have done this, draw on the stem underneath where the petals are, and add leaves onto the stem. Continue to add in any details that you see fit throughout the picture. When you are done drawing, color it if you prefer, then si...
In this video tutorial, viewers learn how to make a PowerPoint video. This task is easy, simple and fast to do. Begin by creating the PowerPoint presentation and save it as a Graphics Integrated format. Then open the Windows Movie Maker program and click on Pictures under the Import menu. Select the presentation and click on Import. Now edit the video clips in the time line by adding transitions, effects, music and other enhancements. When finished, publish the video. This video will benefit ...
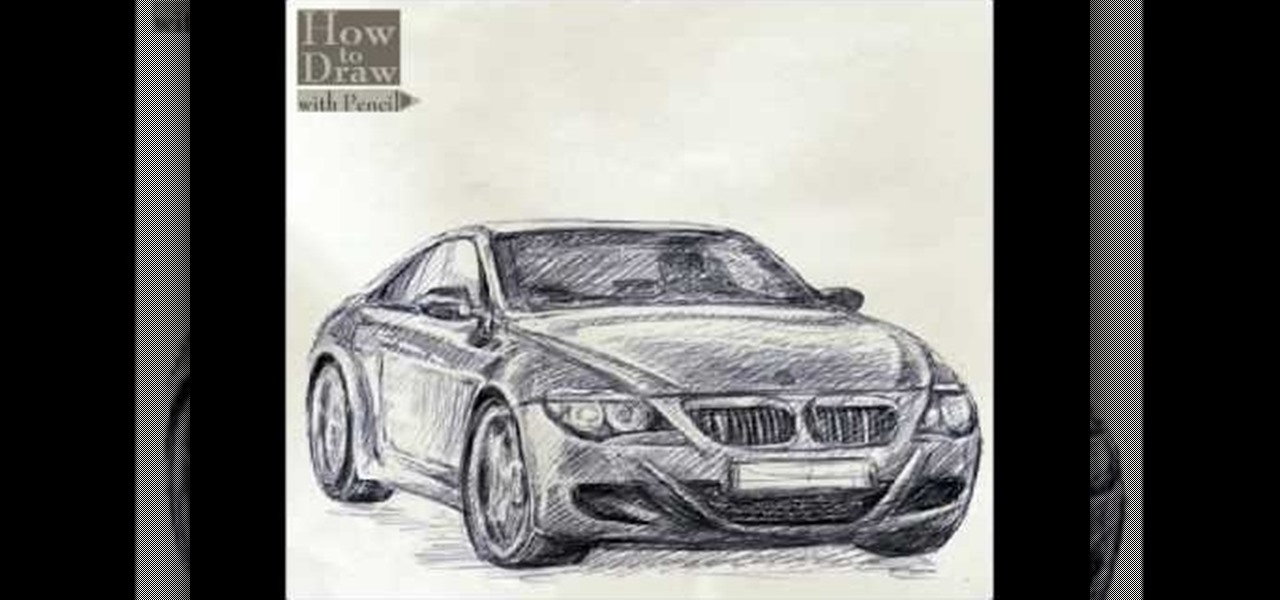
In this video, we learn how to draw a BMW car. Start off by drawing the outline of the car. After this, start to shade the drawing and add in the details of the car. Draw in the windshield, headlights, grill, license plate, and all the other small details. Make sure to use shading underneath the car to make it look more realistic. Also do shading inside the driver's seat to make it look like someone is inside of the car driving. Erase lines where you don't need them to make the car look more ...
In this video, we learn how to draw Hamtaro. Start off by drawing the large head, followed by the body and the ears. After this, draw the arms and legs onto the character. Next, outline the drawing in a darker pen, then add in additional details. Draw on the eyes, nose, and pupils. Don't forget to draw on the paws and feel as well as lines to make it look like fur. To finish up this picture, you will need to add colors to the hamster. You can go with the traditional colors, or change them up ...
In this video, we learn how to start drawing things. To get started with drawing, you have to have a passion for it and know what you want to draw. If you are going to draw with your computer, you will have to learn what all the different tools mean and you will have to learn how to use them. Make sure that when you are drawing, you use shading to your advantage. Start off drawing small things and use outlines to help you draw more precisely. Take your time when you draw and use different tou...
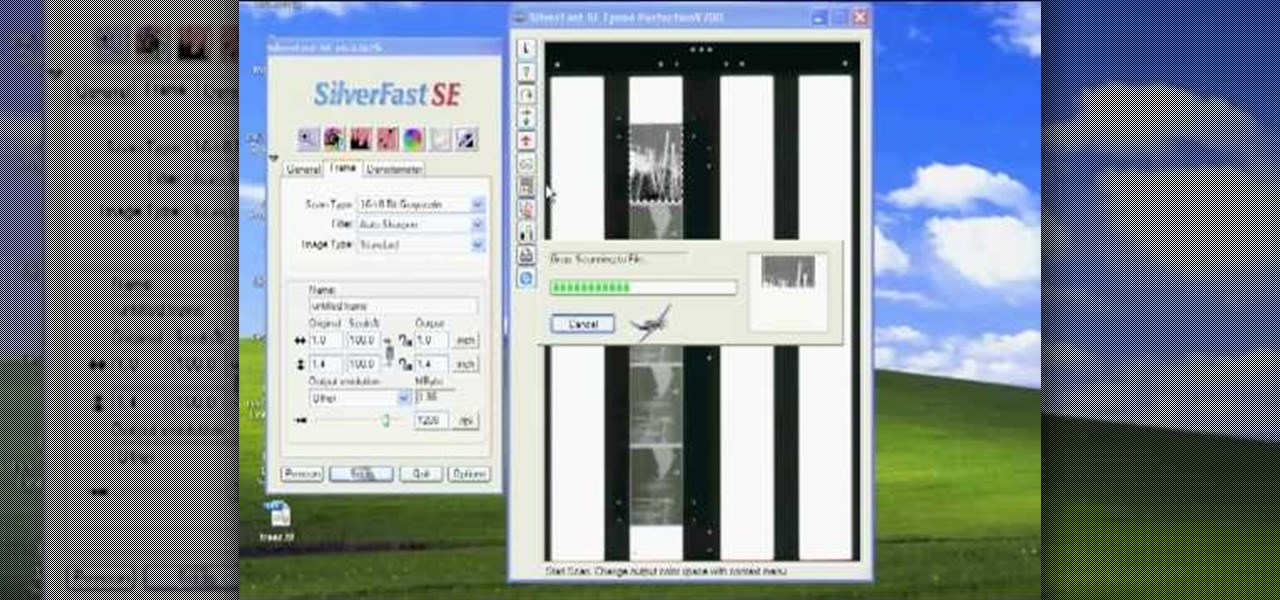
In this tutorial, we learn how to scan and edit negatives with SilverFast and Photoshop. First, open up the software and lay your negative in the scanner. Make sure you have selected the correct settings when you go to scan it, and click that it's transparent. Also, you will need to increase the size of it and make sure the lighting is correct. Now, scan the image and load it onto the software. Once it's loaded, you will be able edit it by zooming in and then rotating the image so it's the co...
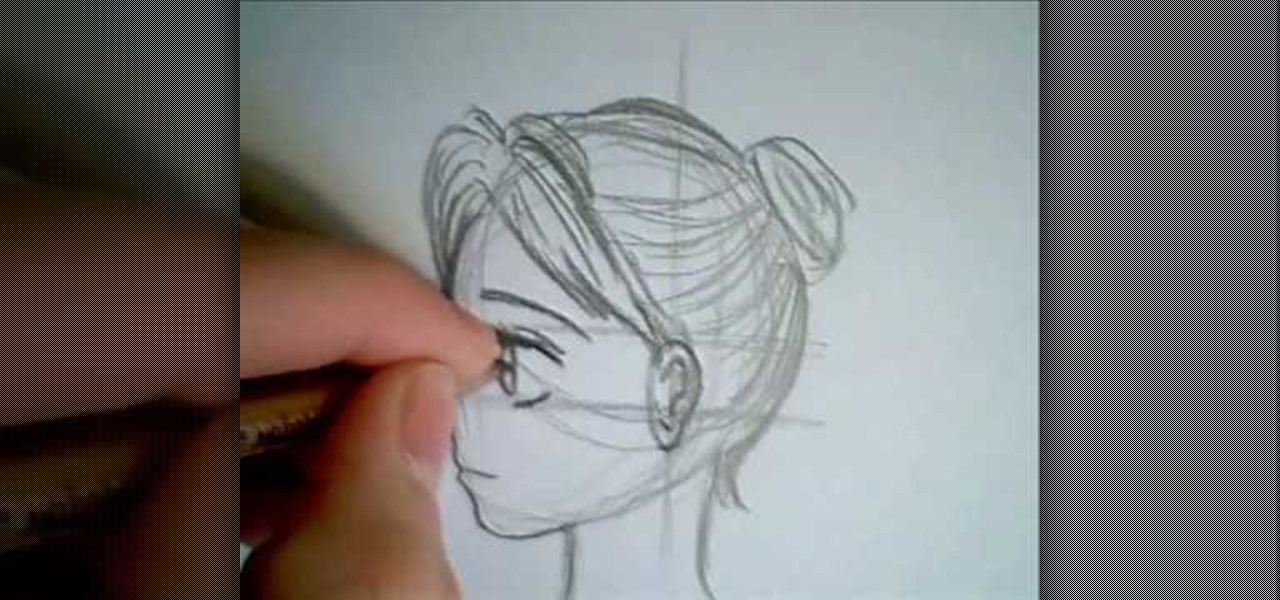
In this video, we learn how to draw a manga face sideways. start by drawing a round circle with a light pencil. After this, draw a chin that is from the side view. Next, add on the nose and make the chin look more prominent, like you are seeing the profile of the face. After this, draw on the ear to the center of the face, then start to add in further details. Make the eye and add shading by the nose to make it appear as though there's another eye. Add in eyelashes, then start to add in hair ...
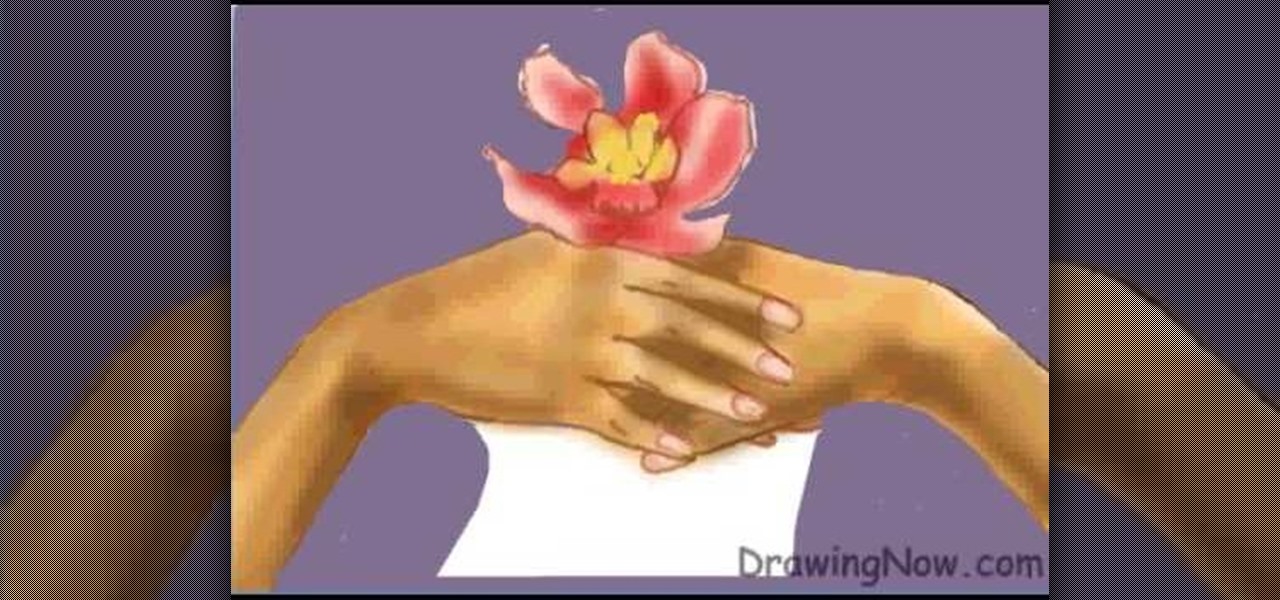
In this video, we learn how to draw two clasping hands. Start off by drawing the two hands holding each others hand. Next, draw a circle above the hands like they are holding something. After this, draw a large flower on the circle and then start to erase the base lines from the drawing. Draw in the fingernails on the picture, then color in the skin color on the nail. Color the flower any color that you would like, then draw in the background to any color you prefer. Shade the wrist of the ar...
In this video, we learn how to use the web application, Sumo Paint. First, go to the website Sumo Paint and the website will start to load in a new window a Flash application. Once it's fully loaded, you will be able to add an image and then start to edit it. There are several different tools available on the side, whether you need to resize, crop, erase, or anything else to your picture! This is a great website for editing and makes everything simple. There is also a toolbar on the top where...
In this tutorial, we learn how to draw azure kite. Start off by drawing the face, then draw on the hat and the upper body. Next, you will want to outline the rough draft that you first made and start to add in details. Color in the hair and the hat, as well as the skin and the outfit. Add in wrinkles and buttons on the clothing as well. Add in the eyes to the face and include the nose, mouth and ears. Place the tattoo on the side of the face, then add in shading on the entire body. When done,...
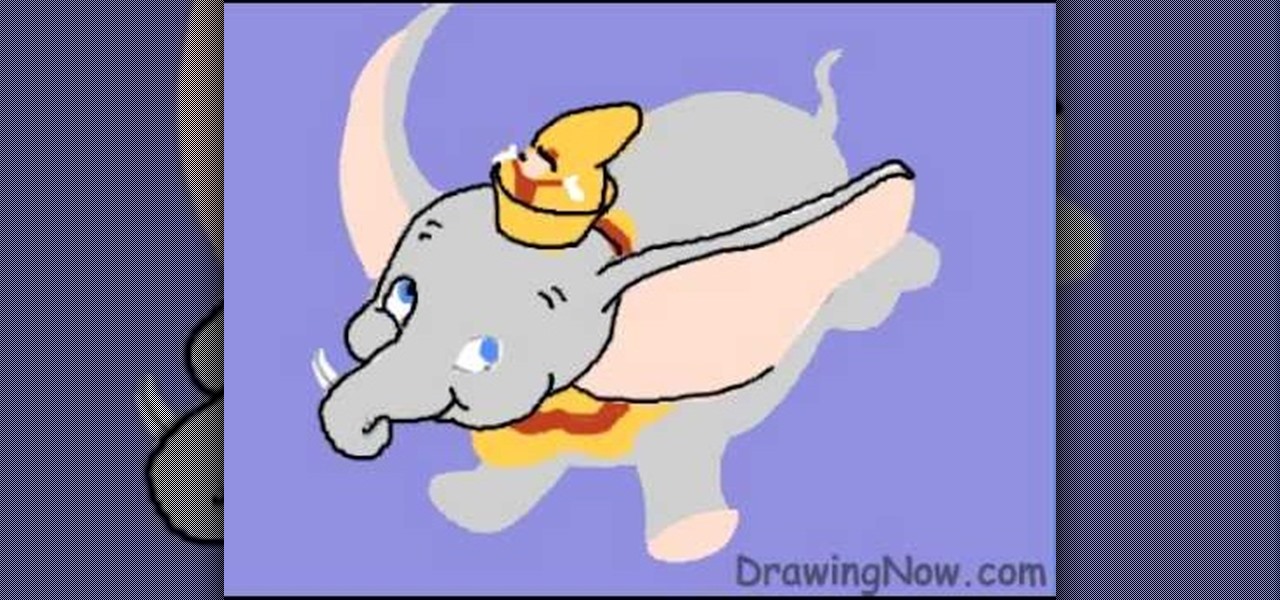
In this tutorial, we learn how to draw Walt Disney character, Dumbo. First, draw the ears flying out in the air, then draw the head outline around it. After this, draw in the trunk outline, the eyes, and the hat. Next draw in the body and legs of the character as well. Next, color the background of the drawing and then start coloring the character in with gray. Next, use a paintbrush to outline the body, then add in any details you see fit. Color in the inside of the ears and then color in th...