In this tutorial, we learn how to insert pictures and format text in Fusion Essentials. Start by selecting your image and then clicking inside the text box. Select an image, then it will appear in the text box. From here, click on the picture and go to the alignment section. Choose how you want the text arranged around the image. You can justify it to the left, center, and right. You can also wrap the text around the image. Preview the page after you align it, then see if it allows the page t...

In this video, we learn how to change the color of clothing in Photoshop. First, click "enhance", then "adjust color", then "saturation". Now place a magnetic lasso around the shirt color you want to change. You can now use a slider to go through all the different colors, and pick that one that you want to use in the picture. Play around with the saturation, hue, and brightness to change what the color looks like in the picture. If you want to add more contrast, it will look more real like it...
When hanging a picture up on the wall, it's important to know exactly which is the right size for your wall. Choosing too small of a picture hanger can result in it being lost in the wall, while it being too big can result in an ugly looking hole.
Getting the perfect shot is difficult, so when you finally get that perfect picture of yourself, you want to enhance it as much as possible. But if this perfect picture took place in a humdrum location like the bathroom or your living room and you want to glorify your face even more by surrounding it with, say, an island paradise, you can transplant your head (and body) using Photoshop.

If you've ever had a friend who was unable to make a birthday party or graduation due to scheduling, sometimes it can depressing. Especially if you always take pictures with each other for any occasion. Well in this tutorial, you will find out how to Photoshop a person into a picture easily. It's just a cheap, easy way to show that no matter what, nothing can seperate you two. Enjoy!

If you've ever wanted to sketch something from scratch and realize you don't have the time to take formal classes, then Photoshop might be what you need. In this helpful tutorial, you'll find out how to take your photos, or any other photo out there, and turn it into a beautiful masterpiece. So sit back and enjoy this tutorial on how to turn a picture into a sketch using Photoshop CS4.

In this how-to video, you will learn how to create flashy pictures and animated gifs for your profile pictures. This is useful if you want to put an animation as your facebook or myspace default photo. First, find and open the image you want to use. It should open in MSpaint. You can go to image and select invert colors. Save this new file with a different name. Now, go to the gifninja website. Click on Create an Animated Gif. Now, upload both of your files to the page. You can select the spe...
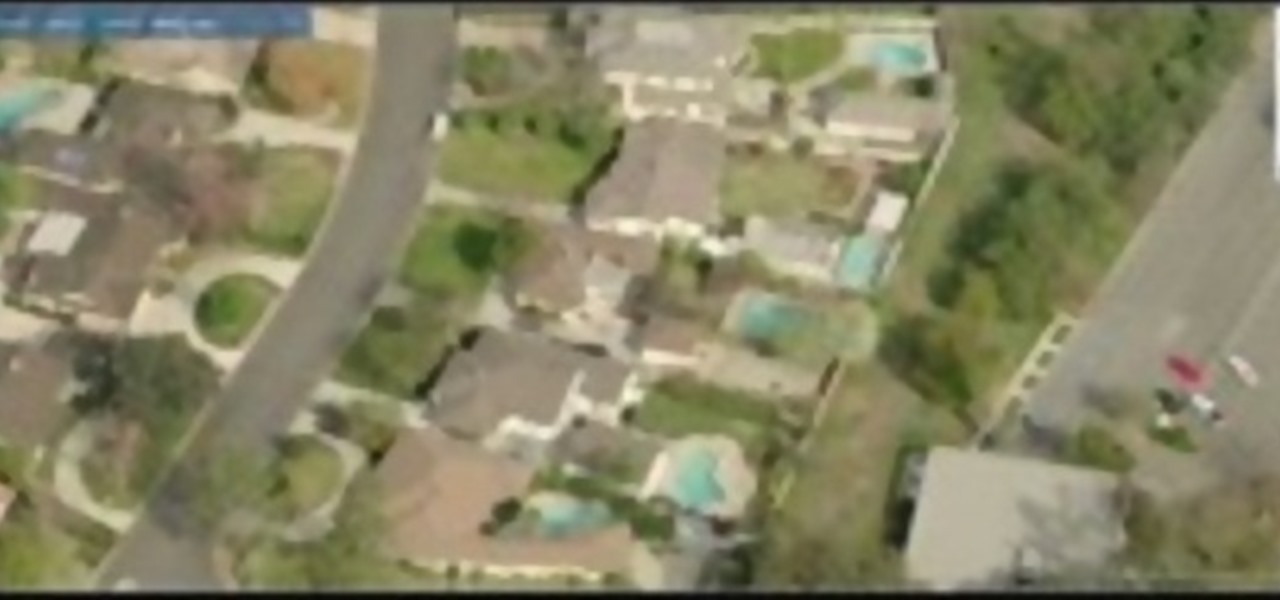
In this how-to video, you will learn how to see high quality pictures of your own house. First, go to your web browser and click on Maps and Directions in the directory on the MSN website. Next, click on locations and type the address of your house or whatever place you want to see. Once this is done, click on bird's eye to get a closer photo of the area. Next, click zoom in until you get an even larger image. You can also click on the picture and drag to move around the image. This video sho...
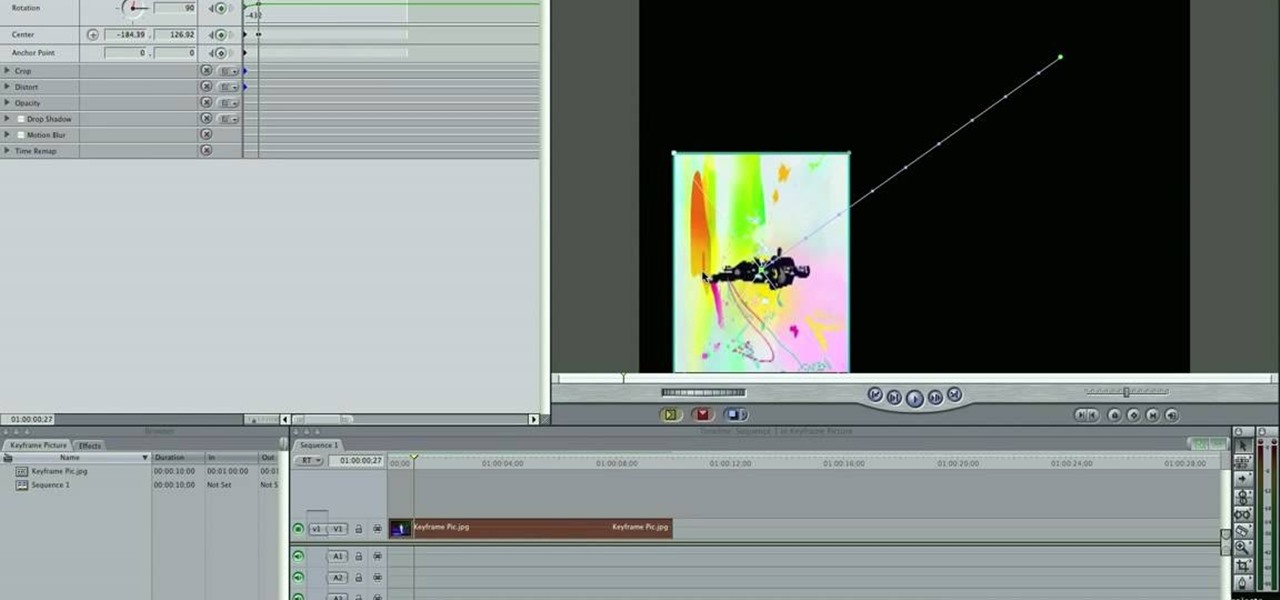
This video tutorial teaches you the basics of Keyframing using Final Cut Pro. A picture is used in this tutorial. You can also use video or picture for this example. The video shows the keyframe button and the different keyframing tools. The video then teaches a basic keyframing concept of how to add a motion to the clip using keyframing. You can also add rotation effect in the keyframe. When you add a keyframe and move the clip from one place to another, it adds a path along which the clip o...
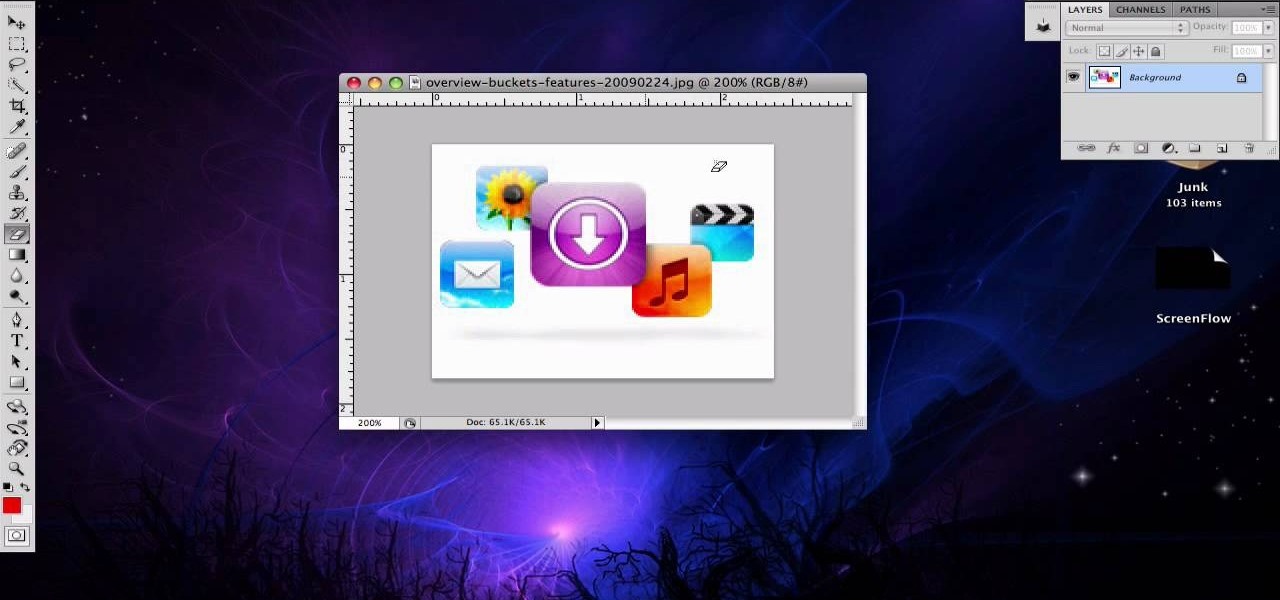
Here is a simple technique to resize multiple pictures in Photoshop by creating an action, to adjust the image size. The only requirement is for the pictures to more or less the same size. First we go to windows and select action then we open up an image to determine the appropriate size that we require. Then click on the create new action and, give it a name then hit record now go to image the image size resize the image and then save and hit ok .You can see that its still recording your act...
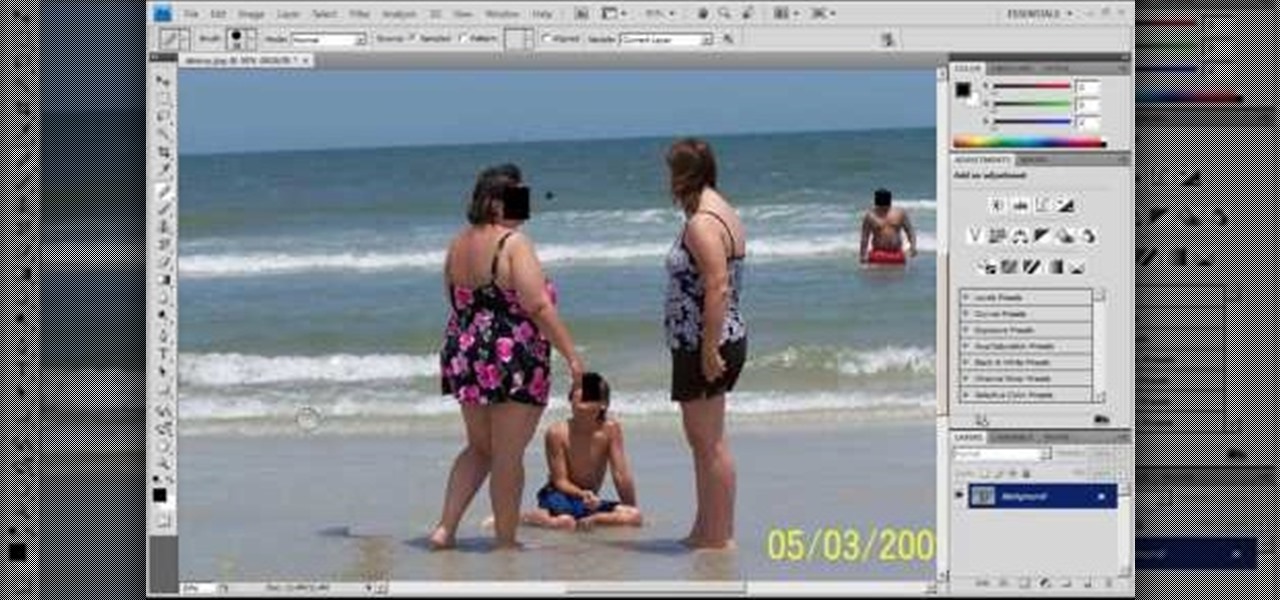
This video teaches you how to use Photoshop to remove people from a picture but you can essentially use this method to remove anything you want from a picture. First, click on the lasso tool and highlight a figure you want to remove. Drag the highlight adjacent to the figure and copy the image. Now paste what you’ve copied over the figure you want to remove. This will work best and is easiest if the area next to the figure is similar to the background of the figure. If you paste the image a...
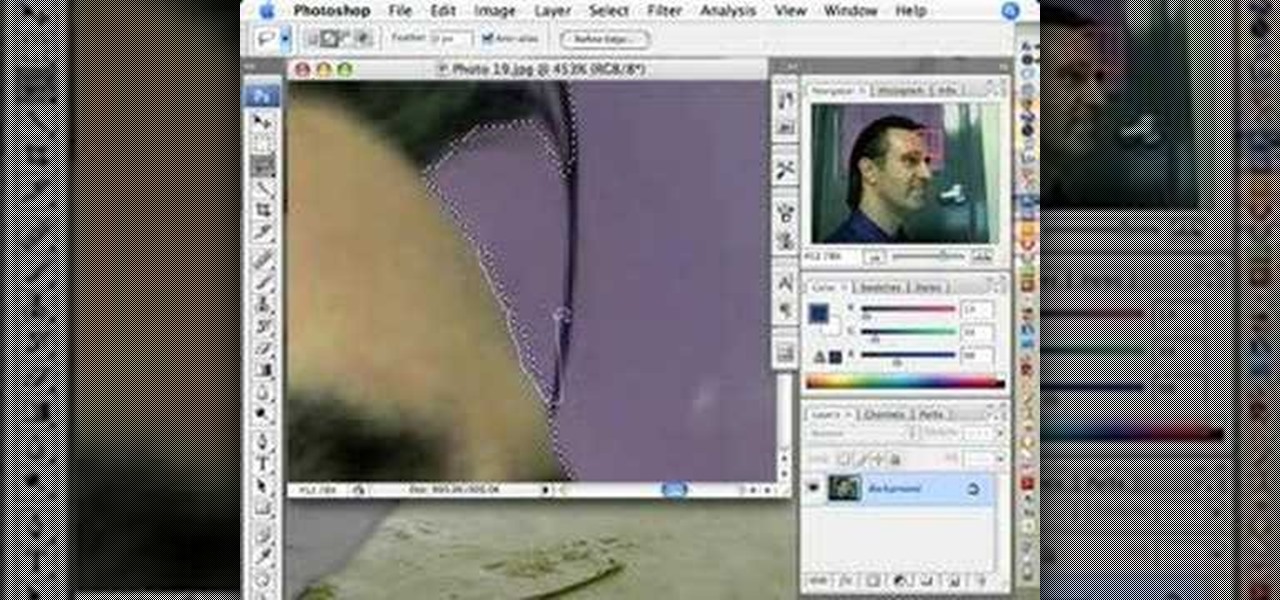
This video is about how to crop a photograph in Adobe Photoshop CS4. So the first step that you will have to do is just simply open the Adobe Photoshop CS4. Once it has loaded, just open a picture that you want to crop out. After the picture have been loaded. If the picture is too small, you can simply click on the zoom icon to make the image clearer. After wards, you need to use the marquee tool which is found on the left side of the screen. Just simply right click the icon and choose which ...
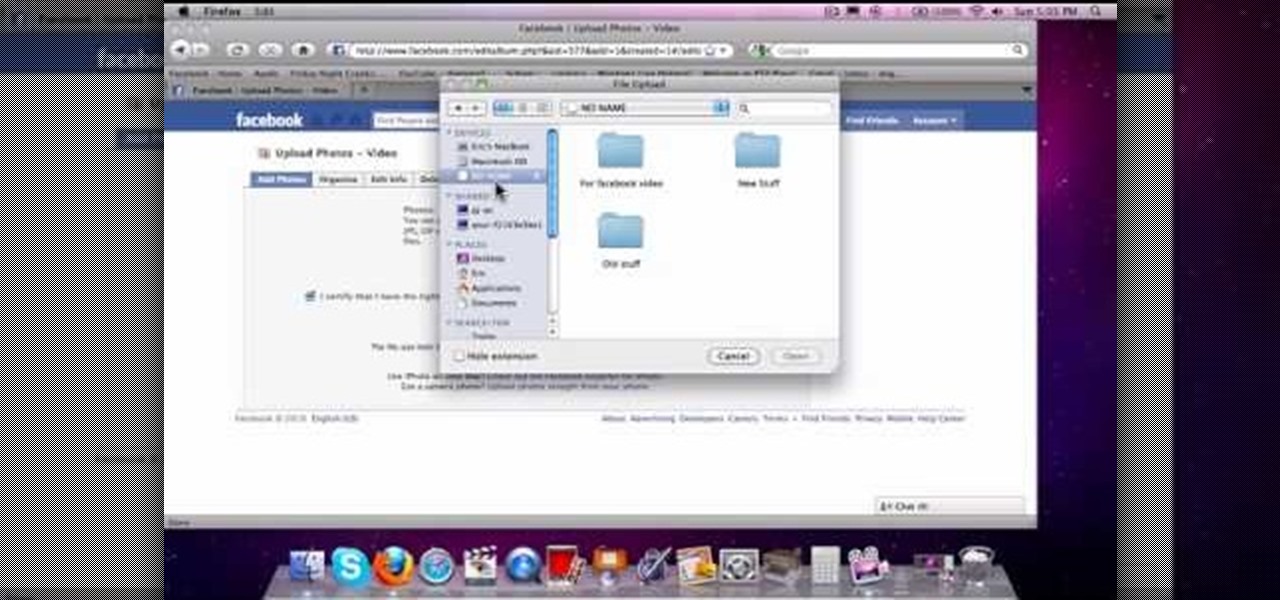
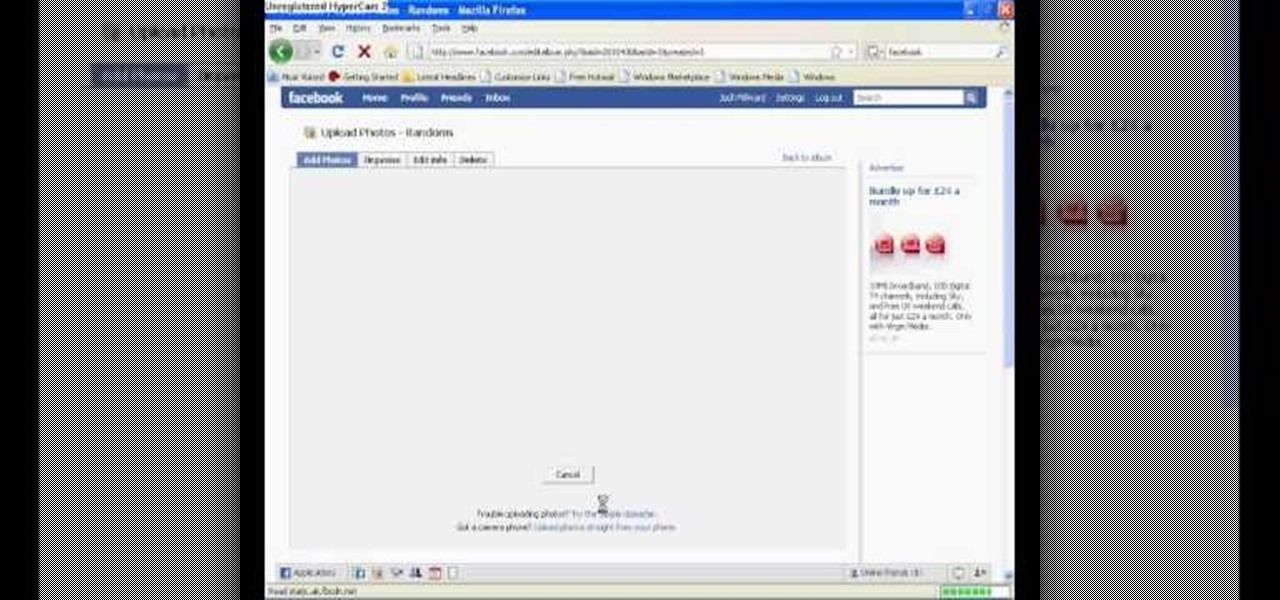
This is how to upload pictures to Facebook from an SD card. On Facebook, navigate to the 'picture upload area'; if you can not find this, you can find it by going to: http://www.facebook.com/photos/?ref=sbCreate an album by choosing a name for it, and you can also add a description of the album, and change the privacy settings of the album. After the album is created, click on 'add photos', and go to 'simple uploader'. Click on 'browse'; and navigate to your SD card location, and select the p...
This video illustrates how to make a temporary tattoo with black eyeliner. This process includes the following steps.Step 1Take the picture you want to make tattoo of.Step 2Reverse the picture and paste it on a paper.Step 3Take a tracing paper and trace the outline of the picture using a eyeliner.Step 4Now reverse the tracing paper and paste it on the place you want.Step 5Now take a cloth, wet it and place it on the tracing paper so that you get the outline of it on the place you want.Step 6N...
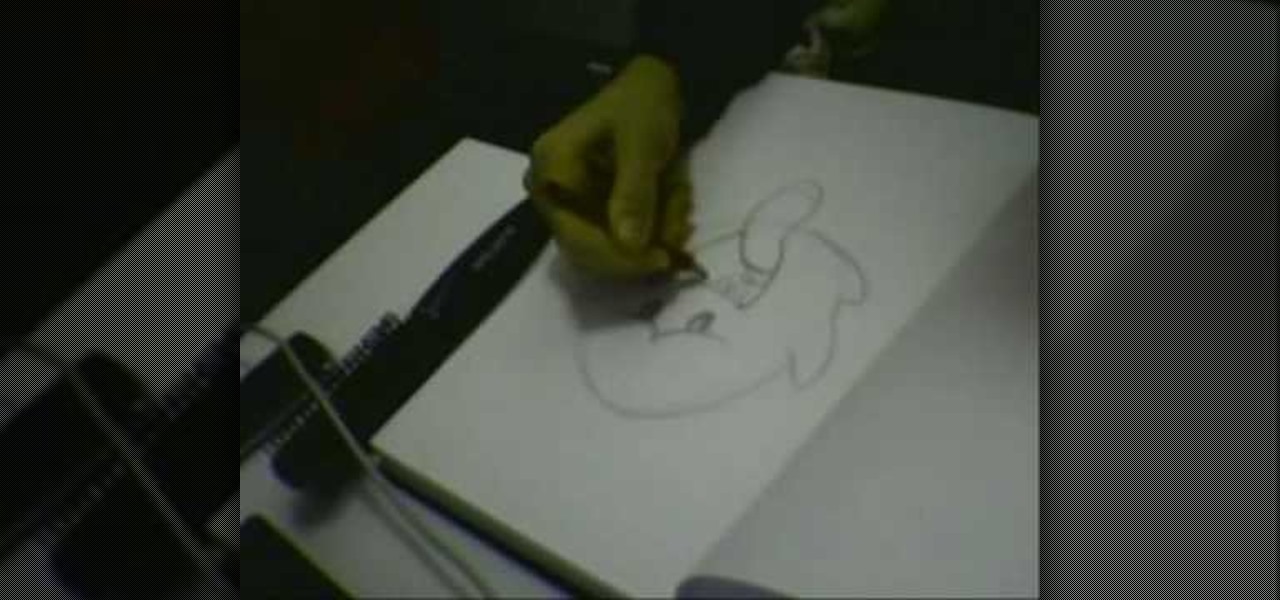
In this video he just draws a simple picture of boo. It maybe takes two or three minutes to make the sketch. First you just draw a circle roughly, and add ears to that. Next add tongue which is very long and outside of the mouth. You just have to give importance to the teeth in this drawing to make your sketch great. Next you just add teeth, which is wide. Next make the teeth highlight. Next draw two small circles like eyes and highlight it with the pencil. Next make the rough sketch into the...
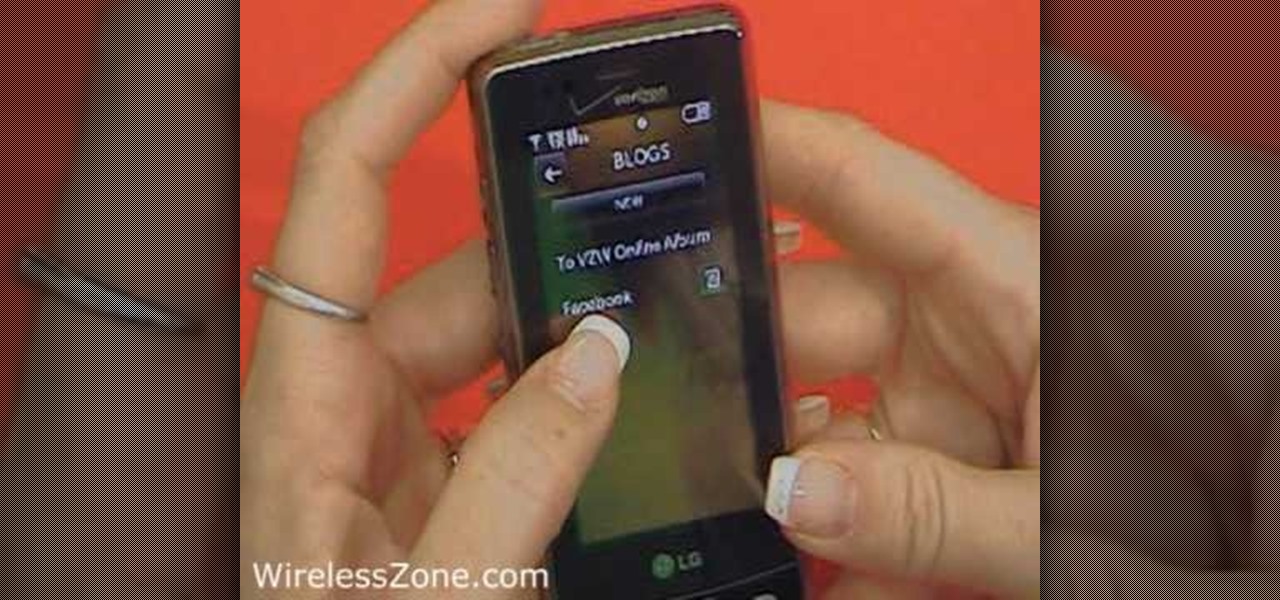
In this how-to video, you will learn how to upload photos and videos to Facebook or MySpace using your mobile phone. First, go to messaging and scroll down to blogs. Here, enter whichever blog you want to upload to. Next, go to message and create a new picture message. A new option called blog will be in this menu. Now, press the option and click on your blog of choice. From there, you can put in text and select your picture or video. Now you can press send. This will send the file or video t...
In this tutorial, Josh Millward teaches us how to post pictures onto a Facebook account. First, log into your Facebook account. Once you're logged in, click on your profile and click "photos". Choose where you want to upload the photo to, you can upload it to an existing album or you can upload to a new album. You can choose which uploading tool you'd like to use. Browse through your files and choose the pictures you want to load into your album. Now click "upload" after agreeing to the terms...
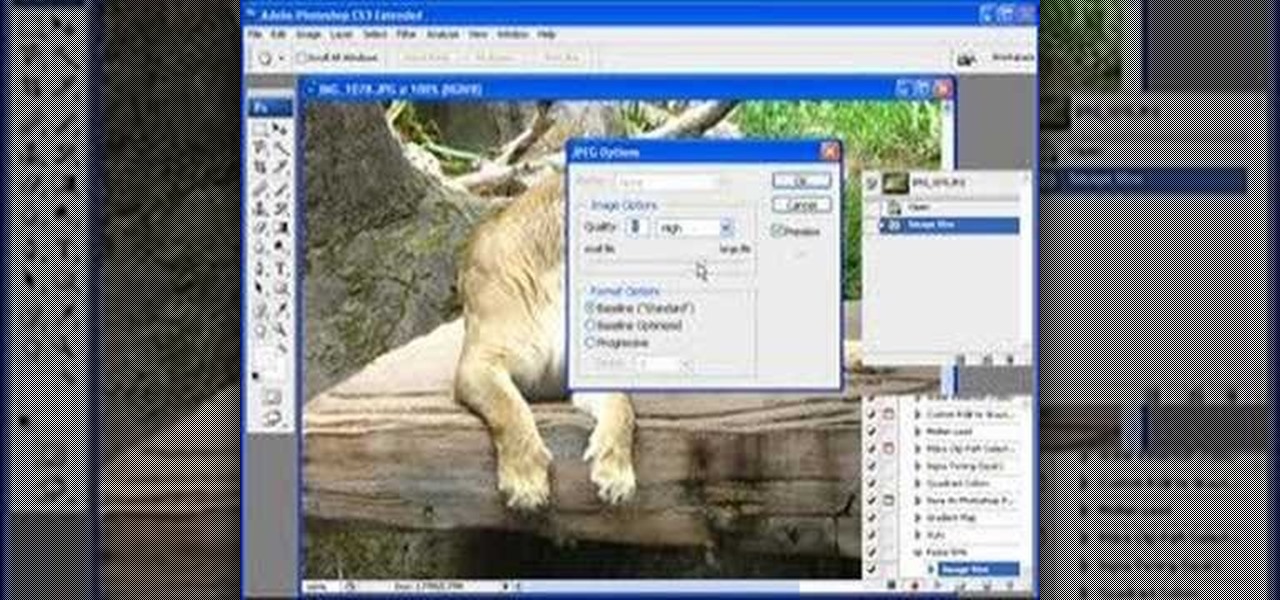
When using Adobe Photoshop being able to crop and resize an image is essential. This live demonstration shows you step by step directions for these useful functions. To crop, select a certain area and hit enter, everything not selected will be deleted. If you mess up you can undo. This is a great way to take a large picture and only use the parts you want to concentrate on. Video also shows how to resize picture using width and height or mega pixels. Gives tips on how to keep your picture fro...
In this video tutorial, viewers learn how to take pictures with an iPod Touch. iPod Touch is a portable media player, personal digital assistant, and Wi-Fi mobile platform. The iPod Touch does not have a built-in camera, but it is able to take screenshots. Begin by going to any option or application that you want to take a screen shot of. Then hold power and home button at the same time until you see a white flash. The picture is located in the Saves Photos folder in the Photos application. T...
The tutorial shows you how to make a professionally looking Google Chrome logo in Photoshop CS4. To start, download the Google Chrome logo, as well as an Earth picture, in a Zip file from Inteltuts. Next, open the logo file in Photoshop CS4, turn the white background layer into transparent, and transform the logo by de-saturating the picture, but make sure you leave the blue center area untouched. The last step is to transform the Earth picture so that it fits right into the center of the des...
This video shows the method to create a photo montage in Sony Vegas. Go to 'Options' menu & Preferences. Go to the 'Editing' tab & 'New still image length (seconds)' and put the corresponding value and hit 'OK'. Open the pictures from explorer and you have a montage in which pictures last for a few seconds when another one comes up. Go to 'Tools' menu and 'Scripting' option. Click on 'ApplyTransition_1_2'. Choose 'Standard Cross Fade' from the drop down menu. Fill in 'Overlap Frames' which te...
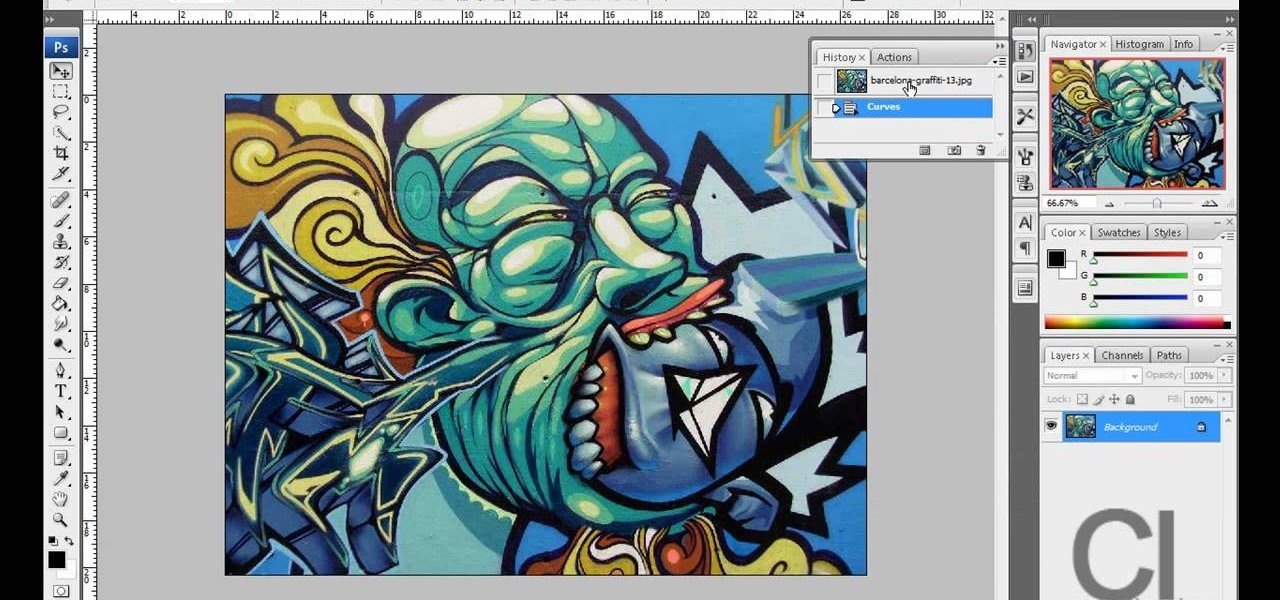
This video demonstrates a way to use the lomo effect on pictures in Photoshop. The effect makes colors stand out more, thus making the picture stand out more. The first step in adding the lomo effect is to change the color curve levels of the picture by going to Image > Adjustment > Curves in Photoshop. They should be changed very slightly, from a straight line to a slight "s" shape curve. After this, the gradient map should be changed to a black to white gradient. Finally, the mode of the ne...
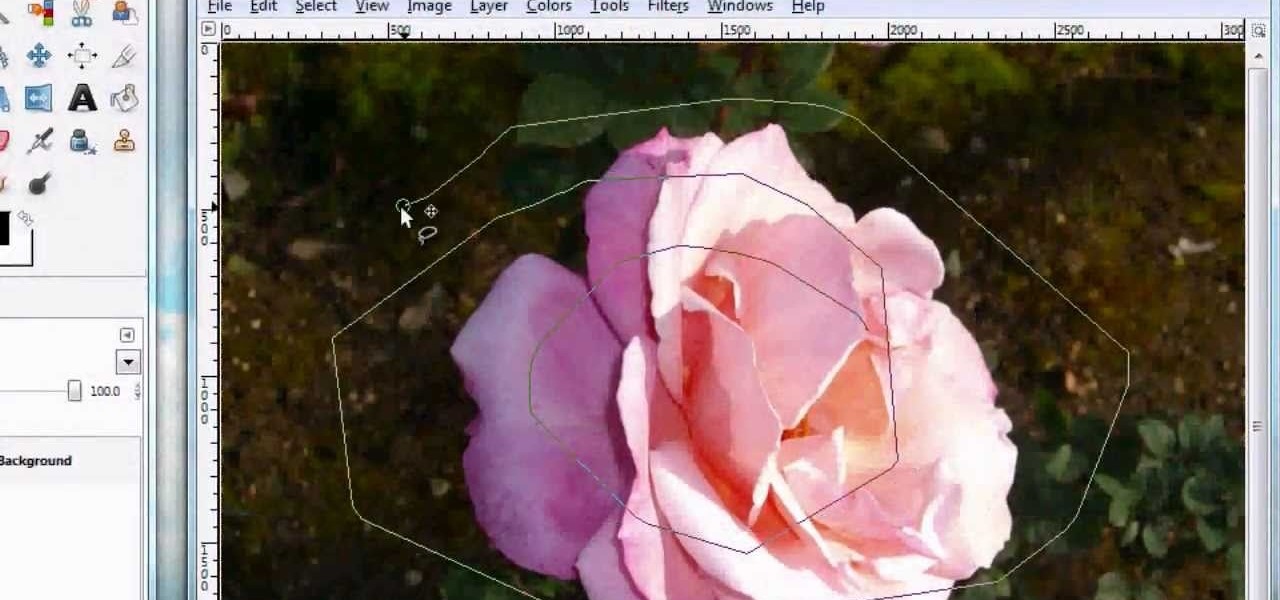
For anyone looking to edit a picture with one or more persons down to just a single person in the picture, you can use GIMP. This video tutorial goes over how to utilize the paths (or pen) tool and foreground select tool. The paths tool allows a person to select a part of an image to create a series of lines, or paths, that allow you to create a path around whatever you want to select in a picture. This item can then be moved and copied to a completely different photo. The foreground select t...
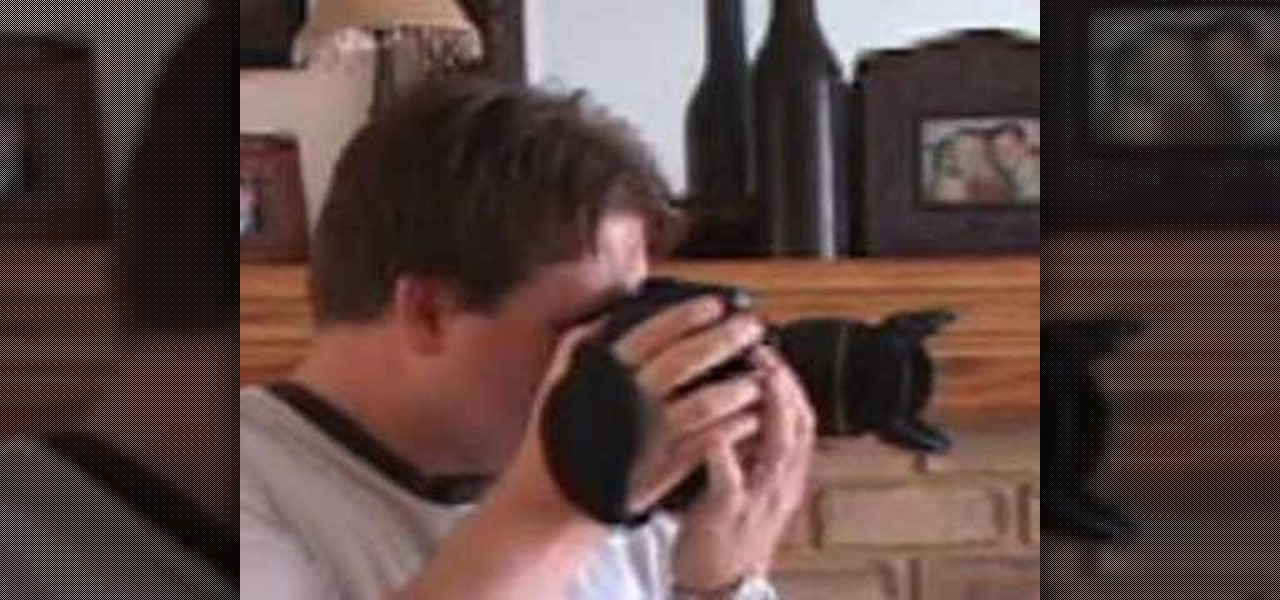
Do you have a SLR and yet you feel that you are missing out on some features? Let's check out the back button focus. When you press the shutter button half way, it moves the focus to the back button. One can activate their camera's focus while the taking the picture which pretty much becomes a manual mode but gives you a lot of independence while taking pictures and it helps keep your subject in focus. This will benefit in taking pictures of high contrast.
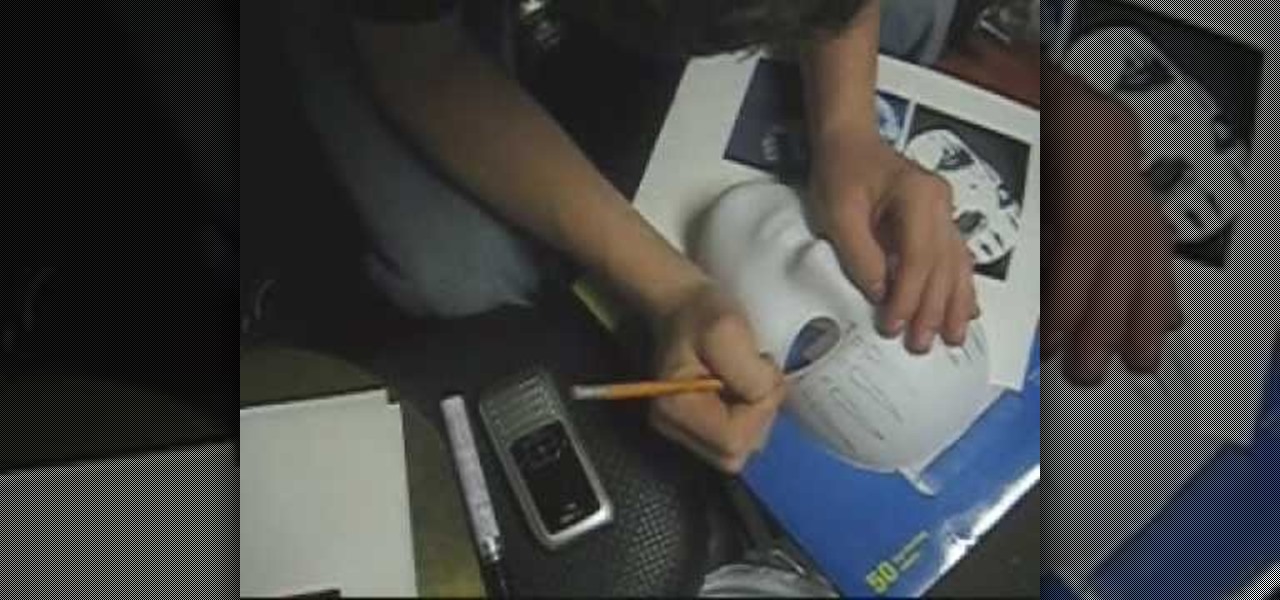
The materials that you need are a white mask, black sharpie, a printed copy picture of the mask, and a pencil. It is recommended that you sketch the picture using the pencil first. So, your first step is to sketch the picture using pencil on to the white mask. After you have finished sketching on the white mask. If you like, you can add extra details to make the mask looks better. You begin to go over it with the black sharpie. When you are done, the result will look like a Jordison mask from...
Ever wanted to change your desktop background and can't figure out how to do this in Windows 7? This tutorial will show you how to change this background. If you have an image saved on your computer already, you can simply right click it and then choose "Set as Desktop Background" and this will set the picture as your desktop background. This can be used for any picture you have stored on your computer, regardless of location. Using this technique, you will soon be able to change your desktop...
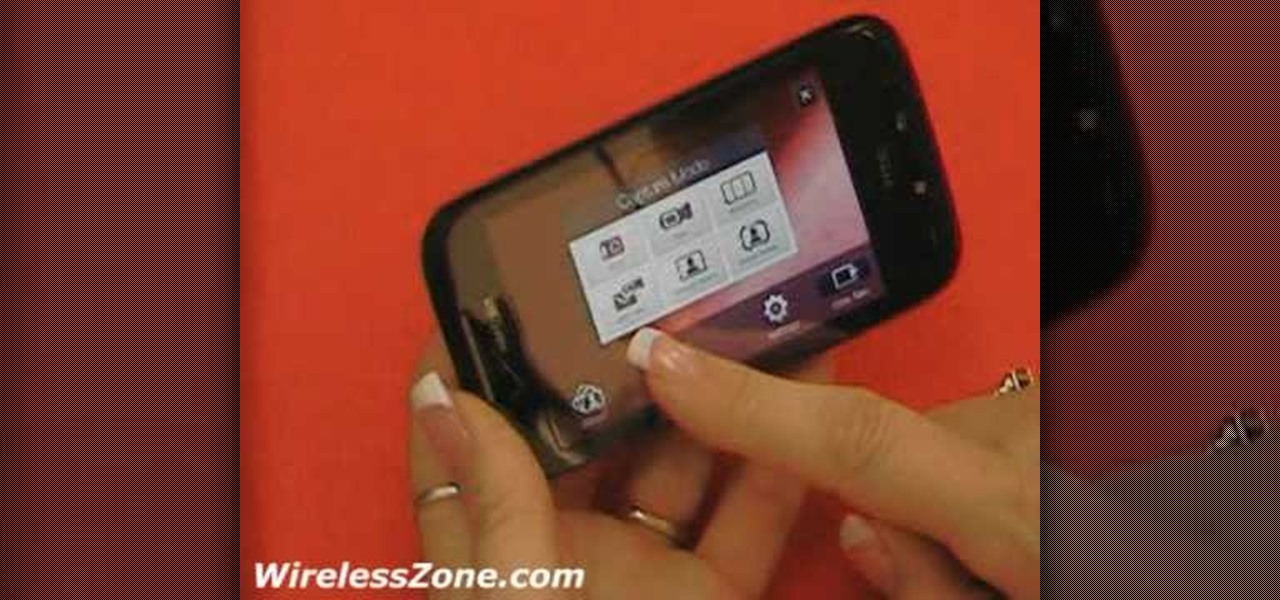
Celluar Chloe from cellular zone shows us the features of HTC Touch Pro 2 camera and video. She shows us at first some picture quality and then shows us how to take a picture. The features of black and white, auto and etc, the rather settings that one can change when taking a picture. The video quality is poor and one cannot see the phone screen clearly. She shows us how to access each of the features she mentions but does not explain in detailed instructions.
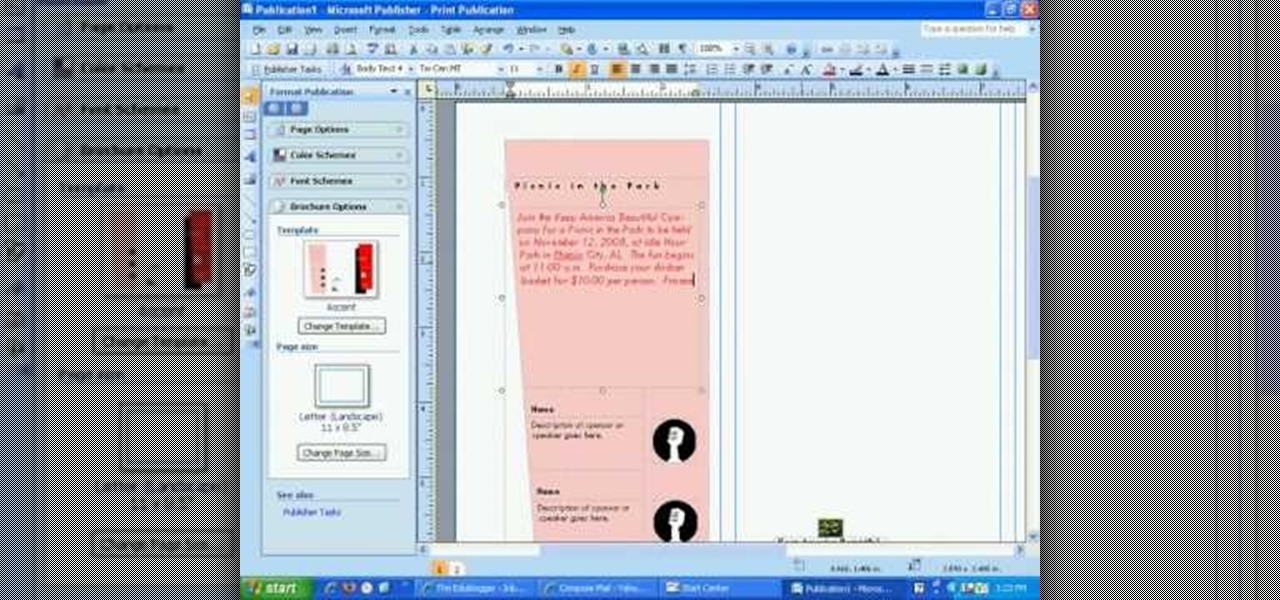
This video shows you how to make a brochure using Microsoft Publisher. To create a brochure first you will need to choose the brochure template in Publisher, in this case the presenter chooses the event brochure. You can then customize the template by changing the default text, which the video shows you how to do by highlighting and deleting. It also shows you how to move to page 2 and change the text there. You can also change the default pictures by choosing the picture to replace and brows...
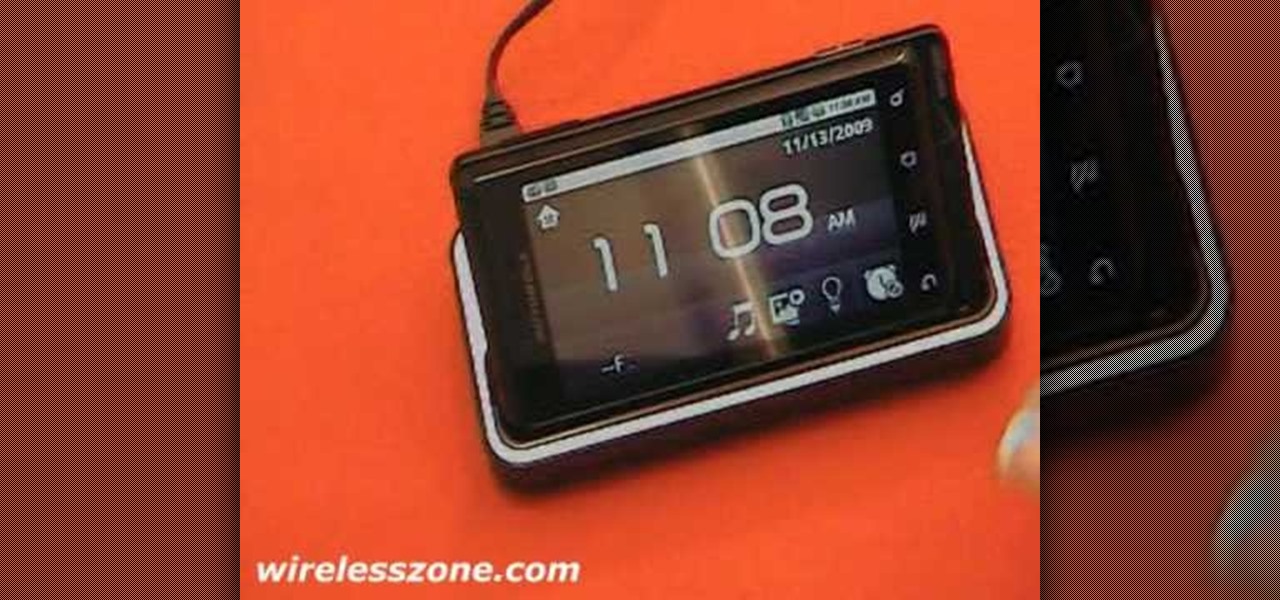
WirelessZone shows you how to use the Droid multimedia station. The dock station comes with the cord and the plug. When you load your phone into the dock it goes into multimedia mode. On the multimedia home screen you have the time, the date, the temp, and the ability to play music, pictures, and a night light. When in the multimedia lock the phone operates like a desk clock. If you go to your pictures, you can cycle through them as you could with a digital picture frame. You also have an ala...
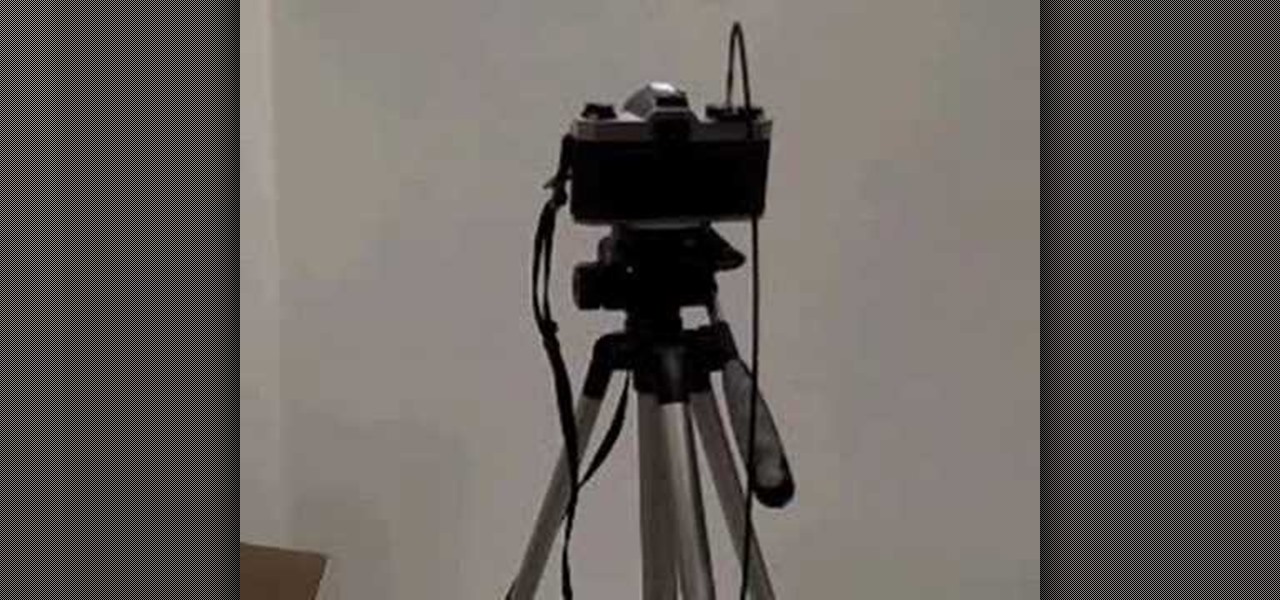
This tutorial shows you how to take nice star pictures and star trail pictures with just a camera. This video also provides tips on choosing film, digital processes, and how to take late night photographs of stars in the night sky. You will need a tripod or a way to keep your camera absolutely still for long exposures. You can take photos of stars with a regular 35mm camera using a release cable, or use a digital camera with long exposure settings.
An accordian fold scrapbook is a great way to make use of minimal space. If you've got a bunch of pictures you'd like to organize all in one album, expand your spatial possibilities by creating accordian fold pages rather than regular turnable pages.
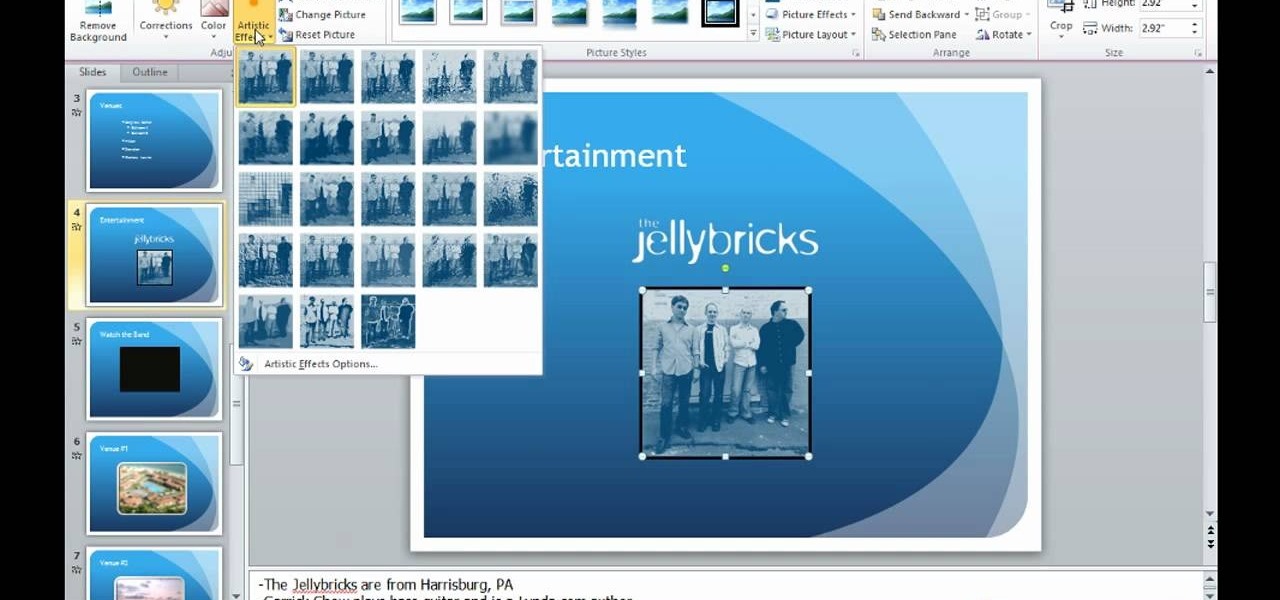
This video describes how to edit images and videos in MS Power Point 2010. For example, we will take a slide with picture added. If you want to edit the picture, first go to the "Picture Tool" button and click on the format tab. If you want to change the contrast and sharpness of the picture use the "Corrections" menu, and to change the saturation, tones, and to do recoloring we can use the color option tab, and then the "Artistic effects" which can be used to see a real time preview like usi...
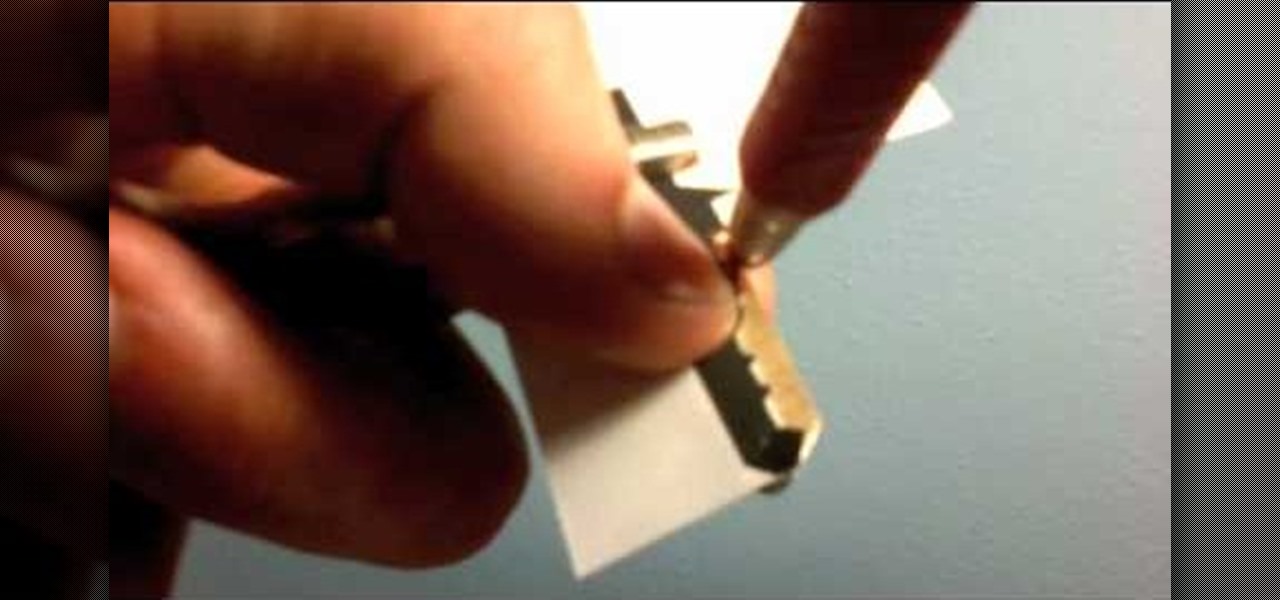
In this ten-step video tutorial, you'll learn how to quickly copy keys using a camera, printer and Dremel tool. With this ten-step process you'll learn the necessary steps to copy almost any key... even if you only have access to it for a brief period of time.
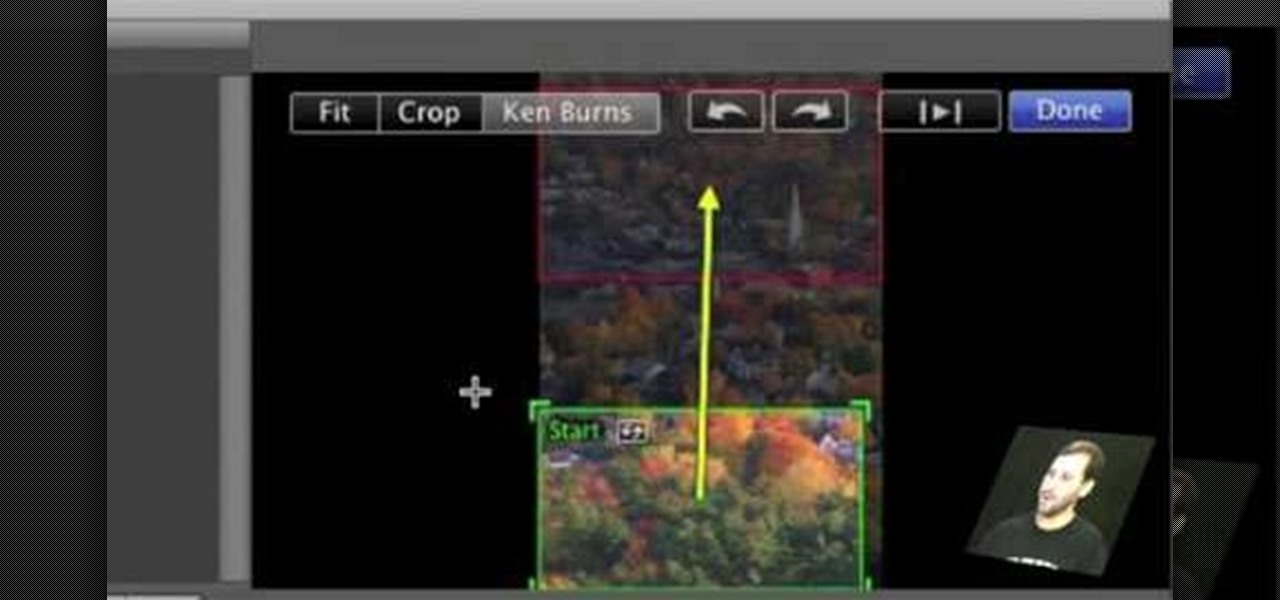
First open up the image by clicking on photo button or just drag the image from finder to the project area. Now click on the crop button or just press the c button, you will see a green and a red area in your picture. Now set the red area to where you want to zoom in and green area to where you want to start your zooming. Now set the green and red area in the picture as showing in the video and play it, you will see that the picture is zooming to where the red area was set. Now change the ima...
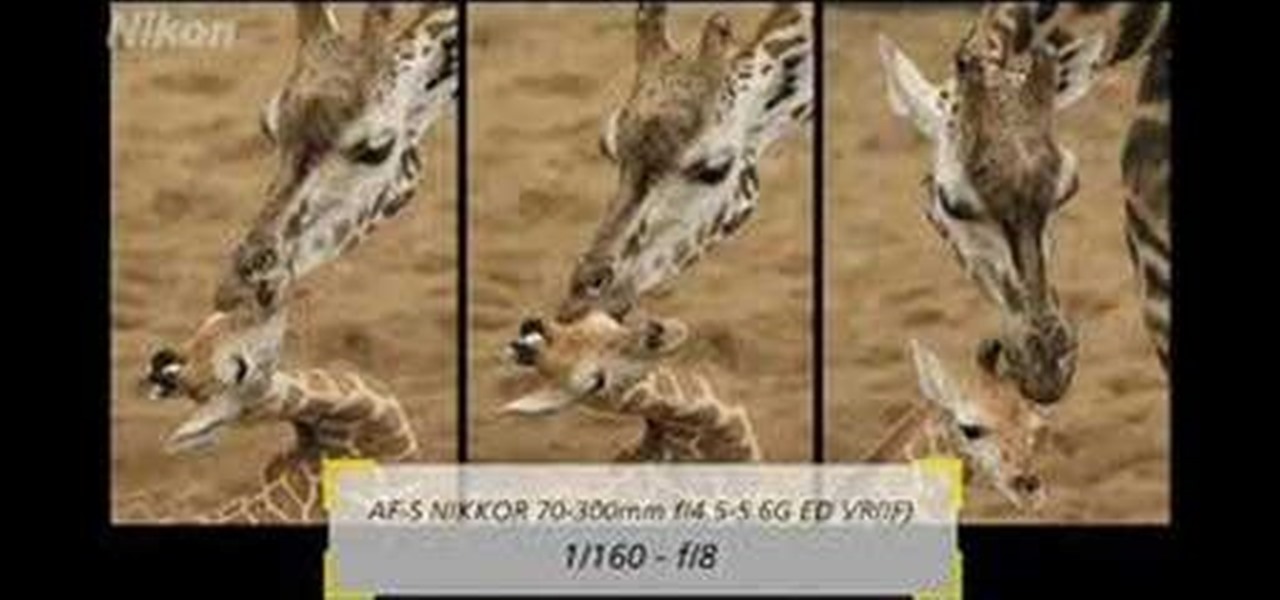
NikonDifferent of Nikon shows you how to shoot zoo/ wild life photography (particularly with a Nikon d40 as an example with a zoom lens with Vibration Reduction), given the fact that animal enclosures are usually set up to give the animals space. You'll want to limit your visit to two or three types of animals (good photographs require time or patience). Animals playing/ fighting make good pictures, but you need to set a fast shutter speed (if you have low light, crank up your ISO). Try to an...
This video tutorial will show you how to create a seamless background texture using Photoshop using any square or rectangular portion of a picture. The narrator in the video demonstrates step-by-step how to achieve a seamless tiling of a photo through Photoshop and dictates the options that you will need to select. You first have to select a portion of the picture that you want to use. Then the narrator explains that you have adjust the sides of the square portion you chose--labeled A, A' , B...
Watch this photography tutorial to learn how to use the existing light to keep your subject from being overpowered by the flash. Taking better pictures using existing light instead of flash is easy with the tips in this how-to video.
You don't need to sync your phone to get your pictures. Many phones offer the capability to send photos taken with the camera to send to either someone else or to yourself through email. This tutorial shows you how to send!
Taking pictures at night is very different than taking them during the day. This video tells you the right way to set up your camera to take beautiful night time shots. Set up your correct exposure and ajust the camera lens to make use of light and setting for your photographs.
Acne is a difficult and embarrassing part of most teenagers and many adults lives. This video offers you instructions on how to remove acne from a picture using Adobe Photoshop. While the example picture may be a cartoon head, you should be able to translate the lessons here to a real face and erase all of those bad memories from your 7th-grade photos.