Interested in creating a zoom blur effect in Motion 3? See how it's done with this free video software guide. Whether you're new to the Apple's popular motion graphics editor/compositing application or simply wish to get better acquainted with the program, you're sure to find value in this tutorial. For more information, including step-by-step instructions, take a look.
Anyone who has flown across multiple timezones is familiar with the negative effects of jet lag, especially when traveling for business on a tight schedule. This video features four easy tips for avoiding the effects of jet lag. These include hydrating properly, going outside, exercising, and forcing yourself into the rhythm of whatever place you are in rather than napping in order to remain on your normal schedule.
Want to know how to integrate Final Cut Pro and Adobe After Effects? This clip will teach you how to do just that. Whether you're new to Apple's Final Cut Pro non-linear video editor or simply new to using these two applications in tandem, you're sure to benefit from this video tutorial. For specifics, including a step-by-step overview of the integration process, watch this Final Cut Pro lesson.

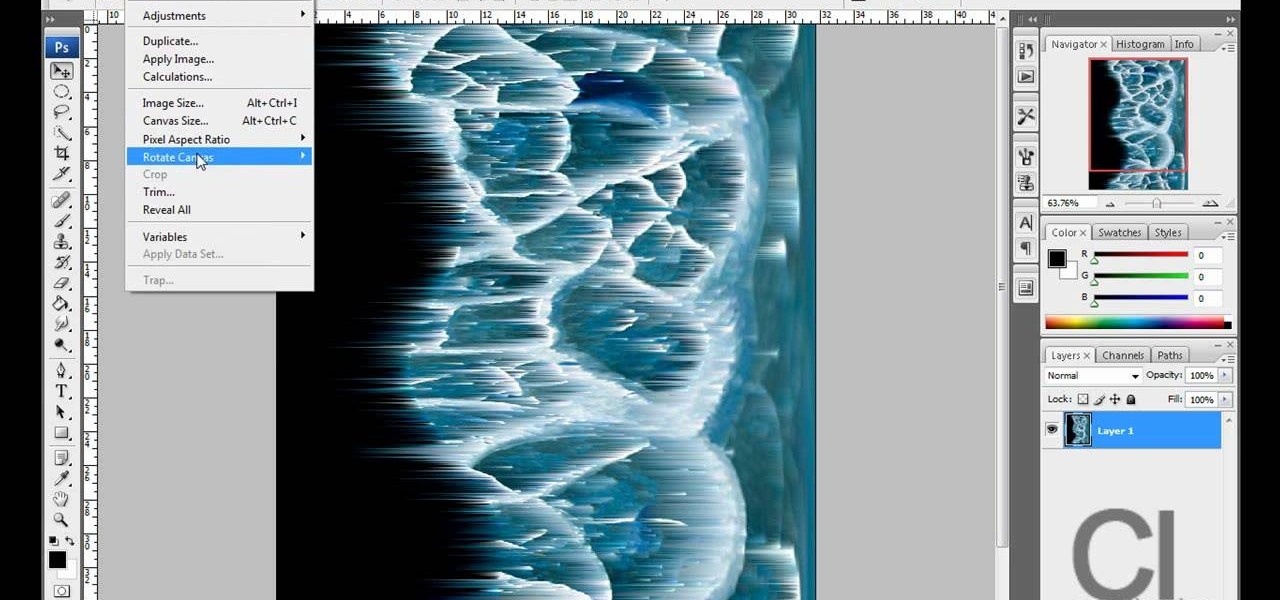
See how to create a realistic bubble effect when working in Adobe Photoshop CS4. Whether you're new to Adobe's popular image editing program or a seasoned graphic design professional just looking to your bag of tricks, you're sure to be well served by this video tutorial. For more information, including step-by-step instructions, and to get started using this effect yourself, watch this free video guide.
Pleasantville is a town where everything is preserved in a frothy '50s white bread film, forever stuck in time, orthodox, and unchanging. So when certain objects begin acquiring a technicolor sheen, the townspeople went bonkers.
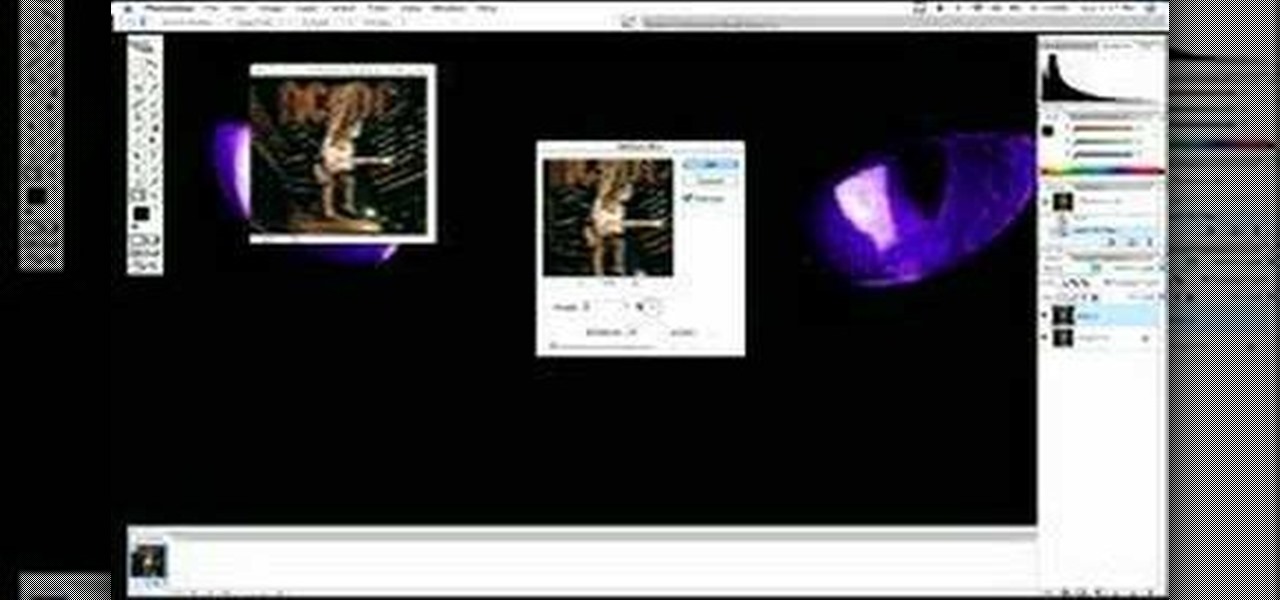
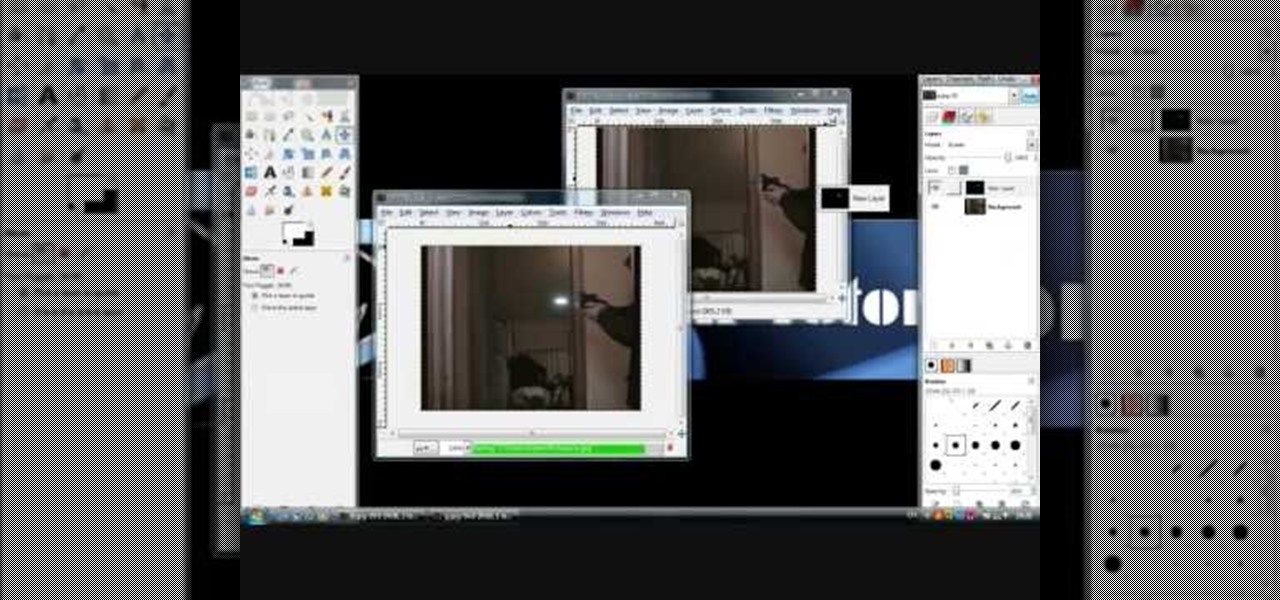
You know those scenes in movies where we see time go by over a single shot? The same image goes from day to night and back again? In this tutorial, learn how to create this great film effect using Final Cut Pro. This video will show you all of the steps you need to know and you will see just how easy it is to do.

If you like the way Compiz works, then you'll love this browser-based compositing windows manager for Firefox. It's an add-on you can install in any Firefox web browser, whether on Windows, Mac or Linux computers.
Here's another cool trick for all you Photoshop fans. If you've been wondering how to make a folded paper effect using the well known software, this tutorial is just for you. It will show you step by step what it takes to give your photo a cool look that is sure to impress others. So sit back and enjoy this tutorial.
Try to use the same brand of spray paint throughout the project, read the instructions, follow them. Different brands may have different instructions, this is why we advise against mixing brands. Begin by lightly sanding your project with 600 grit sand paper, anything lower can potentially scratch your project. Use a sturdy tape to cover the parts you want to leave unpainted. Use a very light coating of primer, sand it with 600 grit sand paper (lightly). To add 'special effects' to the job, u...
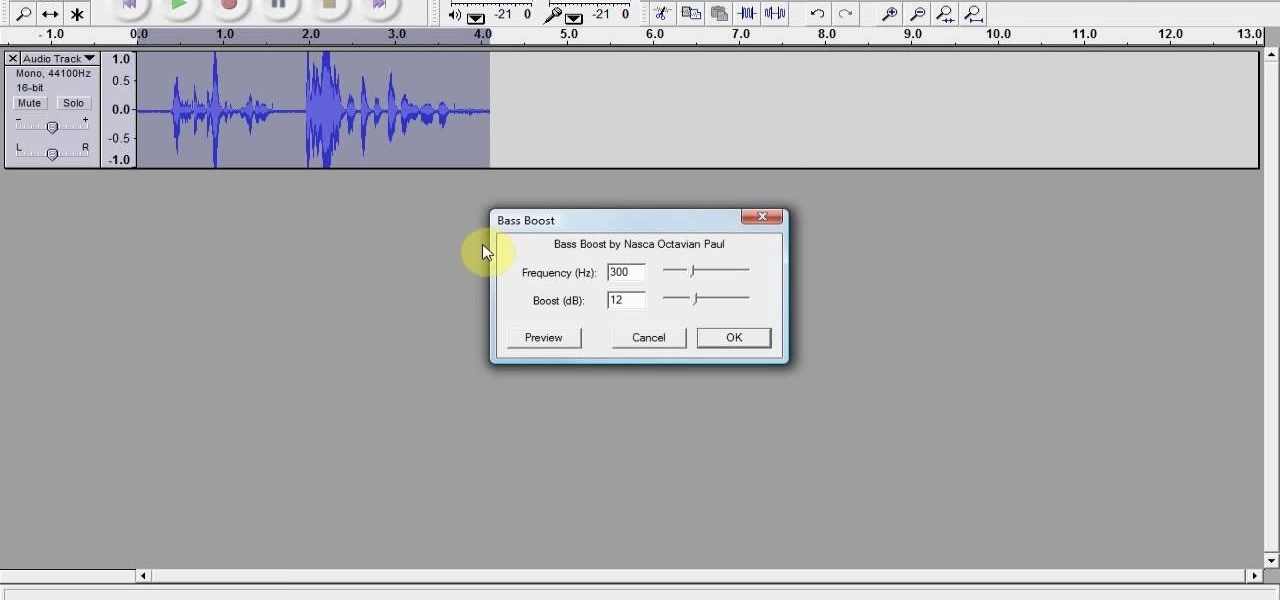
In this Software video tutorial you will learn how to remix popular songs in Audacity. Open Audacity. Go to file > open and find your song for remixing. Then go to effect > change speed. Select a percentage change and click OK. You can change the pitch by going to effect > change pitch and select something and click OK. Play it and see what the pitch change does to the original and select the one that you like. Under ‘effect’ there are plenty of other options available like ‘amplify’,...
This video teaches you how to achieve an eye catching stained glass nail art effect without attending a nail salon. To achieve the striking effect, one needs between 4-7 nail polish colors, and a fine lined nail art nail polish in black. Beginning with the base color, one applies the desired outlines for the "panes" using the nail art brush. Once that is dry and you are satisfied with the outlines, you can begin applying your desired colors to the "panes" achieving the effect of pieces of sta...
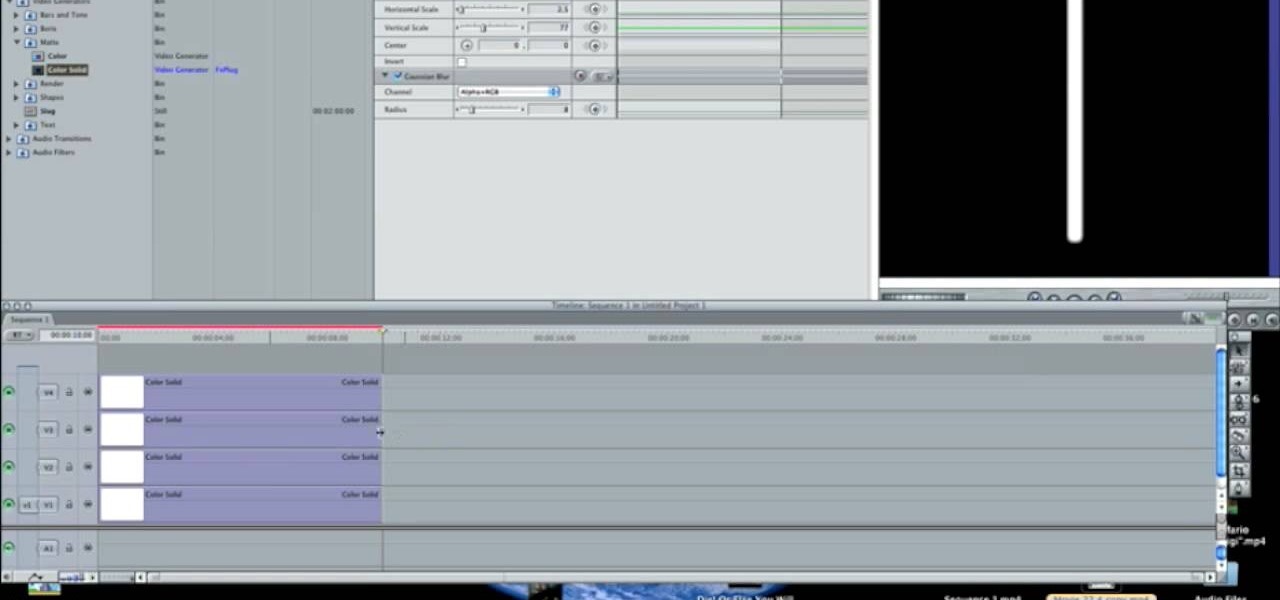
In this how-to video, you will learn how to make a light saber or similar image in the Final Cut Express program. First, go to the effects tab and go to video generators and select color solid. Drag this to the viewer. Go to the control tab and select the blue color. Now drag it to the time line. Double effect the color solid and go to mask shape. Select filters and change the effects settings to 2.5 horizontal scale. For the vertical scale, select 75 to 85. Go to the effects, video effects, ...
To get autotune on Audacity, you will need to have the 1.3.10 beta version from Audacity's website. Verify that you have autotune or G-snap in the plug-ins. You may need to download G-snap from the internet. First, open up Audacity. Then, go to edit and select preferences. Go to effects and click rescan BST effects next time Audacity is started. Then, click the okay button. Close out of Audacity and then reopen it. The program will then import your new files. Your new files will then show up ...
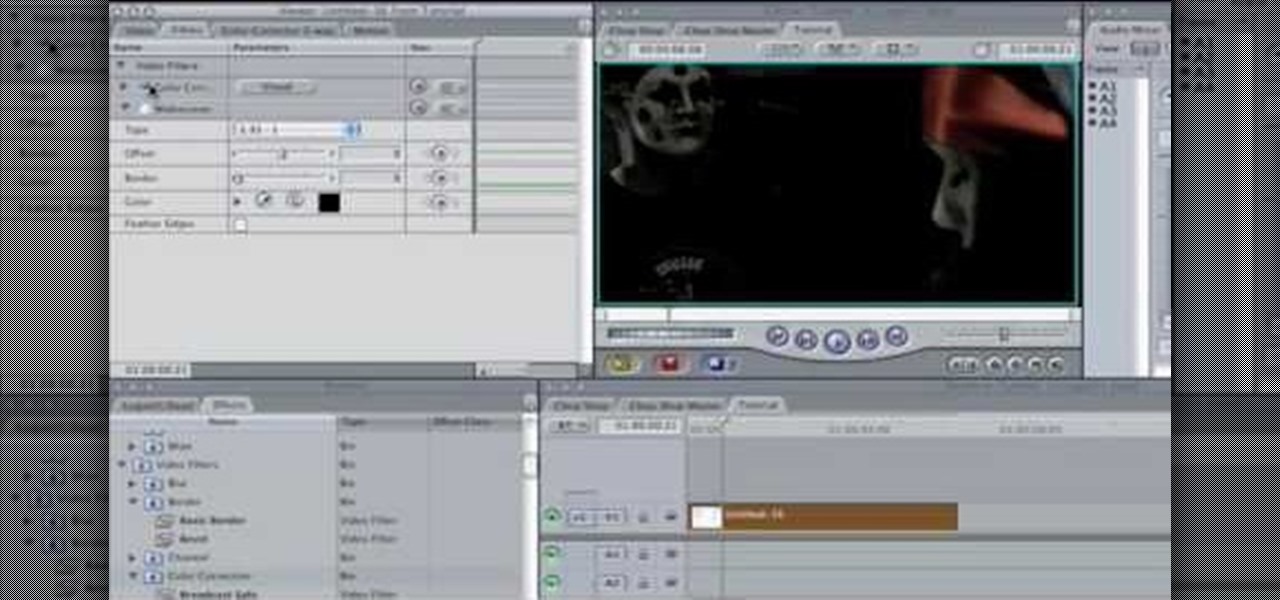
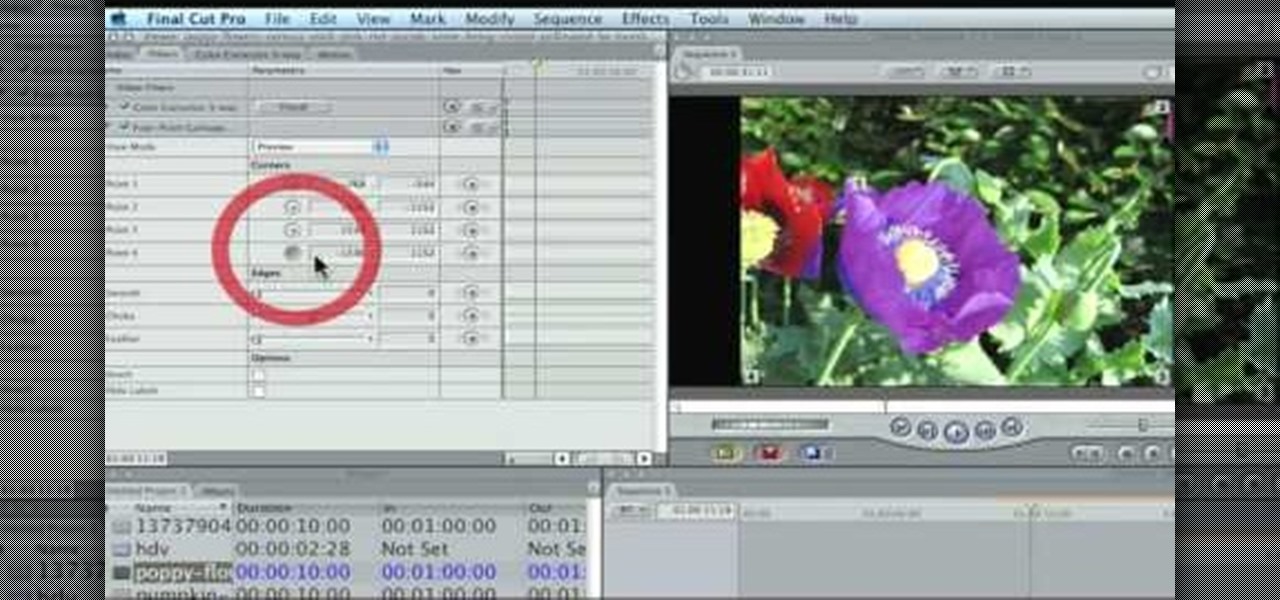
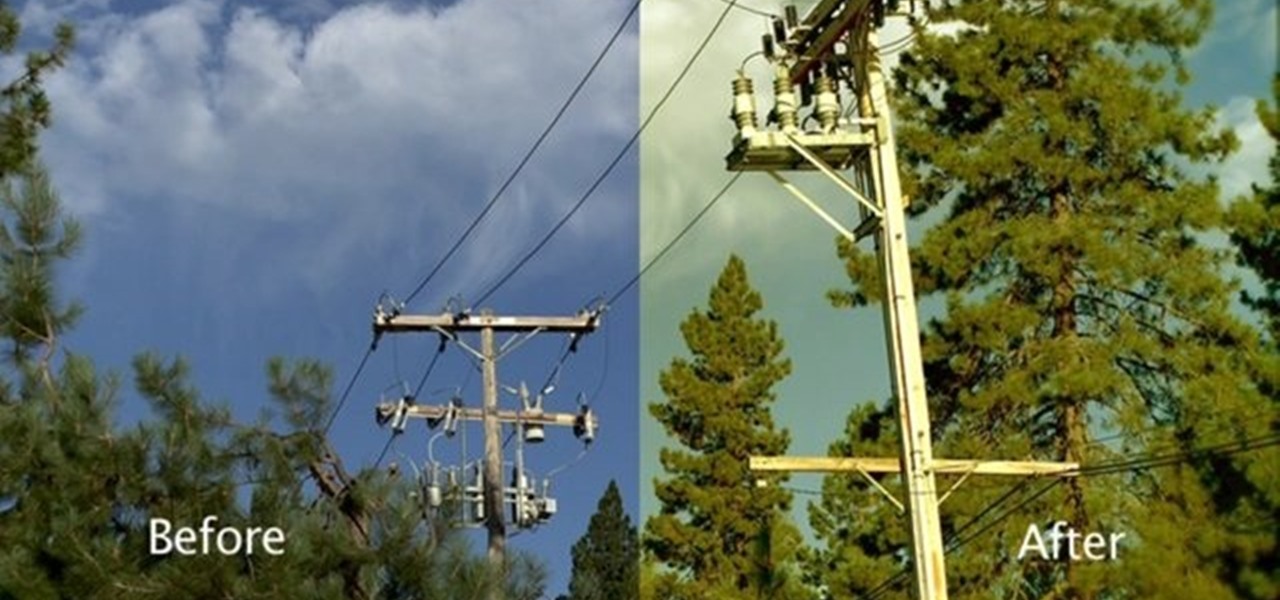
In this Software video tutorial you will learn how to apply the Film Look effect in Final Cut Pro. This is an advanced technique. This essentially takes a video and makes it look like a film. Select the video clip that you want to work with. Then select the ‘color corrector 3 way’ filter. This is under the ‘Effects’ tab. The key to any color correction is to crush the blacks. So, decrease the blacks with the slider. Then increase the whites as films have higher white level. Depending on the s...
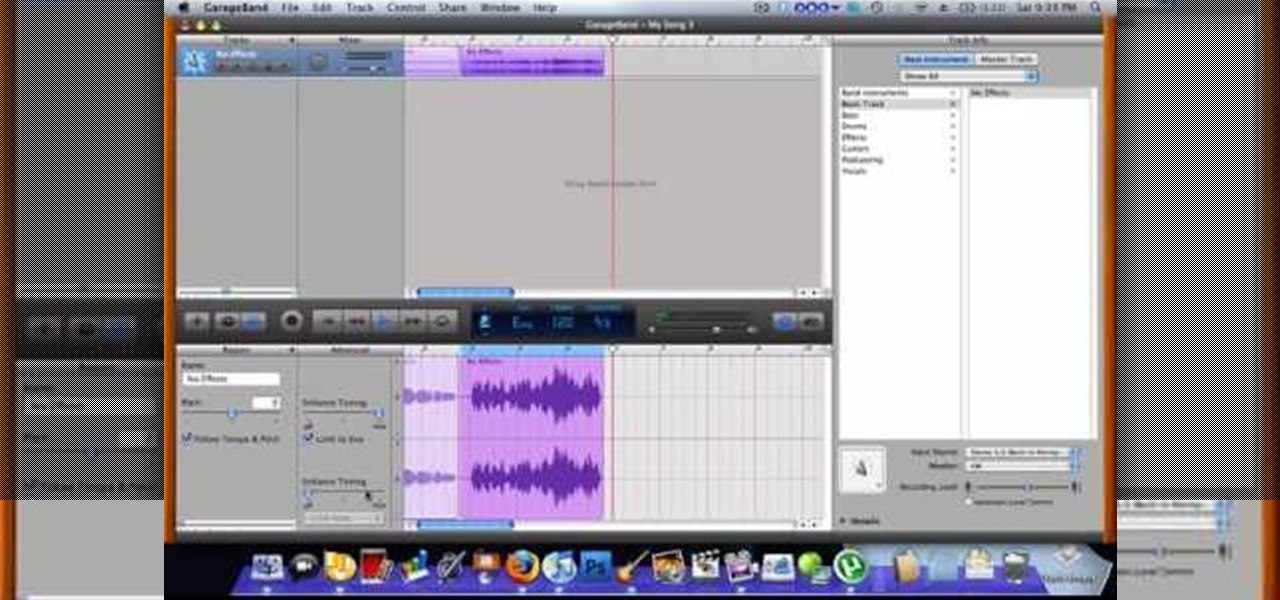
Use autotune on Garageband with your MacFirst, create a new track. Click on real instrumental track. Create. Record your voice. Listen to the recording. Go to view, hide track editor. Go to enhance tuning. You can bring it to max for the TPain effect or choose the enhance tuning setting that you want. If you choose limit key, the program will keep you in the same key as your vocal key. (That was determined by the software.) For vocal effects, record a new track. Choose real instrument track, ...
This step-by-step tutorial will teach you the correct way make a Light-Saber effect using Paint.net.In this video, you will learn how to gather the Light-Saber image, paste the image into Paint.net, choose the preferred color for the Light-Saber, and other special effects such as: sizing your Light-Saber, 'blurring' your Light-Saber, and learning the correct way to save your project.Your first step is to right click on the Light-Saber image and click 'Copy'. Next, you open Paint.net. Then you...
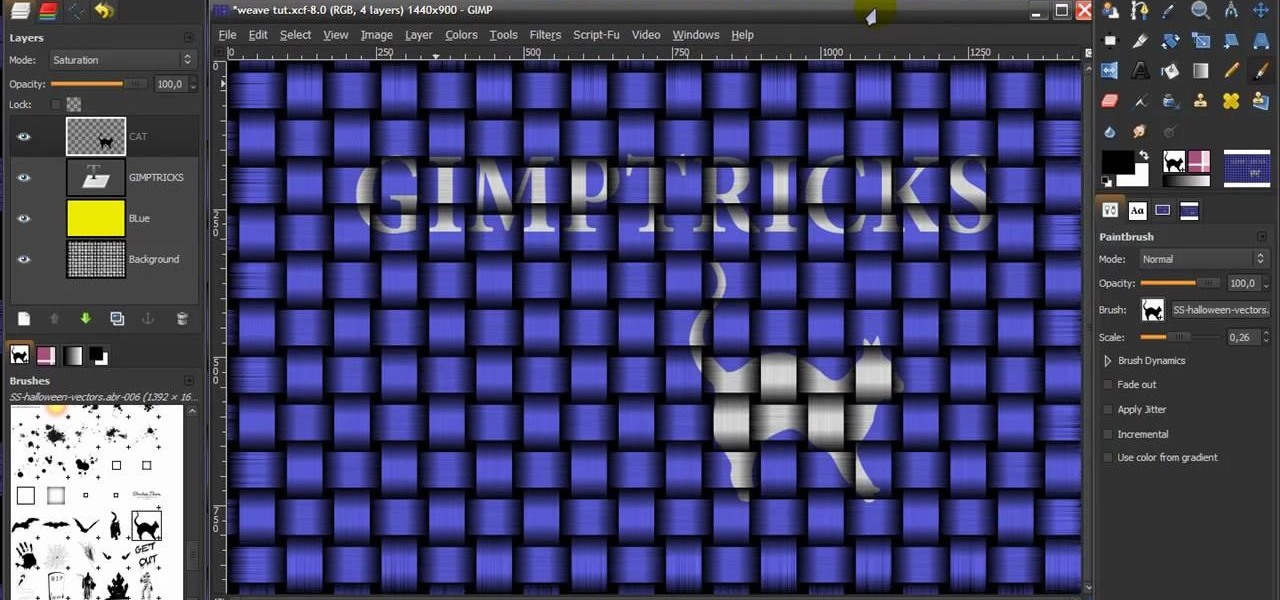
In this video tutorial, viewers learn how to make a metallic wallpaper with a stripped paint effect. GIMP (GNU Image Manipulation Program) is a free software raster graphics editor. This video is very descriptive and clearly explains all the procedures. It provides step-by-step instructions and a visual demonstration for viewers to easily understand and follow along. This video teaches viewers how to use the weave filter and RGB noise, layer modes like abstract, burn and saturation. This vide...
Adding motion to graphics using Photoshop can create an exciting and dynamic effects. Select a picture you want to add motion to. First, duplicate the background layer. Then under Filters, select blur, and then select Motion Blur. Then you set the angle of the Motion Blur. You can select any direction and also set the intensity of the blur by setting the distance setting. Then you will need select the eraser tool and select under Options select the brush. Chose a soft edge brush and erase ove...
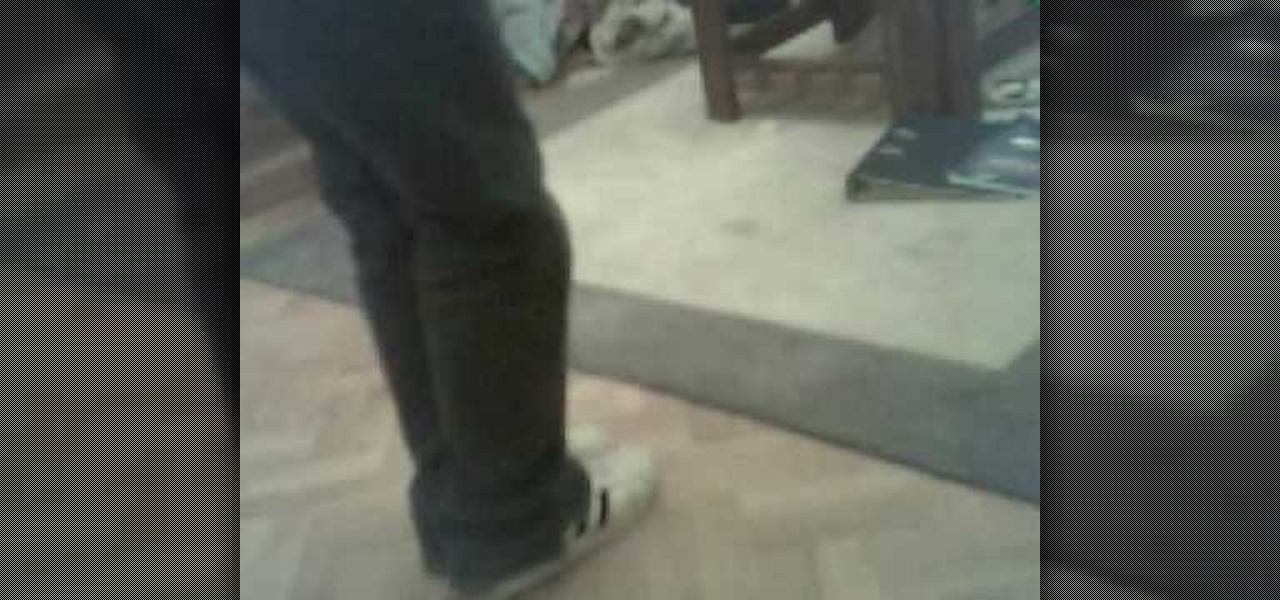
This video tutorial explains How to Levitate Like David Blaine. You do not actually levitate but create an illusion that your feet are off the ground. This effect is based on the point of view of the spectator (what can be seen and what cannot be seen). When you perform the effect, do not tell the spectator what you will be doing, this prevents them from looking for things. To perform the effect, you need to stand at a 45 degree angle so that the spectator can see your left foot and only the ...
This video describes how to use the Chroma Key Effect in a few easy steps.
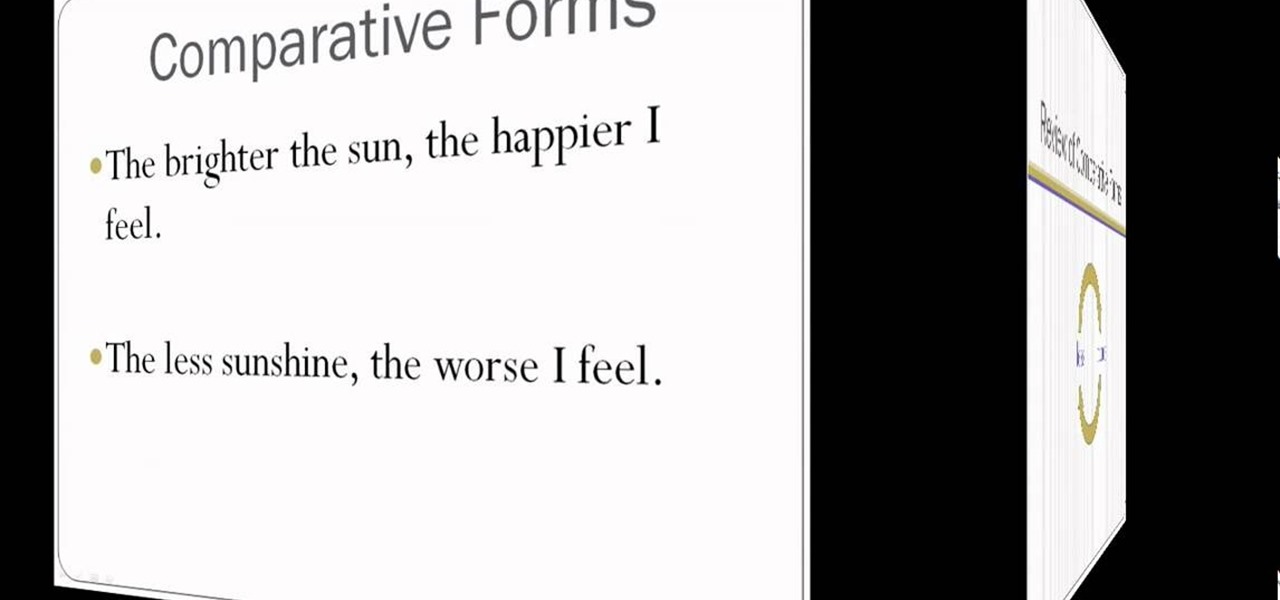
This is a tutorial segment of Double comparatives of English Grammar. In this lesson, the instructor is explaining about how to express a cause and an effect in a easier way with examples. She says that it’s the relationship where one thing makes a change on another or one factor say for example sunshine, produce a result in another by making us to feel happy. Comparative forms are used to express a cause and effect. Words like brighter, happier are examples for that. For example, in the sent...
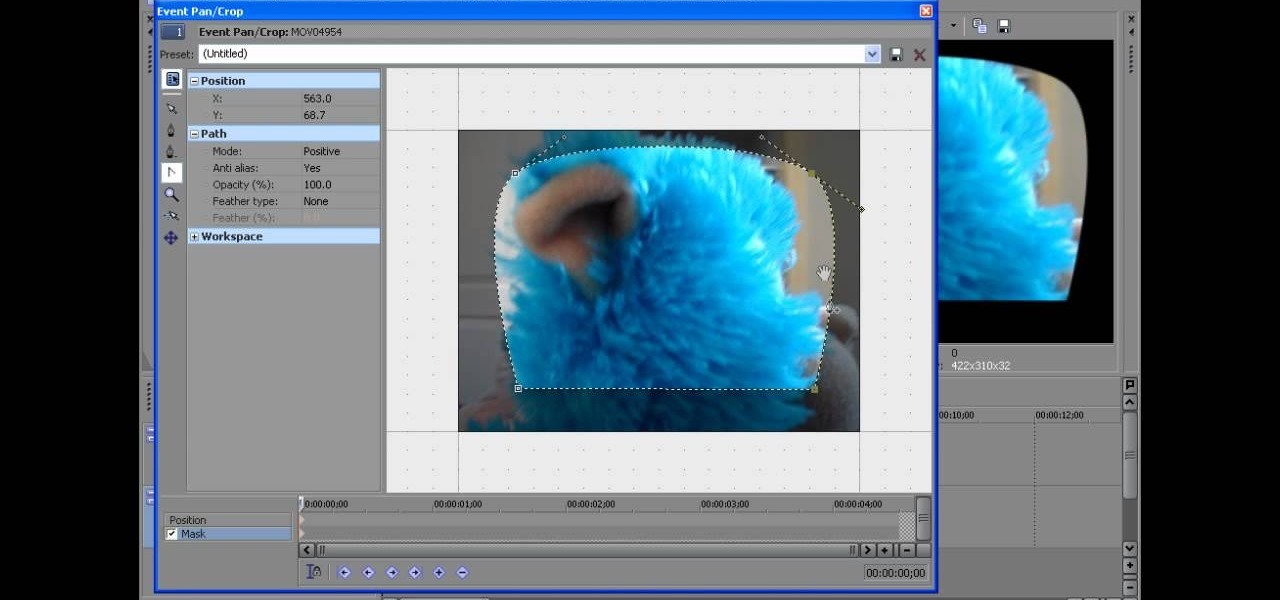
This is a helpvids video that demonstrates how to use the pan and zoom features in the Pinnacle Studio. By clicking on the video camera icon above the time line, you will see the special effects options. First select the scene you would like to add the effect to. Then chose the Pan and Zoom special effect. Key frames are used to control the zoom level and the panning. Insert the first key frame, set the zoom and pan position. Next insert the last key frame and set ending zoom level and pan po...
The video shows us how to create a dreamy effect in Photoshop. Firstly load the image in the Photoshop and then unlock the layer by double clicking on the layer, press unlock and OK. Now make sure your background and the foreground are black and white respectively and if it’s not then press D and it will reset. And then go to filter, click on distort and select diffuse glow. Here you put graininess as zero, glow amount as 6 and clear amount as 19 and press OK which will make the glow with lig...
This video demonstrates a way to use the lomo effect on pictures in Photoshop. The effect makes colors stand out more, thus making the picture stand out more. The first step in adding the lomo effect is to change the color curve levels of the picture by going to Image > Adjustment > Curves in Photoshop. They should be changed very slightly, from a straight line to a slight "s" shape curve. After this, the gradient map should be changed to a black to white gradient. Finally, the mode of the ne...
Todd welcomes us to a new episode of the YouTube show All Things Adobe - Chad and Todd Podcast. This episode concentrates on adding alpha and rotation effects to Dynamic Text Field in Flash CS3. First we get to see a 100 frame text animation and the preview works perfect in the program. But when you go to preview it in an outside window, the effects do not work, due to the default nature of the settings. You have to go to Library, then click the text symbol. Click embed in the property inspec...
ChadandToddPodcast teaches you how to use the spry framework for AJAX in Dreamweaver CS3. This allows for effects on the page to happen, without the need for the browser to refresh. You start with a simple .html page. You have 2 buttons and 2 div tags with text in them. Div 1 and div 2 have the visibility property set to hidden. Click on the div 1 button, go to Tag inspector and click behavior with a plus. Click Effects and choose Appear/fade. The target element should be div 1. Fade from 0 t...
Egg Bram teaches you how to create a cut text effect in Xara Extreme. Create a simple colored rectangle and add some text on top. Then select these two objects and go to Arrange - Combine Shapes - Subtract Shapes. Now the two objects have combined into one. Although the text appears to be white now, if you move another object underneath you will notice that the text is transparent. You can also add effects to this new objects, like a contour or a shadow.
In this video tutorial from PrimeLoops, host Nick, teaches you how to create a beat, using beatbox samples, in FL Studio. You will learn how to drag samples from the browser interface to the channel interface, so that you can use them. As you follow along, Nick shows you how to lay down a beat, add effects to the sounds, how to re-level sounds to compensate for clipping in the peaks of the track, as well as how to automate some of the parameters.
British record producer David Spoon explains how he uses the computer program Propellerhead Reason 4 to create rhythm and bass tracks in his home music studio. He explains that by just messing around with the controls within the program, you can create a lot of interesting sounds and effects. Sometimes the best sounds are discovered by accident. He uses Filter 2 to create interesting effects that he describes as "acid-y" or "nasty", having to do with the resonance of the bass sound. He also a...
In this Adobe Photoshop tutorial the instructor shows how to make a torn image effect. He shows you a sample image of what it is going to look like after producing that effect. It basically looks like as if the photograph was torn to pieces and then put back together with the cracks visible. To do this first open the image in Photoshop. Now make a rough outline of the tear with the polygonal lasso. After generating the tear go to filter and in the distort sub menu choose the ripple. Now it ap...
Planet are cool and explosions are awesome so what could be better than an exploding planet. This tutorial will how you how you can create an exciting and adrenaline invoking exploding planet in Adobe Photoshop without too much work.
In this video by Task Tutorial we learn how to create a simple text effect in Flash. The first step is to create the text you want to use. Then use CTRL-B to break apart and distribute to layers. Now, convert your letters into movie clips using the menu options. Then add key frames and edit Alpha values in all of the letters. Alpha must be 0. Then add motion to the values and at frame 10 add a key frame. And at frame 15 add another key frame. Next use the free transform tool to move the text ...
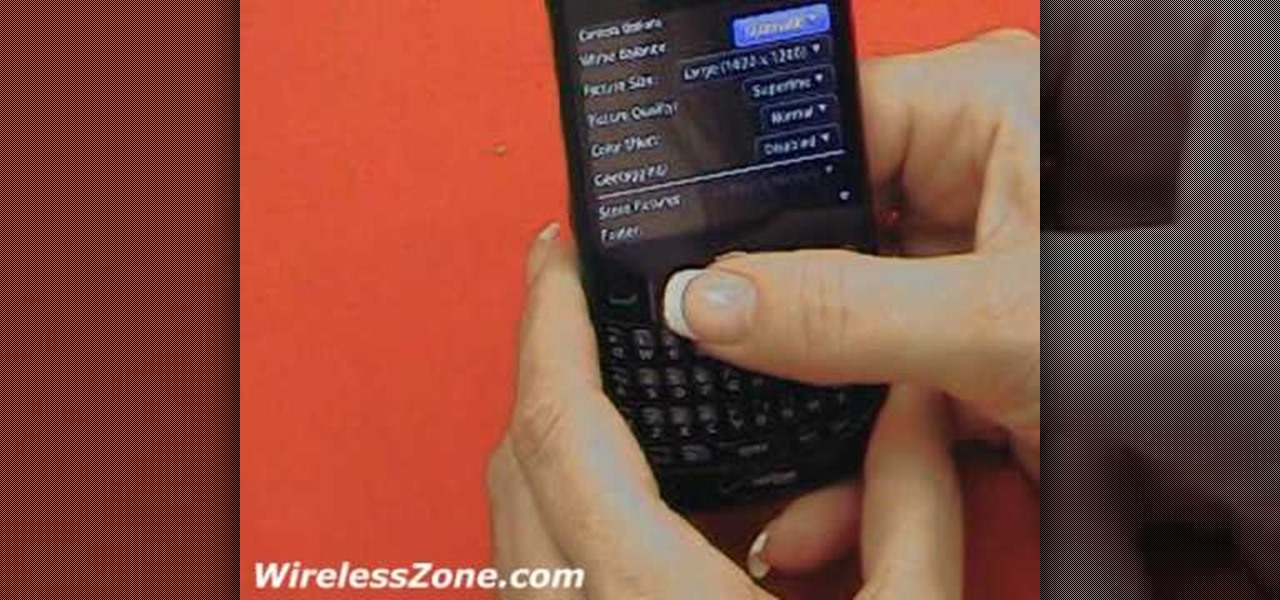
This video tutorial shows both the basic features and more in-depth uses of the Blackberry Curve II camera's capabilities. The tutorial goes through many options, providing a good description of how to access and use each. The viewer will learn the specifications of the camera including its mega-pixels, zooming capabilities, and so forth. Manipulation of lighting effects, color effects, and options when saving and deleting pictures are just some of the components reviewed.
In this little video tutorial, kaje01 demonstrates both the basic edit and advanced techniques for applying the "x-ray" effect using GIMP. Now, what is there to x-ray? Hmm...
One thing you need to know in particular about Sony Vegas is rendering. If you don't know how to render, you're not going to make a good film or video. So watch this and see how to render video in Sony Vegas.
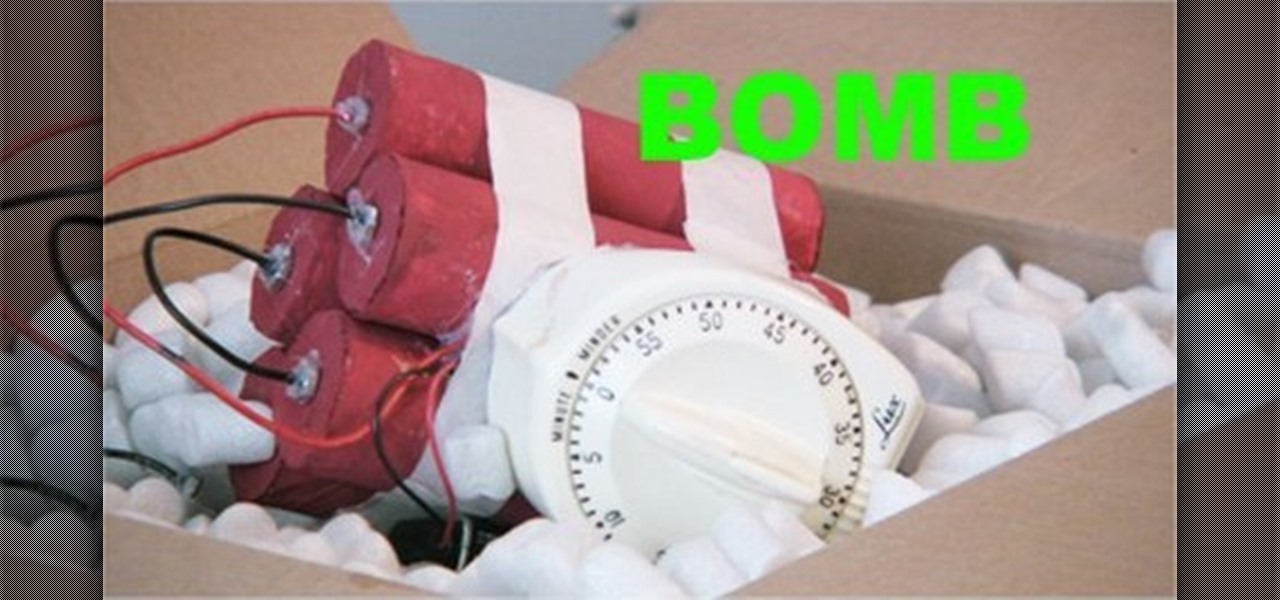
Dynamite your way to movie success with an explosive bomb. A fake explosive bomb, of course. TNT on a timer is a great movie effect for you action flick. Watch this video tutorial to learn how to make a prop movie bomb.
Creating a curved video look, also known as the fisheye look, is one of the easiest camera tricks possible, and can also be done with your editing software. It's commonly used in skateboarding videos, but be done for any low budget indie film. See how to create a fisheye look in Sony Vegas Pro 9.
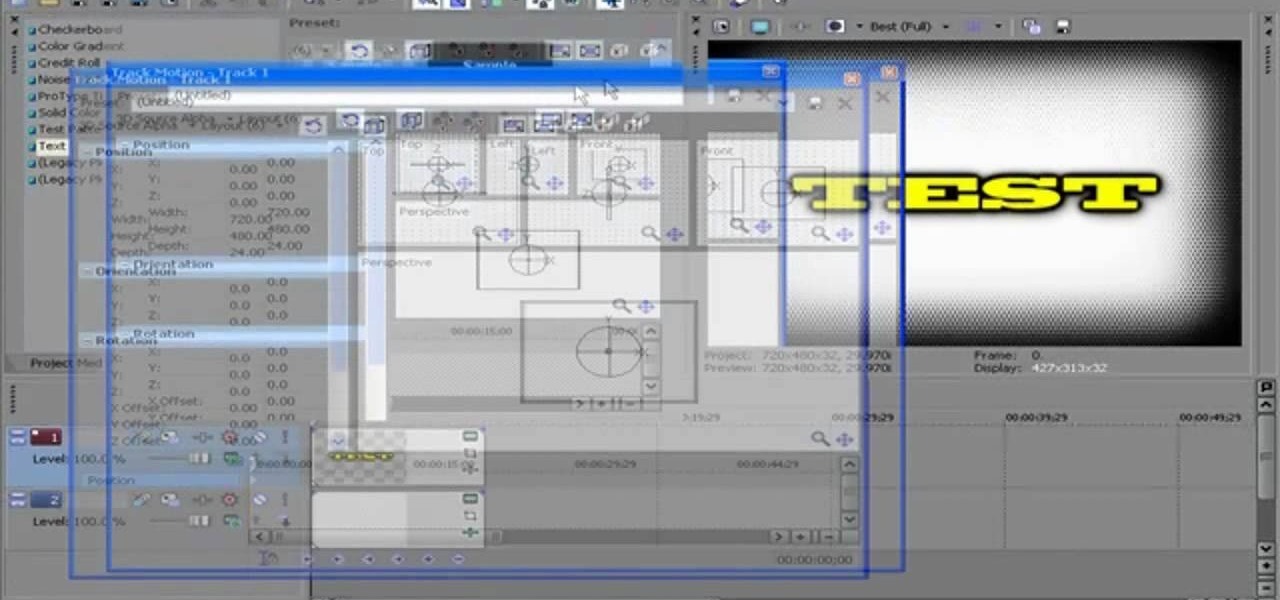
If you own Sony Vegas, a good editing technique to learn is tracking motion. Track motion is the ability to rotate, scale, and skew an object in 3D perspective. This is great for making intros, titles, animated pictures in your homemade videos and much, much more. See how to track motion in Sony Vegas Pro 9. These are the basics.
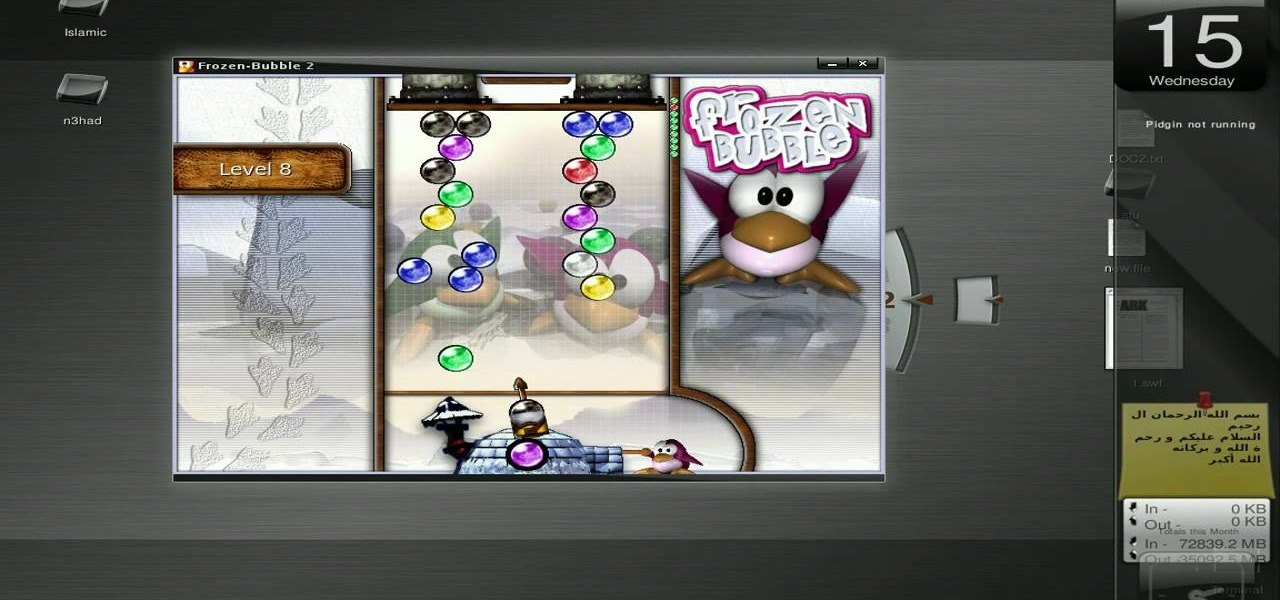
New to Ubuntu Linux? This computer operating system could be a bit tricky for beginners, but fret not, help is here. Check out this video tutorial on how to install Frozen Bubble 2 on Ubuntu Linux.
Check out this video from Chemical Reaction Tutorials (CRTutorials). If you love filmmaking, prop making, editing and everything else that goes along with making movies, then you'll want to see what Adam has to say about laser guns.