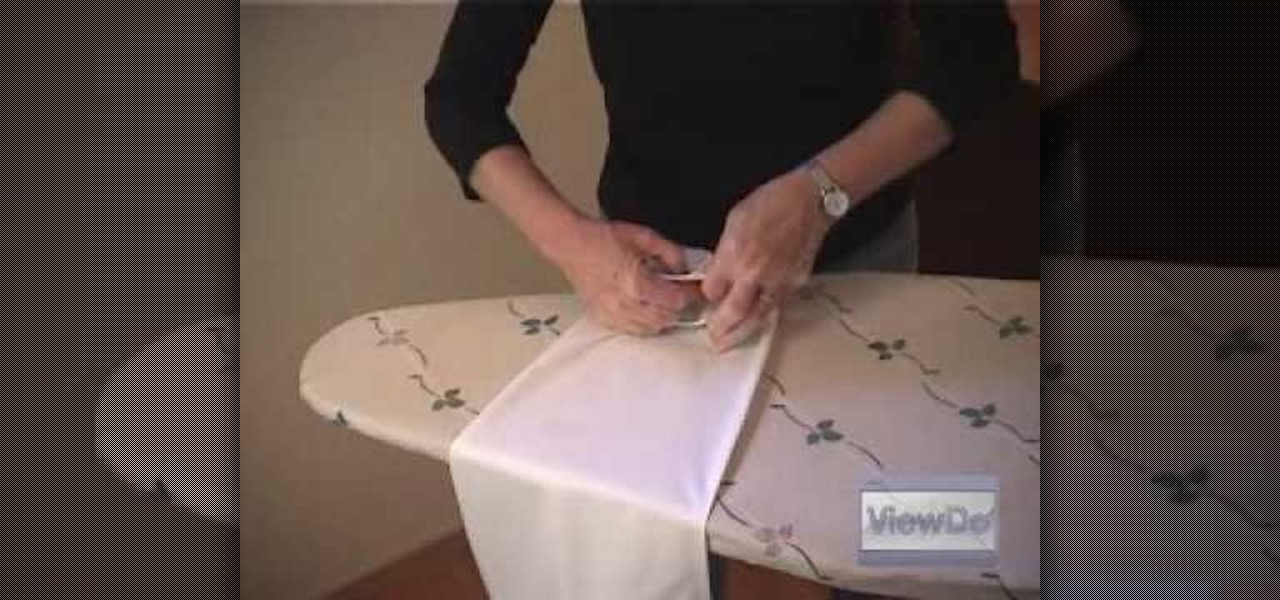
Ironing a button up shirt is an important way to make sure you are always looking in top shape. When ironing a man's shirt, you should always start with the collar first and then move to the shoulders and back. Make sure the shirt is stretched out properly over the ironing board. Then move from the shoulders and down the sleeves, making sure you iron both sides, moving slowly and carefully. After ironing your shirt, make sure you hang it up to prevent more wrinkles from forming. Using this ca...

You're never too old to join in the fun. A 99-year-old woman helped Bismarck, North Dakota, recapture a snow-angel-making world record. Learn how to make snow angels.

Learn how to perform the Scissor Cat Display with cute, female magician Baby Cat. First, Baby Cat demonstrates the methods & then goes into the display. Watch carefully, and with practice you will be able to perform the Scissor Cat Display card flourish trick as well as your instructor. Card flourish is a term magicians use for the skill & technique of card handling. No magic is performed, card flourishes just amaze and display the dexterity of a magician's hands.

This video knitting tutorial demonstrates a technique for attaching a pocket that is the same as that used for inserting a heel. Following the pattern directions, you knit some of the stitches with waste yarn to mark the top of the pocket. Carefully remove the waste yarn and put the loops above and below onto double-point needles. If you're worried about dropping stitches, you can pick up the loops as you go. Remove all the waste yarn and then go back and pick up the stitches. The loops on th...

Prescription swimming goggles cost almost as much as a new pair of glasses. That's way too expensive, especially if you don't get to go swimming as often as you'd like. But using the clever tips in this video tutorial, you'll be able to make a pair of prescription swimming goggles for less than you'd spend on a tank of gas to get you to the beach.
Check out this interesting video to make photorealistic stencils for t-shirts, bags, and other accessories. This video documents how to make a Nikola Tesla shirt. With Adobe Photoshop, it is possible to simplify a found image into a graphic format perfect for stenciling. You can then print out the altered image into mylar or another water resistant paper. After carefully cutting out the stencil, place the mylar over an ironed t-shirt. Complete the stenciling process by dabbing paint into all ...

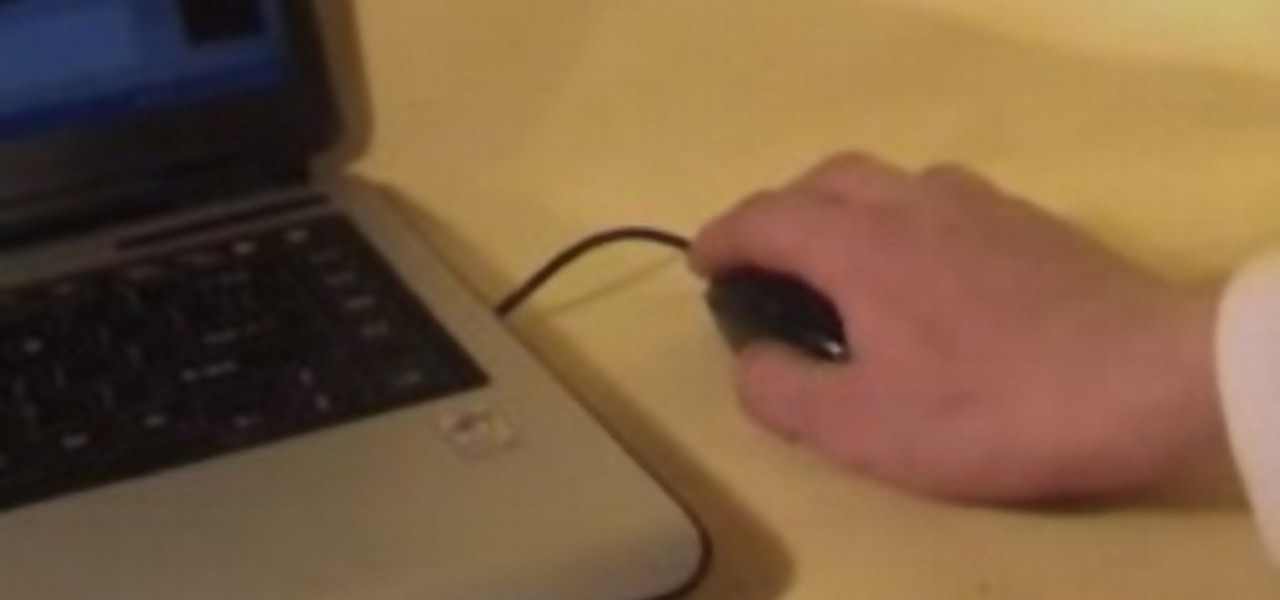
This video tutorial demonstrates a mouse-hacking simple prank sure to annoy any friend or colleague. To replicate this hack, you'll need a mouse and a musical key chain. The steps are roughly as follows: First, open up the mouse. Looking inside, find and remove the scroll wheel, then pull out the mouse's old cable. Take a musical key chain and open it up. Find the musical module with two red LEDs. Carefully glue them to the right-click. Then put the LEDs where the mouse's laser is before fitt...
All you need is a single long piece (at least fifteen meters) of sturdy paracord, as well as a clasp for either end. You can also use this technique to make a rifle sling or something else for which you will need a long length of woven paracord. The knot itself is not difficult - just watch carefully and make sure you've given yourself enough time to finish this project. A great project to make for yourself, or the survivalist in your life.
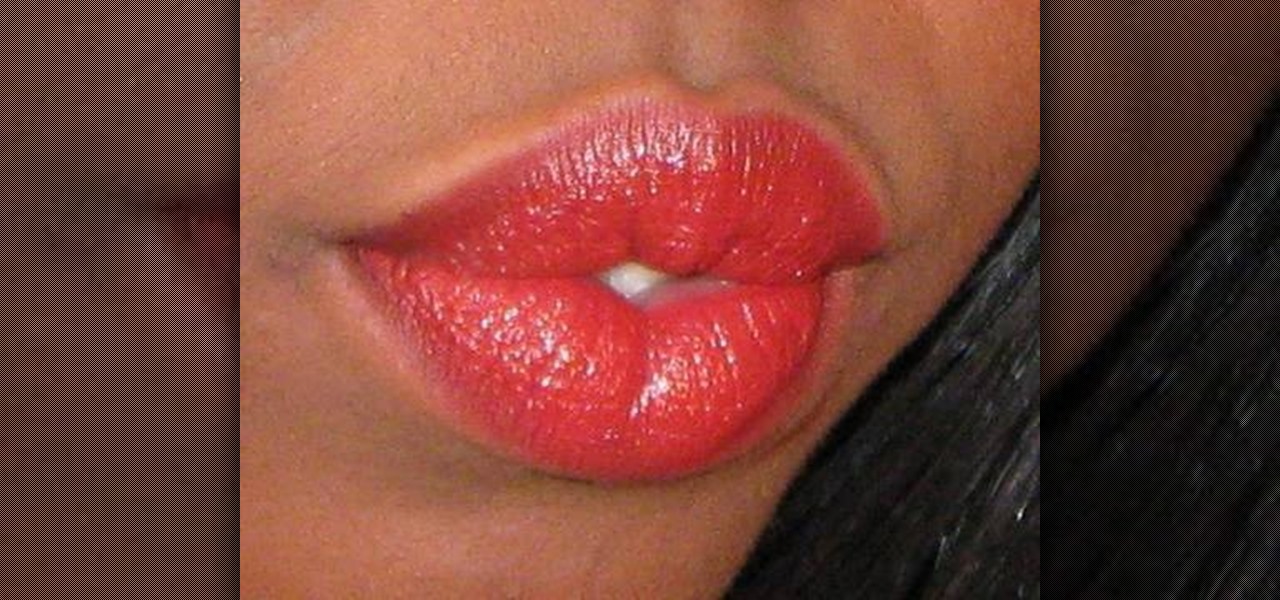
In this tutorial, we learn how to get perfect red lips for African American skin. First, take a dark red lip line from Studio Gear named "red wood" and apply it to the lines of the lips. Once your lips are fully lines, grab your lipstick and apply it to your lips carefully. The liner will be darker than the lipstick, so make sure you blend them in together lightly. After you are finished applying, clean up any smudges on the edges of your mouth. Then, apply makeup on the bottom an sides of th...
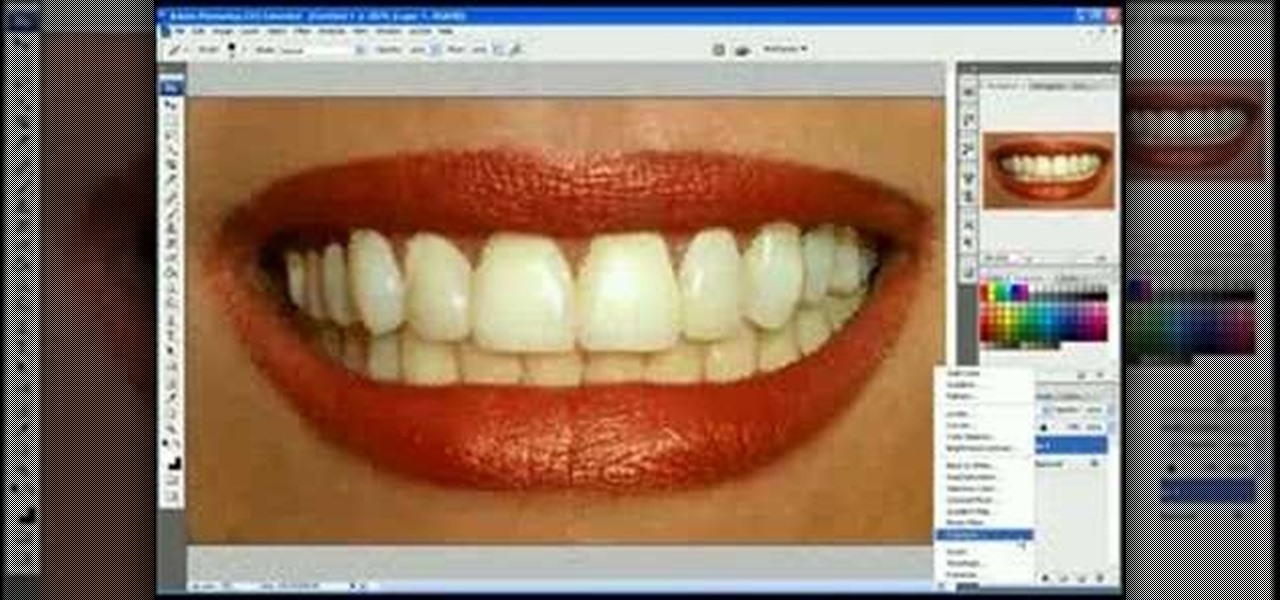
In this video we learn how to whiten teeth in Photoshop like a professional. Start off by opening up Photoshop and zooming in on the teeth in your photo. Start out by selecting a hollow brush and then paint the selection onto the teeth. Paint around them carefully and make sure you don't touch the gums in the middle and on the top of the teeth. Once you have selected the entire area of the teeth you will see them all covered in red. Then, go to "select" and "inverse", then press the button fo...
In this video, we learn how to make a colorful tutu. First, you will need to grab all the colors of fabric that you want to use on your tutu. Then, roll up the fabric of each color carefully, then cut it out to the length you have measured for your subject. After this, cut out one more smaller section of fabric from each piece until you have done this with all of the colors. Now, using a piece of ribbon as the waistband, tie each piece of colored fabric onto it, alternating colors each time. ...
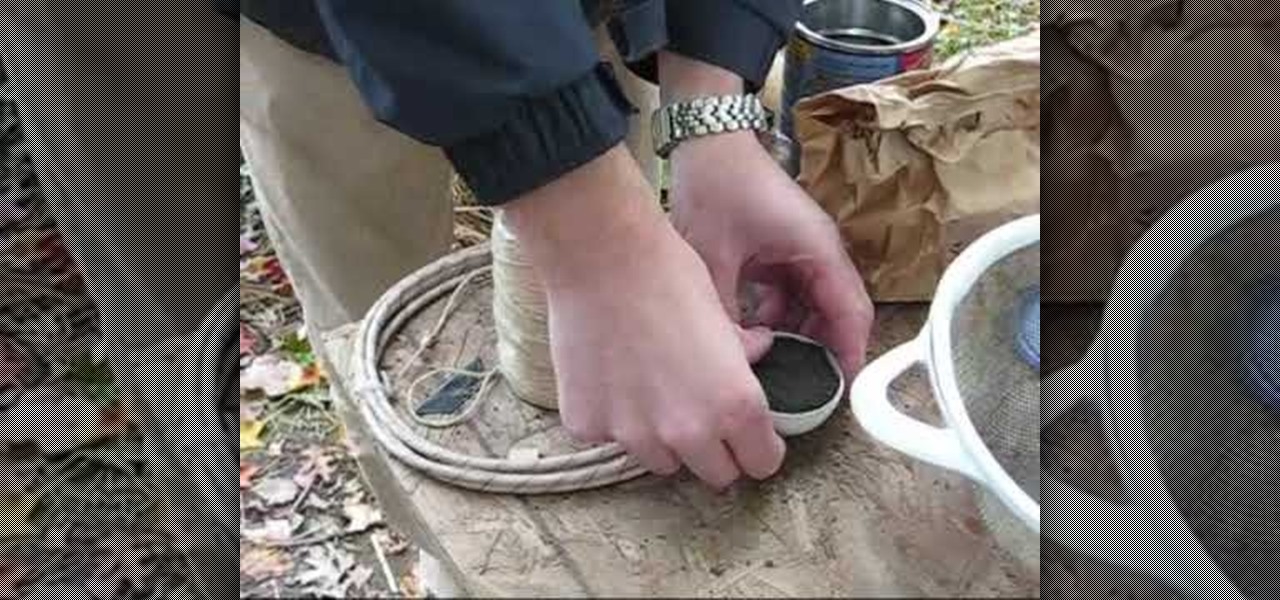
In this tutorial, we learn how to build bar shells and other explosives. First, you will need to pack up the explosives into a container tightly. Then, you will need to wrap it up inside of string tightly and tie it shut tightly. Apply a piece of thick paper over the explosive and then tie it shut again. Once you are finished, you can place all of these inside of a large tub and carry out to use as explosives. Make sure to do this carefully and don't light these when you are close to them, or...
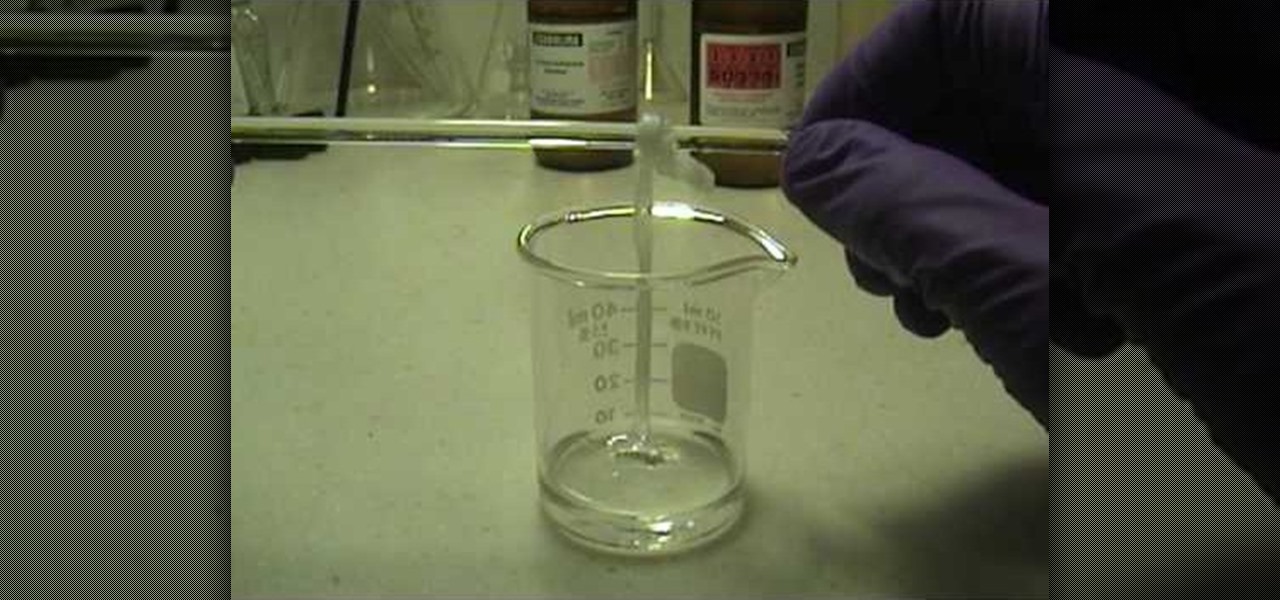
In this tutorial, we learn how to make your own nylon. You will need: pipettes, pipette filler, forceps, beaker, stir rod, sebacoyl chloride and hexanediame solution. Now, pour some of the hexanediame solution into the small beaker. Add in a food coloring if you want to make this a specific color. After this, add in 4 cc's of sebacoyl chloride and carefully drip into the side of the beaker. You should see a layer of where the two liquids are after this. Now, take your tweezers and reach into ...
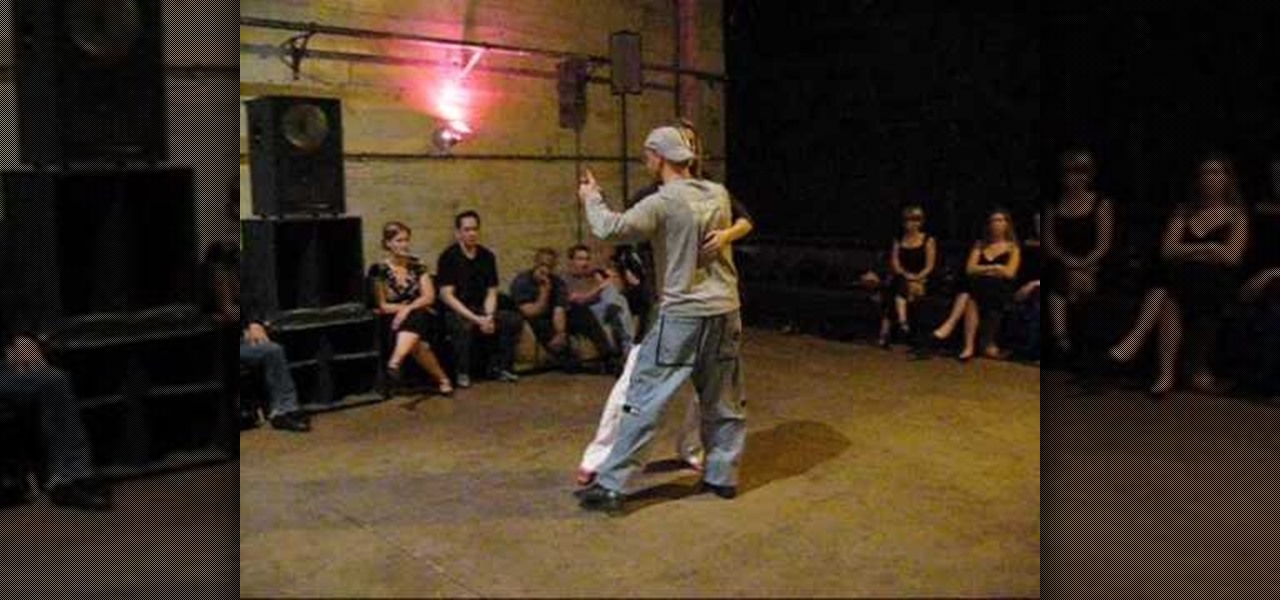
In this tutorial, we learn how to use breathing & intention in tango. Use the pattern of walking into the cross and add in elements of staying in the line. Lead the cross carefully and slowly by breathing slowly to help make an easy transition from closed to open. Put all these elements to help make the dance look better by paying attention to the details. Keep in mind that people are looking at you and want to see someone happy dancing. Keep a smile on your face but also make sure to pay clo...
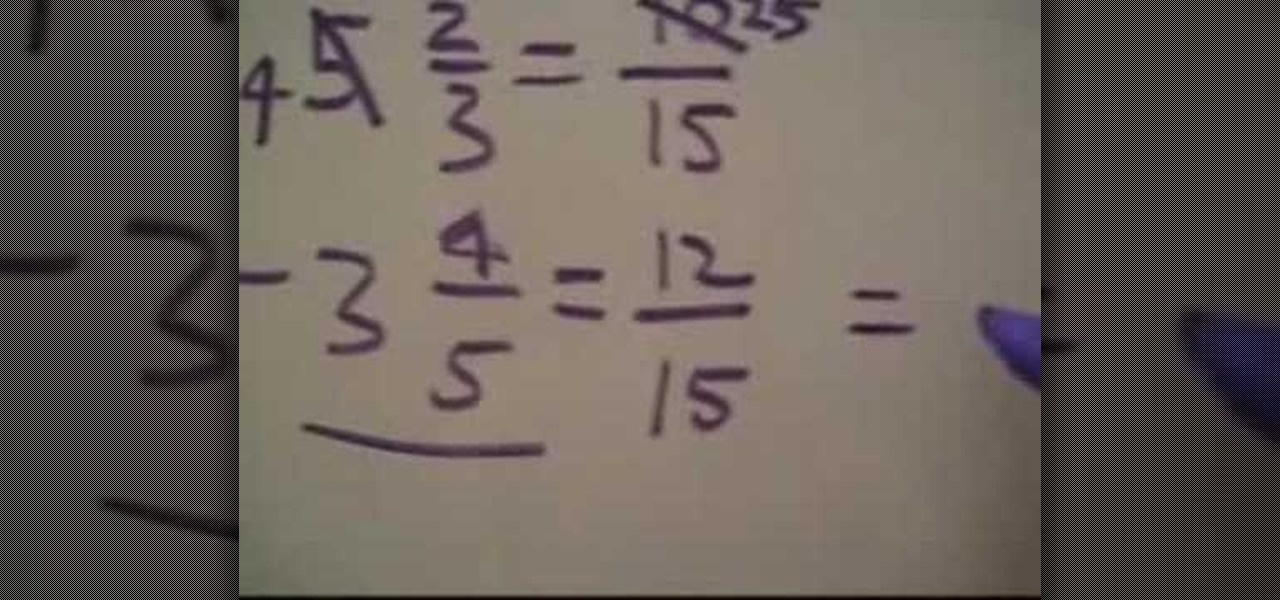
In order to subtract mixed fractions, you'll need to look at the denominators carefully. If the denominators do not match, you'll need to find a common denominator. For example, 5 2/3 minus 3 4/5 do not have the same denominator. The lowest common denominator for them is 15.
In this video, Jeff gives some tips to frequent travelers on how to avoid bringing bed bugs home with them. First, you should begin with inspections of a hotel room, making sure to bring a flashlight and looking carefully in the bed for any bugs. After a stay at a hotel, you should always check yourself for bed bugs before going home. This includes methods such as placing your suitcases in bags in order to avoid infesting your car and emptying your clothes from your luggage outside your home ...
So after much hard labor and patience, you've finally thrown your first vase, fired it carefully in the kiln, and let it harden to a fine finish. What to do next in your pottery making journey? While a beautiful vase is a beautiful vase no matter the finish or color, applying a glaze is like putting on makeup: sure, you don't NEED it, but having it on dramatically improves and accentuates your features, making cheekbones more sculpted, eyes wider and brighter, and lips more well defined. In t...
In order to make and use a stencil, you will need the following: pencil, blue painter's tape, Dura Lar film, Self-healing mat, spray adhesive, old canvas board, airbrush, compressed air, airbrush paint, utility knife, paper, eraser, and an idea for a stencil.
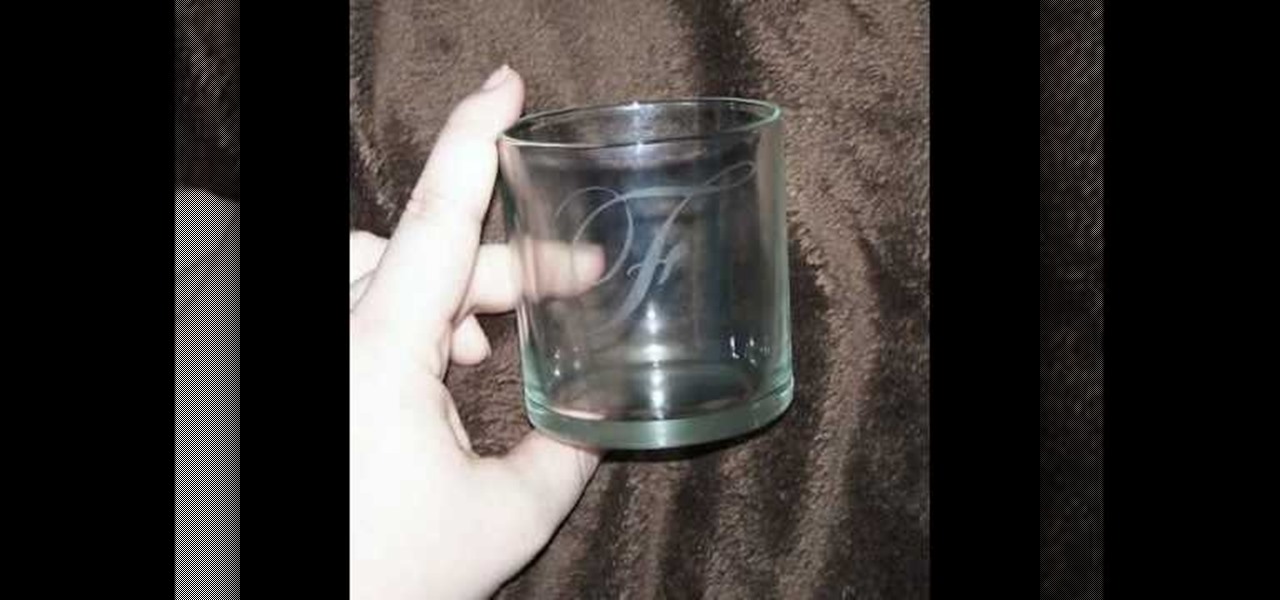
In this video tutorial, viewers learn how to etch glass in 5 minutes. The materials needed for his procedure are: contact paper, Armour Etch and a paintbrush, glass and a sink. Begin by cutting the contact paper face up on a circuit mat. Cut it on medium speed and pressure. Then put the contact paper on glass. Work carefully to prevent any wrinkles and bubbles in the design. Now put the etching cream on in a dabbing motion. The etching cream will not run into areas that are not stuck down. Fi...
In this video tutorial, viewers learn how to make a stencil. The materials needed for this project are: contact paper, scissors and a pencil. Begin by drawing the design, shape letter or number on the contact paper. Make sure to draw the stencil on the back of the paper and make it reversed. When finished drawing, carefully cut out the design. To use it, simply peel off the invisible paper and place it onto the surface of the artwork. Then trace over it. This video will benefit those viewers ...
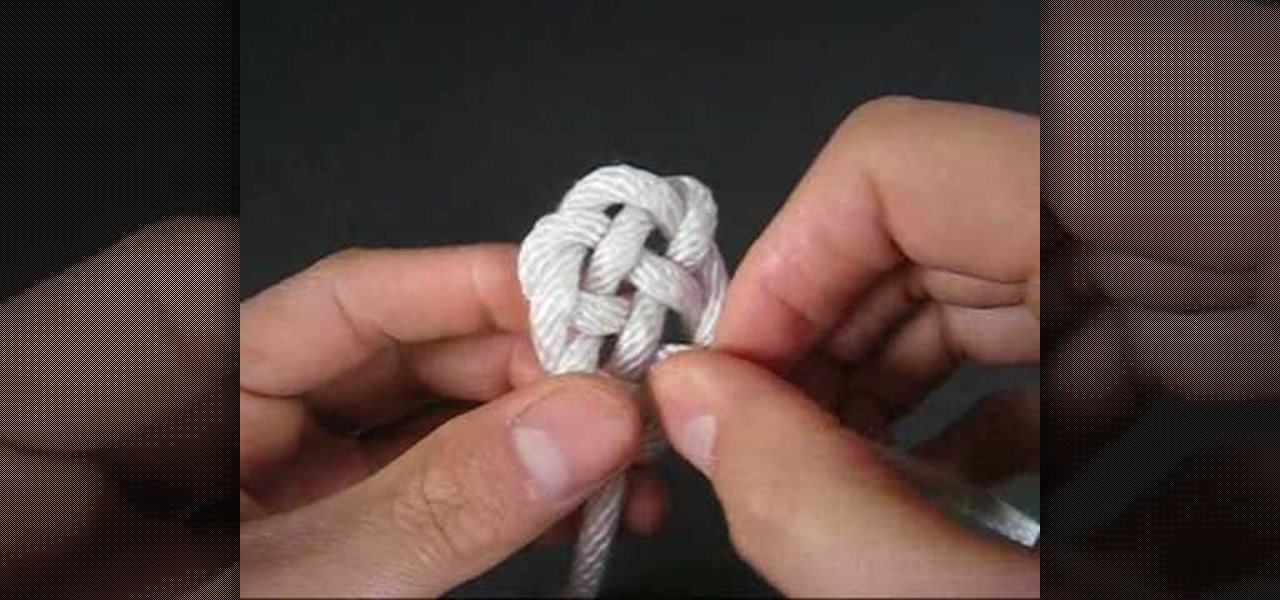
In order to create a Key Hole Weave Knot, you will need: rope or twine. Begin by making a loop. Then, make a second loop next to it. Cross the loops, placing one on top of the other. Weave a free end through the loops. Next, weave the other free end through the loop. Pull them both through carefully. Next, you'll need to shape your knot, by making sure that the spacing is even.
In this video tutorial, viewers learn how to draw curves like an architect. The first way is to use circle and oval shaped templates. When using the template, push down on it firmly and carefully picking the template back up to not smear the pencil marks. If the template does not come with a raised backing, use some built-up tape for leverage. Never use permanent markers with the template, work with dirty hands or cut with the template. Users can also use French curve templates and compasses....
In this video tutorial, viewers learn how to pack lampshades. Most lampshades are packed into 4 cu ft cartons. Begin by placing crushed paper into the bottom of the box. Then place clean sheets of packing paper over each side of the box, making sure that the flaps and inside wall of the box is covered. Now carefully place the lampshade top-down into the box. Then spread clean packing paper over the shade. Now gently place the smaller shade into the larger shade and pack in the remaining packi...
In knitting speak, pearling is just a fancy schmancy term for creating ribs in your crochet project. Ribs help to create a regular pattern and add visual interest to caps (as in this tutorial), scarves, Afgans, and just about any crochet craft.
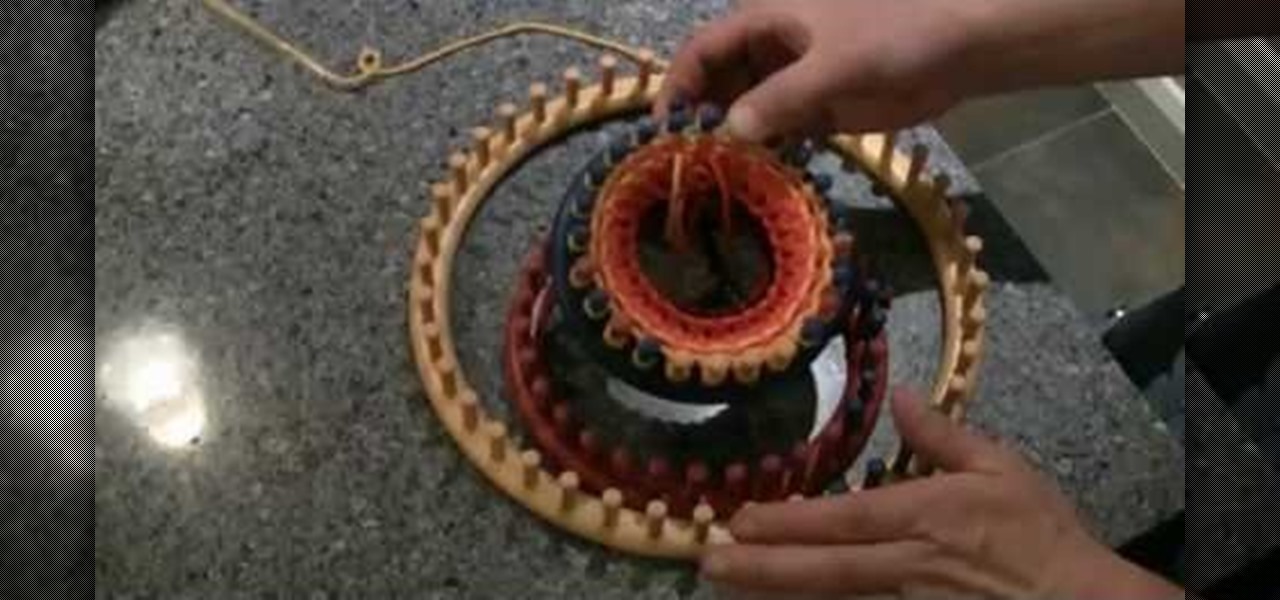
We all know that color coding is important because it helps us to quickly organize things based on visual cues. As students in high school, we used differently colored page tabs to denote different subject matters, and some of us color code file cabinets for easier and faster access. The same principle goes for this tutorial, which teaches you how to color code a knitting loom.
In this video, we learn how to cut a piece of glass with scissors, water, and a lighter. First, you will need to grab a lighter and place it under the piece of glass that you want to cut to heat it up. Next, you will place your piece of glass into a sink full of water and cut your desired piece. Make sure to cut carefully, as you can get hurt very easily when dealing with sharp edges of glass. Make sure you are keeping the piece of glass you are using completely submerged in the water, along ...
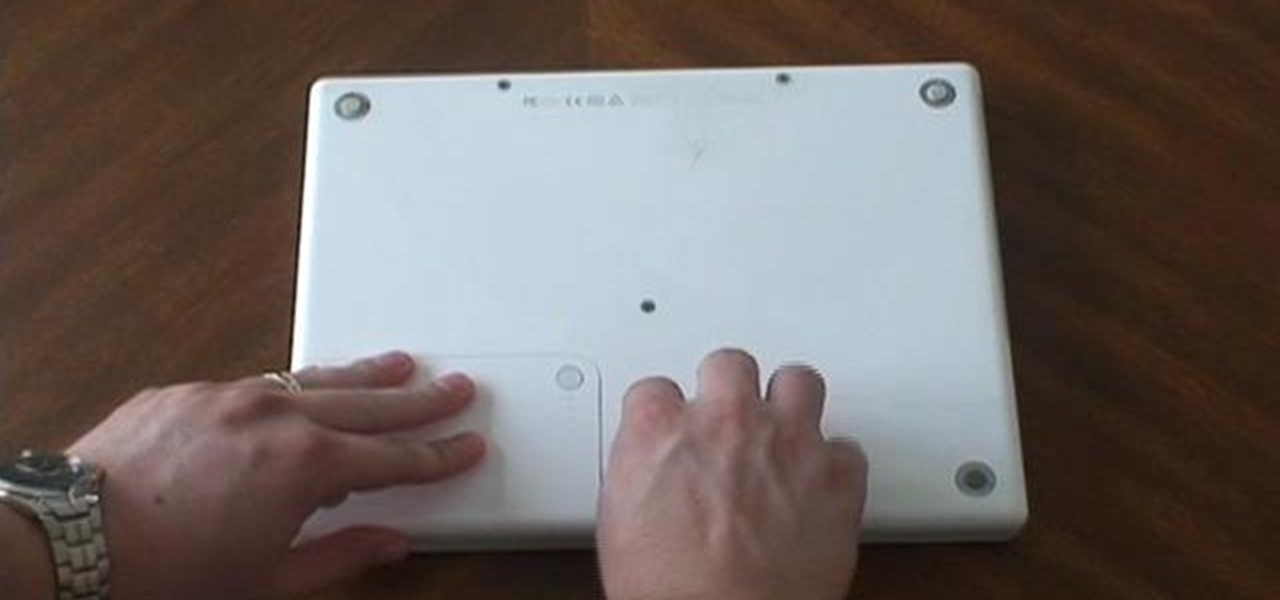
In this video tutorial, viewers learn how to install RAM into an Apple iBook G4 laptop. Begin by turning off the laptop and closing it. Flip the laptop to the backside. Turn the lock and remove the back cover. Flip the laptop over and open it. Press on the keyboard notch (between esc and F1) and remove the keyboard. Then remove the Air Port Extreme card and unscrew the 4 screws underneath it. Remove the cover and carefully press down on the 2 latches that hold the RAM card. Now replace the RA...
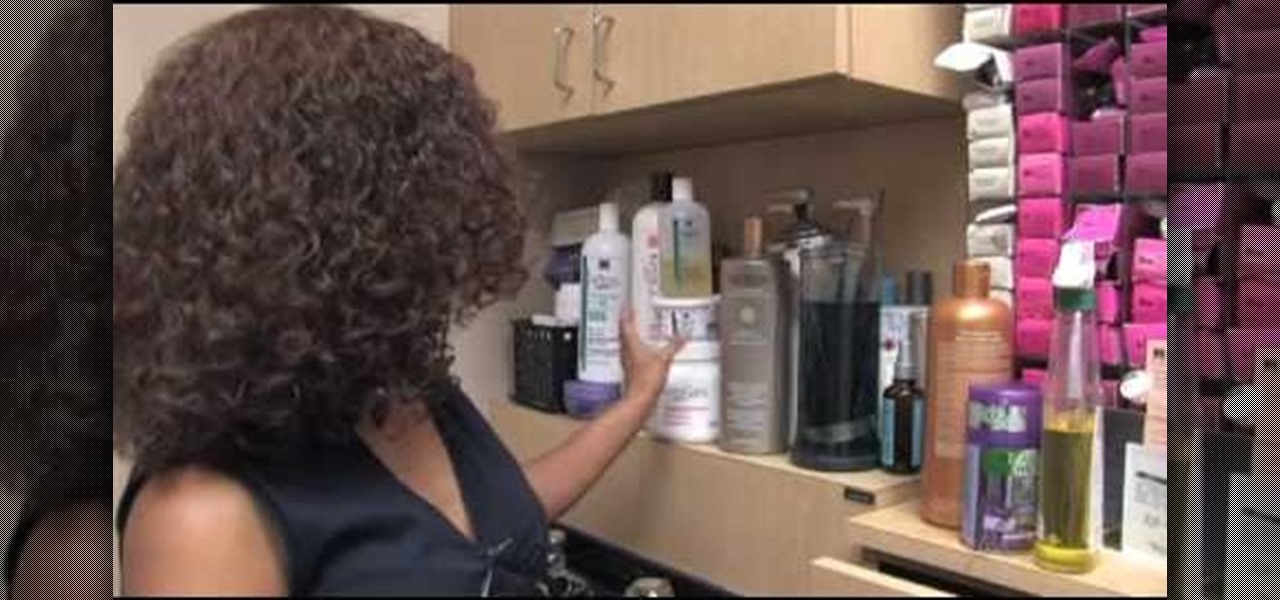
To take care of your relaxed hair, you will need to choose your relaxer carefully. Lean towards relaxers that aid tensile strength rather than deplete it. The hair has to be conditioned properly and regularly. Relaxed hair has been processed, and it requires a lot of moisture. Try using a hair mask. The Moroccan masks are a good choice for your hair. Make sure that you deep condition the hair at least once a week. Try to avoid blow drying your hair. Blow drying dries out the hair. It pulls th...
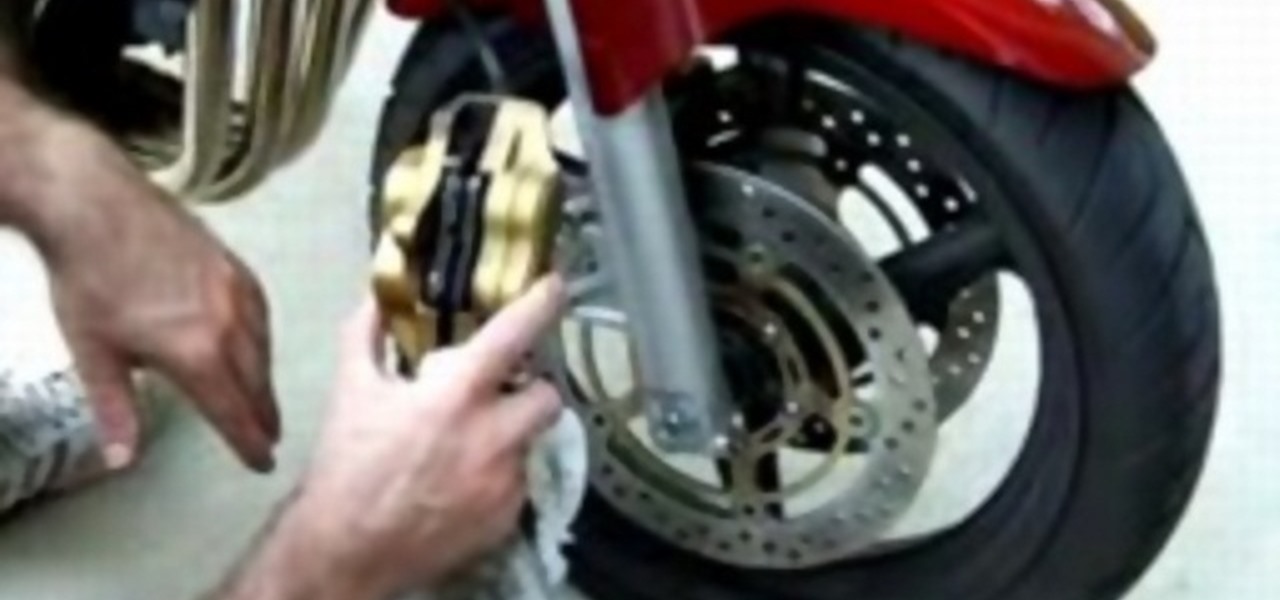
Unlock the two front bolts using a 12mm socket. Carefully remove the device holding the pads from the rotor. Check if your sockets are worn down beyond the indicated notch. If they are, they need to be replaced. Loosen the pin that is holding the pads using a medium-sized screw driver or an L-shaped driver. Once the pin has loosen enough, use a screw driver to stick between the pads and force more space between them. Remove the pin completely. Remove the old brake pads and replace them with y...
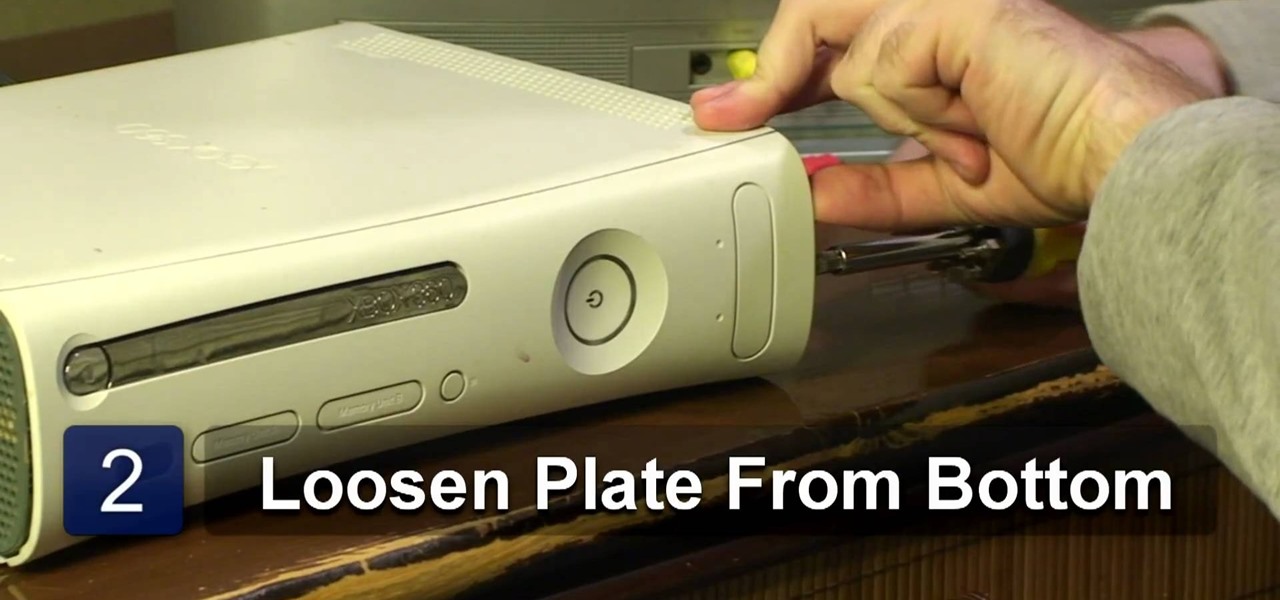
In this video tutorial, viewers learn how to remove an X-Box 360 faceplate. Users will need a screwdriver for this process. Begin by laying the system down to ensure that the console will be balanced, and not fall when removing the faceplate. Then loosen the bottom of the plate with the screwdriver. Once the plate is loosened, grab the edges of the plate and pull it off. Now carefully align the replacement faceplate to the console, and press it on until you here a snap. This video will benefi...
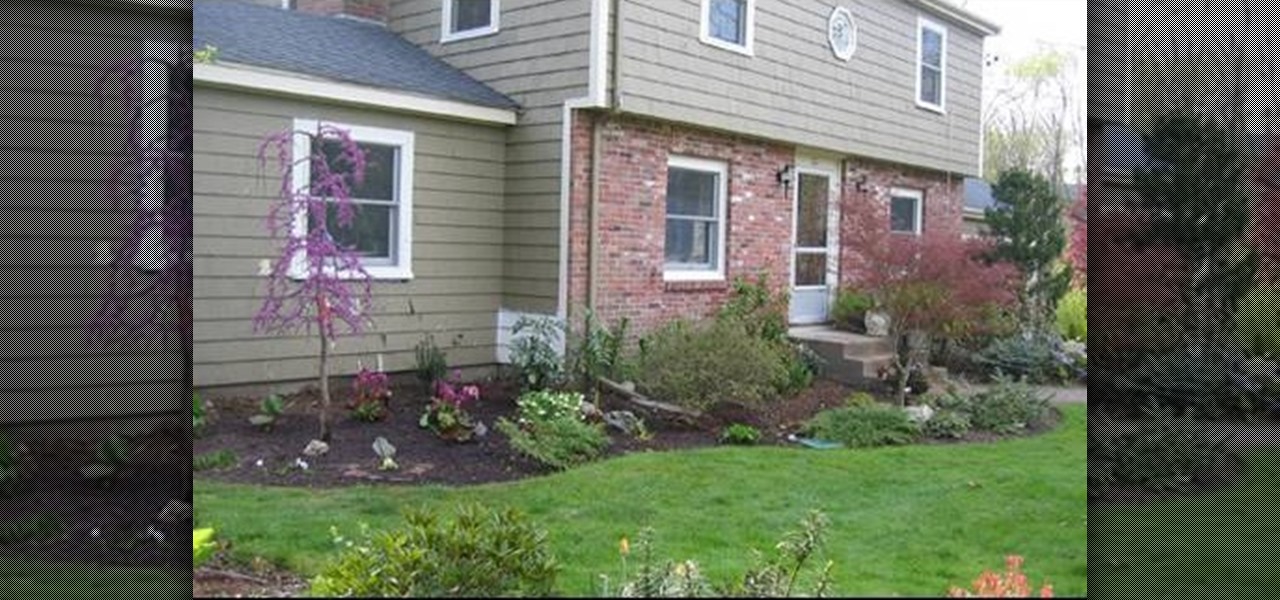
Dave Epstein talks about adding a foundation plant to a home. He is planting a Lavender Twist, a weeping redbud also known as Cercis Canadensis 'Covey'. You will see how adding a foundation plant to your home can make a big impact. You will see a before view of a home to get an idea of what you can do with the space you have available. Also you will get a tip on carefully placing the plant on the side of your home as to not block any windows but also add depth to your home and make it seem bi...
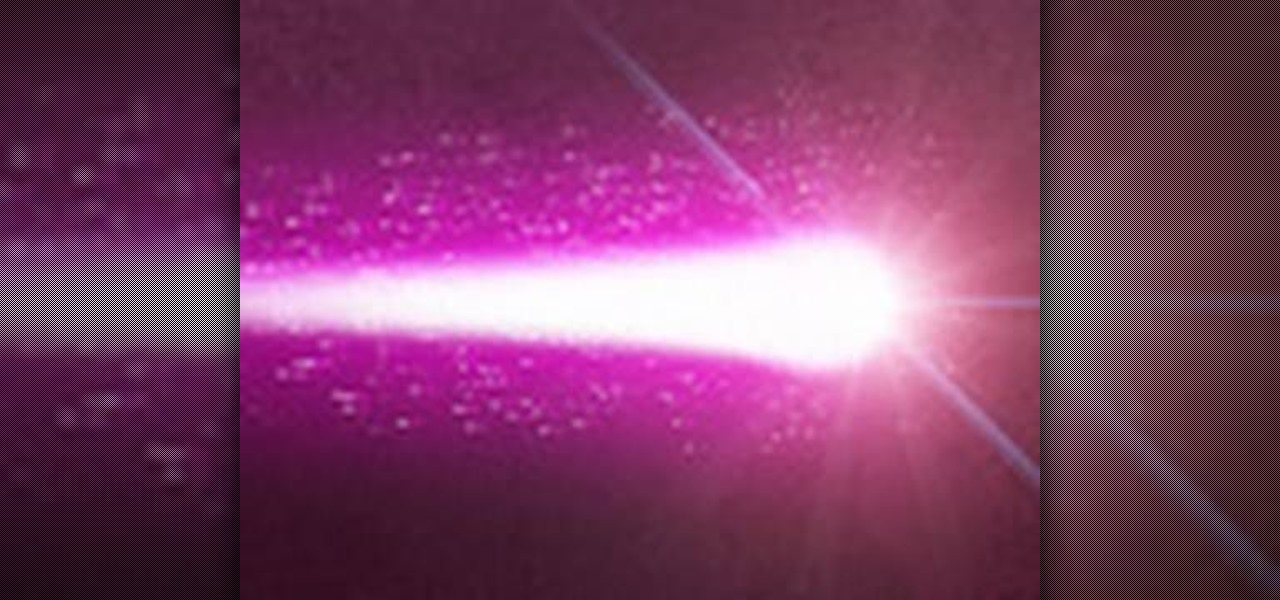
There aren't any words in the silent instructional tutorial video, but if you watch carefully, you'll learn the exact steps necessary to create a phenomenal looking shooting star or comment with nice looking special effects that are achievable in Photoshop. First you'll select a circular region with the selection tool, then you fill it with white. Next you'll use brush settings to create a brush stroke that straight and fades over time to create the comet's tail. Then you'll use Photoshop's l...
In this tutorial, Sandra Lee shows us how to make a centerpiece cake. First, place lemon frosting onto a vanilla round cake and then place another place vanilla cake on top of it. Now, grab your vanilla frosting and pour it on top of the cake, smoothing on the top. Now, grab a butter knife and apply more frosting to the sides of the cake very carefully so you don't brush the cake plate. Once finished, you can decorate some cupcakes with different icings and sprinkles. You can then place the c...
In this how-to video, you will learn how to get more out of your spray cans. This is useful if you want to make the most out of the money spent on these purchases. These spray cans are very useful for painting objects that would be harder with the traditional bus. First, follow the directions on the spray can. It should say to turn it upside down and spray it until it runs clear. This keeps the tips clear. If the can is old, you can carefully remove the tip from the can and drop it in paint t...
Nick Spadaro shows how to make a fire with a fire piston. This device creates fire by compression, just like a deisel engine. You can find these online. Lubricate the gasket with just about anything, including chapstick or animal fat. Then put it in and make sure you have a nice fit. Pick your tender, preferably birch tender fungus, a nice spongy material. Put it in the piston, and put the piston on your leg. Your going to want to strike the piston sharply, straight down, so as not to break t...
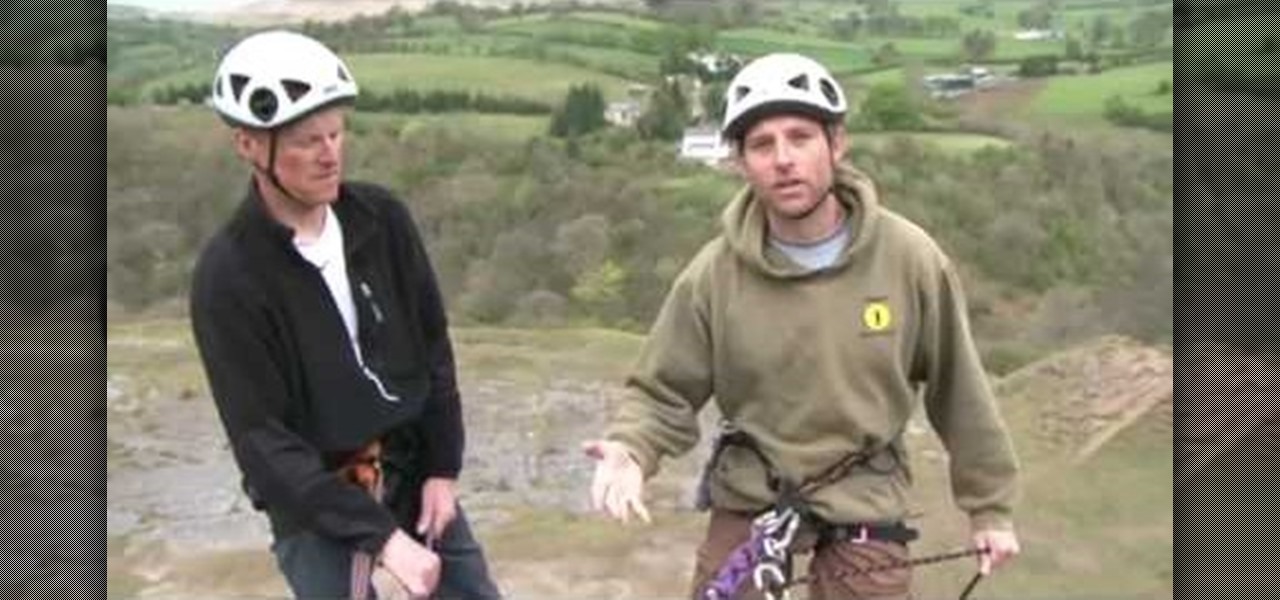
In this Outdoor Recreation video tutorial you will learn how to abseil (decend) in rock climbing. You will need some friction device for this purpose. Earlier people used to wrap the rope around their body and used the body as the friction device. That is a painful process. In the modern method, a figure 8 friction plate is used. There should be no jewelry or other hanging material around the body that can get entangled with the figure 8 plate. Also check the harness is OK. Then carefully go ...
This video shows how to apply a liquid foundation with the 190 brush. The problem with this brush is that it leaves a lot of streaks in your makeup.
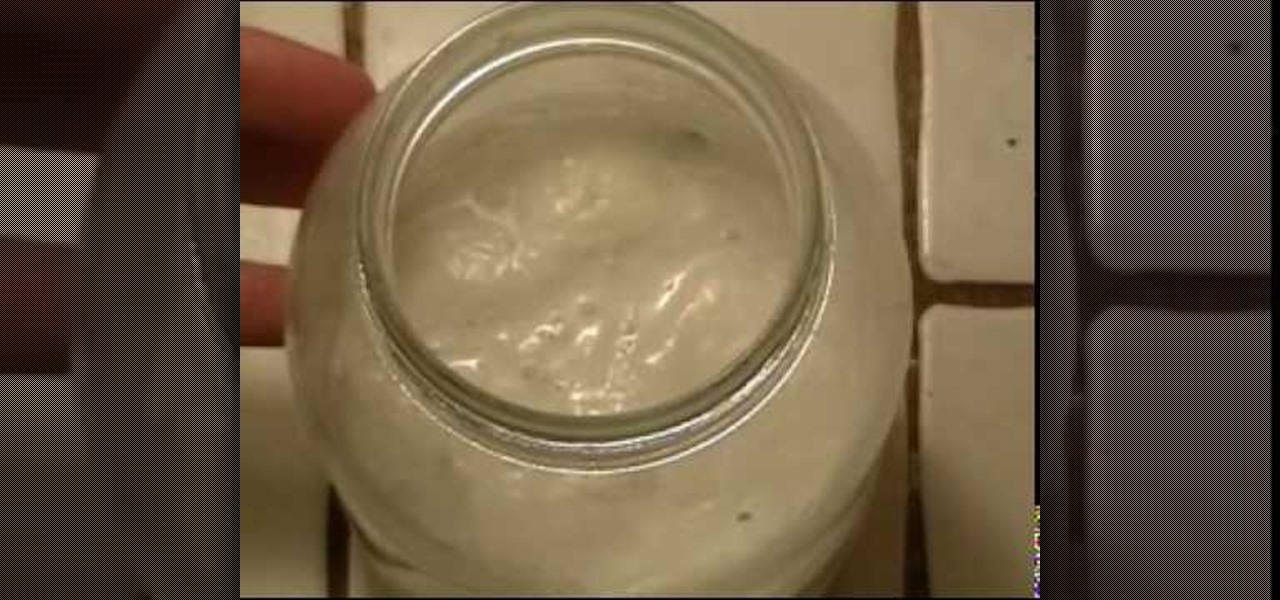
This video tells us the method to make buttermilk from raw milk. This procedure has many steps. We start by taking the raw milk in the first step. This should be carefully measured. Take a pound of milk for our purpose. Purchase a regular buttermilk from the grocery store. In the next step, take about a teaspoon of buttermilk bought from the grocery store and add it to the raw milk kept in the jar. Mix the added buttermilk and the raw sugar thoroughly. Leave the mixture overnight to sit. This...
This video illustrates how to clip hair extensions. 1: First of all take the hair extension and clean your hair. 2: Hold your hair all together and clip them leaving the lower most layer. 3: Now take the extension and release the clip and tie it to the lower most layer. 4: Now release another inch of the hair and again take the extension and clip it. 5: Release the crown area and carefully clip the extension by hiding the extension clip under the top most layer. 6: Leave the top most layer an...
This video shows the method to select the right set for your web show. The video tells us what a set is and its importance in the show. A set is a place for shooting your own show. The set should be designed carefully and properly. A typical set should be bright with various colors. It should not look depressing like a blank wall. Make a set which will look fine on camera. There should be an element of fun in the set. The set should be made to grab the attention of the viewers. The design of ...