In this Adobe Acrobat video tutorial you will learn how to touch up text in a PDF file. This video shows you how to open a PDF file, and edit the page title, as well as change fonts and font colors. Make sure to hit "play tutorial" in the top left corner of the video to start the video. There is no sound, so you'll need to watch the pop-up directions. Touch up text in Adobe Acrobat.

It's important to assist your readers as they browse through your PDF document, especially it has a lot of pages. In this Adobe Acrobat video tutorial you will learn how to create basic buttons for navigation between pages. You'll see how to create a default view state, and save buttons with actions inside the file. Make sure to hit "play tutorial" in the top left corner of the video to start the video. There is no sound, so you'll need to watch the pop-up directions. Create page navigation i...

In this Adobe Acrobat video tutorial you will learn how to add an url link inside a PDF page. Many Internet businesses use this feature to promote their websites by distributing free ebooks. Make sure to hit "play tutorial" in the top left corner of the video to start the video. There is no sound, so you'll need to watch the pop-up directions. Add a url link inside a PDF page in Acrobat 5.

In this Adobe Acrobat video tutorial you will learn how to use the Rubber Stamp Tool. You use the Stamp tool in Acrobat 5 to apply a stamp to an Adobe PDF document in much the same way you would use a rubber stamp on a paper document. In addition to the standard stamps offered, dynamic stamps obtain information from your system and from the Identity panel of the Preferences dialog box, allowing you to indicate name, date, and time information on the stamp. Make sure to hit "play tutorial" in ...

PDF is no longer limited to text and images. In this Adobe Acrobat video tutorial you will learn how to add movie clip to PDF files, and adjust clip properties. Make sure to hit "play tutorial" in the top left corner of the video to start the video. There is no sound, so you'll need to watch the pop-up directions. Add movie clips to PDF files in Acrobat 5.

If you have just downloaded a 500-page PDF ebook, you might really enjoy this video. In this Adobe Acrobat video tutorial you will learn how to navigate multiple page documents using free scroll, thumbnail view, focus square, and view documents as spread. Make sure to hit "play tutorial" in the top left corner of the video to start the video. There is no sound, so you'll need to watch the pop-up directions. Navigate multiple page documents in Acrobat 5.

Double clicking any bitmap based object will get you into bitmap mode. You'll be able to use all the bitmap tools like the Lasso, the Paintbrush, and the Magic Wand. In this Fireworks 8 video tutorial you will learn how to use Paintbrush, and how to set brush preferences. Make sure to hit "play tutorial" in the top left corner of the video to start the video. There is no sound, so you'll need to watch the pop-up directions. Use Paintbrush in Fireworks 8.
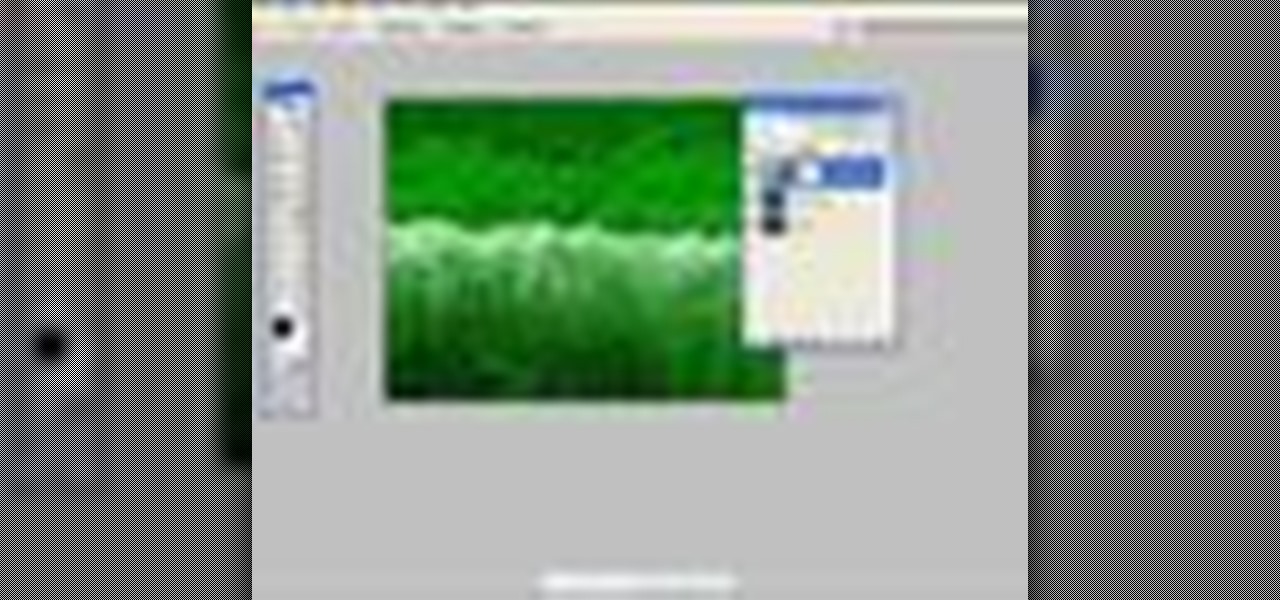
The Replace Color tool lets you select one color and paint over it with a different color. To use the Replace Color tool, choose whether you want to select replacement colors from the swatches or from the image itself using the From drop-down. This is not always the best method to do this, but it's one of the fastest and worth knowing. Make sure to hit "play tutorial" in the top left corner of the video to start the video. There is no sound, so you'll need to watch the pop-up directions. Repl...
Fireworks provides all the tools you need to create animated GIFs. In this Fireworks 8 video tutorial you will learn how to use animated GIF files, including how to view individual frames, and adjust frame timing. Make sure to hit "play tutorial" in the top left corner of the video to start the video. There is no sound, so you'll need to watch the pop-up directions. Use animated gif files in Fireworks 8.
Adobe Fireworks is a bitmap and vector graphics editor aimed at web designers. In this Fireworks 8 video tutorial you will learn how to combine path objects, create a vector path, and join paths from multiple layers. Make sure to hit "play tutorial" in the top left corner of the video to start the video. There is no sound, so you'll need to watch the pop-up directions. Combine path objects in Fireworks 8.
The motivation for the Add Shadow command, according to sources at Macromedia, was in response to a popular enhancement request to add "perspective shadow-like" capability to Fireworks. In this Fireworks 8 video tutorial you will learn how to use distort to add perspective shadows to your objects. Make sure to hit "play tutorial" in the top left corner of the video to start the video. There is no sound, so you'll need to watch the pop-up directions. Add perspective shadows in Fireworks 8.
Is your file too large or too small to fit the screen? In this Bryce 5 video tutorial you will learn how to resize your document by setting the rendering size. Make sure to hit "play tutorial" in the top left corner of the video to start the video. There is no sound, so you'll need to watch the pop-up directions. Size documents in Bryce 5.
Are you creating an army of awe-inspiring monsters, and don't want to create one by one from scratch? In this Bryce 5 video tutorial you will learn how to multi-replicate objects. Learn how to duplicate many objects, and arrange them using the distribute menu. Make sure to hit "play tutorial" in the top left corner of the video to start the video. There is no sound, so you'll need to watch the pop-up directions. Multi-replicate objects in Bryce 5.
Bryce is a texture-based rendering and ray tracing program ideal for creating 3D landscapes, space scenes, buildings and other objects. The name is taken from Bryce Canyon - a rugged region with many of the same landscapes that were first simulated with the software. In this Bryce 5 video tutorial you will learn how to create a volume spotlight. Make sure to hit "play tutorial" in the top left corner of the video to start the video. There is no sound, so you'll need to watch the pop-up direct...
In this Bryce 5 video tutorial you will learn how to make a tunnel with a Boolean operation. Learn how to create a hallway from a boolean object, add a camera, and add a parent object. The video also shows you how to link a camera and light to the parent, and animate the project! Make sure to hit "play tutorial" in the top left corner of the video to start the video. There is no sound, so you'll need to watch the pop-up directions. Make a tunnel & animate a flythrough in Bryce 5.
In this Fireworks 8 video tutorial you will learn how to remove red eye using a simple tool. The Red-eye Removal tool works by removing all the shades of red within a certain range that are within the selected area. These shades of red will be replaced by a neutral color range of gray and black. Make sure to hit "play tutorial" in the top left corner of the video to start the video. There is no sound, so you'll need to watch the pop-up directions. Remove red eye from flash photography in Fire...
Flash is commonly used to create animation, advertisements, various web-page components, integrate video into web pages, and more recently, to develop rich Internet applications. In this Flash 8 video tutorial you will learn how to import sequential images. Make sure to hit "play tutorial" in the top left corner of the video to start the video. There is no sound, so you'll need to watch the pop-up directions. Use sequential images to create animation in Flash 8.
Dreamweaver's Validate Form behavior checks the contents of specified text fields to ensure the user has entered the correct type of data. In this Dreamweaver 8 video tutorial you will learn how to create validate forms. Make sure to hit "play tutorial" in the top left corner of the video to start the video. There is no sound, so you'll need to watch the pop-up directions. Create validate forms in Dreamweaver 8.
File associations associate a file extension to a file type. In this Dreamweaver 8 video tutorial you will learn how to set file associations, specify Dreamweaver preferences and boot the right program from Dreamweaver. Make sure to hit "play tutorial" in the top left corner of the video to start the video. There is no sound, so you'll need to watch the pop-up directions. Set file associations in Dreamweaver 8.
In this Fireworks 8 video tutorial you will learn how to use Blur, Dodge, and Sharpen tools. The Blur tool creates the effect of blurring pixels, giving a soft or out-of-focus effect. The Dodge tool is used to lighten pixels on the image. The Sharpen tool increases the contrast between pixels and is useful for repairing out-of-focus images. Make sure to hit "play tutorial" in the top left corner of the video to start the video. There is no sound, so you'll need to watch the pop-up directions....
After you have created 3D text, you might want to make changes to it. In this 3ds Max video tutorial you will learn how to edit 3d text. You'll learn to use the sub object modifiers, and scale each letter. Make sure to hit "play tutorial" in the top left corner of the video to start the video. There is no sound, so you'll need to watch the pop-up directions. Edit letters individually in 3D text in 3ds Max.
Nearly every object that you encounter in the real world is beveled. Because it is difficult and expensive to manufacture a perfectly sharp edge, most objects are created with chamfered, filleted or eased edges. In this video tutorial you will learn how to create 3d beveled text. Make sure to hit "play tutorial" in the top left corner of the video to start the video. There is no sound, so you'll need to watch the pop-up directions. Make 3D beveled text in 3ds Max.
In this 3ds Max video tutorial you will learn how to create a 3D text shape. Learn how to extrude a font using the Extrude modifier. The modifier works with any closed spline shape, not just text objects. Make sure to hit "play tutorial" in the top left corner of the video to start the video. There is no sound, so you'll need to watch the pop-up directions. Create a 3D text shape in 3ds Max.
In this 3d Max video tutorial you will learn how to apply basic textures. You'll learn how to open material editor and material library, how to apply materials, and render objects with texture. Make sure to hit "play tutorial" in the top left corner of the video to start the video. There is no sound, so you'll need to watch the pop-up directions. Apply basic textures in 3ds Max.
Shapes in 3ds Max are 2D objects that do not show in the rendered images, but are used as a basis for construction of 3D objects or as animation paths. Shapes have names and a specific color in the viewport. In this 3ds Max 7 & 8 video tutorial you will learn how to make primitive shapes. Make sure to hit "play tutorial" in the top left corner of the video to start the video. There is no sound, so you'll need to watch the pop-up directions. Create simple shapes in 3ds Max.
In this 3ds Max video tutorial you will learn how to use Illustrator to make shapes for 3d Max. The video shows you how to prepare and export files in Illustrator. You'll also learn how to import to 3D Max, and extrude the shapes. Make sure to hit "play tutorial" in the top left corner of the video to start the video. There is no sound, so you'll need to watch the pop-up directions. Use Illustrator to make shapes for 3ds Max.
What would you do when the colors of the shapes you are working on in Illustrator don't look good with each other? Color blending might be a way to solve your problem. In this Illustrator video tutorial you will learn to use the Blend Color Tool. Make sure to hit "play tutorial" in the top left corner of the video to start the video. There is no sound, so you'll need to watch the pop-up directions. Use the Blend Color Tool in Illustrator CS2.
Sometimes a simple change in your web page could make it look more livelier. In this Illustrator video tutorial you will learn to create glossy buttons. Learn how to use the Blend and Gradient tools in this example. Make sure to hit "play tutorial" in the top left corner of the video to start the video. There is no sound, so you'll need to watch the pop-up directions. Create glossy buttons in Illustrator CS2.
In this Photoshop CS2 video tutorial you will learn how to deep etch an image with the magnetic lasso. Notice how the demonstrator uses the edge contrast value to make the lasso ignore the grey area. This tutorial is aimed at new users. Make sure to hit "play tutorial" in the top left corner of the video to start the video. There is no sound, so you'll need to watch the pop-up directions. Use the magnetic lasso in Photoshop CS2.
The Clone tool is not just for replicating images. In this Photoshop CS2 video tutorial you will learn how to use the Clone tool to "erase" images. This example shows you how you can use the tool to remove a person and thicken up the treeline. Make sure to hit "play tutorial" in the top left corner of the video to start the video. There is no sound, so you'll need to watch the pop-up directions. Use the Clone tool in Photoshop CS2.
Do you want to touch up the digital photos you have taken? In this Photoshop CS2 video tutorial you will learn how to use the Blur, Sharpen and Smudge tools to enhance photos. Experiment with the tools after you watch the video! Make sure to hit "play tutorial" in the top left corner of the video to start the video. There is no sound, so you'll need to watch the pop-up directions. Use the Blur, Sharpen & Smudge tools in Photoshop CS2.
Adjustment layers allow you to make changes to an image while having the original image untouched. In this Photoshop CS2 video tutorial you will learn to use corrective filters. Learn how to create an adjustment layer, and apply different filter effects to it. Make sure to hit "play tutorial" in the top left corner of the video to start the video. There is no sound, so you'll need to watch the pop-up directions. Apply an adjustment layer in Photoshop CS2.
In this Photoshop CS2 video tutorial you will learn to create a custom fill object. Once created, you can use it over and over. Learn also how to apply fill to page. Make sure to hit "play tutorial" in the top left corner of the video to start the video. There is no sound, so you'll need to watch the pop-up directions. Create a custom fill object in Photoshop CS2.
Poser is a 3D rendering and animation software program optimized for models that depict the human figure in three-dimensional form. In this Poser 6 video tutorial you will learn how to add new figures. Learn how to change the default character to the "Ben" figure, and add "Katie" figure to the same scene. Make sure to hit "play tutorial" in the top left corner of the video to start the video. There is no sound, so you'll need to watch the pop-up directions. Add new figures in Poser 6.
In this Poser video tutorial you will learn how to use the camera positioning controls. You will find the controls on the top left part of the workplace. With the controls, you can move around or zoom in and out on the figures you are working on. Make sure to hit "play tutorial" in the top left corner of the video to start the video. There is no sound, so you'll need to watch the pop-up directions. Use the camera controls in Poser.
Toilet Payback The idea is to rig a urinal in a Men's restroom so that when a guy starts using it the fixtures on top spray back at him (hitting him in the face or chest depending on height).
-Suck a fart -Make a pinata from a bee nest.
Similar to earlier submission I did with catapults, but this time there would be two or three catapults. Each of the guys would be put into one of those giant plastic hamster balls and then shot from the catapult at each other so they would hopefully hit in mid-air. Then roll them down a hill into thorn bushes so it pops.
1. Dress up as a knight and destroy Bam's Parent's house. 2. Fill a hole of disgusting liquids and camouflage it, then let someone walk into the trap.
A montage of "Back to the Future" themed pranks: fill a convertible up with manure with the "Jackass" guys inside, infiltrate a high school dance as a fake band and play crappy music with sucky musicians, dancers, "Party Boy", try to hover craft over a pool of water, Peeping Tom gets hit by a car as innocents look on, paintball gun western duel, drink some "Wake Up" juice, etc. So many possibilities. Tell PJ Knox County says "Whatup?" :-)