In this video, we learn how to sew a two-tier waist-high skirt. First, fold the fabric in half, then fold the right sides together and draw a half circle. Next, anchor your chalk with a spool of thread and swing around the half circle to create another. Now, cut out the circle with scissors. Then, draw a smaller circle using the same method at the bottom and snip it away. This will be the first layer of your skirt. Repeat these steps with another type of fabric for the other layer of your ski...
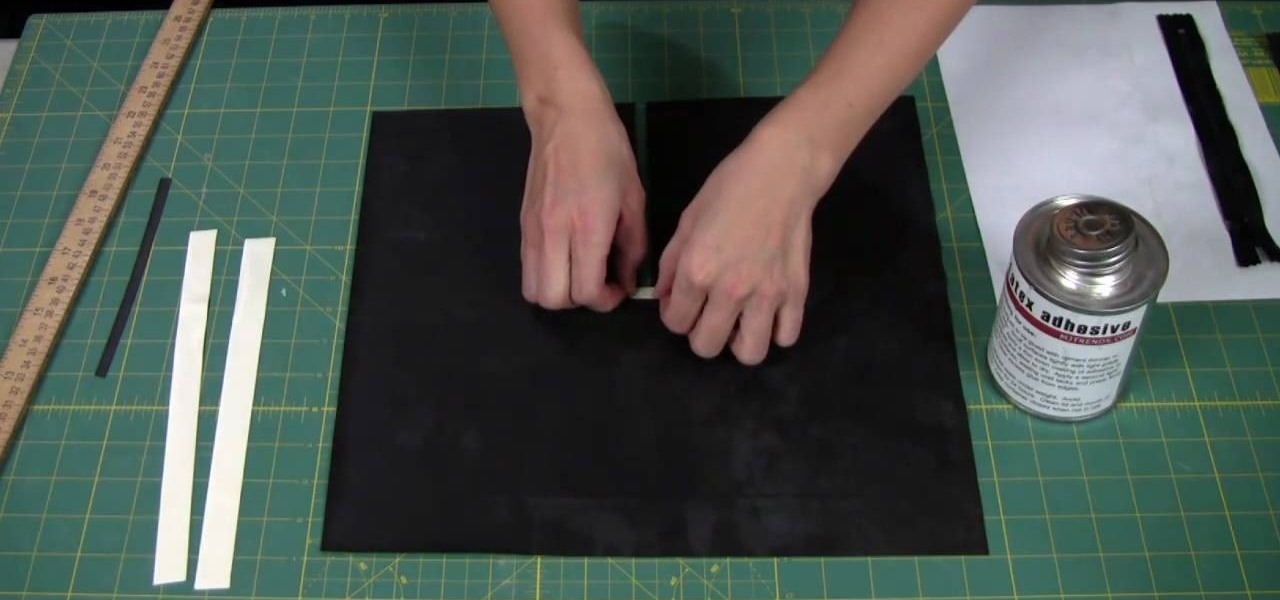
In this video, we learn how to add a zipper to a latex garment. First, apply glue to the zipper, using an ammonia based adhesive in one coat. Next, take a small paint brush from any store and apply a thin layer of adhesive to the zipper. The top will take about 45 minutes to dry, then turn it over and apply another layer of glue to the back. After this, cut two 1/2" strips of latex a little bit longer than the zippers. Also cut a 1/4" wide and 1" long piece of latex as well. Now, apply these ...
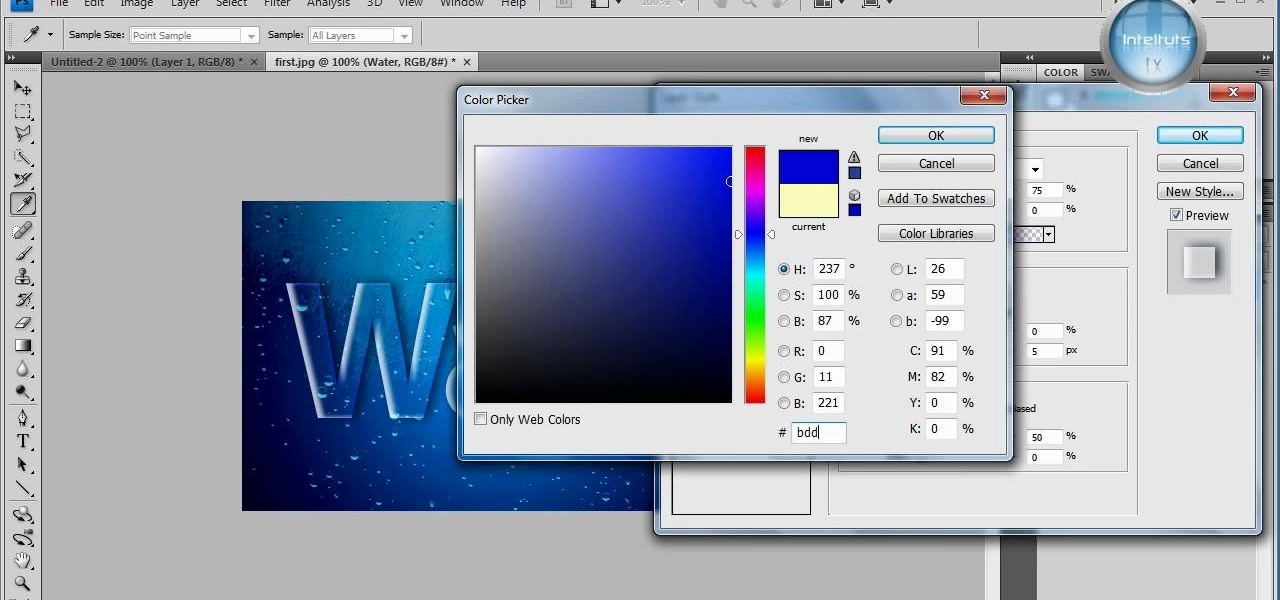
In this tutorial, we learn how to create a Lomo effect in Photoshop. This is a contrast that gives the photo a "cool" vibe and change up the effect that you see. First, load up your picture into Photoshop and then go to adjustments, then curve. From here, add a slight s-curve and then add a green channel with the same s-curve that you just created. Go to the blue channel and create the opposite s-channel from the others, then click "ok". Now, go to layer, new adjustment layer, then gradient m...

In this video, we learn how to remove acne spots with Photoshop. First, open up the picture and zoom in on the acne you want to remove. Now, unlock the layer by right clicking and unlocking it. Next, use the clone stamp tool while pressing alt to clear the skin where the blemishes are at. Click constantly on the acne until all of it is done. You want to click as many times as possible to get the best effect in removing this. When you are finished with this, duplicate the layer, then change th...

In this video, we learn how to convert an image into a sketch in Photoshop. First, open up Photoshop and open the picture you want to convert. Now, click the layer and unlock the background. After this, go to "image", "adjustments", and remove all the saturation from the photo so it's black and white. Then, duplicate this and invert it by going back to the adjustments section. Now, go on the top of the layers tab and select "color dodge" from the drop down menu. Now, go to "filter", "other", ...

In this tutorial, we learn how to draw different kinds of eyes. If you are drawing an eye from the side, make sure you show the eye bulging out of the eye, and show the long eyelashes and layers of the lids. If you are drawing an eye looking up, make sure to show the socket of the eye and the layers underneath the top of the eyelid. To draw an eye closed, you will show the brow bone and crease of the eye, as well as the lashes and the circles underneath the eye. There are a lot of different e...

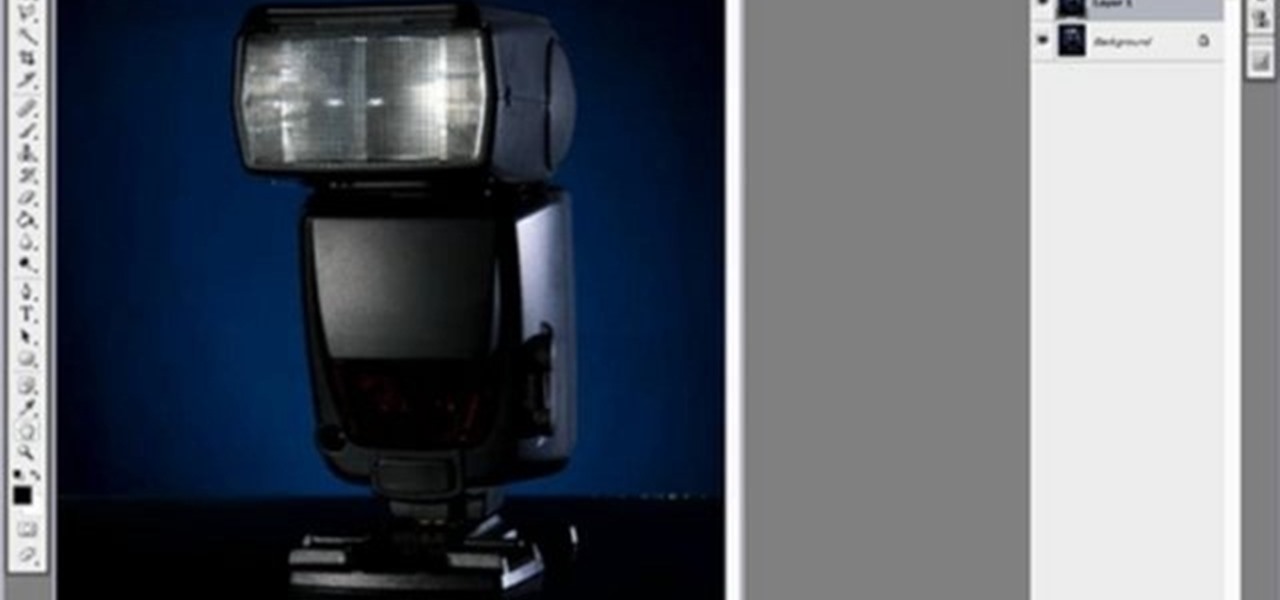
Yanik Chauvin teaches us how to color correct product shots in Photoshop in this tutorial. First, remove some of the black from the image by using your crop tool. After this, if your image is too wide, duplicate your layer and use the marquee tool to edit. Remove any dust spots from your image, to make it look more clear so you have an image that is impeccable. You can do this by creating a new layer and then adding a feather to the image. Continue to go through the editing tools available un...
In this video, we learn how to bring out the blue in your eyes using makeup. To start, put black eyeliner on the waterline of your top eye, only using a very thin layer. Next, grab a light blue eyeliner and apply it under the black eyeliner on your bottom waterline. After this, apply the light blue eyeliner to the top of the eye above the black eyeliner layer. You can use any type of blue eyeliner you like, just make sure it's very light blue. When you're finished, apply mascara to your eyes ...
In this tutorial, we learn how to style short hair in a classic Hollywood style. To start this look, pin your hair up in different layers and start off with the very bottom layer. Next, heat up a barrel roller until it's hot. Next, grab a small piece of hair and place the barrel roller into it for several seconds until you feel the curl has settled in. After this, release your hair and spray hair spray into it. Your hair will come out with more of a crimp than a curl when you are finished, de...
In order to cut a long layer haircut, you will need a good pair of scissors. You must stay in the exact same standing position the entire time. Bring all of the hair together on each side, in order to cut it.
In this video tutorial, viewers learn how to make a sawed0off shotgun. The materials required for this project are: hot glue gun, duct tape, cardboard, utility knife, black marker, spray paint and 2 paper towel rolls. Begin by tracing a shotgun outline onto the cardboard. Make 6 layers and glue all the layers together. Then smooth the edges with sandpaper and tape the outside with some duct tape. Now tape the 2 paper towel rolls together and tape it on top of the shotgun. Finish by painting t...
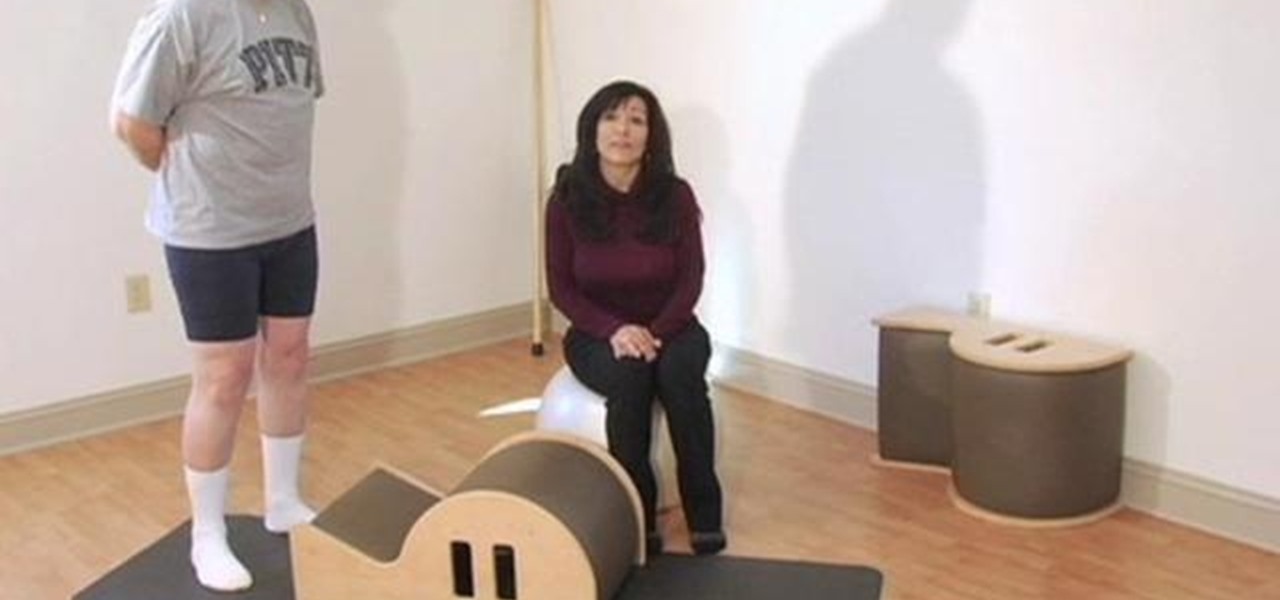
Learn how to perform a barrel exercise routine perfect for those with layer syndrome. With pilates, as with any physical fitness system, a basic mastery of proper technique is essential for both maximizing the effectiveness of your workouts and avoiding accidental injury. Whether you're looking to slim down or merely tighten up your core, you're sure to be well served by this home fitness how-to from the folks at Balanced Body Pilates. For complete instructions, give this free exercise video ...
In this video, we learn how to get a shimmery brown eye like Kim Kardashian with Ren Ren. First, prime your lids with a neutral Mac paint pot color. Next, add a light shimmer eyeshadow onto the eye with a slightly damp brush. Now, apply a highlight to your eye crease with a brush by darkening the outer eye. After this, blend really well and then add a little more shimmer to the lid. Finally, you will want to add a thick layer of eyeliner on both the top and bottom and layer the eye line out t...
There are a few ways to bring pictures into a Flash file. This tutorial shows one simple way to do that. You can work with the photos in many ways, which will be discuss in later tutorials. Importing a .psd directly into Flash can be very useful because it maintains the layers in CS3, making it easy to animate or apply action script later to the layer. Whether you're new to Adobe's popular Flash-development platform or a seasoned web developer looking to better acquaint yourself with Flash CS...
In this tutorial, learn how to make a very cool wet writing effect that you can use for graphics and logos. You will be creating this effect in Photoshop CS4. In this video, you will learn how to take tons of different layer styles and transform a basic text layer into a majestic piece of artwork. You will be shown the process step by step from the very beginning. This tutorial also shows the use of gradients and color corrections tools to optimize the full piece of work.
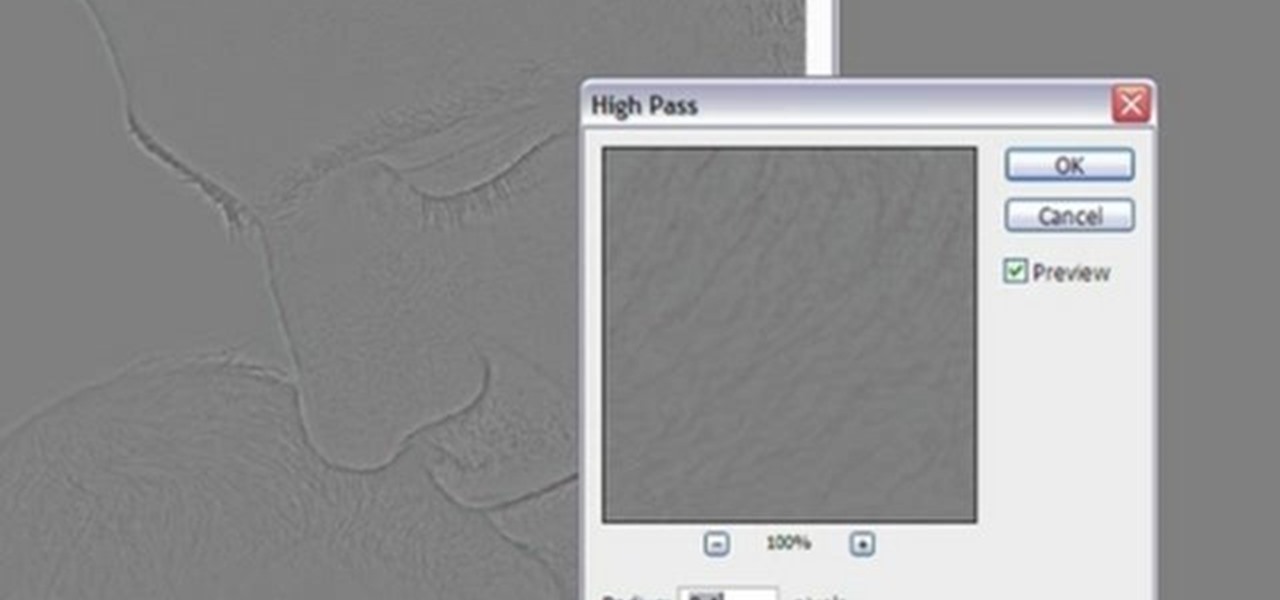
In this Software video tutorial you will learn how to sharpen blurry images using Photoshop. Open the image and duplicate the original layer. Then go to filter > other > high pass. In the window that pops up, enter a value of 4 – 6 pixels. Now simply change the blending mode of that layer to overlay by clicking on ‘layers’ and selecting ‘overlay’ from the dropdown menu. You will notice that you have a much clearer picture. Then go to filters > sharpen > ‘unsharp mask’ to add som...
In this video tutorial, viewers learn how to add a watermark to an image using Adobe Photoshop. Begin by importing the image into the program. Select the Horizontal Type Mask Tool under the Text tool. Then select the font color, type and size. Now type in the text and click out of it when finished. Then press the Control and J key to open the text into a layer. Click on the layer and select the style. Now finish by editing and customizing the text. This video will benefit those viewers who ha...
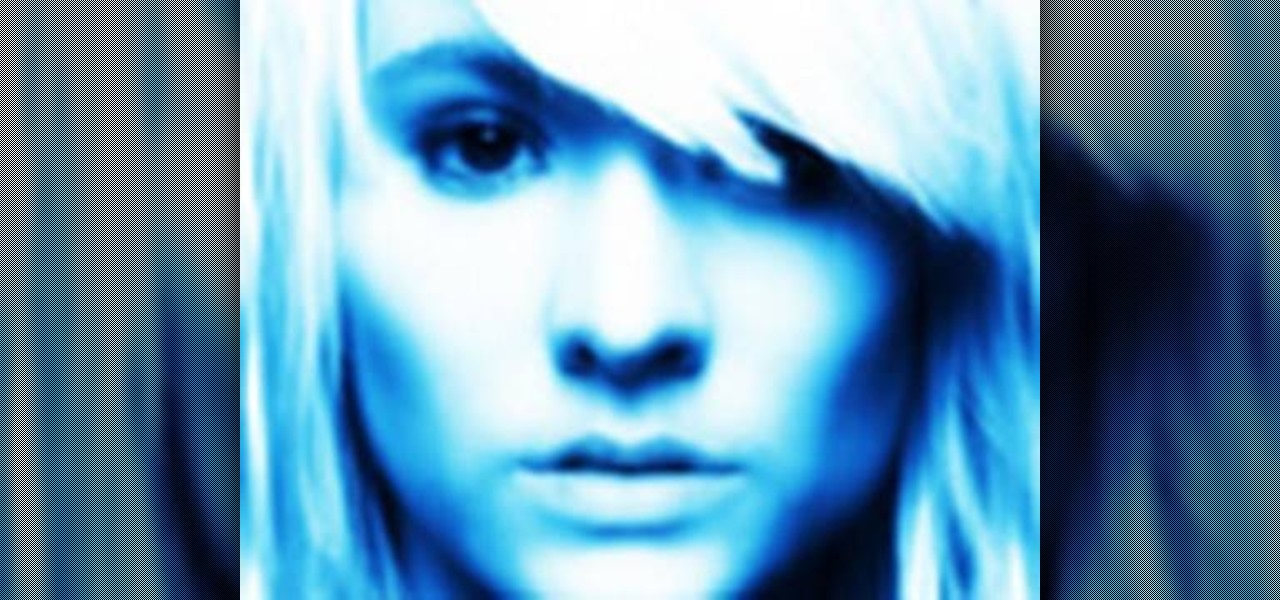
In this video, we learn how to created a chilled look on a photo using PhotoShop. First open up PhotoShop and open up the picture you want to change. First, duplicate the layer on the photo. Then press "control" then "u" and make the picture blue. Now, click "filter" then "blur" and add a small amount of blur to the photo. Now you can click on "overlay" and you can see the photo change. If you want to make it look more blue, duplicate the layer again and you will see more of a chill factor on...
In this Software video tutorial you will learn how to make a copyright brush using Photoshop. Open up Photoshop and open a new document by clicking ctrl+N. Create a new text layer on the right side and type in your text. Right click on the text layer > rasterize type. On the left side select the ‘rectangular marqee tool’ and draw a rectangle around the text. Go to edit > define brush preset. In the next box, give it a name and click OK. Then go to file > open and select a picture on which...
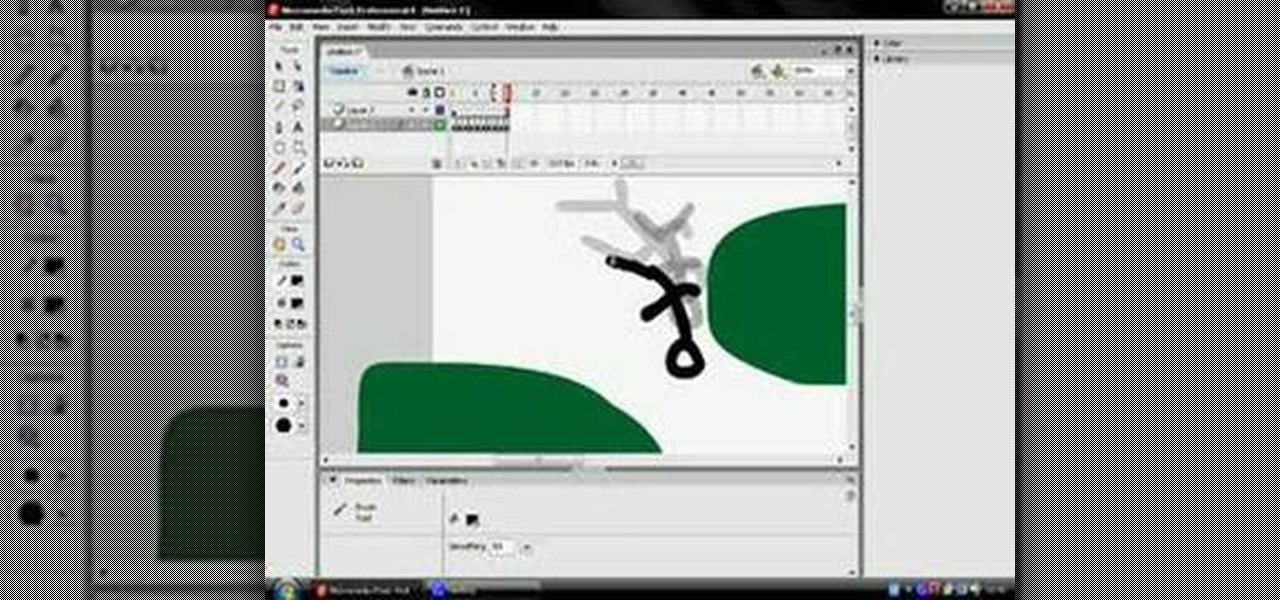
This how to video shows you how to use the program Macromedia Flash 8. First, open the program and click Flash Document. Next, select show frame in the drop down menu. Next, right click and select insert layer. Select the pen tool and choose a size. Next, select a color and then draw a picture. Click the other layer and zoom in. Click the onion skin. Continue to draw and then press F7. Keep on doing this for each new animation. Click control and test the movie. Go to file and save the file. Y...
In this video tutorial, viewers learn how to tan an image using Adobe Photoshop. Begin by opening the image in the program and create a new layer. Then select the brush tool and select the tan color. Click OK and apply the color over the areas that are wanted to be tan. Then apply another layer with the same color to darken the image. Finish by configuring the Opacity to a lighter color and blend it to the image, This video will benefit those viewers who enjoy editing images to enhance them a...
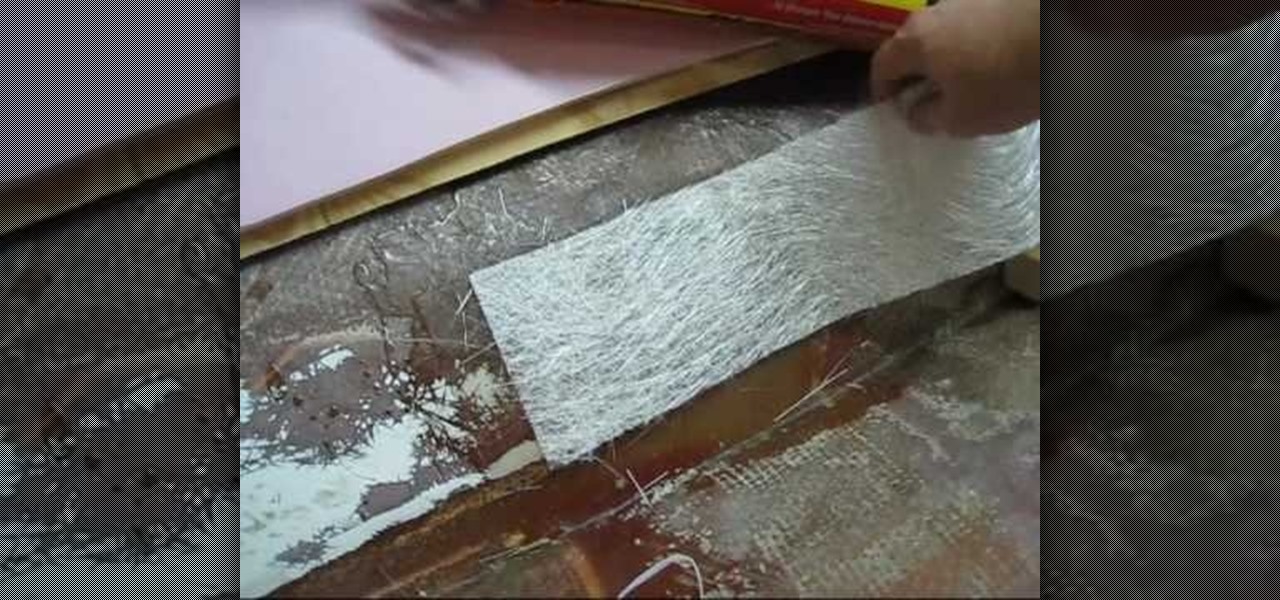
LowkeeLT demonstrates how to patch a hole in a fiberglass boat hull. First, grind around the edge of the hole to make it smooth. Make an angle that goes towards the hull so that the resin won't get caught and create air pockets. Attach kitchen wax paper to the boat as a non-stick material for the poly resin to set against. Then, put down a flexible cutting board by duct taping the two layers on the outside of the hull and pulling it taut. Attach three layers of fiberglass strips with resin to...
This video is about Wet Felting Wool Over Soap .The materials required small sized soap bars, a towel, hot water and wool batting which is sheep's wool that has been washed and dyed. Now take a thin piece of the wool and lay it over the soap. Thin layers help the felting process and these layers are wrapped around the soap in vertical as well as horizontal direction. Now apply hot water to the bar and rub it over the wool. Keep doing this for a couple of minutes and then leave the bar to dry....
In this video you will learn how to change eye color or removing red eye in Adobe Photoshop. First, to change the eye color you must enter in Adobe Photoshop, open a photo, select the zoom tool and zoom in near the eye. We will use the first tool and make a circle of the eye. By holding shift key remove the areas you don't want to paint. Now go to layer, then new ant the layer you want to copy. Now select hue/saturation. Now slide hue until you are happy with the color, then hit ok and that's...
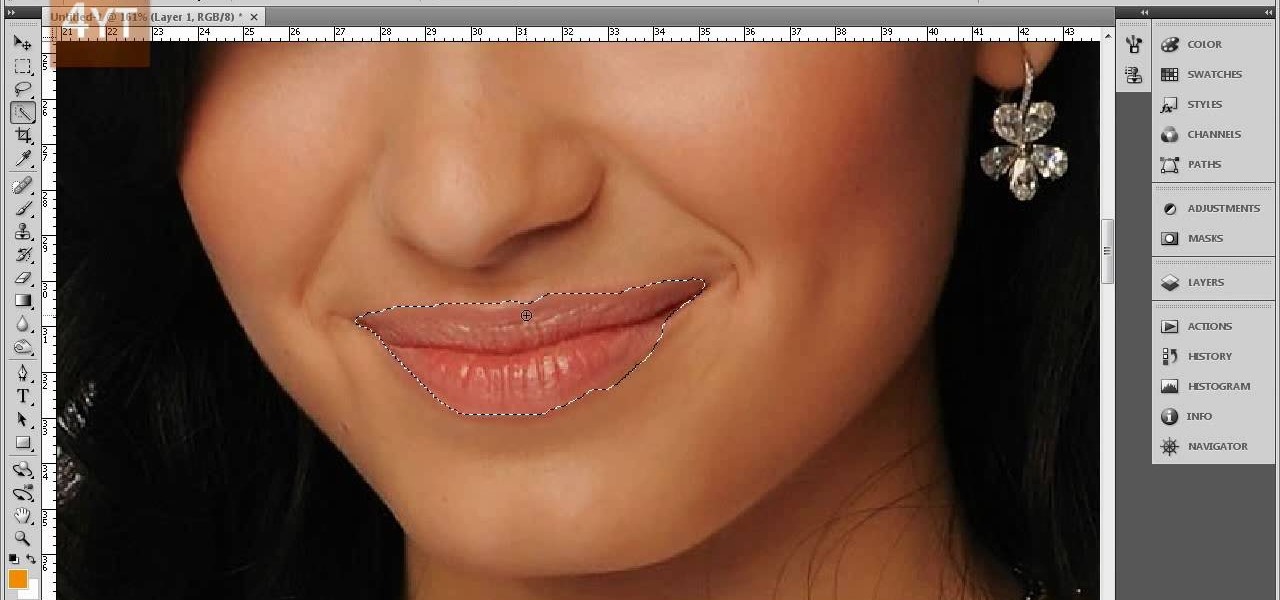
Forget to put on lipstick before a photo? Or perhaps you want to spice up an old photo of someone you love. Well their is a way, as 4YouTutorial demonstrates step by step using Photoshop CS4. First upload a photo or image into Photoshop. Next access your Photoshop layers and delete the default locked layer. After, activate the zoom tool and zoom in on the photo where the lips are located. Next choose the quick selection tool (make sure it's on plus) and drag it over her lips. This process can...
This video guides you through a process you can use in Adobe Photoshop CS3 or CS4 in order to change a persons eye color. The computer user shows how to first select only the iris of the eye by guiding you through which tool bar buttons to use. You should then zoom in close to the eye in order to very accurately select just the iris. Once the iris is selected you will go to the select menu then click "New Fill Layer" then "Solid Color..." When the dialogue opens up you will change the Mode to...
Watch this video and teach yourself how to make an easy and cheap clutch wallet using duct tape. The materials required for this are a pair of scissors, a rod, Velcro sticky tacks and duct tapes of different colors and you can use as many colors as you want. Cut out 12 inch strips of duct tape and stick five of them slightly overlapping one over the other. Then stick five more of the duct tape strips as in the above procedure so that the sticky sides of the two layers will be stuck together. ...
In this how-to video, you will learn how to make a .gif animation from video footage. First, open Photoshop, click file and select import video frames to layers. Next, select the video you want to use and open it. Once this is done, you will see the amount of frames in the videos as layers in the video. Go to window and animation to open a new display for the animation. If you want to shrink the .gif image size, go to edit and image. Change the size to your liking. Now, just go to file and se...
1.First take 1 cup of All purpose flour in a plate and 2 cups of same flour in another plate. And then take a stuffer can be anything like sweet coconut, chocolate flavor to put inside the puff.2.First add one tablespoon of vegetable oil to each plate and slowly make it out by hand and add some water and make flour mix. Now separate the 2 cups flour mix into 4 to 5 big pieces and separate the 1 cup flour mix into 4 to 5 small pieces.3.cover the small pieces with big pieces of each. Now just r...
In this video you will learn how to make a GIF animation without Photoshop. This is by using a windows operating system program and its from a website which is provided. Go to your search engine then type in download. Then click on CNET, then type in Photobie and download the latest version. Once you've downloaded and have it open click on layer, then click import images as new layers on current photo panel. Then add your images and have them ordered as you want them. Then click on the top on...
In this video tutorial, viewers learn how to sharpen photos in Adobe Photoshop CS3. Begin by opening the image in the program and duplicate the image layer. To duplicate, press the control and J button. With that images, go to Filter, choose Other and select High Pass. The images will now be covered entirely of gray. It is recommended to set the radius as 5-6 pixels and then press OK. Change the layer blending mode to overlay, soft light, hard light, vivid light or linear light. This video wi...
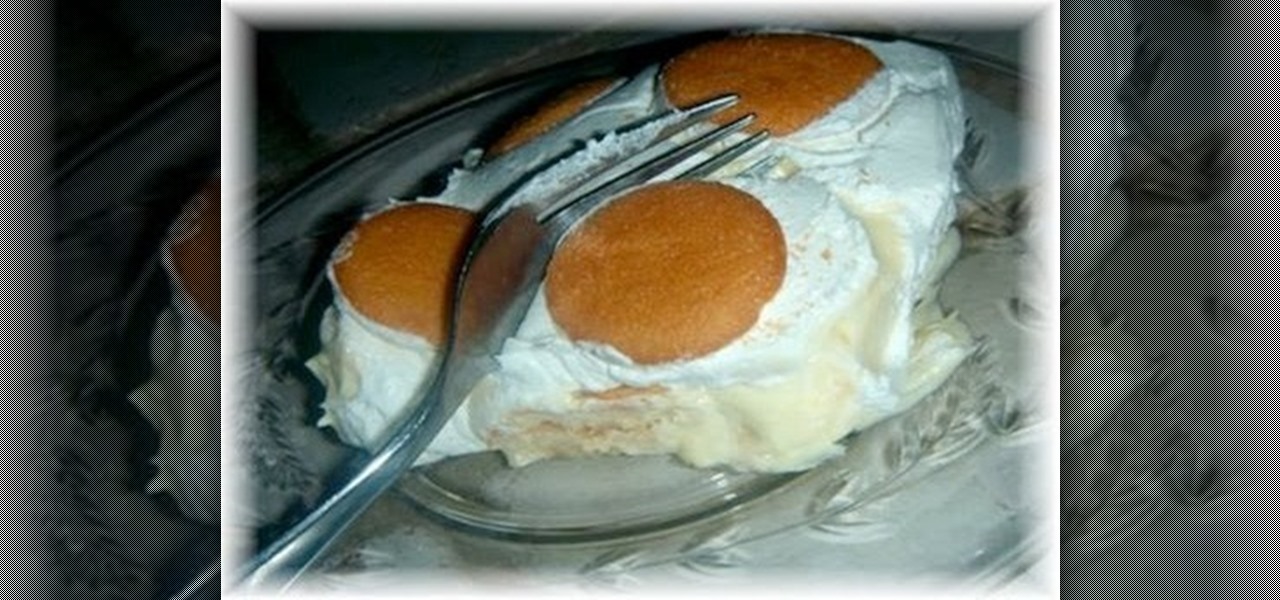
Start by putting two packs of vanilla pudding mix in a bowl. Add two cups of milk to the pudding. Stir it with a large plastic or wood spoon until it is really creamy. Next you will add 8 ounces of sour cream and stir it in with your spoon. After it is well mixed, stir in half of a container of whipped cream (about 4 ounces). In the bottom of another bowl, put 1-2 sliced bananas and some nilla wafers. Take the mixture that you have made in the other bowl and spread it out on top of the wafers...
In this Beauty and Style category video tutorial you will learn how to cover up an old tattoo. The video is presented by Robert Scott, aesthetician from RSFaceBody. You have a life long relationship with your tattoo. But, if you want to cover it up for any event like a wedding, the first choice is to do that with clothing. Of course, it will depend on where your tattoo is. If it can’t be covered with clothing, you may have to use make-up. You start with the lightest foundation first and slowl...
You can learn how to use After Effects to make an interesting introduction for your YouTube video by following the steps in this video tutorial. You will need to use a preset called Trapcode Particular 2. 0. Once this trial version is downloaded, go into After Effects and select New Composition. Create any name you want for the file and then select HDV/HDTV for the Preset. This video outlines how to create the introduction from the initial layer to the final layer, which is up to you to decid...
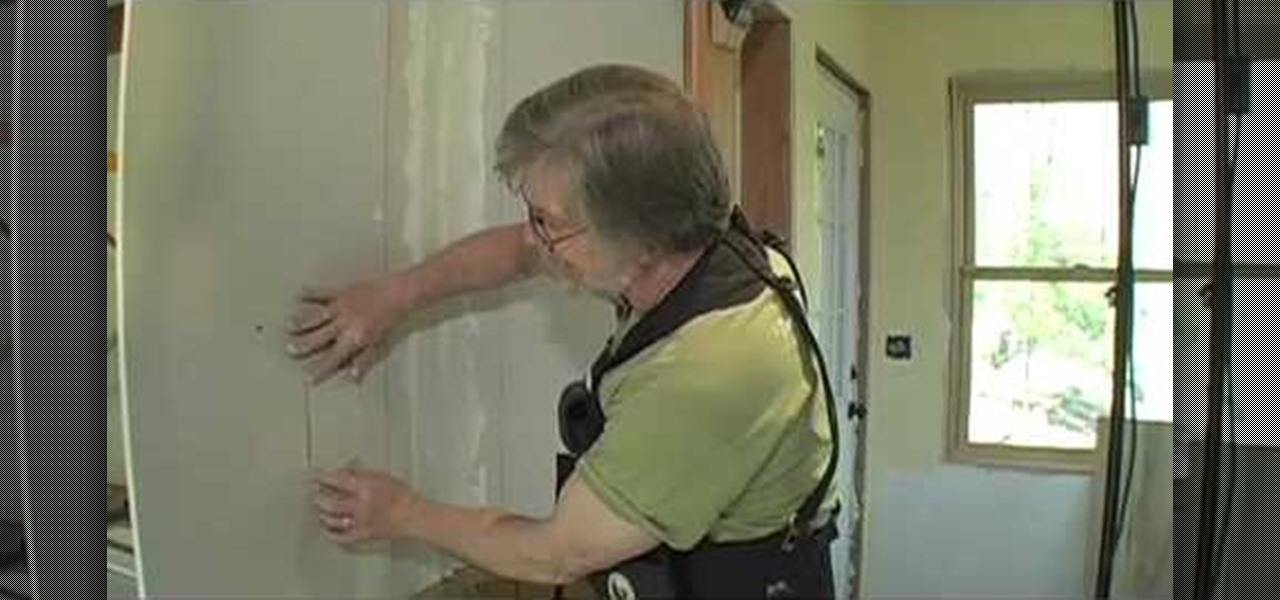
Chuck Miller gives us a great tip for patching a small hole in drywall, such as a hole from an outlet box.
Doc Willoughby, Executive Editor of Gourmet Magazine, shares the recipe for this delicious pudding cake, so called because it separates into a pudding layer and a cake layer as it bakes.
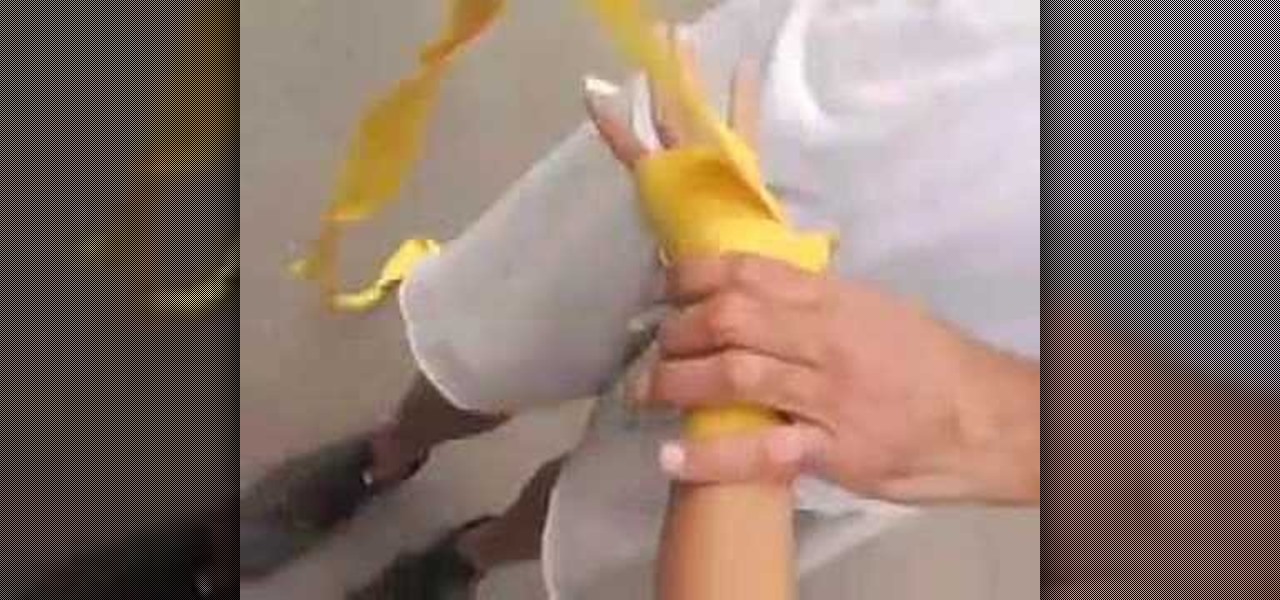
In this video tutorial, viewers learn how to wrap their hands for boxing. Begin by putting the hand through the loop and put the wrap over the hand. Now wrap it 3 time around the wrist and layer it. Then go back and criss cross the back of the wrist, as well as in between the thumb and index finger. Now wrap it around the thumb. Now wrap 3 times around the knuckles and layer it. Go through a pair of fingers, then wrap it around the thumb and repeat this for the other fingers. Finish by coveri...
The video teaches you how to make mini pizza appetizers. To make this dish, you need pre-made pizza crusts. These pizzas will be white pizzas which means that tomato sauce will not be used. In the video the lady uses a ready made white dip which artichoke and other ingredients. Spread a very thin layer of this dip on to the pizza crust staying within half an inch within the edges. Keeping the layer thin prevents it from melting over and making a mess in the oven. Then take some grilled chicke...
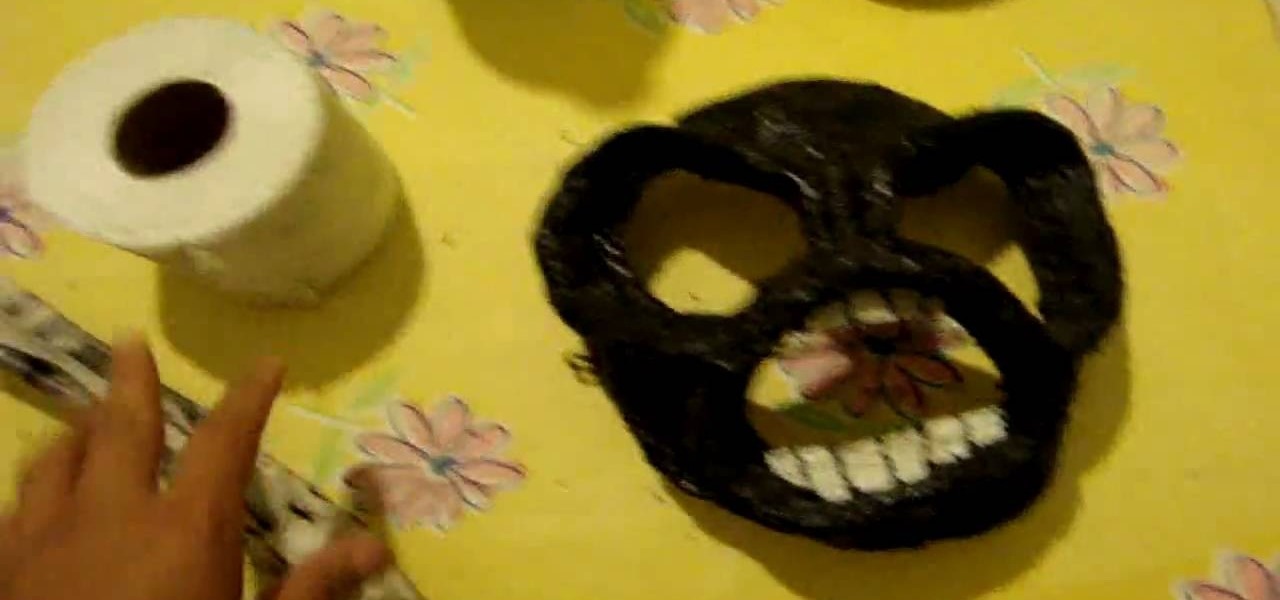
In this video, user mudvayne200 teaches you how to make a Sid Wilson from Slipknot mask. You will need a roll of toilet paper, a newspaper, water, a balloon and scissors. You will want to fill up the balloon and then cut strips of newspaper. Put water on the strips of paper and place them on top of the balloon. Do this a few times to have a few layers. Once it's dry, you can cut it in half and cut holes for the eyes and mouth. You can also add a layer of toilet paper and let it dry. Color it ...
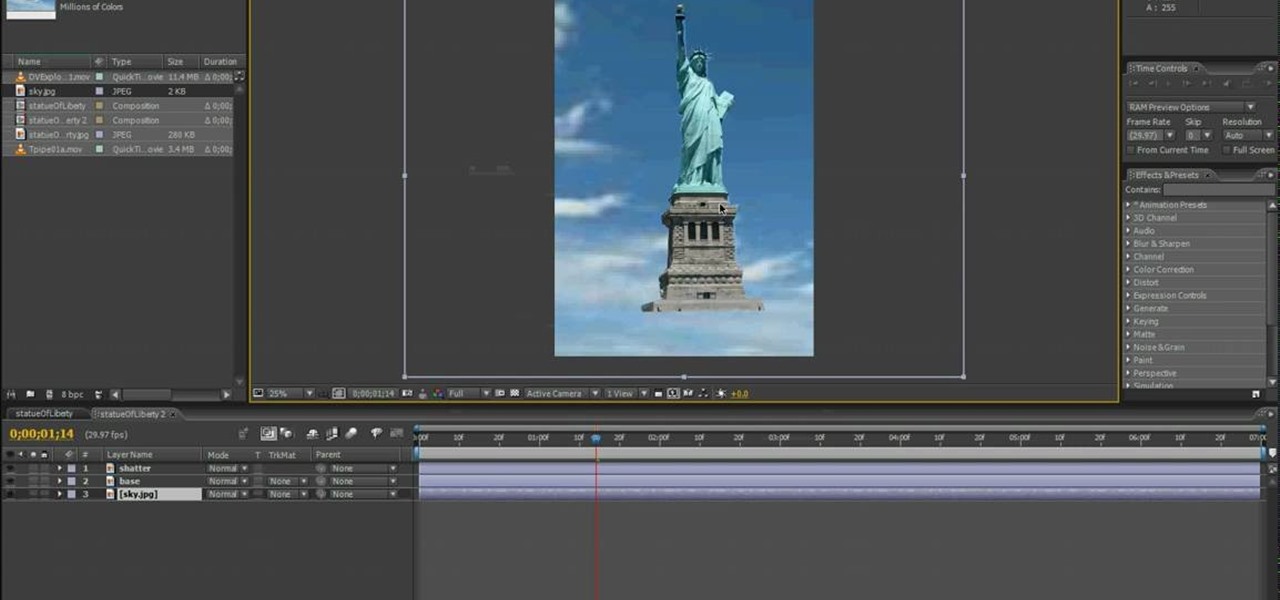
This video shows you how to create a building explosion (more specifically, the Statue of Liberty) in Adobe After Effects in less than ten minutes. The smoke and fire are downloaded separately, while the shattering of the statue is created in After Effects. First, duplicate the layers into what will and what will not explode, then create a mask around each one. Then, set the shatter effect to the exploding layer. Set the shape pattern to glass to make it more realistic. Also, you can raise th...