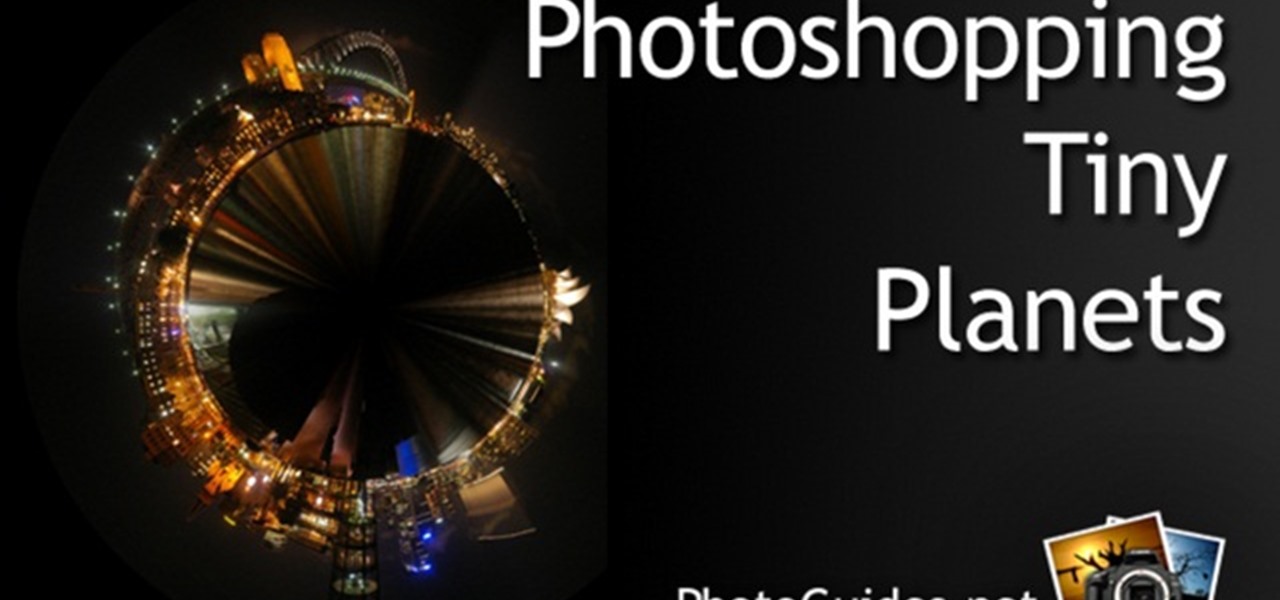
In this video, we learn how to create tiny planets in Photoshop. First, unlock your background layer and create a line in the middle of the image. Now, select the bottom that is underneath the line and drag it down to the bottom of the canvas. After this, make your image into a square by resizing the image with your tools. After this, you will need to rotate the image 180 degrees, then select "polar coordinates" in the distort tools. After this, you can rotate your canvas back around 180 degr...

In this video, we learn how to use the web application, Sumo Paint. First, go to the website Sumo Paint and the website will start to load in a new window a Flash application. Once it's fully loaded, you will be able to add an image and then start to edit it. There are several different tools available on the side, whether you need to resize, crop, erase, or anything else to your picture! This is a great website for editing and makes everything simple. There is also a toolbar on the top where...

In this tutorial, we learn how to draw an eye in GIMP. First, open up the GIMP software and set up a circle, then color it dark blue. Next, add in light to the middle of the eye, so it looks like a light is shining onto it. After this, make a small circle in the middle of the eye, coloring it black. When done with this, create a new layer and then add brightness to the pupil of the eye. Continue to play around with the contrast and colors of the eye, so it looks more realistic and life like. ...

In this tutorial, we learn how to do a quick J-rock hairstyle. To start, you will want to start off by brushing out your hair and straightening all of your layers. After this, do your makeup with thick black eyeliner all around your eyes. Next, hairspray the hair while holding it up, then tease it so it has extra volume, but don't brush it back down. Do this throughout the entire head, leaving the bottom of the hair flat and straight. Next, apply wax and gel to the hair and finish styling it ...
This video tutorial is in the Home & Garden category where you will learn how to install a kitchen backsplash with glass tile accents. A tile can be attached to walls with the help of mastic. It doesn't require mixing and it is stronger than mortar. Before applying mastic, sand the wall surface lightly. Don't sand away the paint. Clean the surface with damp cloth. Layout the tile pattern below the space and measure the dimensions. Do the marking on the wall of the centerline. Apply a thin lay...
In this tutorial, we learn how to pierce your cartilage. To do this, you will need: gold/silver earring, alcohol, and paper towels. To start, you want to mark the spot that you want to pierce, then clean your needle and the area with rubbing alcohol. Now, pierce the needle through the area you want it to be. Keep pushing the needle through until you get to the other side, then replace the area with the jewelry as you go. You will pass several different layers of skin and cartilage, so be prep...

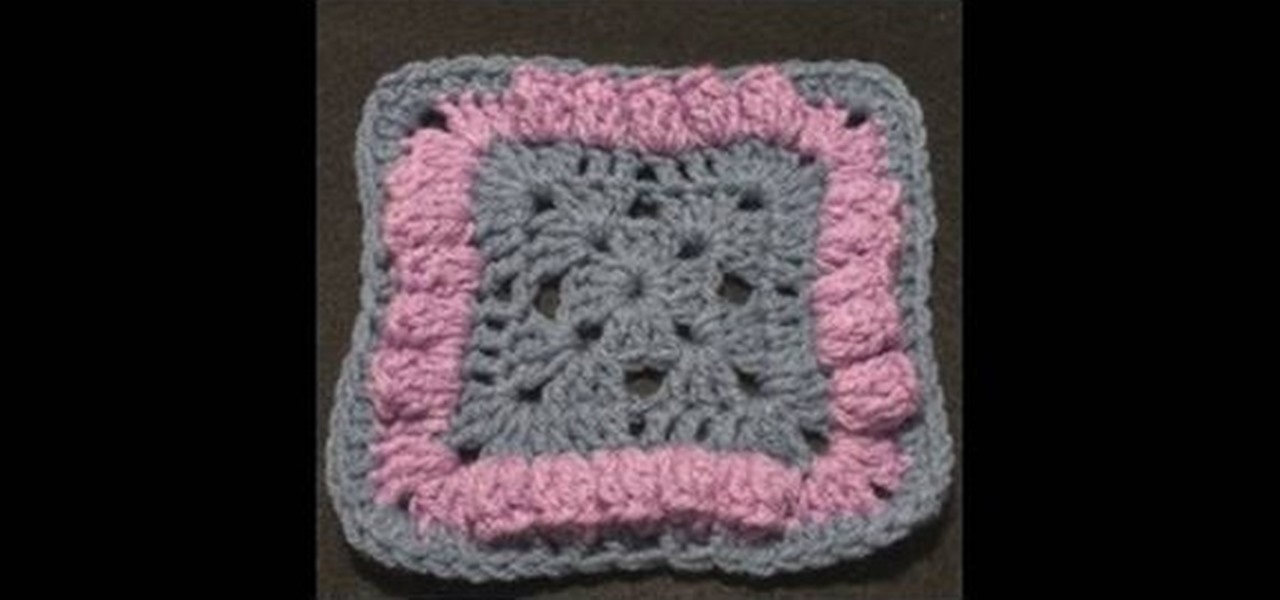
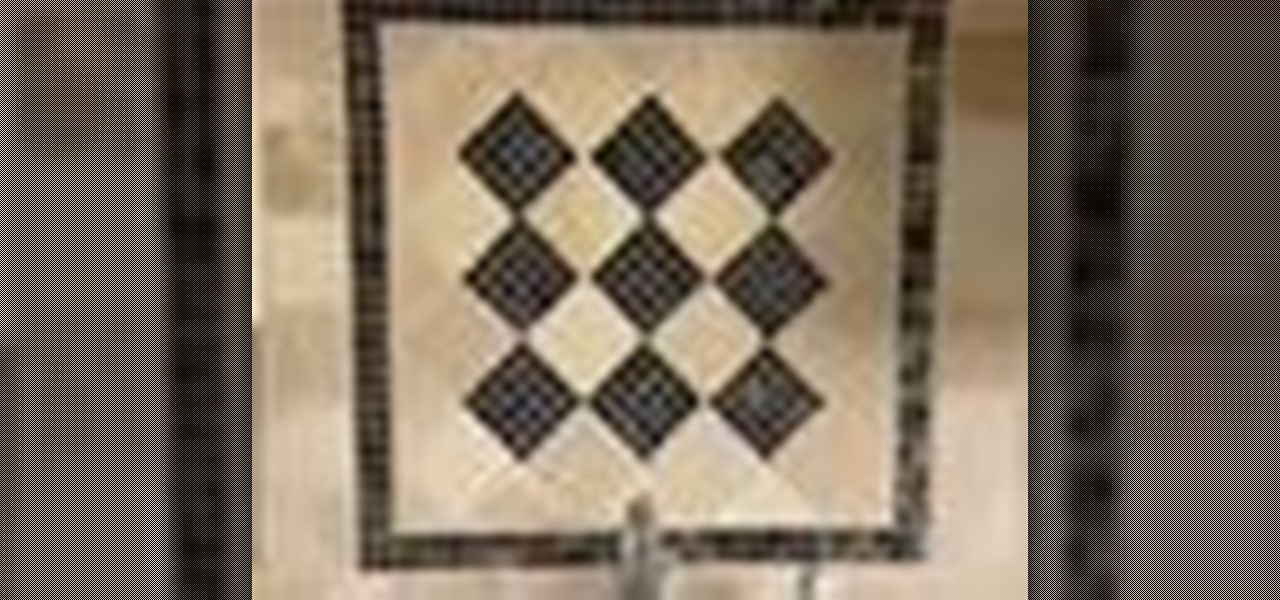
In this tutorial, we learn how to crochet a Bellevue granny square. Start by adding the slipknot to the crochet hook. Work a chain of four and join with the beginning chain. The first two rounds are going to be a traditional granny square. Chain, pull up, then work three double crochets. Continue doing this for all of them. Chain two, then work three more double crochets. Work the last three double crochets and you will have the base of the granny square complete. Continue doing this, but end...
Watch this video to learn how to alter your pitch and tone while singing!
In this tutorial, we learn how to draw Chowder. Start off by drawing the ears, then start drawing in the head underneath. Make sure the face is wide, then draw in large eyes, a nose, and a large smile. Make sure to add the tongue inside the mouth. After this, draw the arms, making sure to add in layers of fat to the upper body. Then, draw in the stomach and the legs to this character. Draw in shorts, then add on a t-shirt as well. Finish this off by adding in a tail, and any more details you ...
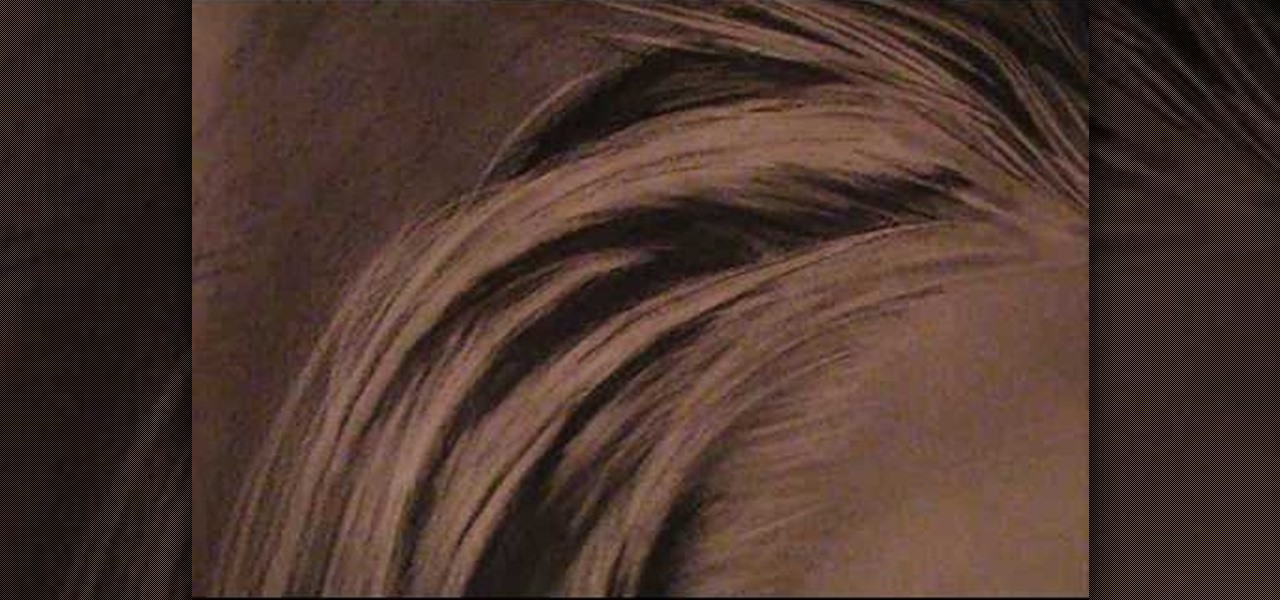
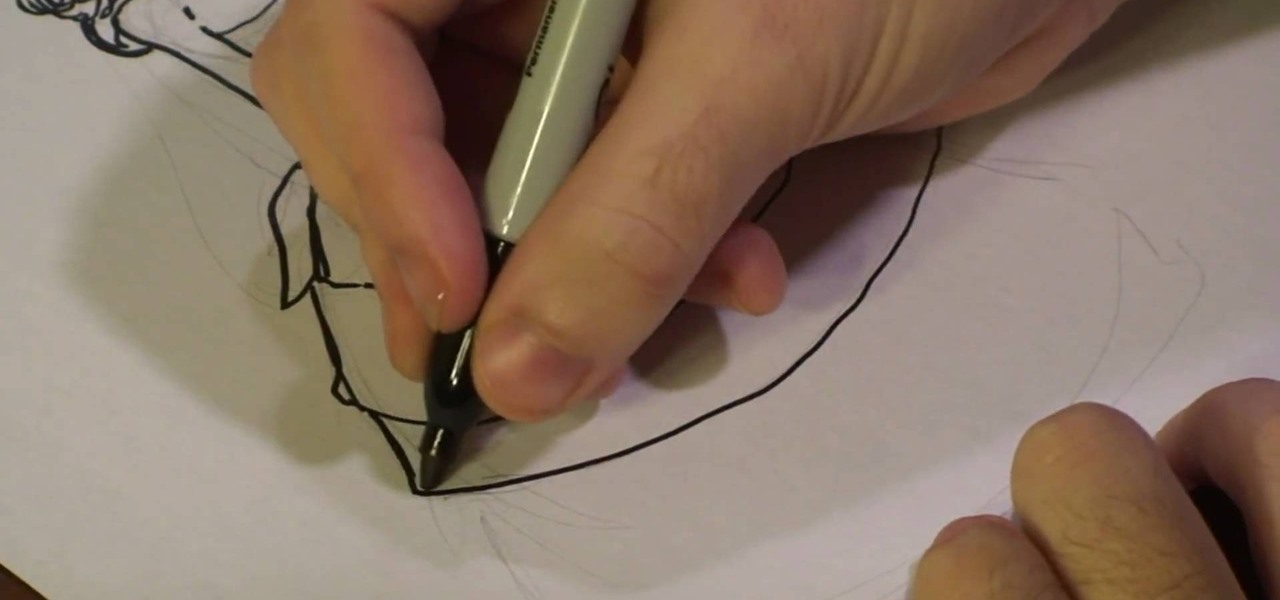
In this tutorial, we learn how to draw realistic hair. Start out with a rough outline and look where the hair is clustered together. Draw the clustered area first. Then, cross hatch over the entire surface of the area and blend in. Add hair to the forehead area, then use a darker pencil to form the shape of the hair. After you do the clusters, start to draw the hair that is separated from the rest. Keep looking at the picture you are drawing, then use an eraser to change the drawing to match ...
In this tutorial, we learn how to make a rose from a turnip. To start, cut at an angle all the way around the outside of the turnip. After this cut, cut a thin layer around the turnip just around the inside of the cuts that were just made. Continue to do this process throughout the entire fruit until you get to the top. Make sure to alternate from the middle of the petal, so they aren't all line up the same. When you get to the top, you will be making smaller cuts, until you finish. When you'...
Smokey eyes are so boring, don't you think? Whether or not you vary the colors (blue smokey eye versus black and silver smokey eye) the same idea is there: layer it on, smoke it out, and presto! Smokey eyes. But with so many gals turning to smokey eyes to get their sexy makeup fill, don't you want to stand out just a little bit?
Preserve the modesty of your fresh batch of Devil's food cupcakes by sheathing them in layers of icing and shaping them into fun animal shapes! While we love plain cupcakes, decorating cupcakes for special events like holidays and parties helps get your food in line with the theme and decor and will make guests smile.
In this tutorial, we learn how to make a triple decker peanut butter and jelly sandwich. First, take three pieces of bread and seal your bread bag up again. Next, grab your favorite kind of jelly and peanut butter. Use a spreader to spread the items on the sandwich instead of a butter knife. First, spread a layer of peanut butter onto one of the slices of bread. Next, stack another piece of bread on top of the peanut butter, and spread the peanut butter jam on top of that piece. After this, p...
In this video, we learn how to carve a papaya flower design. To start, you will want to take a sharp object and outline the drawing you want to make. Carve this onto the papaya, then remove the skin as you are making different shapes. If you want to do a large flower design, carve layers into the papaya to make the flower look more realistic. Take time to carve the different petals, stems, and other details. This is a fun way to make something beautiful with your food, and can double as a cen...
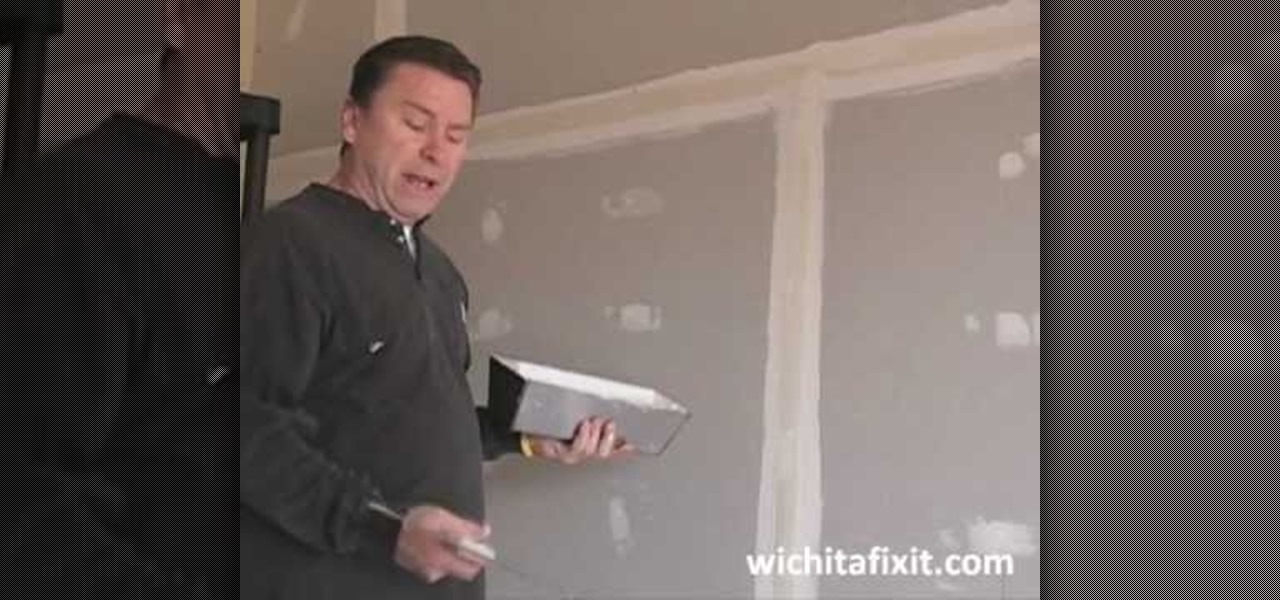
In this video tutorial, viewers learn how to drywall a tape butt joint. This task is very easy, simple and fast to do. Once the tape is on the butt joint, apply a thin layer of drywall compound and then apply a second coat of compound. Scrape off any excess compound. The main goal is to apply the compound over the tape. Make sure to use the drywall knife to smooth out and spread the compound. This video will benefit those viewers who are interested in pursuing a career as in drywall or are re...
In this tutorial, we learn how to build the perfect campfire. It's important to consider the materials, it's impossible to take a lighter and light a large piece of wood. You want to start the fire small and build it large. Think about the wood you will be using, which will decide if you are going to cook on it or need it for warmth/light. Birch bark is great for a base layer. Cinder is perfect to place on top of the birch, then add in larger pieces of wood as you create a bigger fire. When y...
In this video tutorial, viewers learn how to draw the black Spider-man in Adobe Photo-shop. Begin by drawing the shape of Spider-man and then scan it. Now extract the ink from the white page. Then change the ink from black to white. Make the background black. Then fill the entire figure of the character in black color, using the pencil tool. Now create a blue layer over the entire image. Add white to the eyes and center spider symbol. Finish by adding details and a spider web in the backgroun...
In this tutorial, we learn how to do the veil style for your hair. First, you will section the front of your hair and bangs into three separate and equal sections tied with small rubber bangs. Next, section the layer of hair behind the front row and make four separate sections. Keep doing this until you reach the back of the hair, adding one section each time. After this, braid the hair as far back as it goes to combine with the next box. When you are finished braiding, you will have a veil s...
In this tutorial, we learn how to do hair and makeup for going out. Begin by applying your favorite foundation, along with bronzer and blush. Next, apply eyeliner to both the top and bottom lashes. After this, brush on a layer of dark eyeshadow onto your eyelid, going up to the crease. Next, use a white eyeshadow to brush on the inside crease of the eyelid. When finished with this, use a black eyeshadow on the outer edge of the eye, then blend all the colors together. To finish the makeup, ap...
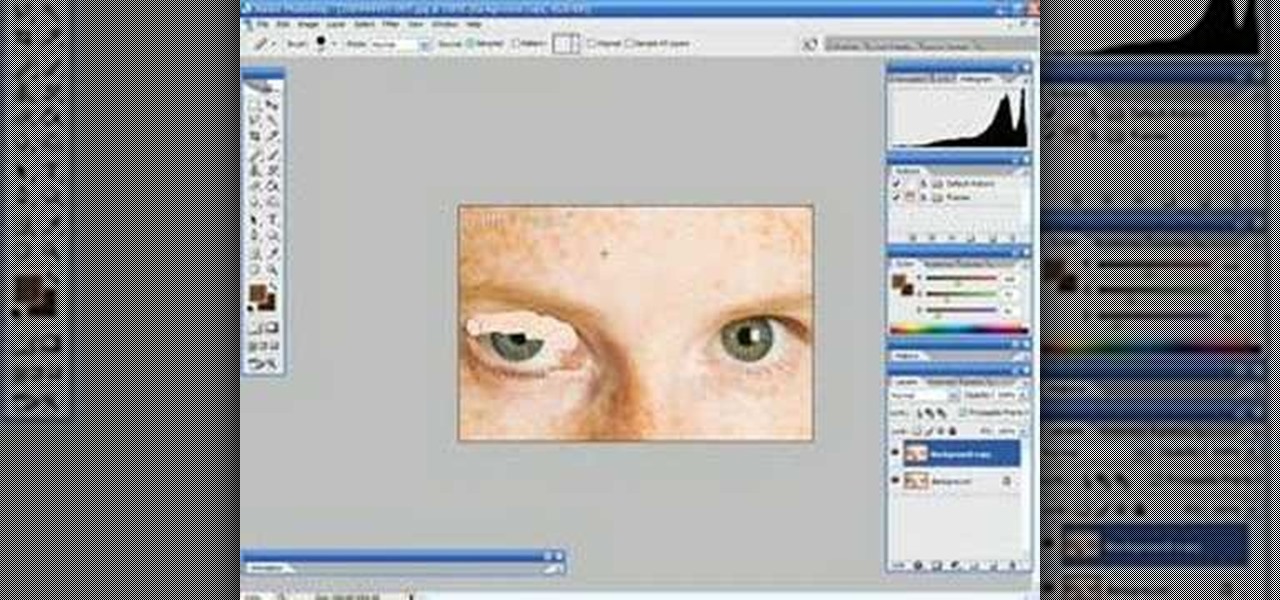
This tutorial teaches us how to touch up eyes while using Photoshop. First, open up Photoshop and zoom into the eyes on a picture you want to touch up the eyes on. First, select the adjustment layer icon and brighten the image. Next, invert the mass and select the "v" key, then pain the eyes on both sides. Next, click "filter" and then click "blur" so you will soften the edges so the picture doesn't look fake. Now, you can click on "before and after" to see what the picture results look like....
In this tutorial, we learn how to fold a Christmas tree. First, start with a square paper and fold it in half, then open it and fold it corner to corner. Open the paper again, the turn it over and fold it side to side. Open it once more and fold again side to side. The paper will not automatically fall into the shaped creases and you will have four flaps. Take your finger inside and flatten all the flaps. You should have four flaps on each side and then you can cut the bottom to form a trunk ...
In this video, we learn how to properly pack glass for moving. Make sure you have a table or work area that has a furniture pad on it. Now, place packing paper onto the bottom of a box carton for glasses and china. Glass should be on the top of the box while plates should be placed at the bottom. Put the glasses into a rolled piece of paper until secured, then place upside down into the box. When finished, add crushed paper to the top of the first layer to avoid any glass from breaking. Make ...
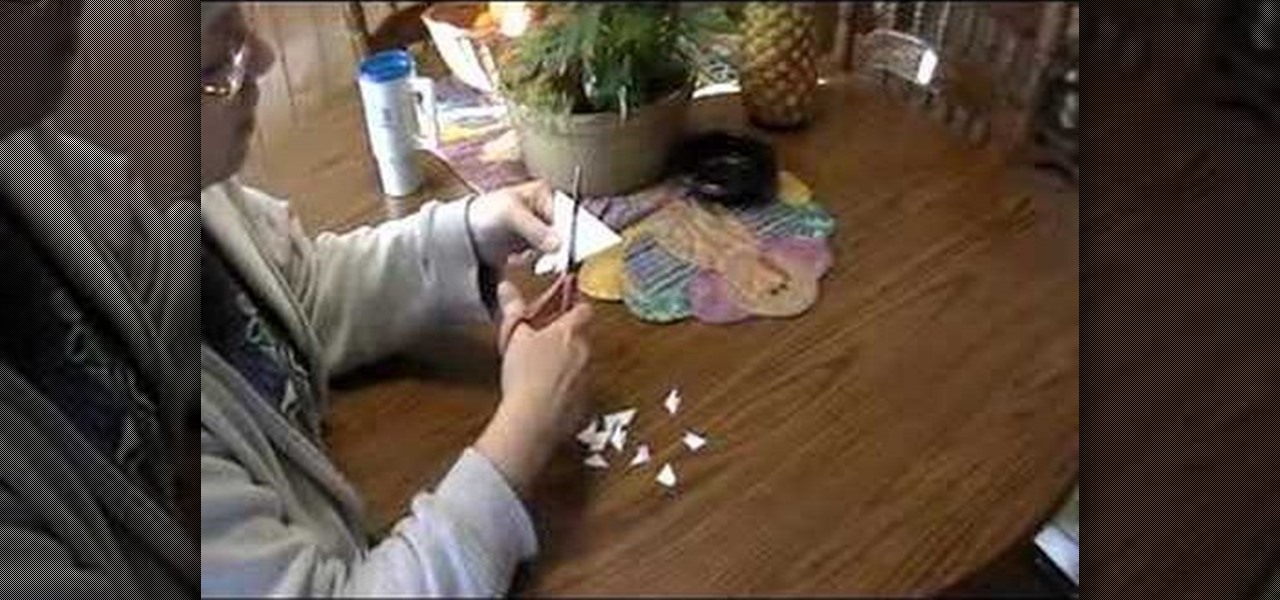
In this tutorial, we learn how to make a tissue paper flower. You will need: pipe cleaners, scissors, and tissue paper (three different colors). First, twist three pipe cleaners together to make a stem. Next, cut your tissue papers all into the same size, mix colors to get a prettier flower. Now, layer the sheet and fold the papers as many times as possible. Cut the ends in a triangle shape, then spread the papers again and fold up again in the alternate direction. Now using your papers and p...
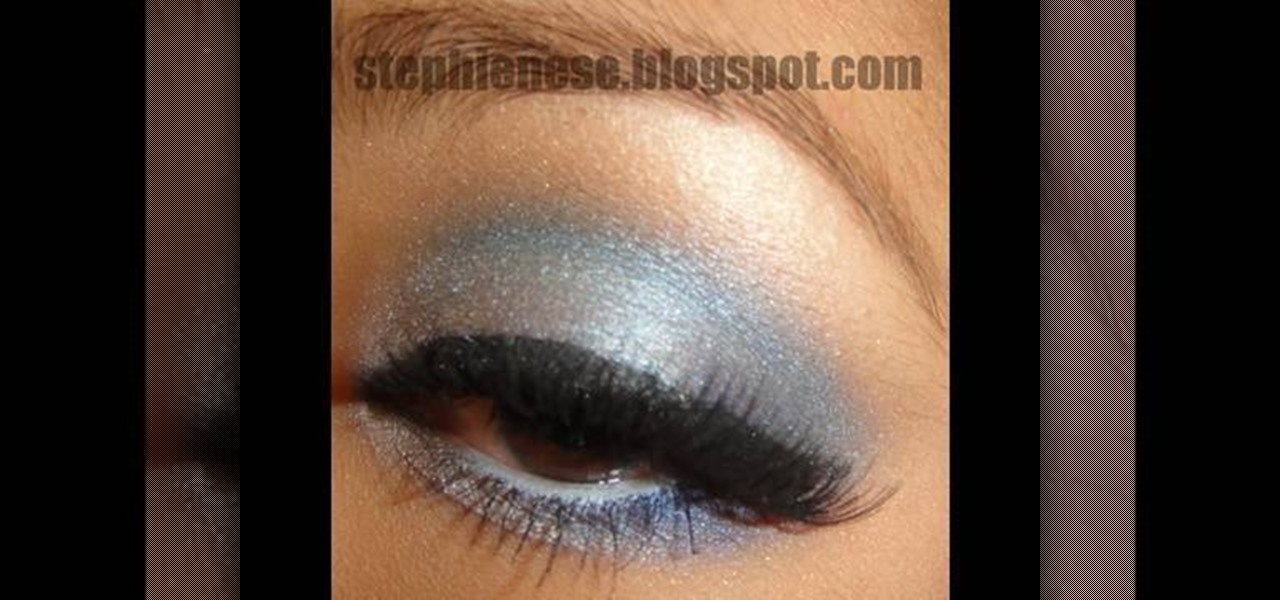
In this tutorial, we learn how to apply ice blue eye shades for the winter. To start, apply concealer underneath your eyes and then apply foundation to the entire face. Next, use an angled brush to apply makeup to your brows and make them more full. Now apply powder underneath your eye to catch any powder that falls while you are applying eyeshadow. After this apply primer to your entire lid and then apply a yellow tone shadow to your entire eye. Now take a blue eyeshadow and brush it on the ...
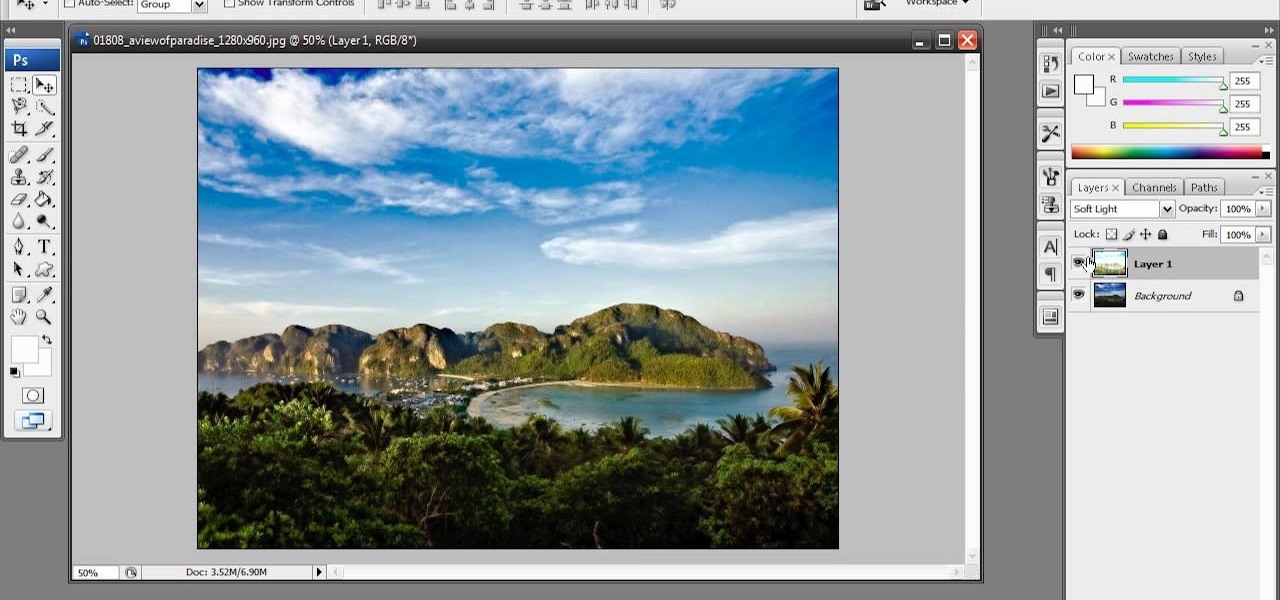
In this video tutorial, viewers learn how to enhance an image in Adobe Photoshop. Begin by duplicating the layer by press the Control and J buttons. Then change the blending mode to Soft Light. Now press the Control and M keys to open Curves, and drag the curves up to brighten the image. Then click on Filter, go to Blur and select Gaussian Blur. Set the Radius at 2.7 pixels and click OK. This video will benefit those viewers who enjoy editing images, and would like to learn how to enhance a p...
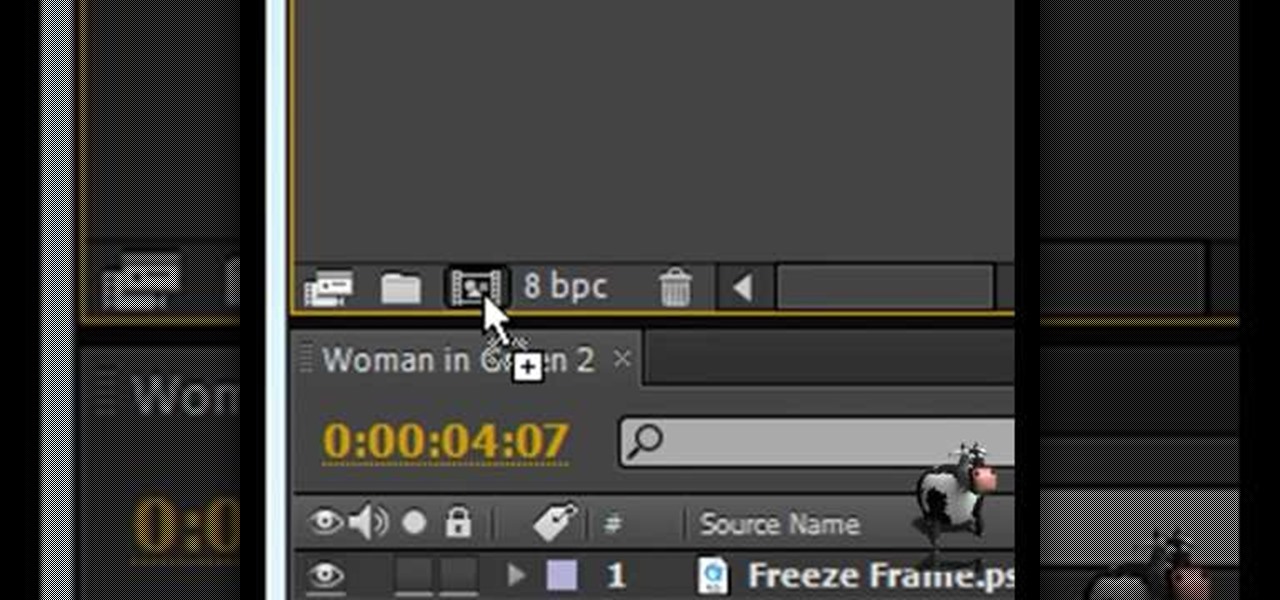
Themadcowmoo continues to show us how to create a shatter & disintegration effect in Adobe After Effects. In the second part of his two part video series he begins by getting rid of the extrusion depth in the shadow by changing the value to 0 (0.00). He then instructs on how to accomplish and even smaller disintegration effect by selecting the 'Shatter Map' tab, going to the fractal layer, choosing 'Fractal Noise' in the top right panel and then selecting '10' as the value within the 'Transfo...
Are you a fan of the CW's "One Tree Hill"? Profess your love for this long-running television hit by creating this character-inspired tank top! Based on a reconstructed tank worn by Peyton during a fight with Lucas in the fourth season, this shirt is really lightweight for summer and you can layer it on top of another tank top if you need the extra warmth.
You know how leaves that fall onto a newly fashioned, wet layer of cement create a beautiful indentation and mold of the leaf that stays on as long as the concrete stays there? Well, you can use a similar method to create concrete decor indented with rhubarb leaves.
In this video tutorial, viewers learn how to draw a bridal dress. Begin by drawing the basic shape of the female figure. Then draw the arms wearing a long gloves. Now add the hair on the figure's head. Make the hair curly and glamorous looking. Then draw the basic form of the dress. Give the dress a lot of layers and frills by adding curved horizontal lines along the dress. Finish by drawing the bride's veil behind her head and back and any extra details. This video will benefit those viewers...
In this video tutorial, viewers learn how to make a red-cyan anaglyphic 3D photo, using Adobe Photo-shop. Begin by taking two pictures of the same image. The second picture should be 6,5 cm to the right of the first picture. Now load both images onto Photo-shop and drag the second picture over the first one. Select Layer, click on Blending Option and uncheck Channel R. Place the red on the left side and cyan on the right side. This video will benefit those viewers who photo editing and would ...
Prepare two video clips which are on entirely the same scene or spot. Shoot the first video clip so that the actor enters and leaves the scene from the left. Then, shoot the second video clip so that the actor enters and leaves the scene from the right. On your Sony Vegas Pro application, layer both video clips together. Create a rectangular mask on the first video to indicate which part of the scene should only be shown. Add a little bit of feather effect so that the first video will blend i...
Do you have tons of post-its and scraps of paper lying around? Is it overwhelming to sift through layers of papers just to find the newest note? If you have this problem, worry no more! In this tutorial, you will learn how to create your very own DIY chalkboard so that you can organize your notes and get rid of all the clutter!
In this video from Over the Kitchen Counter, learn how to make a batch of simple, delicious crepes. Thin and tender, these pancakes are very versatile and are easy to use in both sweet and savory dishes. Make up a batch then freeze any leftovers layered between waxed paper and wrapped in foil. Fill with whatever you like: sliced berries and icecream, bananas sauteed in rum, marmalade and orange liqueur, chicken and broccoli in a white sauce, or just butter and syrup. To make these crepes, you...
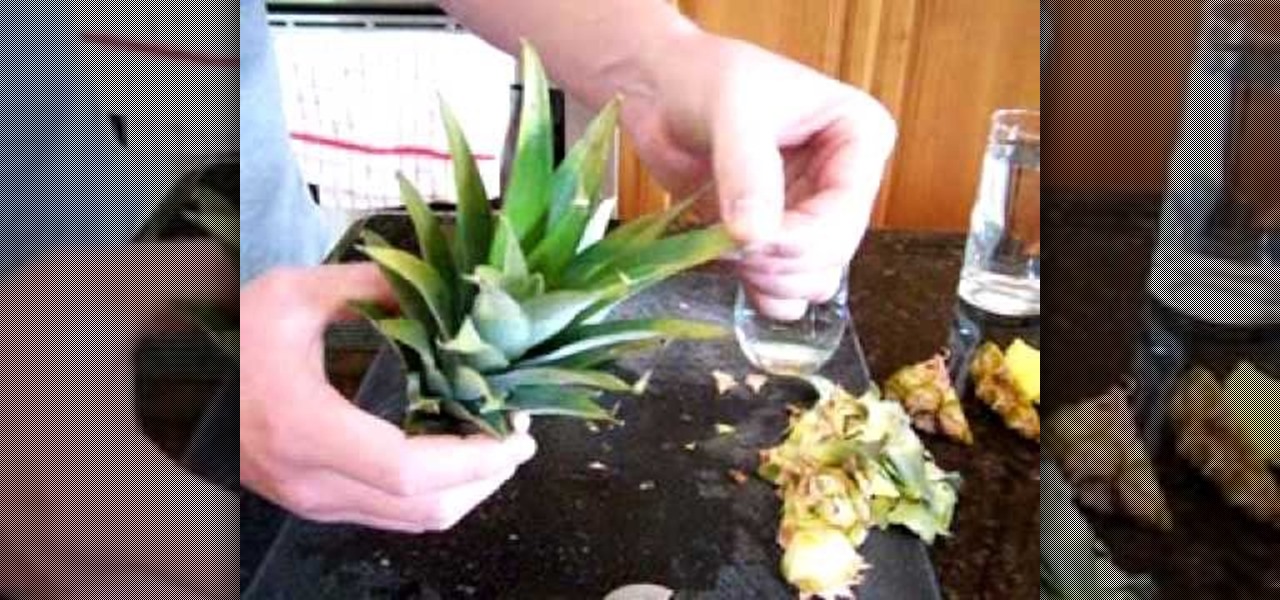
This video shows how to grow pineapples at home. First, take a pineapple and slice off the top. Next, cut off all the meat from the top of the plant. Then start to peel all the bottom layer of leaves off the plant. Once the plant is well pruned, place it in water for about 2 weeks. You'll see new roots grow in the water. Once there is a healthy root growth structure the plants are ready to be transplanted. Then you'll put the plants into a pot. The transplanting part of the process will be fo...
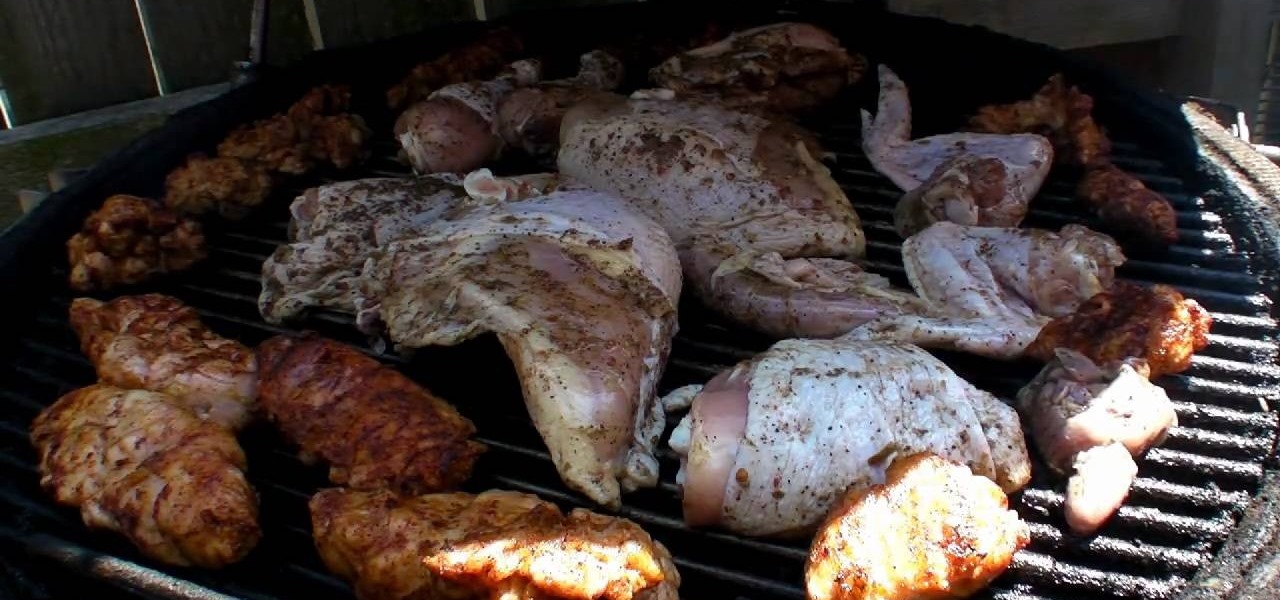
SurfinSapo shows you how to make Jamaican Jerk Chicken and Mummified Mollejas in this brief instructional video. He starts by layering hot coals on top of unlit coals, making the 'kamato' the perfect temperature. Then he rolls the Mollejas (sweetbread meat) in Hoochie Mama BB Spice from Sucklebuters.com, then sets them on the grill over the hot coals. Next, he takes the chicken (marinated in Wa;lerswood Traditional Jamaican Jerk seasoning, hot and spicy) and throws it on the hot kamato next t...
To make the country bump hairstyle as seen on Carrie Underwood, Dean Banowetz, a stylist from American Idol demonstrates for BeautyTV. First, he takes a section of hair from the forehead to the crown and from the center of one eye to the other. Then he sections it from side to side and back combs the hair lightly to create the bump in the front. Additional back combing or a tail comb can be used to increase the volume of the bump as desired. After smoothing the top layer of hair over the bump...
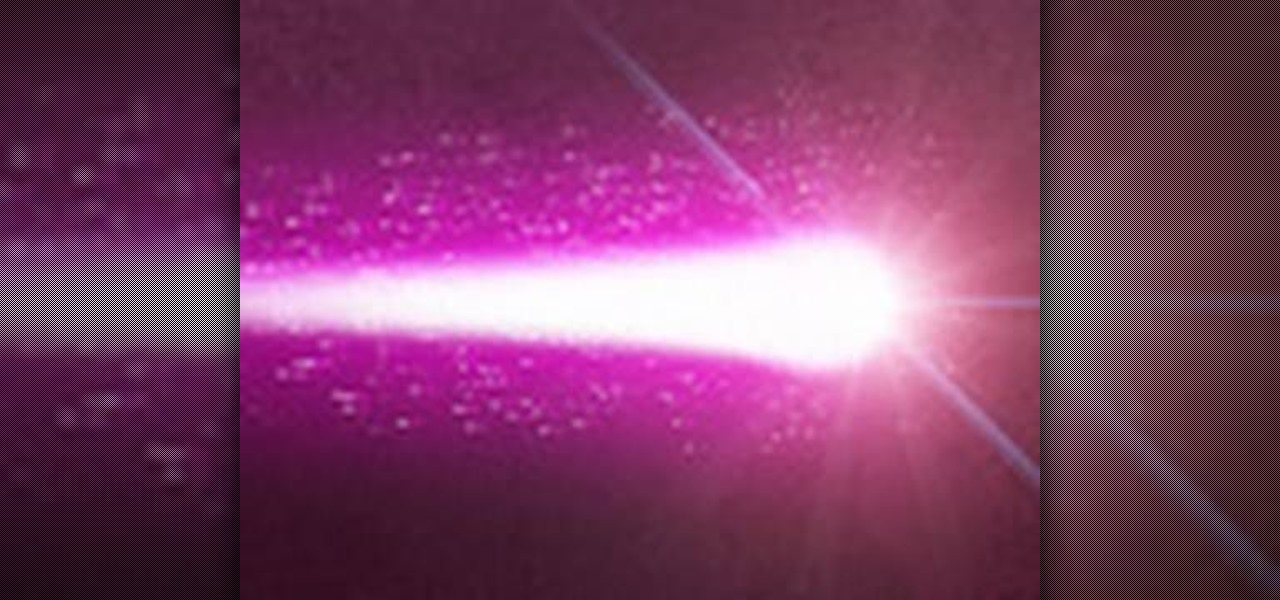
There aren't any words in the silent instructional tutorial video, but if you watch carefully, you'll learn the exact steps necessary to create a phenomenal looking shooting star or comment with nice looking special effects that are achievable in Photoshop. First you'll select a circular region with the selection tool, then you fill it with white. Next you'll use brush settings to create a brush stroke that straight and fades over time to create the comet's tail. Then you'll use Photoshop's l...
Dirt cake starts by making a large package of chocolate pudding according to the recipe on the box. Then when the pudding is cool mix in a tub of cool whip. For the crust, freeze Oreo, or other chocolate sandwich cookies overnight, then use a food processor or blender to crush them. They can also be crushed using a hammer and large plastic bag. Put a layer of cookie crumbs on the bottom of the pan, and put some gummy worms on top of the crust. Pour the pudding and cream mix over the crust and...
In this Software video tutorial you will learn how to make a winking animated GIF in Adobe Photoshop. Select a photograph of two eyes and duplicate the layer. Now copy the top eyelashes and paste them on top of the bottom eyelashes. Go to the eye drop tool and select a dark color. Then go to paint brush, choose a brush with size 1 and select darken in the ‘mode’ dropdown menu. Reduce opacity to 50%. Now darken the lower eyelashes as shown in the video. Then go to healing brush tool and se...