In this tutorial, we learn how to make a double point needle holder. First, you will need to grab four of your needles, two small objects that have holes in the bottoms, stretchy bead cord, crimp beads, and pliers. Then, you will drill the holes in the bottom of your objects if they aren't already taken out. After this, poke a hole through them and thread the stretchy bead cord through the ends of one and around the other. This should make a circle. Then, you will tie a knot and use a crimp b...

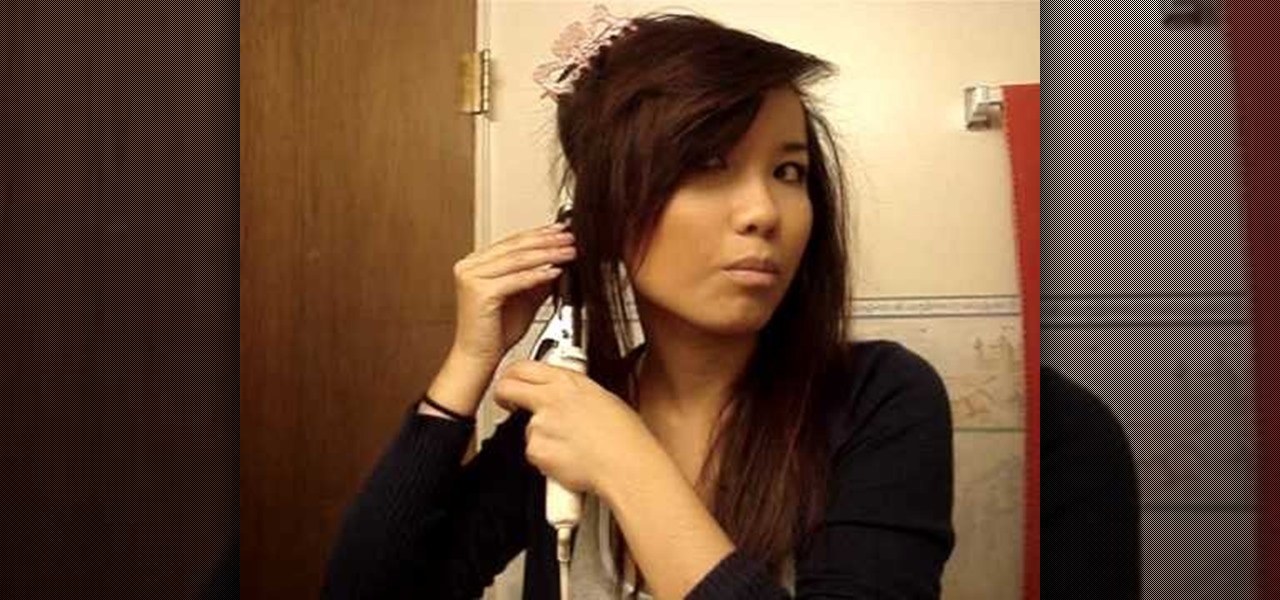
The Enzo Milano curling iron is revolutionary in that it is clipless. If you've curled your hair a few times before then you know that a great deal of curling irons always have a clip attached that holds in the hair, keeping it in place when you curl.
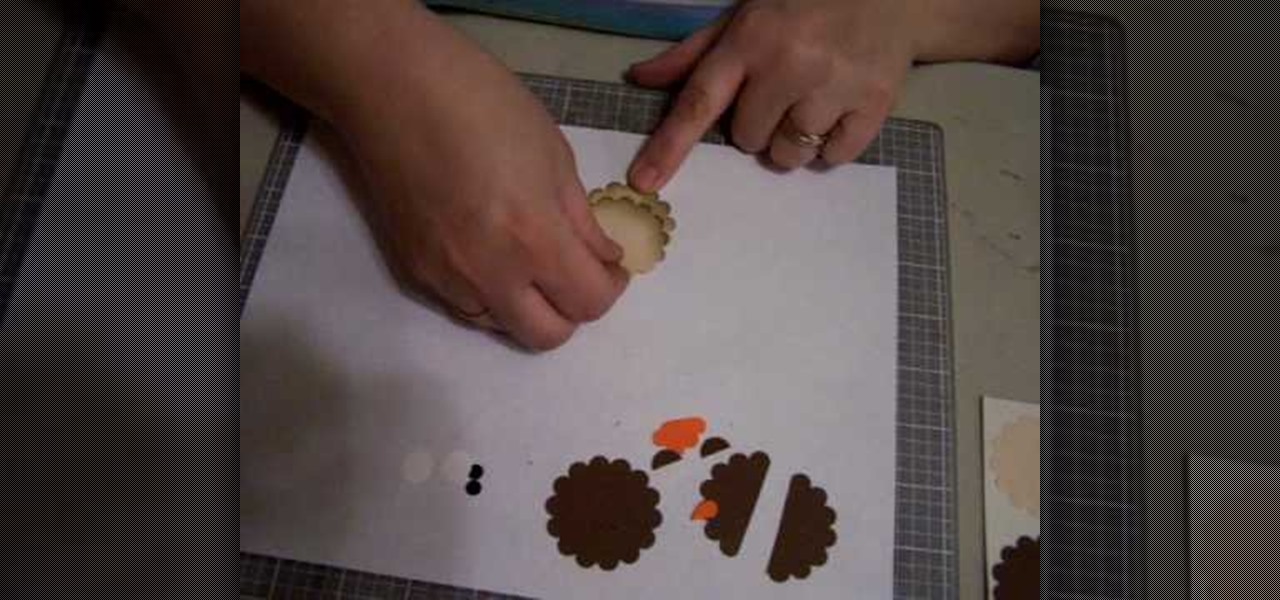
In this video, we learn how to make an owl with Stampin' Up punches. First, cut out two dark brown scallop circles, then two light brown scallop circles. After this, cut out two orange flowers, two black small circles, three white circles, and an orange heart. To put these together, cut one of the dark brown punches in half so you have two pieces. Then, cut off half the flower on both of the flower shapes. Next, put all the pieces together, using the dark brown for the face along with white a...

This video tutorial is in the Food category which will show you how to make scrambled eggs using a flashlight. Break an egg and pour it in to a small metal container. Clamp a Wicked Lasers torch in an upright position so that the bulb end is facing upwards. Now switch on the torch and place the container over it. After sometime as the container gets heated, the egg will start to cook. Mix the egg with a spoon while holding the container with the other hand to prevent it from falling over. Don...
In this video, we learn how to make a lariat necklace. First, cut your wire so it's 20" long. Then, make a loop at one of the ends and attach a small chain to it. After this, put on the crimp bead and make a loop through the bead. Once finished, take your pliers and clamp it down. Now attach your chosen beads to the wire until you reach the end where the chain is. After this, cut out three pieces of wire and attach them together in a slight v shape. After this, apply beads to them, then tie t...
Is your eyeshadow busted and broken up? Don't toss it away just yet— it's totally repairable. Bring back the smoothness with a little tip that will save you tons of money in the long run. The key? Rubbing alcohol. By adding a little bit of rubbing alcohol to your broken eyeshadow, and by mixing it together with a small spatula or butter knife, you can get it back to its original vigor.

Make yourself princess for a day by creating the lovely Rapunzel-like curls presented in this video. Don't get us wrong - straight hair is sleek and modern - but when we're in the mood for romance we make a beeline for the curling iron.
In this tutorial, we learn how to build your own hydroponics system. To do this, you will need: square line rain gutter, 6x end caps, 3x gutter running outlet, 1x small pond pump, 2 meters pond pump tubing, timber for framework, large plastic container, and gutter leaf guard. When you start, you will need to measure out how tall your pump will need to be, then build the framework to surround it. Then, grab all your gutter parts and put them together. Once you do this, start to set up all the ...
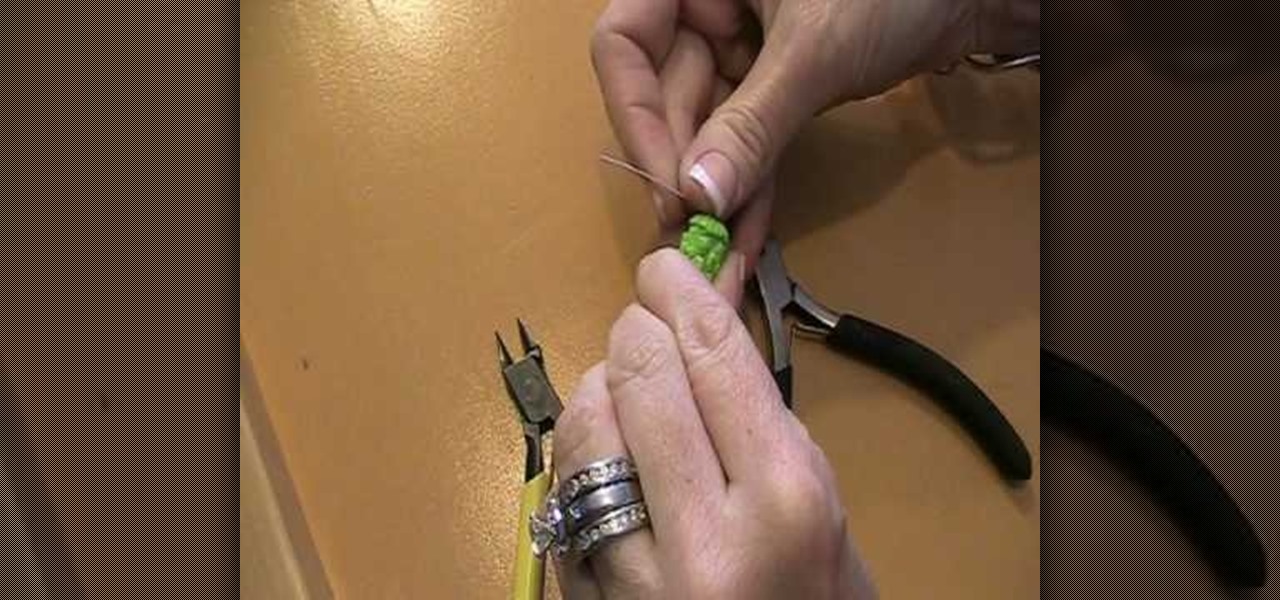
In this tutorial, we learn how to make earrings with Swarovski Crystal & coiled wire. You will need: 6 mm round bead, 4 mm Swarovski crystal, 2 inch head pin, and coiled wire. First, place the beads on to the head pin then bend the pin to 90 degrees. Cut this around 8 mm with a wire cutter, then use pliers to curve the bottom of the pin into a loop. Now grab the wire and cut it into a small strip. Form a loop at the bottom, then twist it into a wired circle. Attach this to the loop on the ear...
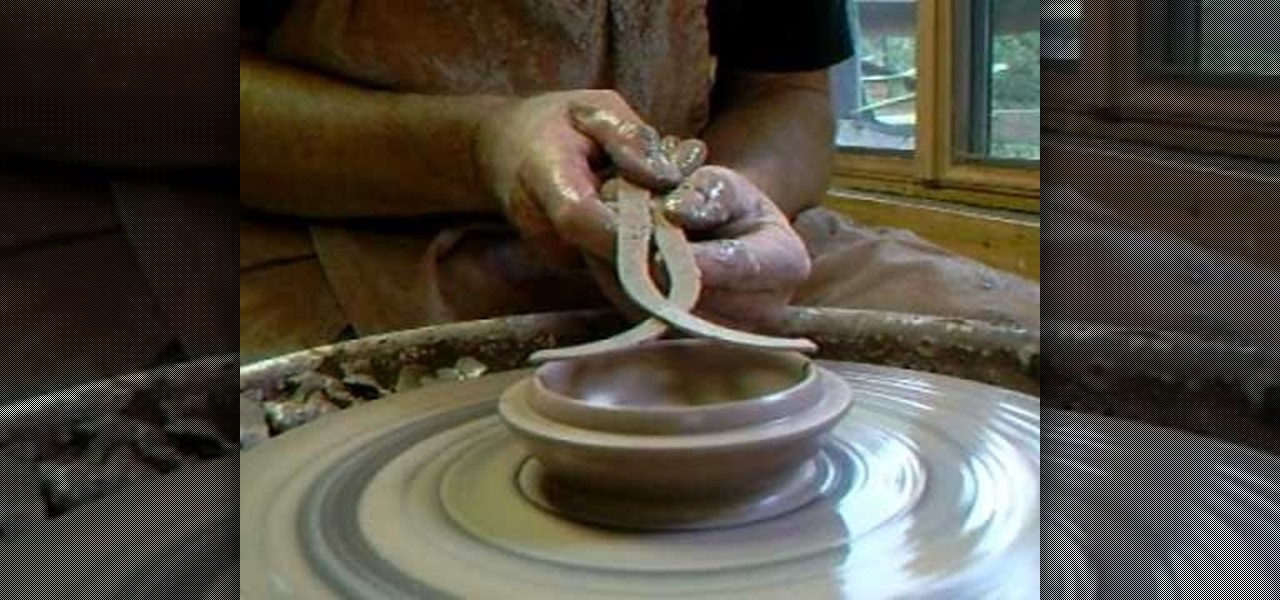
In this tutorial, Simon Leach teaches us how to make lidded boxes. First, grab your pot and dip the top of it into water to get it wet and soft. Now, grab a small amount of clay and set it on your spinning table. After this, get your hands wet and start to craft a lid out of the clay. Make an inner base as you are spinning the clay by carefully placing your finger on the side of the top. When finished spinning, place the top down and see if it's the correct size for the pot, then glaze and fi...
In this video, we learn how to do a stockinette stitch. This is where you knit one row and stitch the row after that. This will curl up if you don't stitch on the side of it as well. When you're on the right side, you will do a knit row making it as large or as small as you want it to be. After this, turn your work around and you will see the wrong side of the work. Now your next row will be purl stitches. Continue to do these until you finish, this is a simple and easy way to learn stitching!
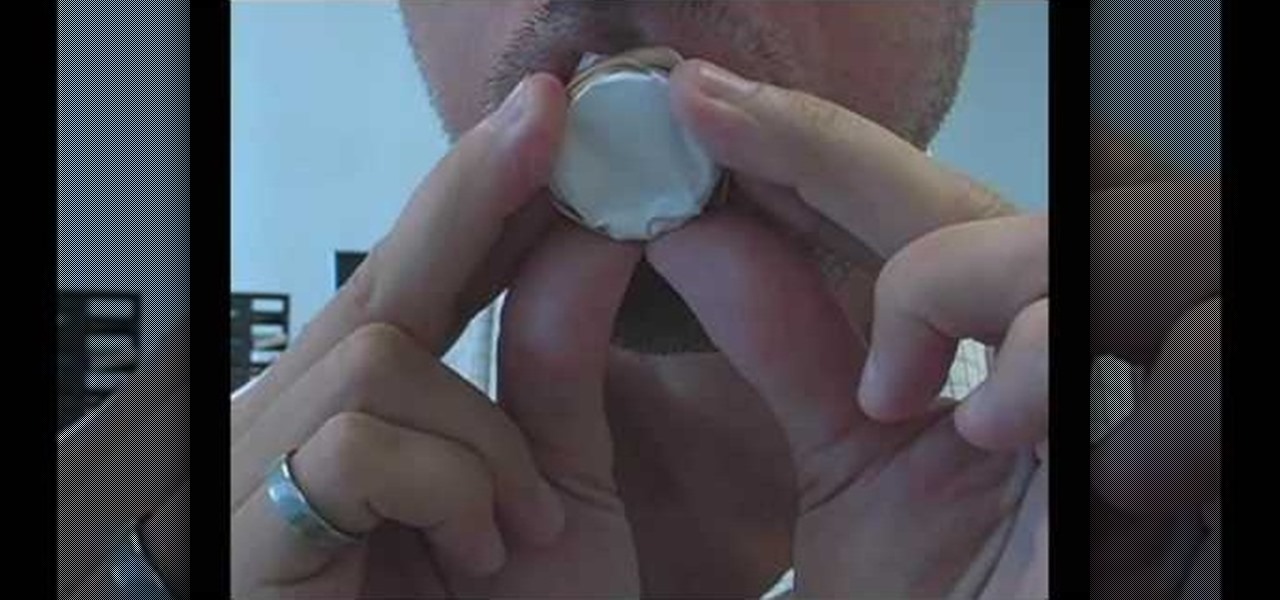
In this video tutorial, viewers learn how to make a realistic goose call. The materials required for this project are: a plastic bottle cap, scissors, rubber band and a piece of paper. Begin by making a small hole in the bottle cap. Then wrap the paper around the other side of the bottle cap and secure it with the rubber band. Now just blow in the hole and make a humming sound to create a goose call. This video will benefit those viewers who enjoy goose hunting, and would like to learn how to...
In this video, we learn how to perform a backward wristlock: Omote Gyaku. This is a basic move that can be done in different variations. First, place your thumb on the back of their hand and turn the wrist around. After this, turn it sideways and turn it up and over. Doing this will twist the wrist and lock it so the opponent falls down to the ground with pain. Just a small amount of force sets off a chain reaction in all the joints in the entire body. Once you have this down, it's a very eff...
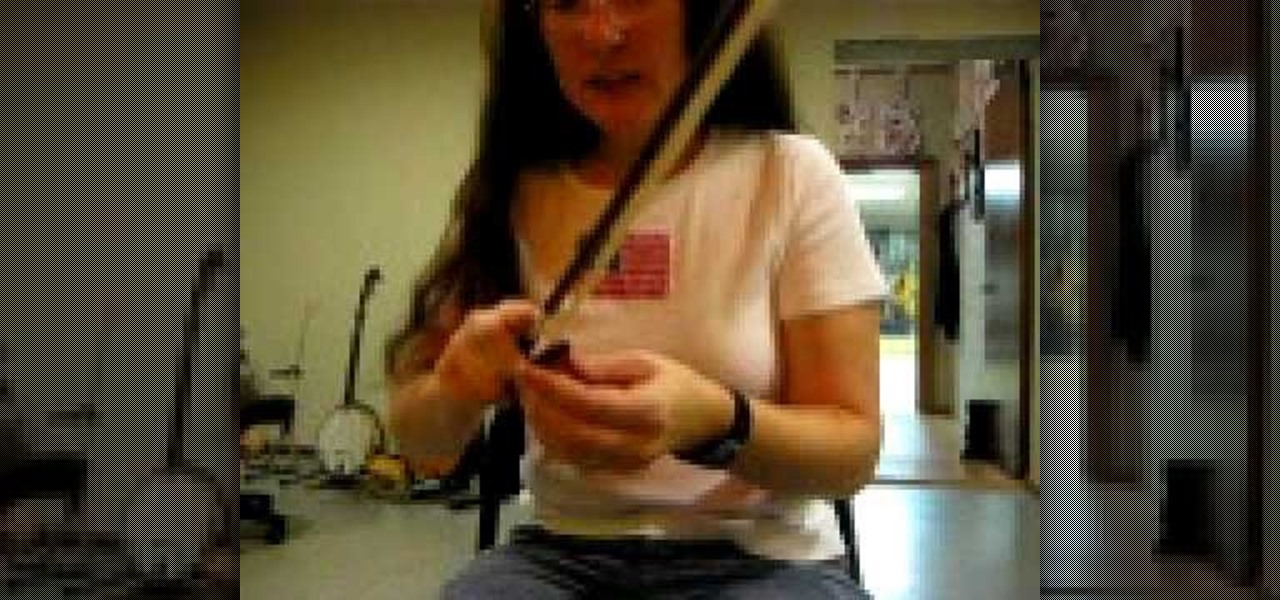
In this video, we learn how to rosin a violin bow for the first time. To start, you will want to tighten the hair on the bow by turning the bottom bow clockwise. Next, you will take your rosin and move the bow over it. Just do small sections at a time, then move onto the next section. It may be hard to get the rosin going, scratch it with sandpaper before you begin if it's being difficult. You will know when the rosin is going, because it will not look shiny anymore. Once you reach the top of...
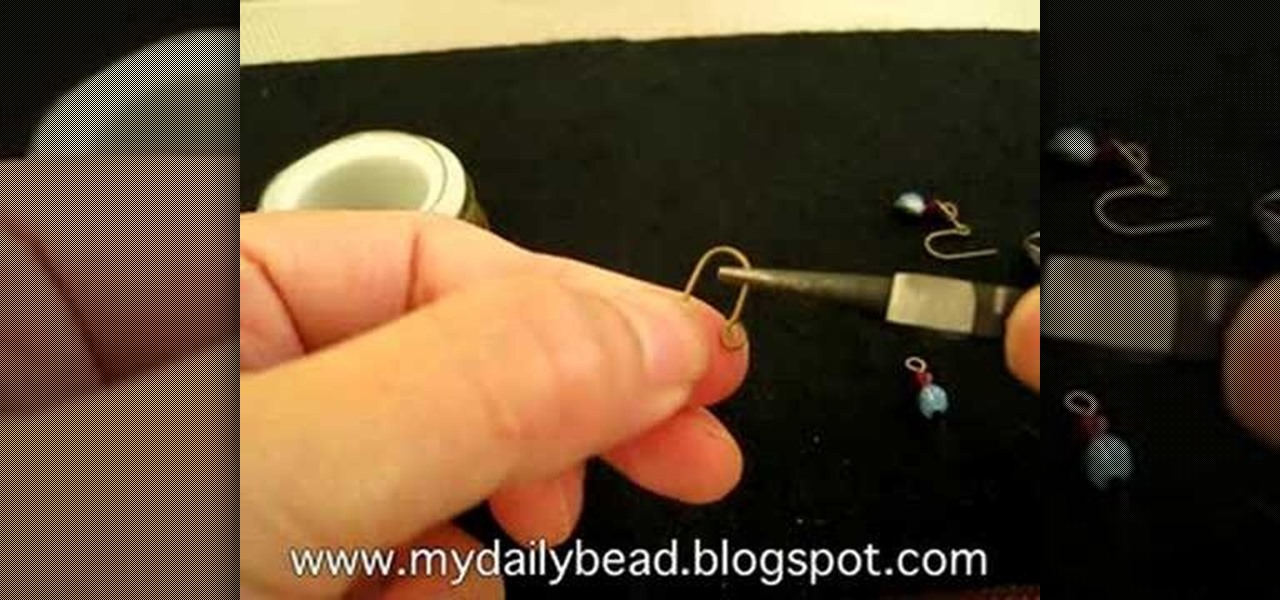
What exactly is a head pin? In jewelry crafting, a head pin is the small wire loop on top of a bead that allows the bead to be attached to a necklace or an earring. If you're looking to get into making your own jewelry, then creating a headpin is one of the most basic skills you'll utilize for the rest of your career.
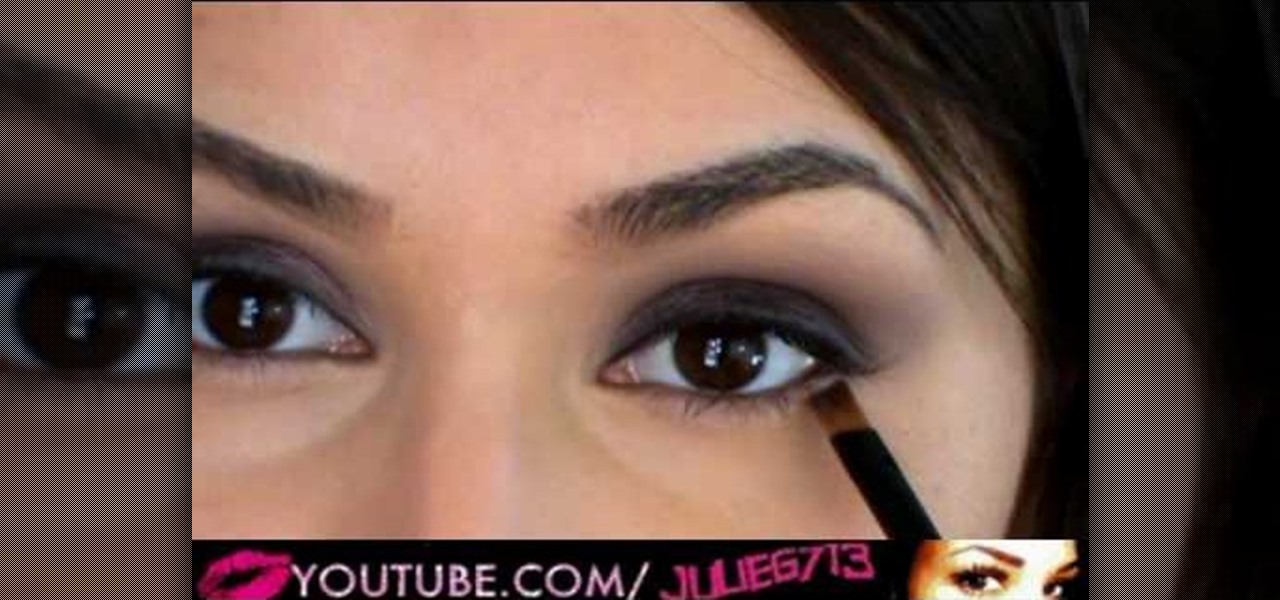
There exists a small set of makeup skills that is essential for your fashionable survival in the lipstick jungle: How to do the perfect red lip, how to shape and drawn in your brows, and how to do the perfect smokey eye. With these skills you'll be able to create a makeup look to suit any occasion, and we guarantee it.
Snails are such cool cats. While we humans labor the day away in a whirlwind of errands and obligations, snails take their time wherever they choose to go. As such, we can learn a bit about taking it easy and relaxing from these small wisdom bearers.
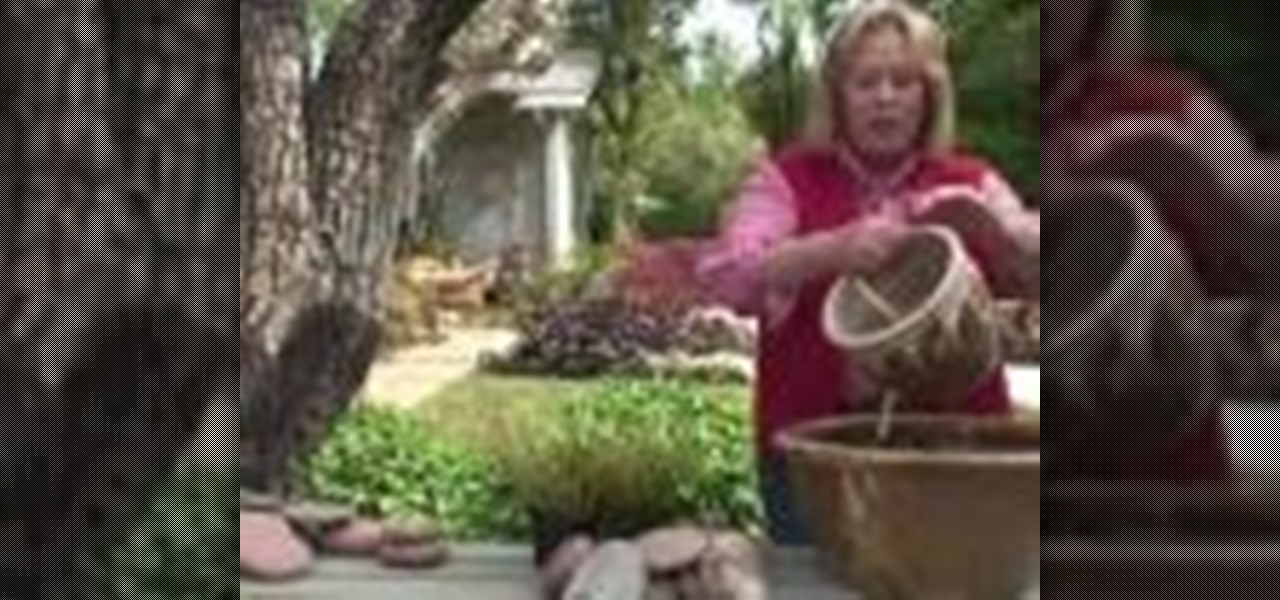
Forget about buying a garden fountain. You can make a DIY one for your garden. You can even make a small on for a tabletop! You just need to get the right pump for the job. The base of you fountain just needs to be big enough to completely submerge the pump under water. Watch to learn the rest, which involves flower pots and cobble stones.
In this video, we learn how to make Indian vegetarian shammi kebab. You will first need to mash a green plantain that has been boiled first. Next, add oil to a pan and then add black cumin, chopped onions, salt, chopped green chilies, turmeric powder, chopped mint leaf, chick peas, coriander powder, red chili powder, and mix together. Then, add in your plantains and salt, then chopped coriander. Continue to mix this all together while on low heat, then mash the mixture until well combined. No...
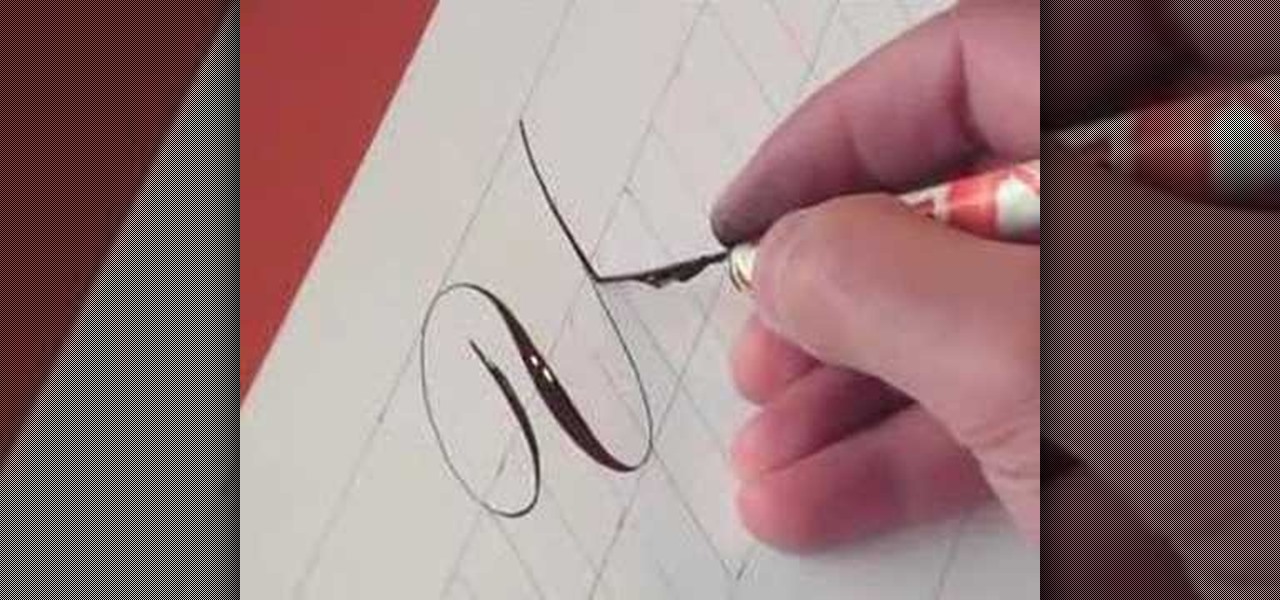
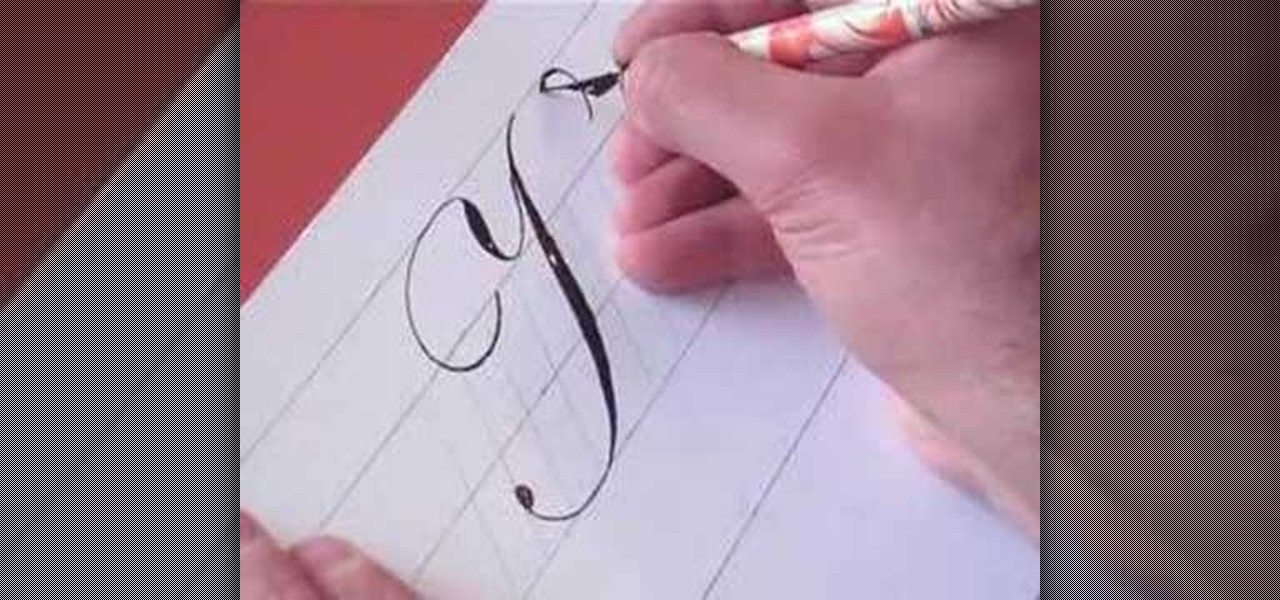
In this tutorial, we learn how to write the letter Y in calligraphy copperplate. First, make a thin line with the pen, going thicker as you go down, make a loop and then come back down. Make a "u" shape, then connect a curved line to the other side finished with a dot on the bottom to complete the letter. To make the lower case letter, make a small thin hump, then drag the pen down to a thicker line. Make a new line on the other side, making a thicker line and connect it with the other shape ...
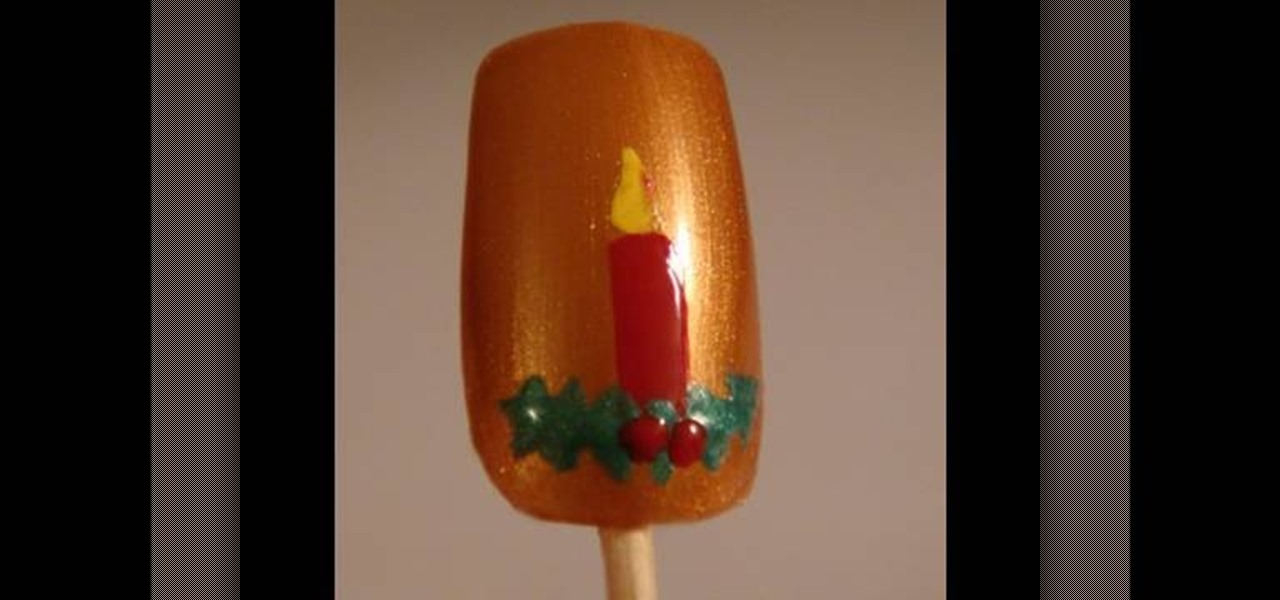
In this tutorial, we learn how to design Christmas holiday winter nails. First, purchase acrylic nails and paint them a burnt orange or copper color. Now, take a very small and pointed brush and dip it into red nail polish. Draw a candle onto the acrylic nail, then paint green around it to make holly and yellow above it to make a flame. Set this aside and let it dry, then continue to decorate the rest of your nails with either the same design or something else Christmas related. Apply to your...
In this tutorial, we learn how to make Indian dahi puri. You will first grab your yogurt, and mix it together with salt. After you do this, poke a small hole in your mini puri shell and sprinkle spices on the bottom of the plate. Next, place different spices and vegetables into the middle of the shell. Follow this with adding the liquid mixture into the shells, then top off with chopped onions and tomatoes. Add spices to the top and curd if you like. To finish, sprinkle the yogurt on top and ...
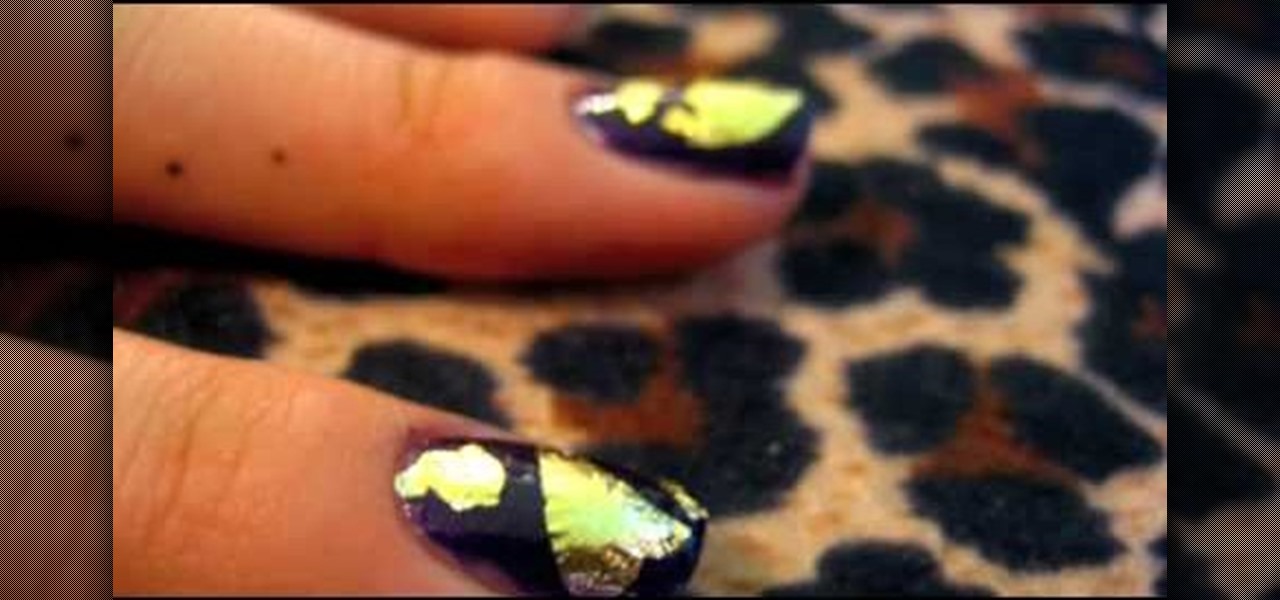
In this video, we learn how to apply gold leaf to your nails. First, paint your nails with a dark purple color over the entire nail, then let it dry. After this, apply a clear coat of nail polish and cut out small pieces of gold leaf from a large sheet. Once you have these broken apart, grab them with a toothpick and drop them down onto the nail in the spot you want them to be. You can place around two leaves on each nail. do this for each leaf, then apply the clear coast of nail polish over ...
A bedbug is a small brownish, blood-sucking insect. Usually, infestation brings emotional trauma. So, the problem is greater than the physical problem, since the bugs bite at night, while the victim sleeps. Often, the bites are mistaken for dermatological conditions, until the bugs are found. Typically, bedbugs are going to be within 10-15 feet of your bed. They will usually be along the rim. They will also be underneath the box spring. There will be in the nightstands. There will also be blo...
In this video, we learn how to write the letter K in calligraphy copperplate. Start by running your calligraphy pen on the paper going from a thin line to a thick, making a line curved to the left ending with a dot at the end of a small loop. Next, make a loop to drag out across the top on the right hand side and curve it down to make the K letter. Do the same to make the lower case letter, except making a loop for the top of the letter instead. When finished, let the ink dry and you've got y...
In this video, we learn how to make a mosaic jewelry ring. First, put the glue into a container, then place the stones into the glue and then place them onto the ring. Start by making the outer ring of the circle, then continue to go around the inside and the middle. Once you have all the stones placed inside, let the ring and stones dry for a full two hours. Next, take your powder and add a small amount of water. Mix together until you have a toothpaste like consistency, then rub it on the r...
In this tutorial, we learn how to make a vegetarian Spanish-style paella. You will need: 1 tbsp olive oil, 1 bay leaf, 1/2 onion, 1.5 c Basmati rice, 1 clove garlic, 1/2 vegetable bouillon, 1/2 green bell pepper, 1 tsp tomato paste, 1 small tomato (chopped), 1 chopped tomato, 3 c water, saffron, salt, and fresh thyme. First, sautŽ your onion with garlic and bell pepper in a skillet with olive oil. Next, add in the tomato and saffron, then add in the bay leaf, rice, and herbs and mix thoroughl...
In this video, we learn how to write the letter O in calligraphy copperplate. Take your calligraphy pen and make a medium thick half loop at the top, dragging it down into a thicker line on the left side of the word. Then, continue onto the other side of the O with a lighter touch of the pen making a very thin line, finishing with a loop in the middle. Make the smaller O just like normal, making the thick line on the side and finishing with a small loop bending out to the right at the end. Wh...
In this video, we learn how to make photo magnets. First, clean your glass with vinegar, make sure it's small enough for the magnet. After this, cut your preferred image to fit in the glass, then apply adhesive to the image. Apply the glass with the texture side down, then push it around to work out all the bubbles. Clean the glass off with a damp towel before it dries. Next, apply Diamond Glaze to the back of the magnet and then allow it to dry completely. When finished, attach a magnet to t...
Learning how to play popular songs on the guitar gives you all the trappings of rock stardom - swoon-worthy finger dexterity, girls, and unkempt hair - without the drug addictions and STDs. Become a small town hit by learning how to strum Michael Buble's single "Haven't Met You Yet" on the guitar.
In this video, we learn how to build a LEGO pickup truck. First, you will need to lay out all the parts that you need to build the truck. This includes small and large parts that are in gray and white colors, as well as wheels. Start off by building the middle of the car, making room for the wheels to fit in. After this, start to add on the blocks that go on the back and the front to make the headlights and different features on the truck. Add on the block for the windshield, then add on the ...
In this video, we learn how to apply eyeshadow and eyeliner in Adobe Photoshop. First, load your picture in and zoom in on the eye. After you do this, you will need to click on layer one and then click on the color picker. Next, choose the color you want for the eye and paint it onto the lids using a small brush and zooming in on the eye even further. After you brush the color onto the entire eye, you can choose black for the eyeliner and use a smaller brush. Paint the liner onto the bottom a...
In this video, we learn how to draw a game character in motion. First draw the outline of the game character and make the body more prominent with details. After this, start to add in darker lines around the outside, then start to shade in the drawing and make the different parts pop out of the page. Next, add in colors throughout the sketch and add in white marks to show the glare on the picture. You will want to keep adding in all the small details to make this picture look even better. Whe...
In this tutorial, we learn how to make a neck knife survival kit. This is good to have so you can use it for eating and making shelter as well as protect against wild animals. The neck knife should be a small kit and able to hide underneath a shirt. It should be adjustable with a paracord knot so you can make sure it doesn't snag against something. The knife should be a simple one that has a decent point on it. Make sure the pouch that the knife is in is thick enough not to let the knife poin...
In this tutorial, we learn how to make a pendant and adjustable cord necklace. First, grab your pendant and guide a small metal ball onto the bottom of it with a needle. Next, place a spacer through the top and another ball on the top of that. Now, take your pliers to bend the needle to keep the balls in the same place. Keep twist it until you make a loop shape with it. Now, place a string into the loop and then make a knot with the two ends of the string. This will now become your necklace a...
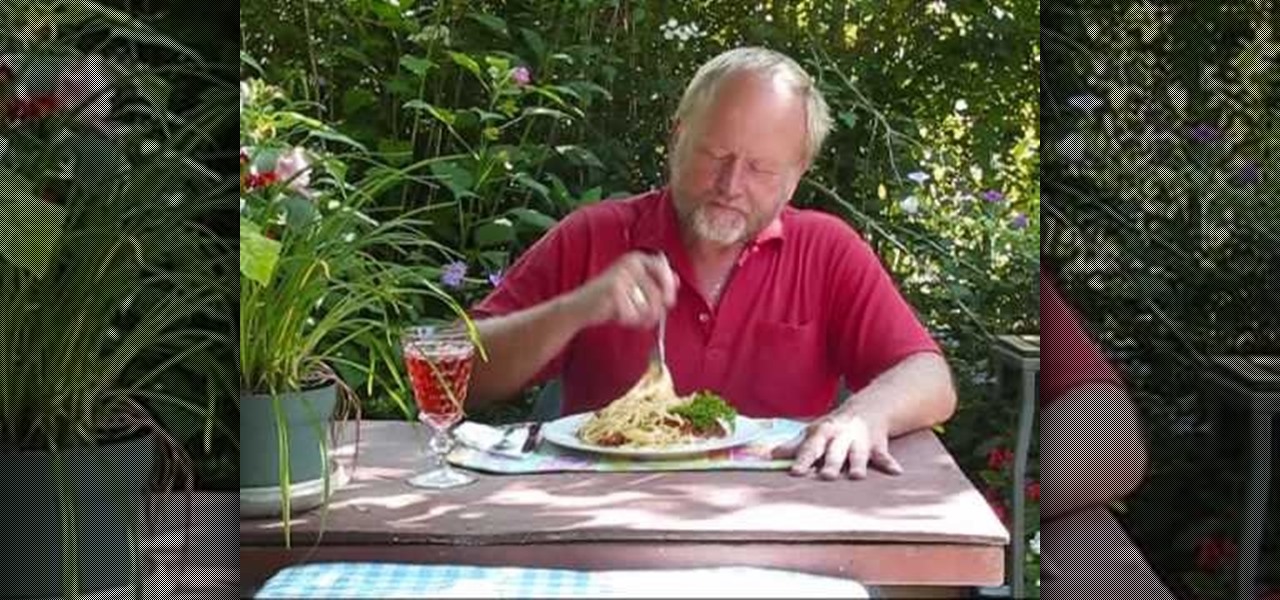
In this tutorial, we learn how to make spaghetti pasta sauce from homegrown tomatoes. First, pick out your favorite tomatoes from your garden. next, you need to wash them and they remove the skins by first boiling the water. After this, cut your tomatoes into small chunks, then chop up garlic and onions. Now, place olive oil into a pot on low heat and add in the garlic and onions. SautŽ these, then add in the cut up tomatoes and stir. Let these cook on medium heat, then chop up any other vege...
In this tutorial, we learn how to do a complete forearm workout. First, grab a small weight in each hand and start to lift your forearms up into the air. Control your movement when you go both up and down, to help work your arms out better. Next, lift up gently with the weights, relaxing your body and letting the muscles do the work. Don't lift with your back or use momentum, use only your muscles to lift. Continue to do this for several reps. After this, grab a dumbbell and start to lift it ...
In this video tutorial, viewers learn how to suture. Begin by lifting up the skin on the far side of the laceration with the tissue forceps and insert the needle with some distance far away from the wounded edge. Then lift up the skin with the near side laceration and mirror the course of the needle. Now move somewhat to the right of the subsection of this stitch, parallel to the incision line. Place the second subsection of the horizontal macro-suture like the first part. But this time from ...
In this video, we learn how to make January thank you notes with Stampin' Up. First, you want to choose what you want your notes to say. You can use a small card stock that is 3" x 3". Then, use a border hole punch and apply it on in different colors you prefer. After this, you will want to stamp on a message that says thank you in black on the front of the card. Next, you can lay a heart punch out on top of the card to give it more personality. You can also place the heart on first and let t...
Okay, so watching "The Princess Diaries" gave us something of a princess complex. Come on, what girl doesn't want to own her own country (however small and fake), have Julie Andrews as her grandma, and be driven to even trivial places like the nail salon in a limo? Sounds good to us!