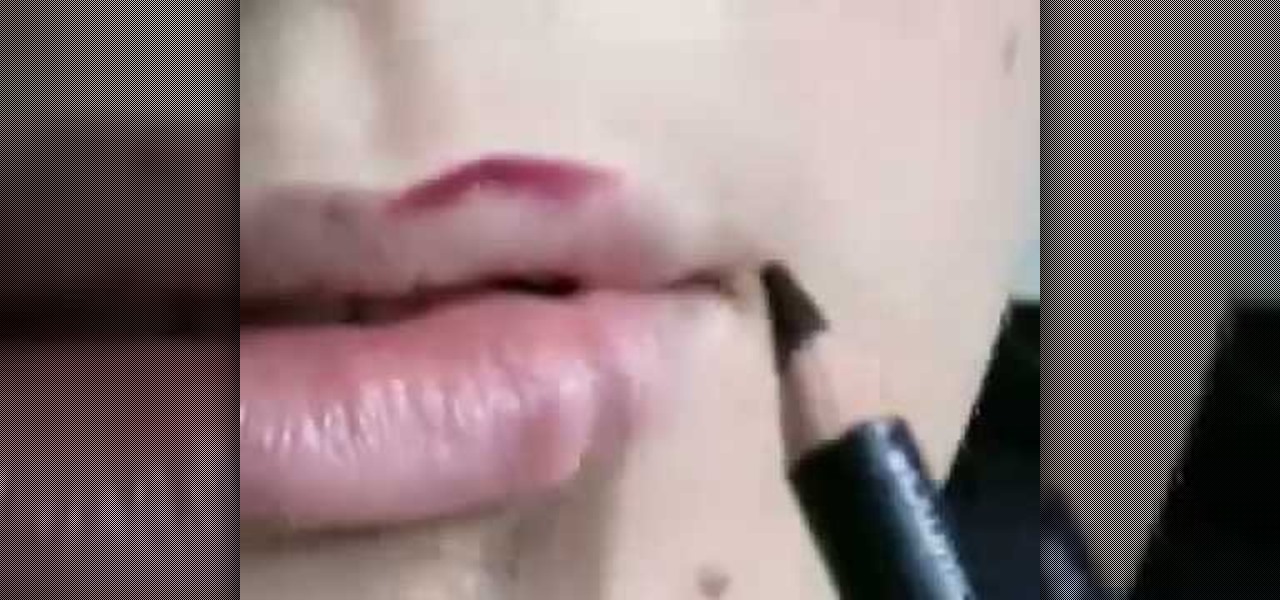
In this video, we learn how to do gothic glamour makeup. First apply your makeup as you normally would, except make your foundation a little lighter than usual. From here, apply a matte black eyeshadow to your eyelid and up into your eye crease. Press this on so it's thick and the black color really shows through. Then, apply black eyeliner on the bottom of the eye on the waterline. Smudge this on the bottom and then apply mascara to the top and the bottom lashes on the eye. To finish this of...
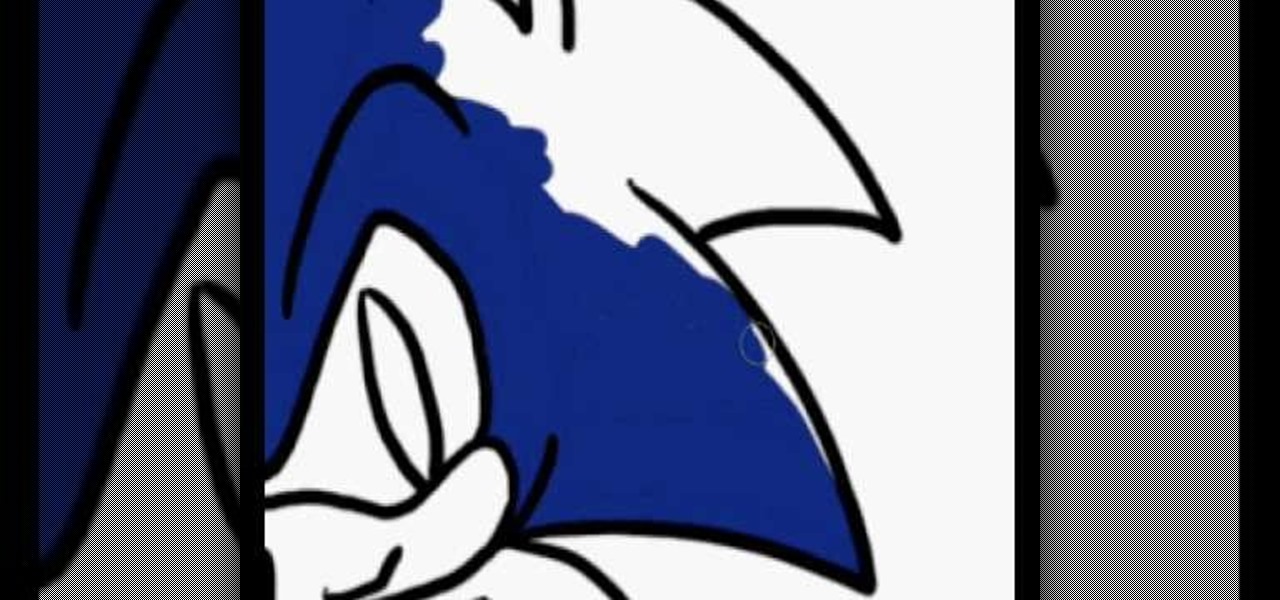
In this video, we learn how to draw Sonic in Adobe Illustrator. First, draw out the muzzle and the nose with a pen. From here, you will draw out the eyes and then make the outline for the ears and the hair. Next, draw in the details around the face. Once you do this, add color to the hair and to the face as you see fit. Then, add in additional lines to show creases and make him look more realistic. After this, add in shading with darker colors on the sides of the face and the hair. When finis...

In this tutorial, we learn how to draw Uncle Scrooge McDuck. Start off by drawing the outline of the hat, heat, neck, upper body, instrument, and lower body. After this, draw on the eyes, glasses, and the beak. From here, you will start to add in additional details and erase the outline lines from where they aren't needed. Start to add in lines to create folds on the character and then color him in with the appropriate colors. After this, add in shading to different parts of him and his instr...
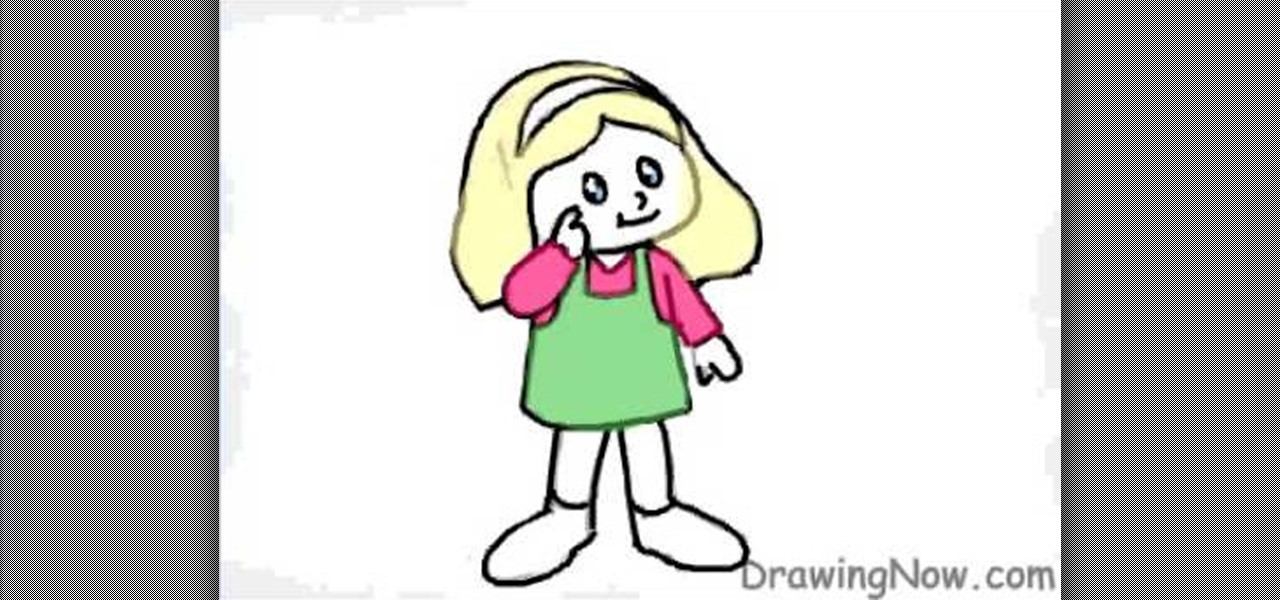
In this video, we learn how to draw a cartoon figure of a little girl. Start out by drawing the head, then draw the rest of the body for the girl. Outline a dress on her and make sure one of her hands are touching her face. From here, draw in the details of her face and then her outfit. Erase any background lines from the outline to make it look more clean. Then, add in details to the outfit and color in the eyes. To finish this, add in the color to the outfit and the skin, then the hair. Sav...

In this video, we learn how to draw Darth Vader from Star Wars. Start out by drawing the outline for the body, then draw in reference lines around to figure out where the facial features will go. From here, use a darker paint brush to make the outline darker and then erase any background lines. Then, start to add in the details to the body as well as to the outfit of the costume. Color in the background and then draw on the muscular details to the body. Add in color to the body and the cape t...
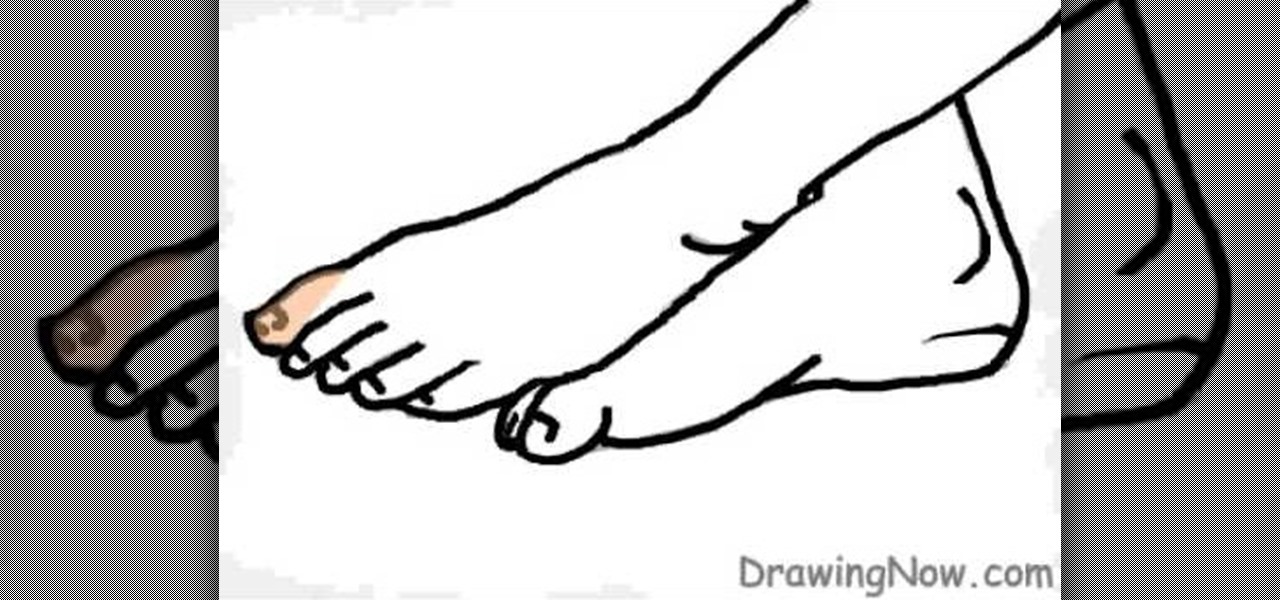
In this tutorial, we learn how to draw two feet. First, draw the feet crossed with just the ankles showing. After this, draw in the toes and then start to draw in lines where the muscles of the feet are. From here, you will start to add in the smaller details using a small brush. Then, create the toenails on the toes and color the feet and ankles a skin color. After this, add in gray to shade the lines onto the feet and ankles. Use darker lines to create contours of the limbs and then you wil...

In this video you will learn how to draw a Batman cartoon in a quick and easy way. In order to do that just follow these instructions from the video: The first thing that you will need to do is to draw the head of the cartoon. Now draw the body lines and the hands of the cartoon. The next thing to draw are the legs and the cape. Use a marker to draw over the sketch and complete the drawing with all of the details. The last thing to do is color the drawing with the colors used in the video.
In this tutorial, we learn how to make a Halo Needler prop. You will need: knife, scissors, pink straws, paint colors, cardboard, paint brush, and pencil. First, draw the pattern out on a piece of cardboard. Next, cut this out and make four layers of it. After this, glue or tape it together and then line glue everything together. Now, cover this with paper mache until all parts are fully covered and dry. Next, color with your paint and then let it dry until the paint is no longer wet. This wi...
In this tutorial, we learn how to draw the cartoon vampire character Alucard. Start out by drawing the outline of the face, along with the hat and the collar as well. Then, draw in a cross in the teeth, with just the upper teeth and fang showing. Then, draw in all the details of the face, along with the hat details. After this, color in the skin and then the rest of the clothing around the face and on the body. Color in the background as well, with black and reds to create an eerie glow with ...
In this tutorial, we learn how to draw a scene from Star Wars. Start off by coloring the background peach, then adding orange with the spray paint tool to the bottom. After this, color in clouds to the sky with a light tan. From here, add in a spaceship in the sky and then two large machines on the bottom of the ground. Draw in another spaceship in the far right background. Then, start to add in details to each of the different ships or tractors. Draw a person on the ground carrying a gun wit...
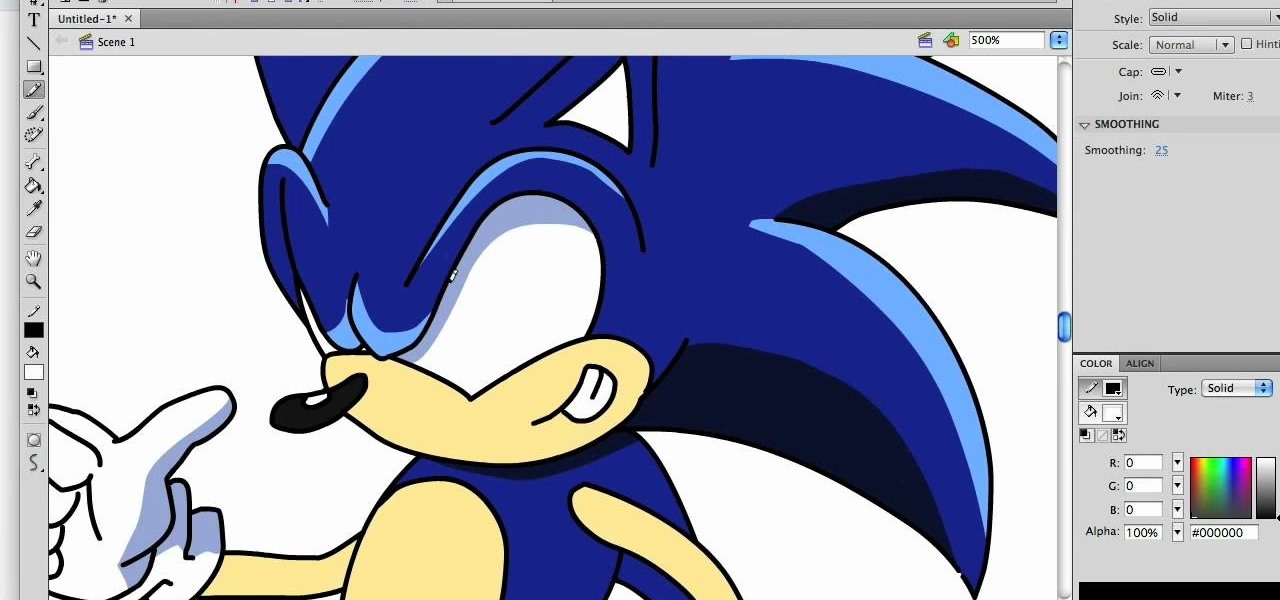
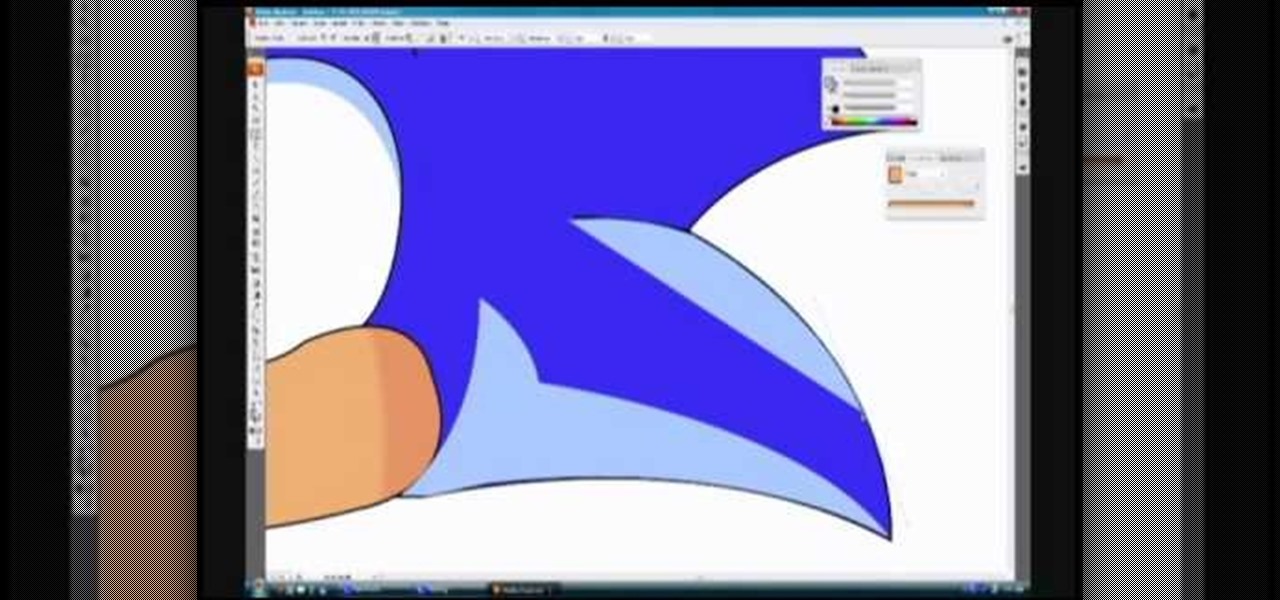
In this video, we learn how to draw Sonic the Hedgehog in Photoshop. First, draw a circle on the page and then draw the eyes onto him. After this, draw on his ears and then his hair around his head. After this, draw in the rest of his body and his feet. From here, use a darker paint brush to create the final outline of the character. Draw in the lines around Sonic to make him appear more realistic. Then, color him a dark blue color with red on his shoes. When finished, save this drawing and y...
In this video, we learn how to make rock salt animals with your kids. You can use any kind of animal including a snake or alligator. To start, cut out the shape on a piece of white construction paper. After this, you will need to mix up some water color in a shallow dish. You can make this by mixing up water with some food coloring. Now, dissolve the rock salt into it and then let the child brush the mixture onto the top of the piece of paper. Let this dry overnight, then when finished it wil...
In this tutorial, we learn how to draw the head of a Native American Indian chief. First, you will draw the outline of the head as well as the head dress that he is wearing. Draw in lines to show where the jaw lines, cheeks, and other facial features are. After this, draw in the details of the face then get to work on the headdress. Add in details to this, then start to add in colors to it, making it as colorful as you would like it to be. When finished, add in some feathers at the bottom and...
In this tutorial we learn how to make a Christmas wreath card holder. To do this, you can use a Styrofoam wreath, feather boa, glue gun, and pictures. First, glue the feather boa around the Styrofoam wreath in any color that you would like. After this, attach your favorite color of ribbons to the boa and then attach some wire to the back of it with the glue. After this, you can place the pictures on the frame and then attach anything else you would like! This is a fun craft that looks great i...
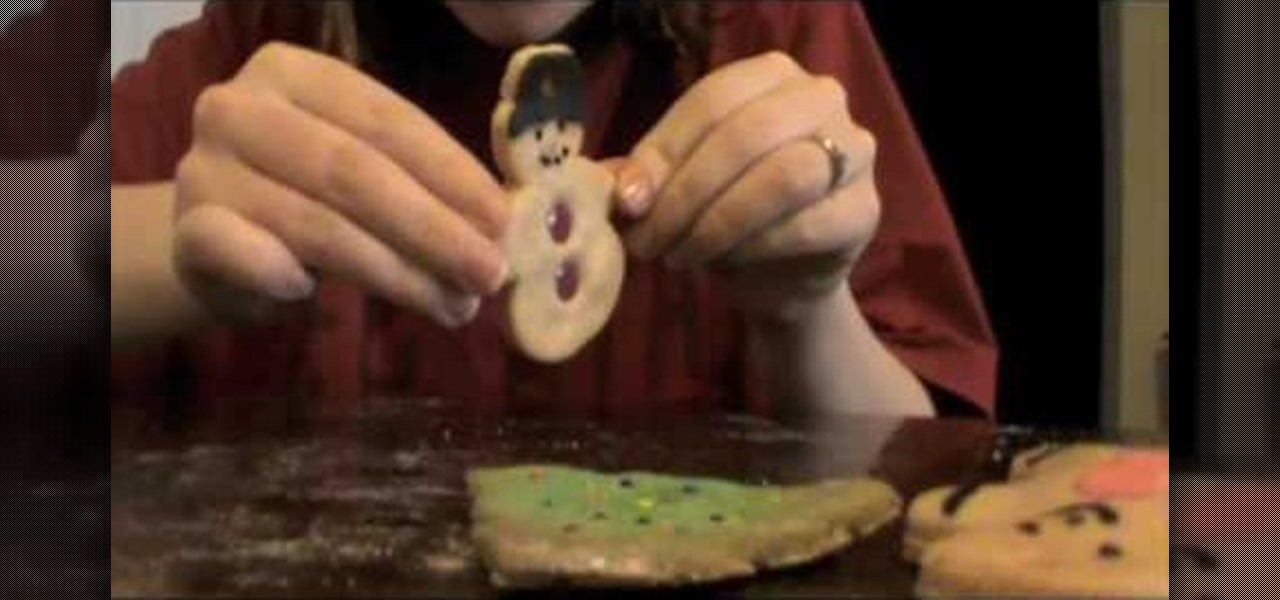
In this video, we learn how to create a marbleized water look with icing. This is a colorful and eye catching way to put icing on a cake to make a memorable piece! First, spoon your icing into a small bowl and then make a rice cereal treat and shape it into a circle. To start to decorate this, you will pipe on green icing to the sides and front of the ball to make it look like a fish. Then, pipe some of the icing onto a flat surface with red confectioner's sugar. Once this is covered and hard...
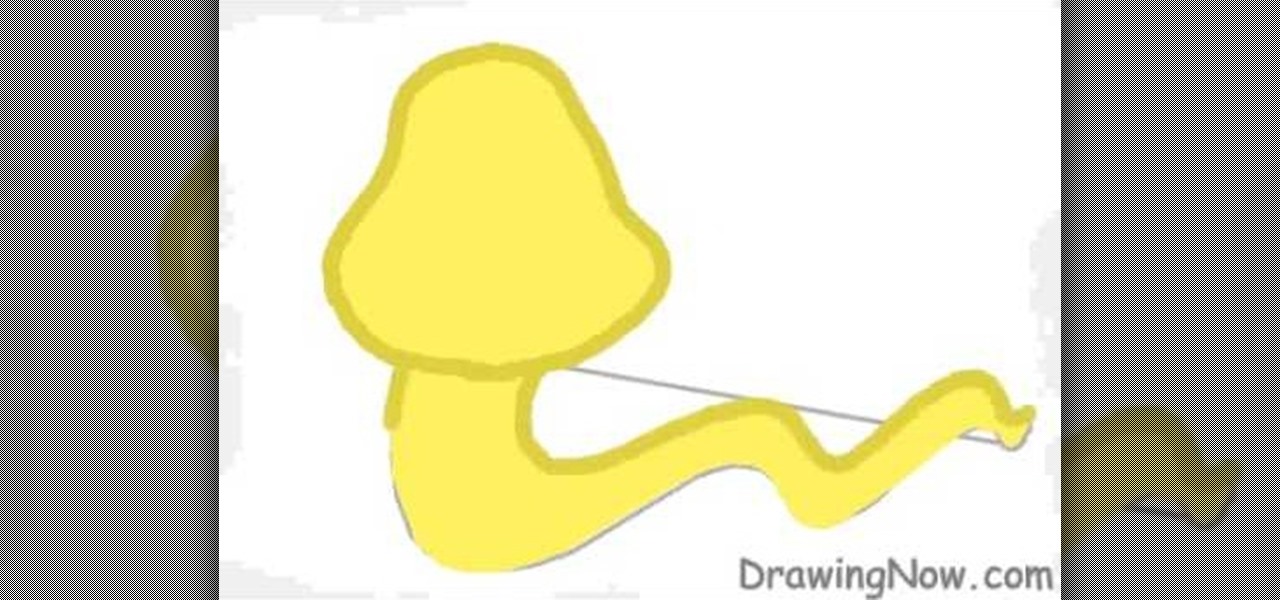
In this tutorial, we learn how to draw a cute snake. First, draw a bell shape for the head, then draw a thick squiggly line for the body of it. After this, color the snake yellow and then outline it with a dark green color. From here, add stripes to the snake in hot pink. Next, you will draw on the face to the snake. Make sure to give it a friendly smile and draw the stripes on the top of the head. Next, you will draw on the tongue, giving it a long one with two triangle edges. This will fini...
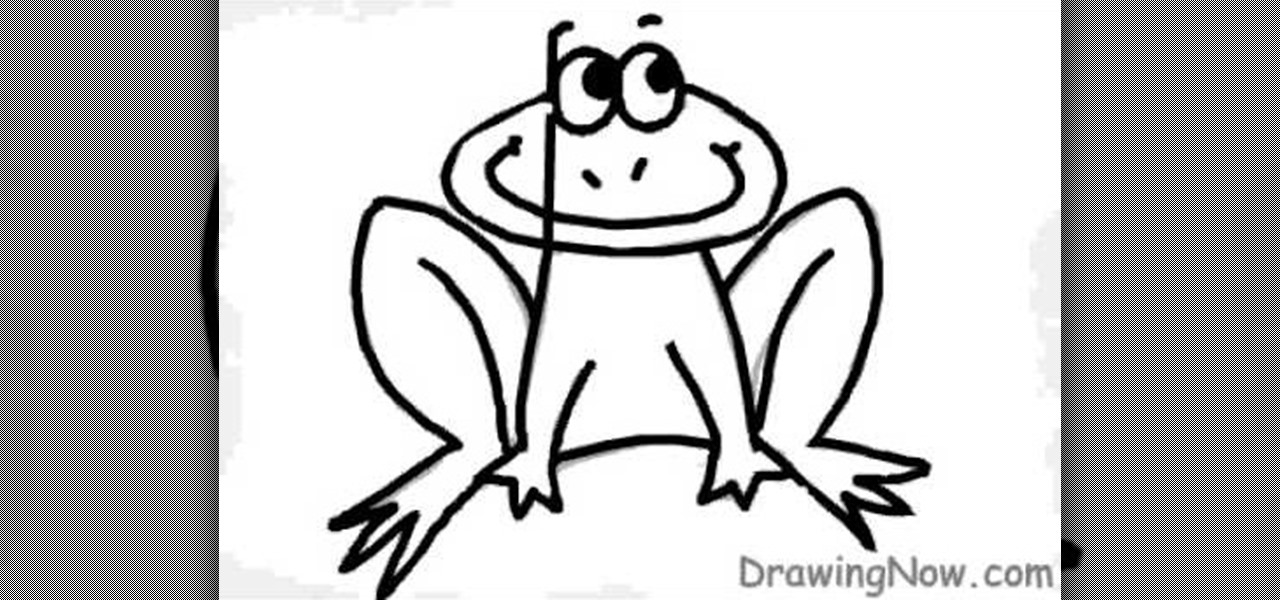
In this tutorial, we learn how to draw a cartoon frog. First, draw an oval fro the face with two small circles sticking up. After this, draw the outline for the legs, arms, and body. Then, draw on the eyes, nose, and a big smile. Make sure to make the toes on the bottom of the feet. After this, erase any background lines and start to add in some color. Use green and dark greens to shade the sides and middle areas on the frog. Then, add dots to the legs to give it some character. After this, c...
In this tutorial, we learn how to draw Dora from "Dora the Explorer: Pirate Adventure". Start out by drawing the outline for the character. Then, add in the details for the body, including the hand holding an eyepiece. From here, you will start to add in color to the hands and the clothing on the body for the outline. Add in the facial features and the features of the clothing as well. Then, you will draw in the hair and the hat, along with any other details you left out. Color anything you w...
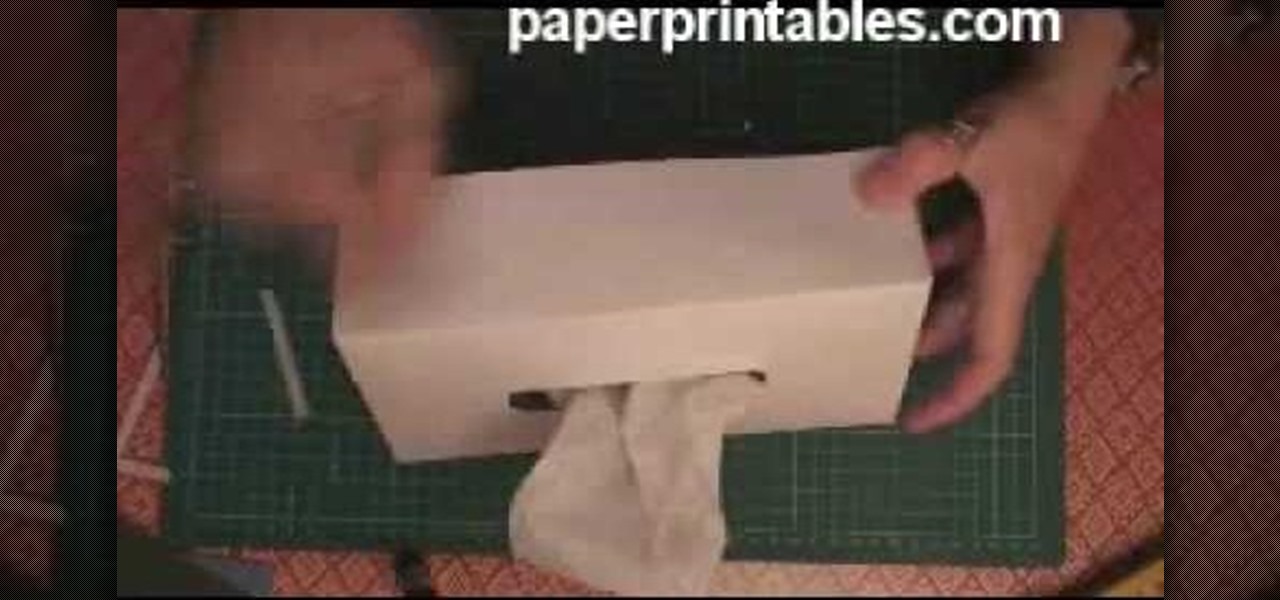
In this video, we learn how to make a decorative tissue box cover. First, you will need to get a piece of paper in your choice of color and set your tissue box on top of it. Use different colors of paper to trace out the edges of the box and then you will tape them all together. Make edges off the paper when you trace them so they fold over. When finished, you will put this onto the tissue box. You can also decorate this with any accessories that you would like to add a personal touch to the ...
If you're a fan of Tinkerbell, then this video is for you! We learn how to draw Disney's magical fairy, Tinkerbell. Start off by drawing the outline of her body and wings. Then, draw over this to make a 3D version of her. From here, you will start to draw in the details of the face and the body as well as the clothes. Once finished, you will color in the skin, wings, and clothing. Use shading and lines to make the character appear more realistic. To finish this up, add a colored background an...
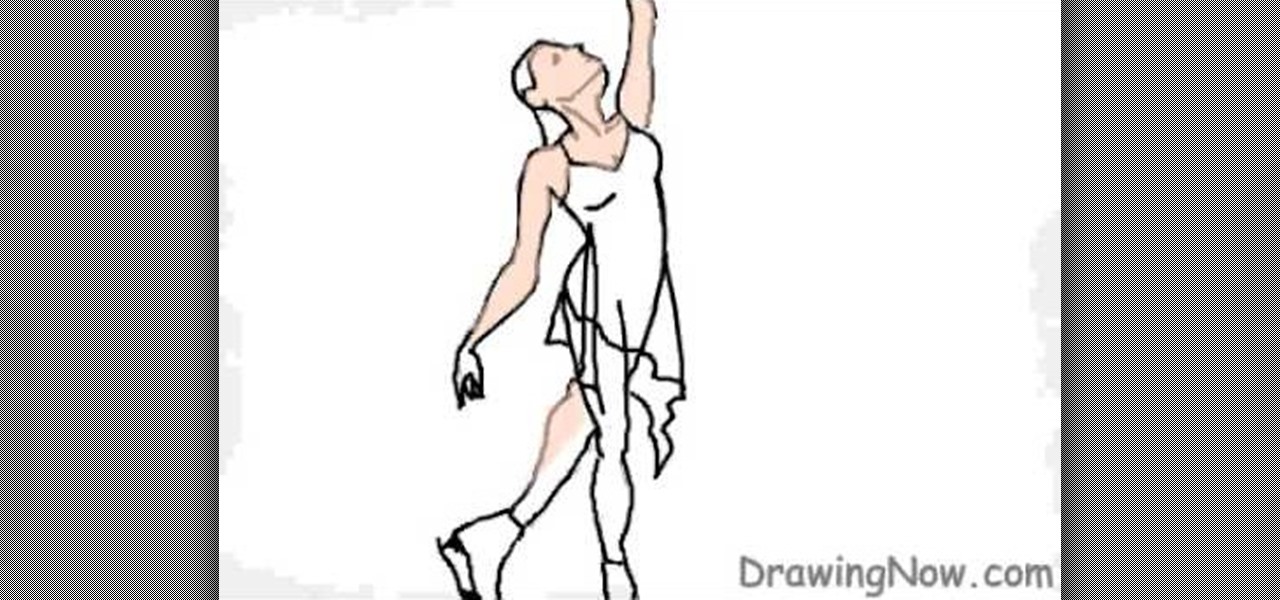
In this tutorial, we learn how to draw an ice skater. Draw the outline of the entire body of the skater first. Draw one of her hands high in the air and her legs crossed on the ground. From here, draw in the details of the face and clothing, as well as the legs. Next, color in the skin of the ice skater and shade in the sides of the limbs. Draw in the ice skates on the feet, then color in the dress over her body. Create lines on the clothing to show the folds and make it look more realistic t...
In this tutorial, we learn how to draw a hyper-stylized Sonic the Hedgehog. To start, you will draw the outline of the entire body of Sonic. Make sure you draw in the huge spikes for the hair as well. Next, you will draw in the eyes, muzzle, and nose on the face. Then, you will draw in the stomach area, the feet, and the hands. After this, clean up any background lines and color the character in completely. Next, shade in darker colors on the sides of the body to give Sonic more depth and mak...
In this tutorial, we learn how to draw Optimus Prime, leader of the Transformers. First, draw the outline of Optimus Prime, use basic lines and circles to show where the joints are going to go. After this, draw the full outline around the character, using a dark line to make it look 3D. Then, draw in the rest of the details for the character, giving him a look like a machine or a bunch of metal. Next, you will start to shade in the different parts and add colors that were used in the movie. W...
In this tutorial, we learn how to draw The Incredibles. Start out by coloring the background orange, yellow, and white. Then, draw the outlines of the bodies for all of the characters in the family. After this, draw in the details, giving them a 3D type of image. Next, you will color in the clothing and add in the fine details for the hair and the face as well. Erase any background lines from the drawing to clean it up, then add in some shading to make it look more realistic. To finish this, ...
In this video, we learn how to make a cheap and realistic blood splatter. After you have made your blood, you will need to make sure it's the right color you need for blood. Now, take Kleenex and rip it into five different parts. Then, stick these into a tube and grab a pesticide sprayer. After this, stick the blood into the bucket for the sprayer. Now, when you shoot the blood splatter the Kleenex tissue will turn the color of the blood and look like brains or parts of the body that have bee...
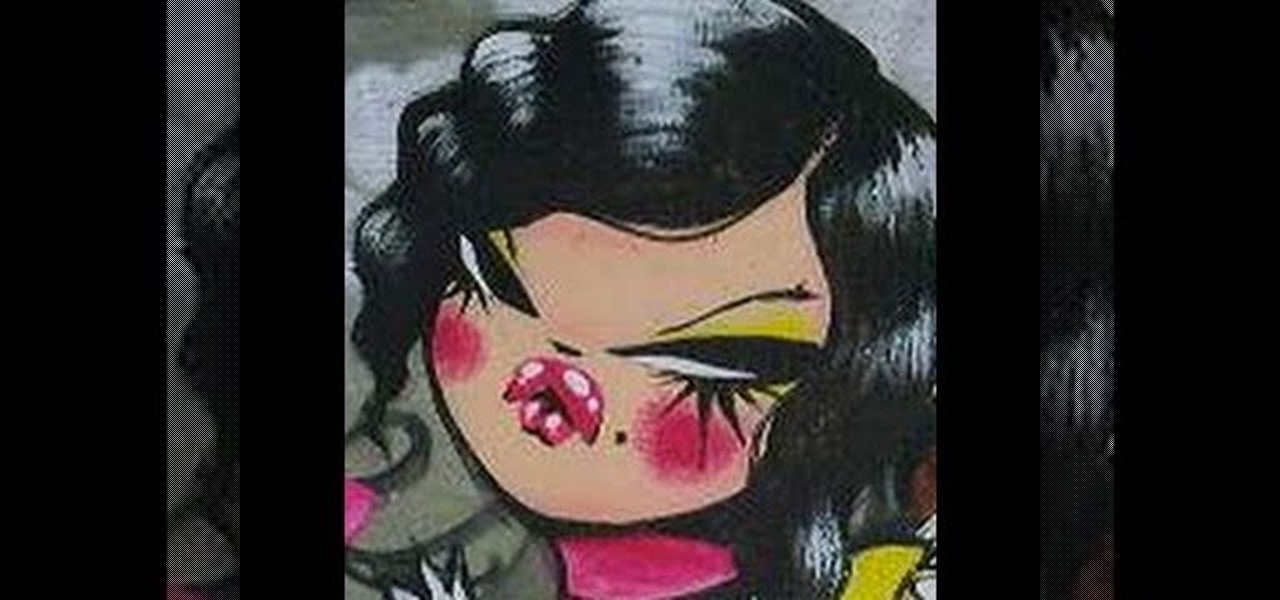
You may not recognize her name, but graffiti artist Miss Van draws and paints some of the most pouplar urban characters of our day. The French artist started wall painting when she was just 18, depicting snarky, bosomy girls with various expressions and Betty Boop lips.
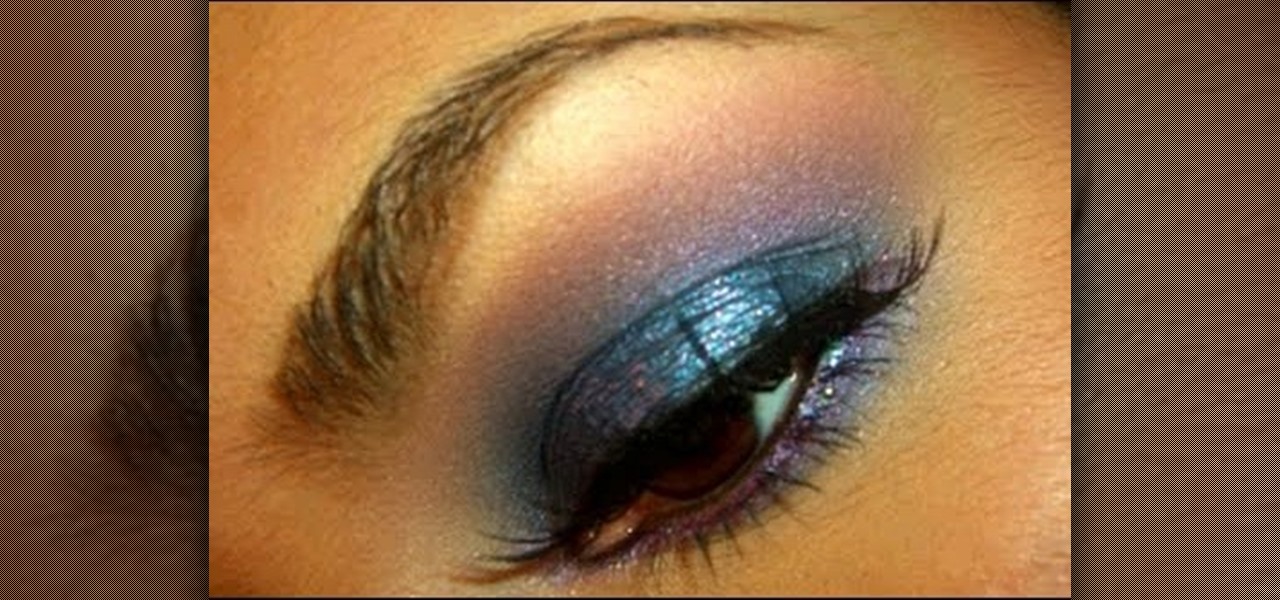
Though it may not seem like it, blue eye makeup is one of the most universally flattering shades out there. We're not talking robin's egg blue or any of the lighter shades of blue; rather, we're thinking a deep, dark navy or an electric, sparkly teal.
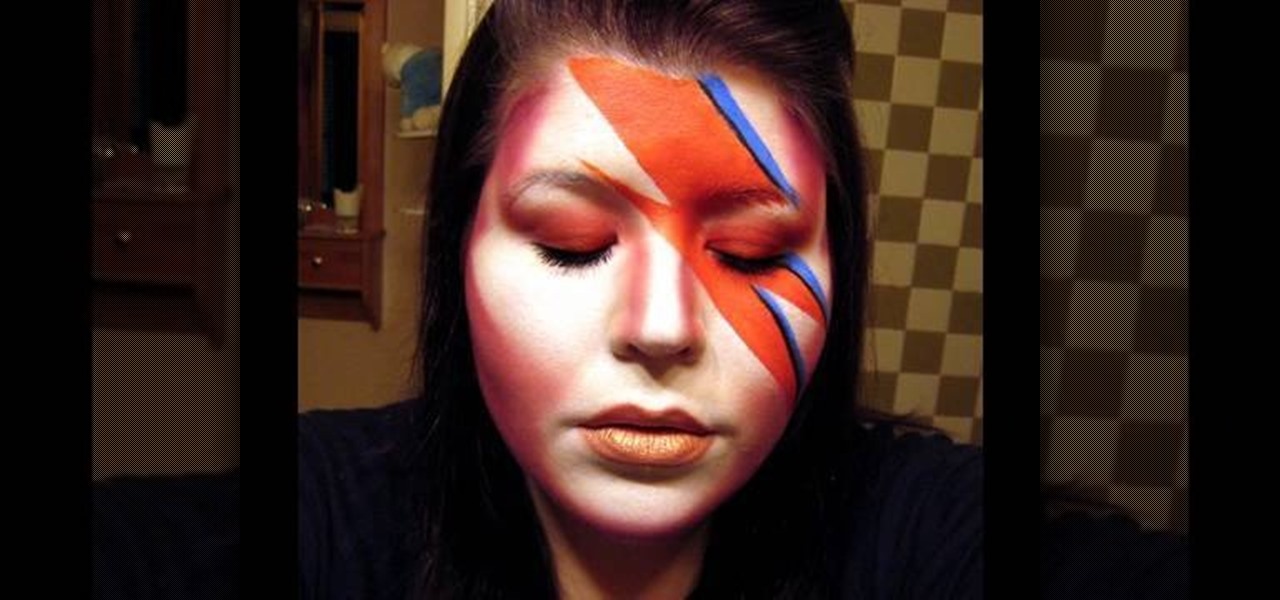
In this video we learn how to do Bowie-like inspired makeup. Start off by applying white makeup to the face all over around the lips and on the bridge of the nose. From here, apply red color to the side of the face and on the right eyelid going up to the corner of the face. Then, contour the nose with this same color, connecting the sides to each other. Now, apply red paint and blue paint to the face to create the design that is on the left hand side of the face. Once your design is finished,...
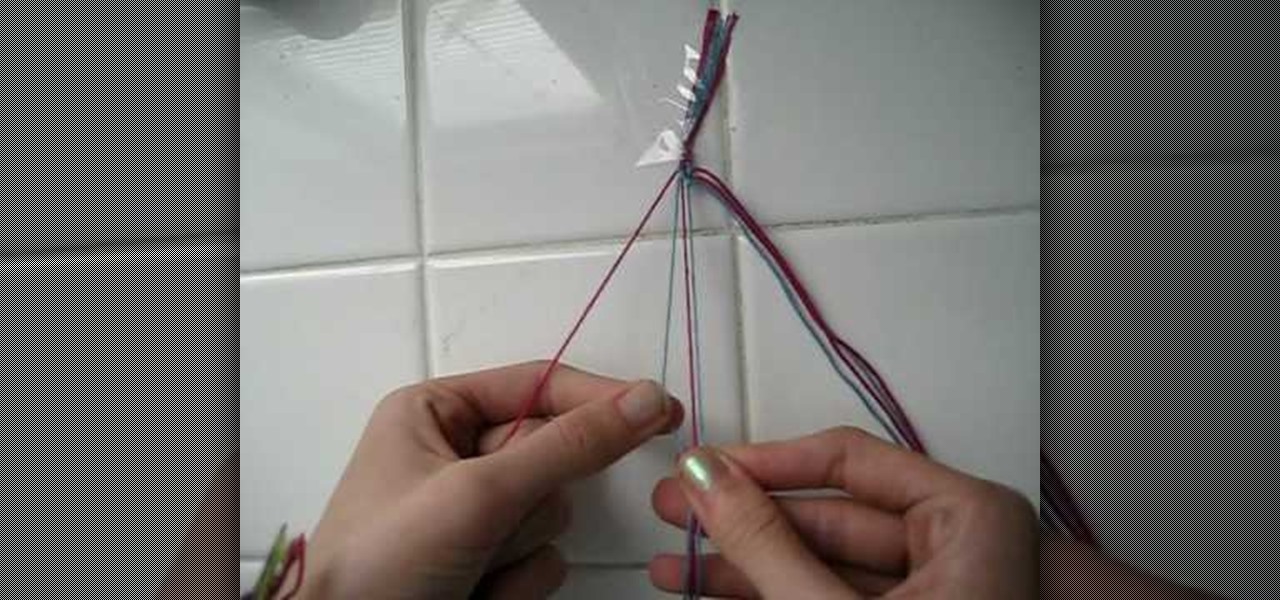
In this video we learn how to make a friendship bracelet with vertical hearts. First, tape your strings to a wall, they should be two colors with four of each. Arrange them so they are alternating colors until you reach the other side. After this, grab the first string and set it aside. Then, take the next two and tie them in a knot at the top. Tie the third string with the fourth at the top as well. Continue to do this until you reach the seventh string. Continue to tie the strings until you...
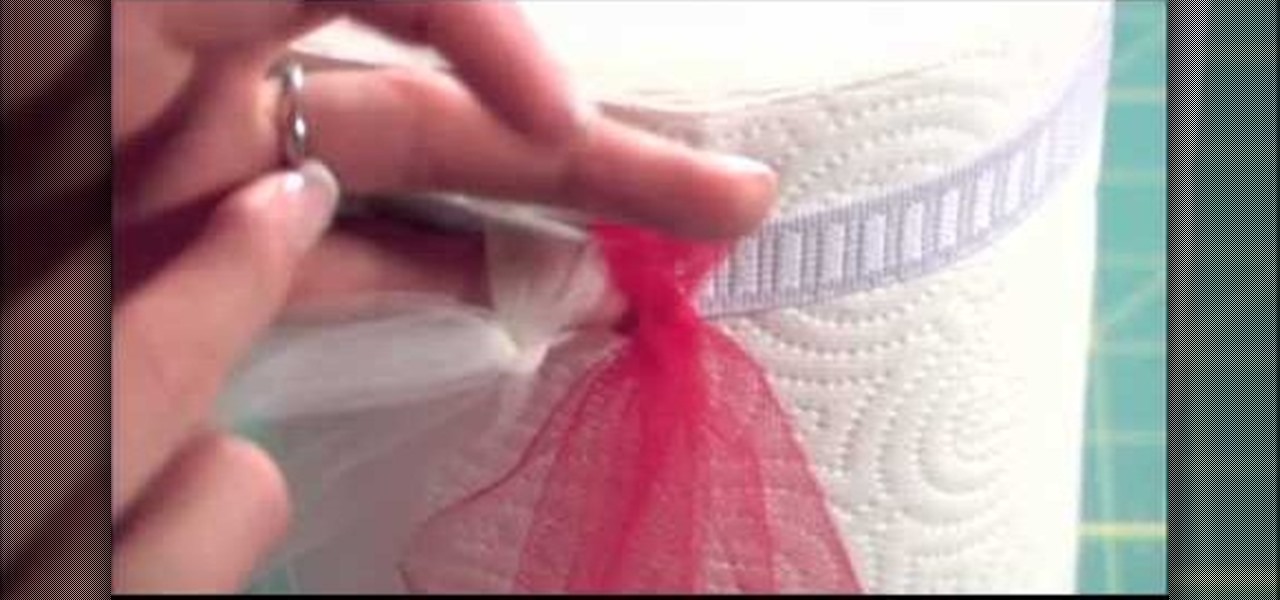
In this tutorial, we learn how to make a tutu. First, you will need to grab a rotary color and some tulle, along with an elastic band for the waist. Now, measure out the tulle for how long you want your tutu to be. Now, cut out the measurements you have made. Gather up the tulle together in different colors, and then grab the elastic. Tie the top of the fabric onto the elastic, then secure it. Once finished going all the way around the elastic, tie the waistband and then you will be ready to ...
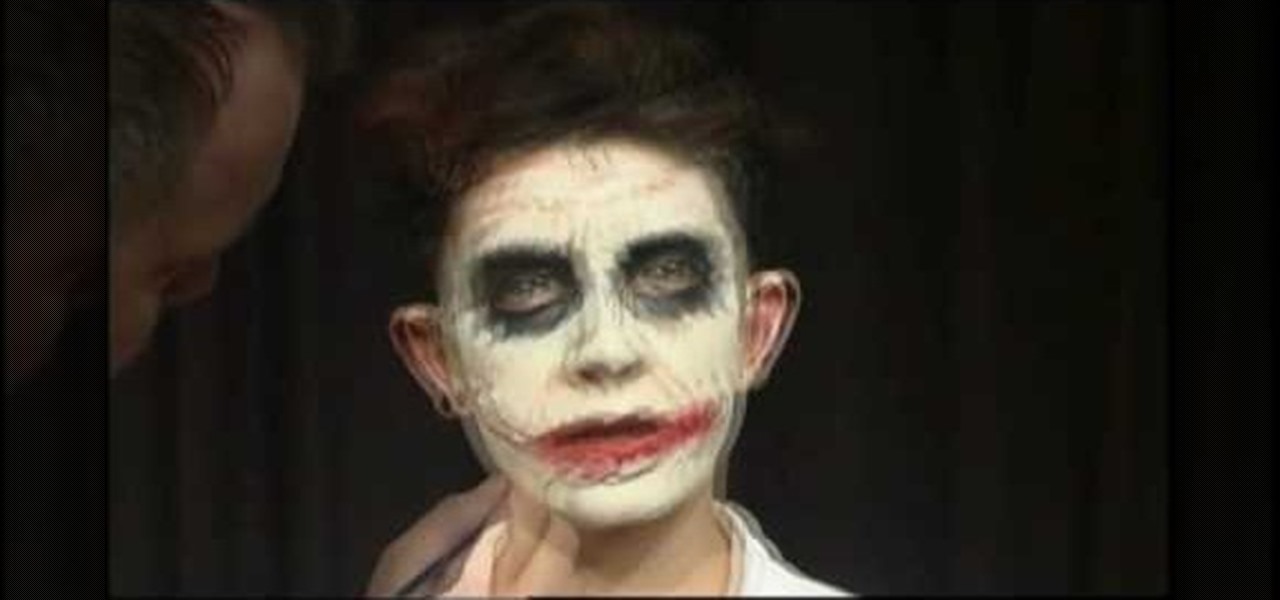
In this video, we learn how to make a prosthetic Glasgow smile like the joker. First, smooth the material onto the face and around the lips. Follow the shape of the lips for the sides of the mouth to make it look larger. Use a Q-tip to push on the prosthetic onto the face. Once this is attached, you can add in the color to the lips to make it look more realistic. Makeup will need to be added to the entire face. White should be on the face, black should be around the eyes. Go for a cracked and...
In this tutorial, we learn how to tie dye an oval style shape. Start with a square piece of a shirt that is damp, then fold it in half. Then fold it in half again, then in half again. After this, fold the shirt accordion style, paying attention to where the main corner of the shirt is. Once finished folding, tie two knots in the bottom, then fold the fabric up until you reach the ties. Now, tie or secure this bundle tightly with rubber bands. Apply your favorite colors of die on the shirt, ge...
In this tutorial, we learn how to draw a female vector cartoon character in CorelDraw X4. Start out by drawing the head of the character with lines that are curved. Then, add in the pupil and color of the eye. Don't forget to add in the lines underneath and on top of the eye, as well as the creases above them. Copy and paste this to create the other eye, then add in eyelashes and eyebrows. Then, draw in a nose and shape the face. add in additional details to the face, then add in the colors t...
In this tutorial, we learn how to make models and ornaments with salt dough. First, grab a baking sheet and place aluminum foil over it. Now, grab some gloss sealer, salt, food coloring, flour, ribbon, glitter, cookie cutters, and buttons. To make the dough, combine flour with water and salt. Mix this together until you get a dough shape, then roll out and cut into shapes with cookie cutters. Cut a small hole in the top of it, then bake until golden brown in the oven. Tie a string in the hole...
In this video, we learn how to draw a cherry fairy. First, sketch the entire picture before you start to draw in any detail. After this, draw in darker lines where you want the features of the body to go, then start to add in features of the face. Next, add in color to the face and to the outfit of the fairy. Make sure you give her hair and bangs that are surrounding her face as well. Once you have the color completed, create a white light coming from the bottom of the fairy and going up into...
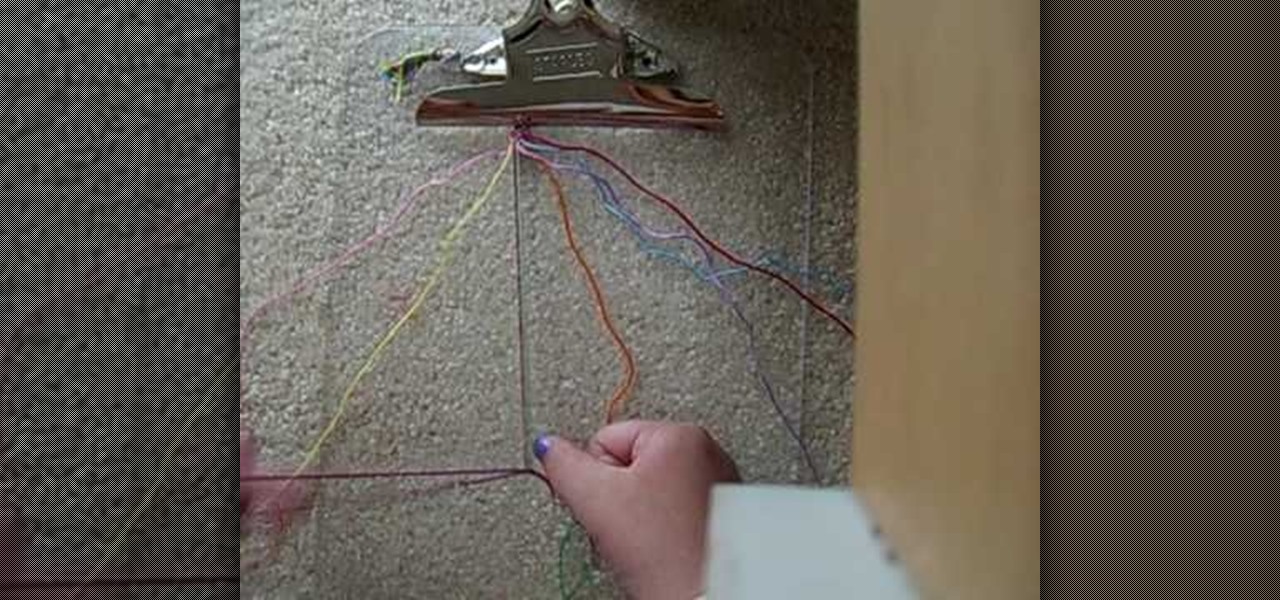
In this tutorial, we learn how to make friendship bracelets: the rag rug. First, grab eight different colors and arrange them all spaced out. Clip them to a clipboard at the top, then take your first strand and make a knot around your second strand twice. From here, you will take your third strand and tie it around your fourth strand. Continue to do this until you reach the rest of the colors that you have twice. Next, take the seventh and sixth strand and make a backwards knot. Then, do the ...
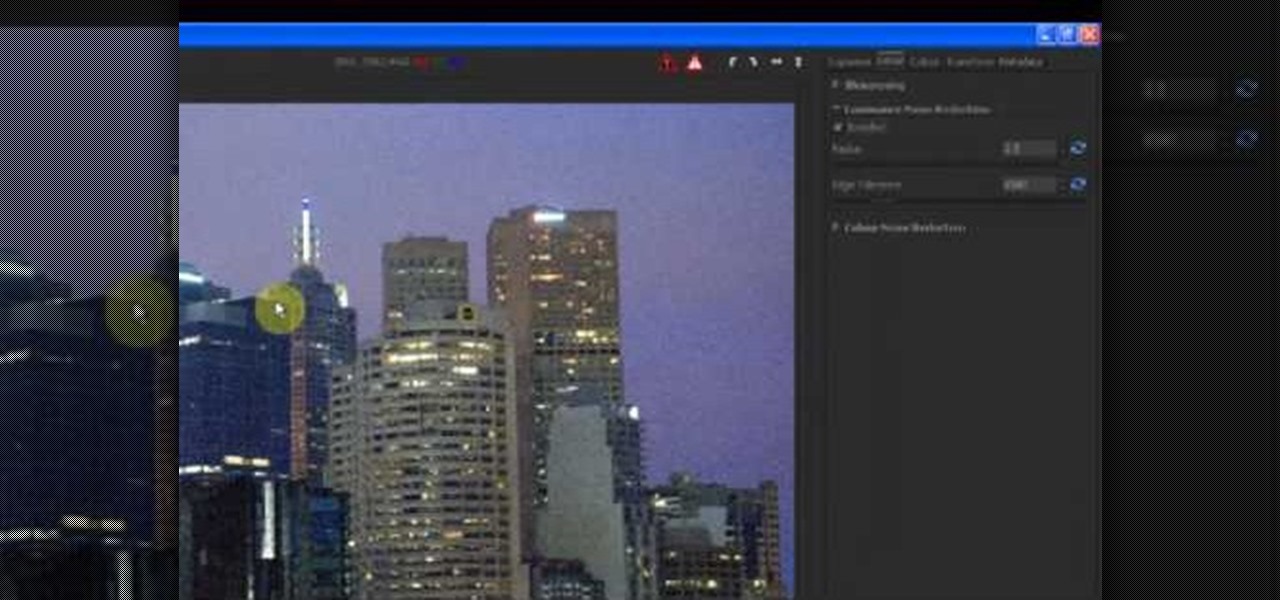
In this tutorial, we learn how to reduce noise in RAW Therapee. First, open up your photo in the software that you want to reduce the noise on. Then, open up the detailed view of the photo and click on then click on the detail button. Through here, you can sharpen the image or you can change the noise reduction for the color and luminance. Click on the drop down menu for the luminance and then enable to checked section. Then, move the edge tolerance to its maximum to see the full effect on th...
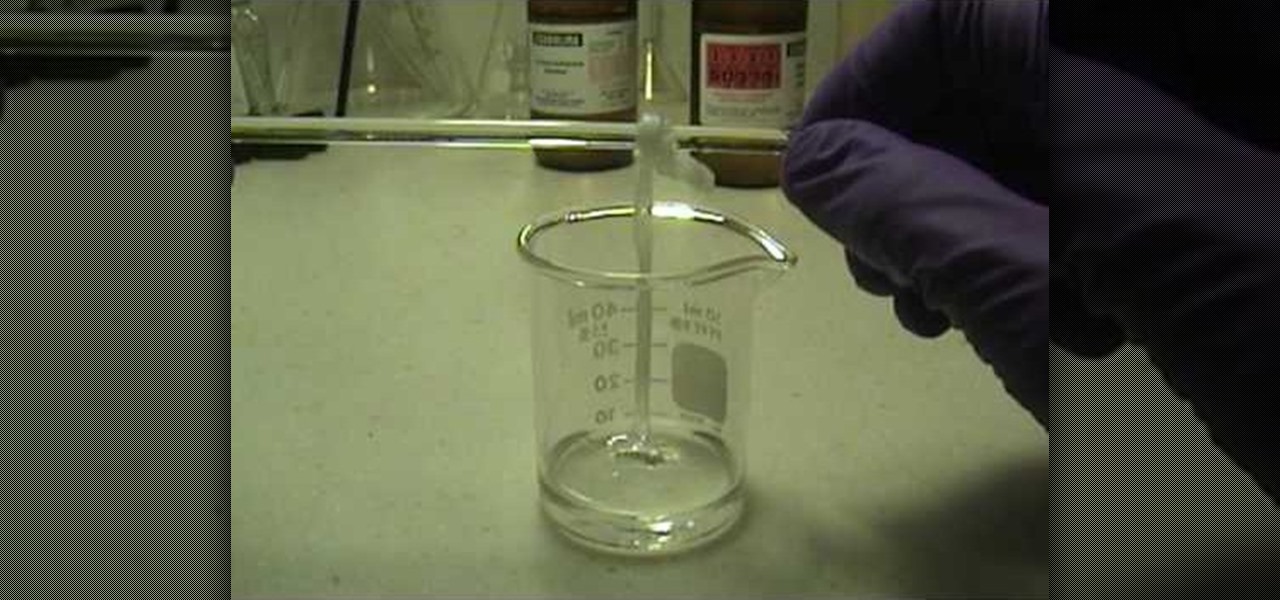
In this tutorial, we learn how to make your own nylon. You will need: pipettes, pipette filler, forceps, beaker, stir rod, sebacoyl chloride and hexanediame solution. Now, pour some of the hexanediame solution into the small beaker. Add in a food coloring if you want to make this a specific color. After this, add in 4 cc's of sebacoyl chloride and carefully drip into the side of the beaker. You should see a layer of where the two liquids are after this. Now, take your tweezers and reach into ...
In this tutorial, we learn how to draw anime. Start off by drawing the outline of the anime, then color in the face, hair, and clothing. Add in the ear on the side of the head, then add in the features of the face. Next, add in shading to the face, hair, and clothing to add dimension to the drawing. Next, add in details to the face to make this look more realistic. Then, draw in trees and leaves for the background of the drawing and color them green and brown. After this, add in a light sheen...
In this video, we learn how to make a tutu for Halloween. First, take your pink fabric and lay it out flat. Next, use your scissors to cut down a folded edge on the top of the fabric. Now you will have two pieces. Next you will roll the fabric down until you reach the end, then you will cut strips out of the fabric. Now, take your elastic piece and tie the strips of fabric onto it. You can use any colors you would like to make this. You can use pinks, oranges, blacks, whites, and any other co...