In this tutorial, we learn how to make fur suit hand paws. First, take your fabric that looks like fur and has a cotton lining. Then, cut out the different pieces you need to create the paw shape. Now, sew the pieces that you cut out onto the fur and then cut it into the shape to fit onto your hand. From here, you will sew this together with a bottom piece, then you can sew the paws together and place it on your hand to wear. Add in any additional details you would like, then wear these where...

In this tutorial, we learn how to draw eyebrows and eye lashes. First, sketch out the basic shape of the eyebrow. Cross edge with a 2B pencil, then blend it in to lighten in and act as a skin tone. Then, draw the actual hair with a B pencil, going upwards with the pencil strokes in the front area. For eyelashes, you will sketch out the outline with a 2H, then draw the eyelid and the hairs for the lashes. Draw in the direction and the shape of the eye to give off the illusion that it's round. ...
In this tutorial, we learn how to make an over-sized fashion bow fashion accessory. First, take your fabric and cut it to the desired size you want the bow to be. Cut this in a square shape at first, then sew the sides of the square. Then, fold this in half and pull in the middle of the square. Cut this in the middle to make a hole. Then, turn this inside out and push out the edges. Put an additional square of fabric around the square in the middle, then shape it out to be a cute bow to wear ...
In this tutorial we learn how to make a simple origami paper football. First, grab a strip of paper of your choice of size. Then, fold the bottom over into a triangle shape. Then, fold this up where the last fold ended. Continue to fold up until you reach the top of the strip of paper. When you reach the top, you will have extra paper at the very top. Fold this into the pocket that you created when you folded the triangle shapes up. Now you can hold this with one finger on a hand while you fl...

In this tutorial, we learn how to understand special quadrilaterals. A quadrilateral is a shape with four sides. Three figures of these are: kites, parallelograms, and trapezoids. Two types of parallelograms are the rhombus and the rectangle. Rectangles have four right angles. A square is also a parallelogram, which has four right angles and two congruent sides. A square is always a rhombus a parallelogram is always a quadrilateral and a kite is always a quadrilateral. The parallelogram is so...

In this tutorial, we learn how to tie dye an oval style shape. Start with a square piece of a shirt that is damp, then fold it in half. Then fold it in half again, then in half again. After this, fold the shirt accordion style, paying attention to where the main corner of the shirt is. Once finished folding, tie two knots in the bottom, then fold the fabric up until you reach the ties. Now, tie or secure this bundle tightly with rubber bands. Apply your favorite colors of die on the shirt, ge...

In this tutorial, we learn how to make models and ornaments with salt dough. First, grab a baking sheet and place aluminum foil over it. Now, grab some gloss sealer, salt, food coloring, flour, ribbon, glitter, cookie cutters, and buttons. To make the dough, combine flour with water and salt. Mix this together until you get a dough shape, then roll out and cut into shapes with cookie cutters. Cut a small hole in the top of it, then bake until golden brown in the oven. Tie a string in the hole...
In this tutorial, we learn how to create a genuine Italian pizza. After you have your dough, knead it out on a heavily floured surface. Move your hands in a circular motion and use the palms to create the circular shape of the pie. The, bring the dough into the air and pat off any excess flour. Throw the dough into the air, then catch it and bring it back down to the surface. When you have the circular shape of the pie, add the sauce to the top of the dough. Next, sprinkle on any type of chee...
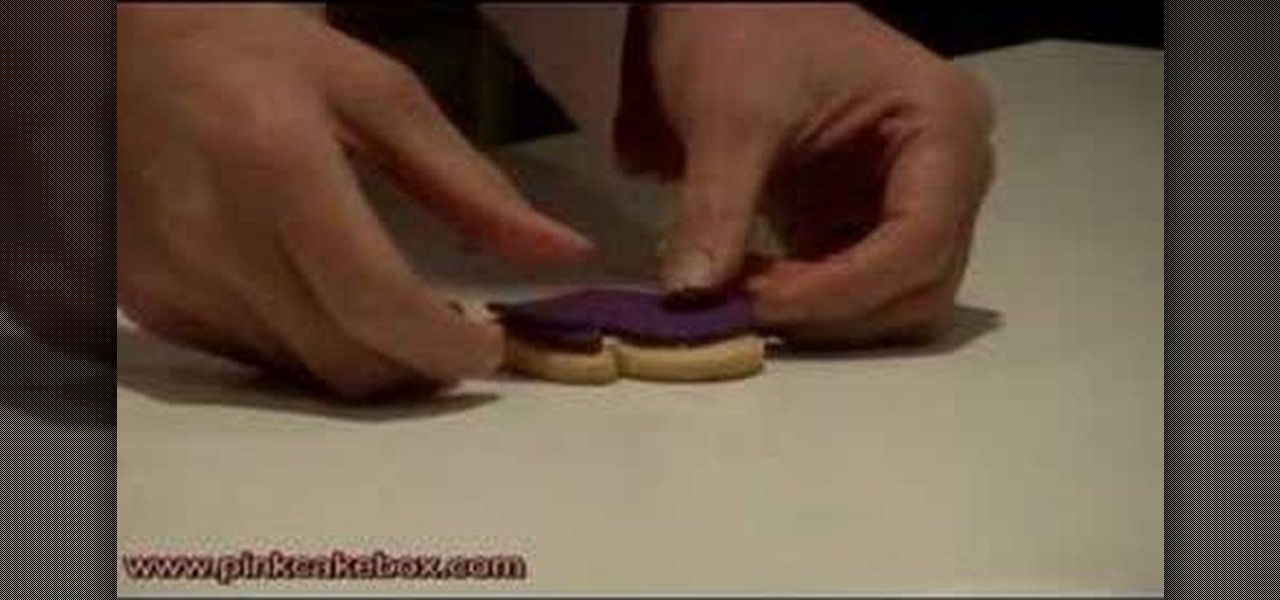
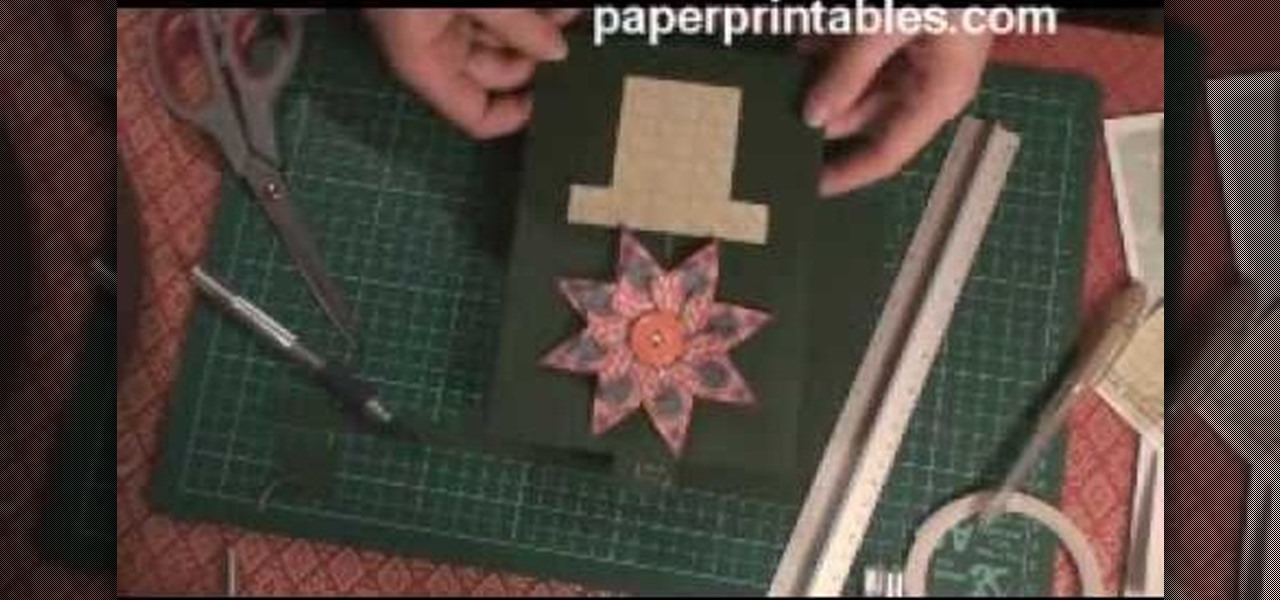
In this tutorial, we learn how to make a clown punch using Stampin' Up! products. You will need: a red scallop circle, green key punch, orange scallop circle, heart shape, circle, oval, red circle, flower, black eyes, and a yellow small circle. After you have these punched out, make the hat out of the green large and oval shapes, then apply the flower to the top of the hat. Next, glue the circle behind this, then cut up the orange and red scalloped circles to create hair on the sides. Next, a...
Whether you were born with barely visible, fine brows or a full-on Bert unibrow, there's often a lot you can do to rein in those brows for a more shapely, pleasing finish. And the journey doesn't end once you've plucked stray hairs.
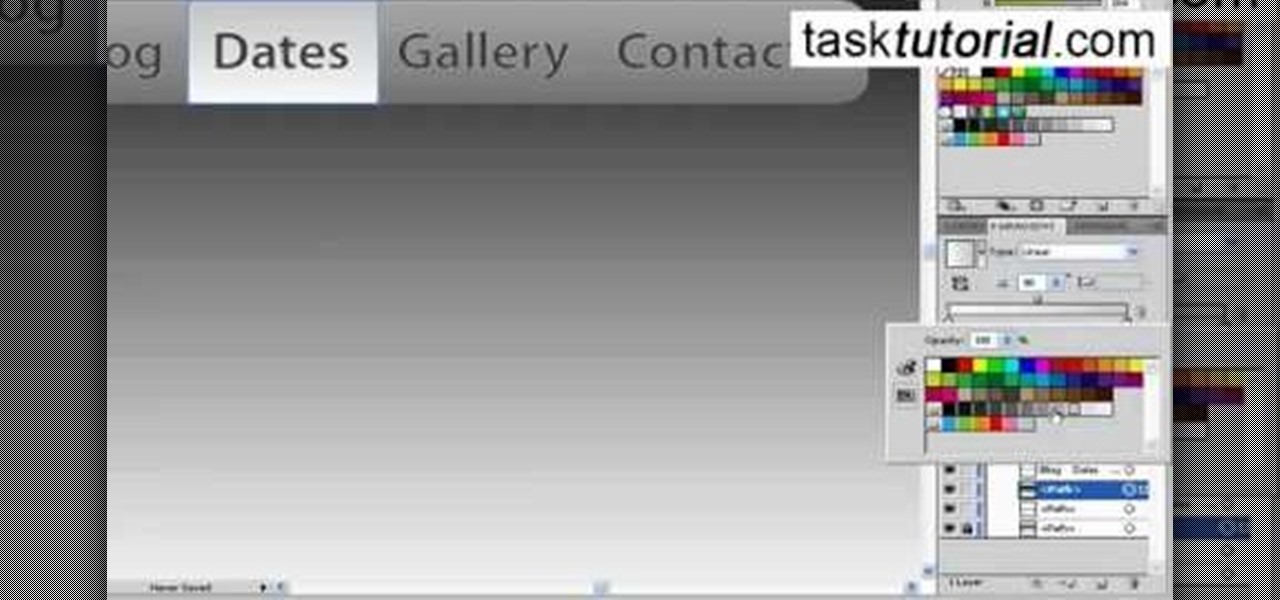
First thing you need to do this is to select rectangle tool and make a shape and select the gradient fill and change the angle of gradient to 90 degree. Now color and resize it as showing in the video. Now type your navigation texts like blog, contact, gallery etc. Now size your text for your rectangle shape. Now set the texts in the bar and resize your bar.
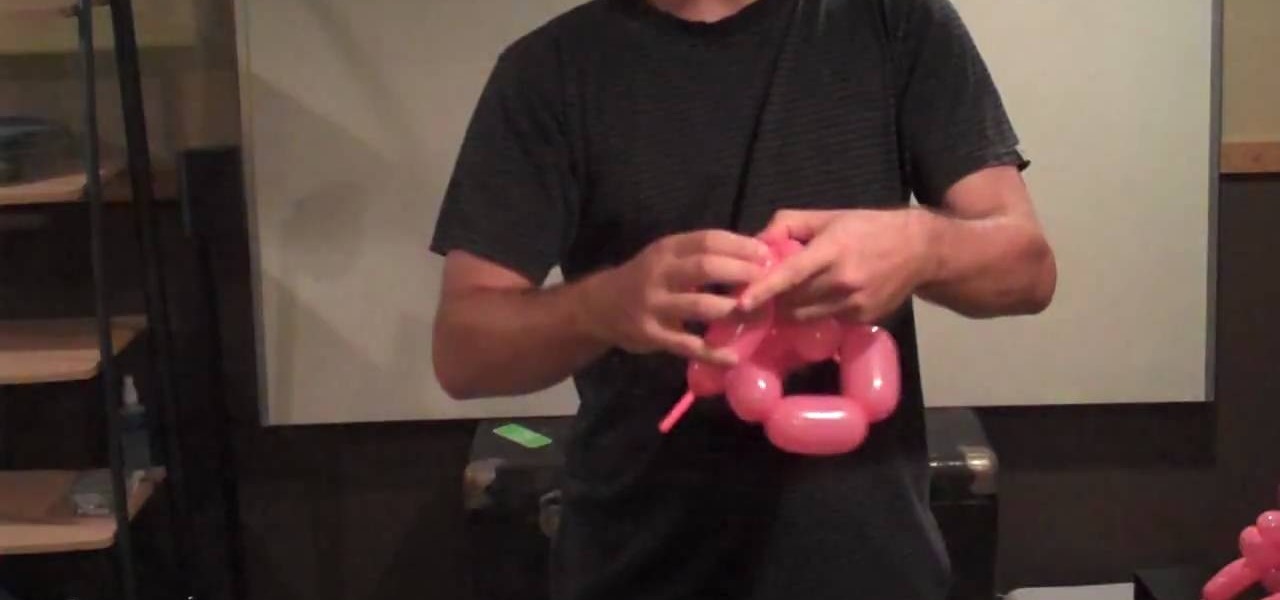
This video shows viewers how to create a maple leaf using two long balloons which are used for making animal balloons. You will begin by inflating the first balloon, leaving a few inches of empty space at the end of the balloon. Begin by making two small bubbles by twisting the balloon and creating consecutive bubbles in the balloon. Follow these with two larger bubbles and 3 more smaller ones, to create a hexagon shape. Continue to create small bubbles, folding them into each other to create...
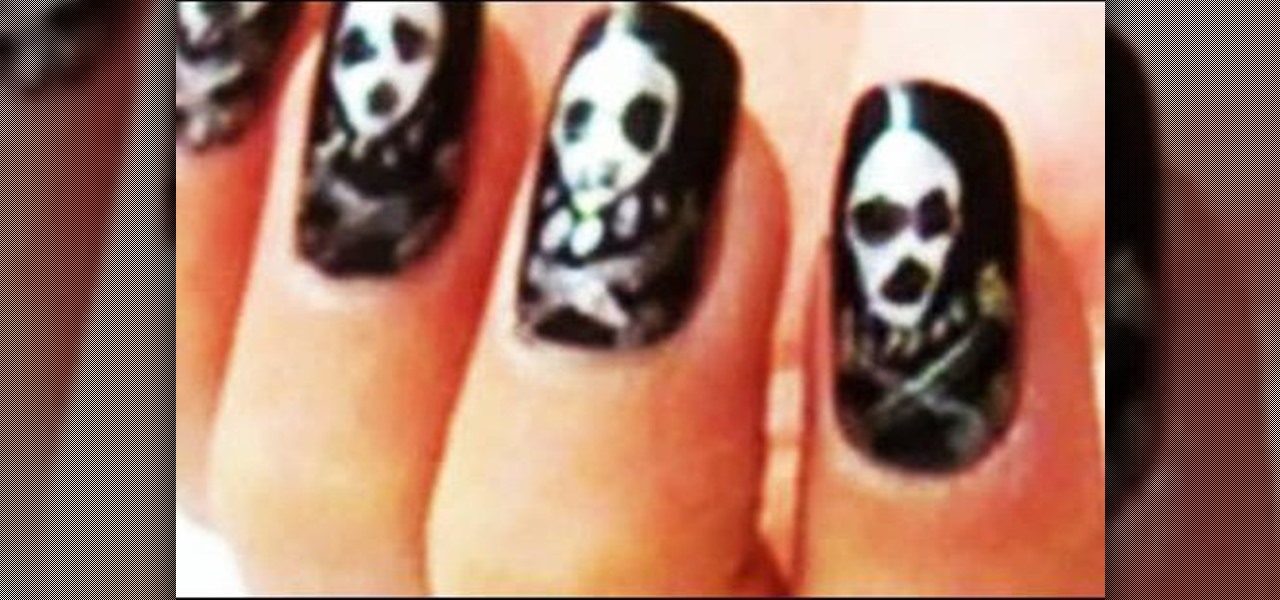
In this video, we learn how to create Halloween inspired skull nails. First, apply a base coat to the nails before applying anything else. After this, apply a black nail polish to the entire nail and allow it to dry. Now, take a silver nail polish, and draw a skull shape onto the nail. Use your black nail polish to create the eyes in the skull, then use a nail brush to create the shape of the head and bones underneath the skull. Let the nail dry, then repeat this on all your nails for a spook...
In order to make a hook for an earring, you will need the following: round nose pliers, a wire cutter, a nail file or sand paper, an ink pen, 20-22 gauge wire. With your round nose pliers, make little hook, in the end of the wire. Bend it, until it makes a little loop.
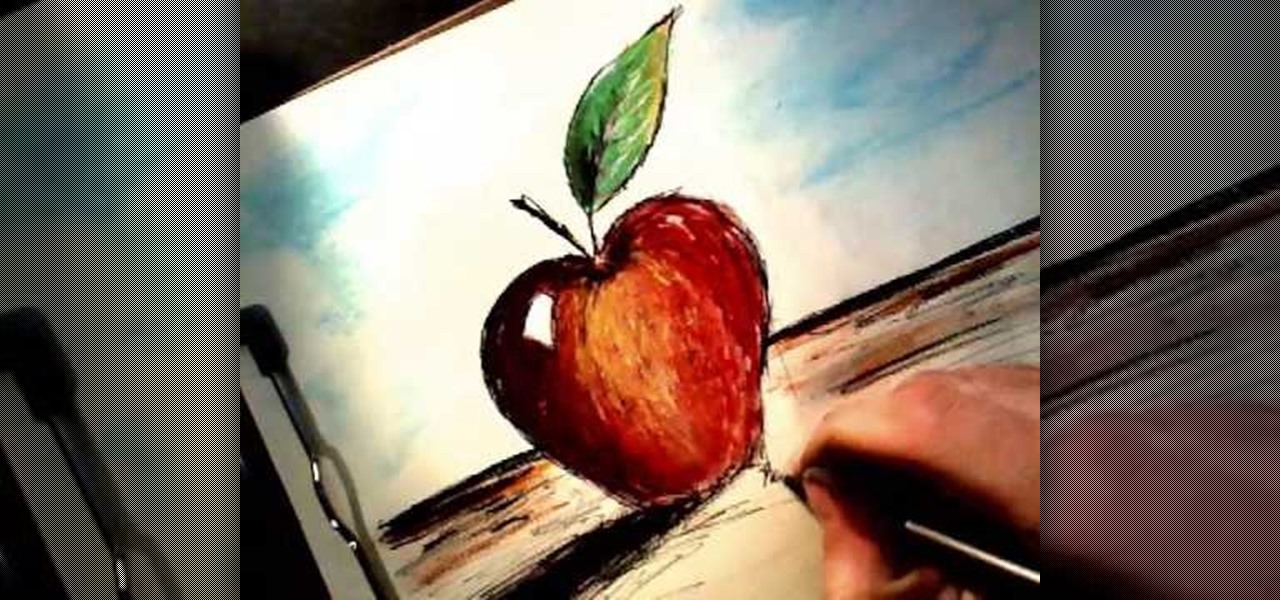
In this tutorial, we learn how to draw an apple. Start by drawing the outline shape of the apple. It looks like a slight heart shape in the middle of the apple where the stem is. After this, start to fill in the apple with lines to make it look more realistic, then draw the stem and a leaf coming out of the top middle of it. Color in the leaf with browns, blacks, and green. Then, draw lines on the bottom of the paper to make it look like the surface. Finish by coloring the apple red, making d...
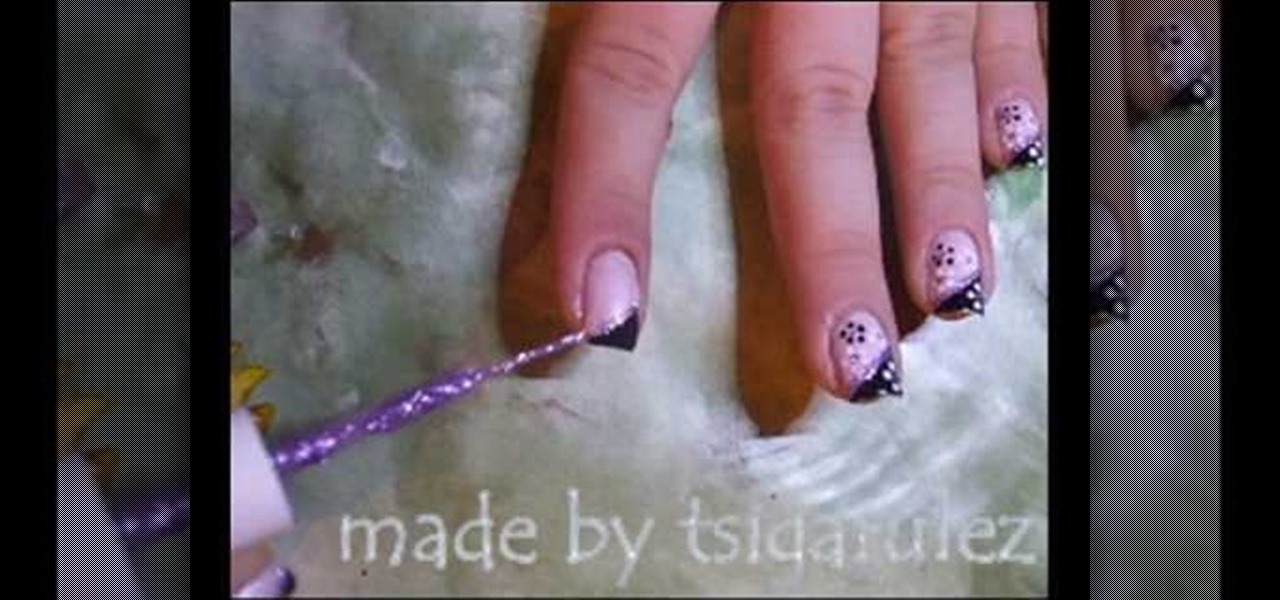
In this tutorial, we learn how to paint a black & pink French manicure with flowers. Start by painting the nails with a light pink nail polish, adding a couple layers so the color shows on top of the nail. Wait for this to dry, then paint black nail polish in a diagonal line across the top corner of the nail. Now, allow this to dry and take a sparkly purple nail polish and paint it in a line directly underneath the black polish. Next, use a toothpick or dotting tool to dot white nail polish i...
Gumpaste is the weapon of choice for many bakers and pastry chefs because of its versatility. Not only can just-made gumpaste be bent and shaped into anything you can imagine (from giraffes to leaves), but once you give gumpaste the chance to harden, it'll maintain that shape until it goes down your child's throat.
Fondant is one of a pastry chef's favorite substances because it's so versatile. You can use fondant to coat a cake with an even, smooth surface, you can shape fondant into little adornments like fish and ladybugs, and you can even employ fondant to decorate cookies.
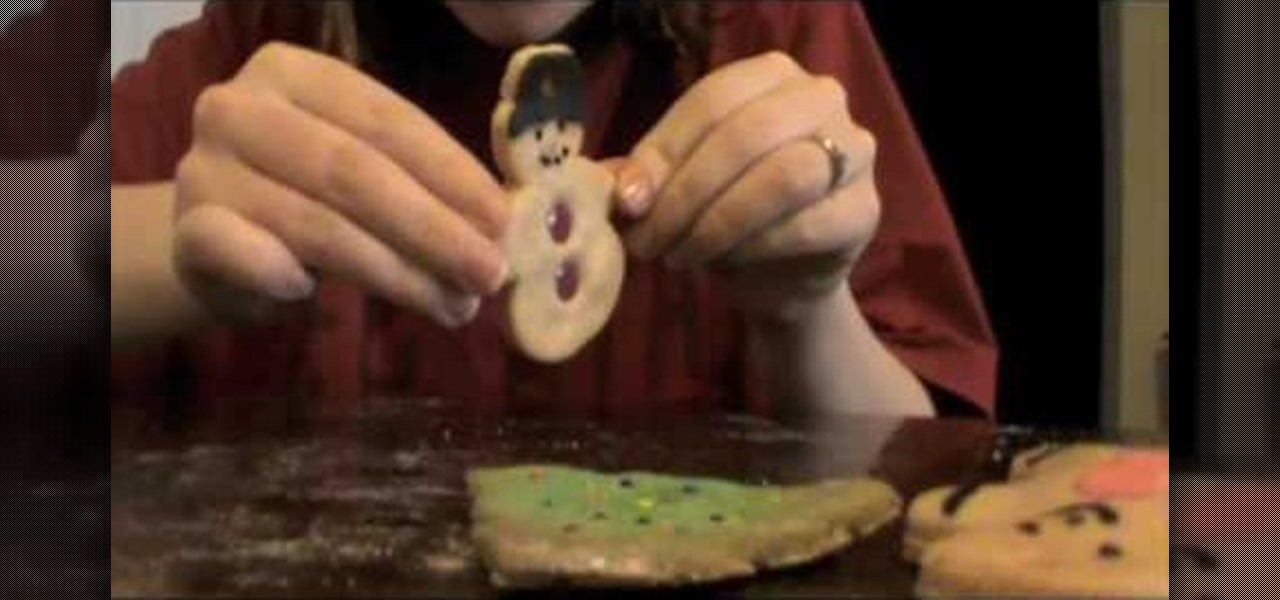
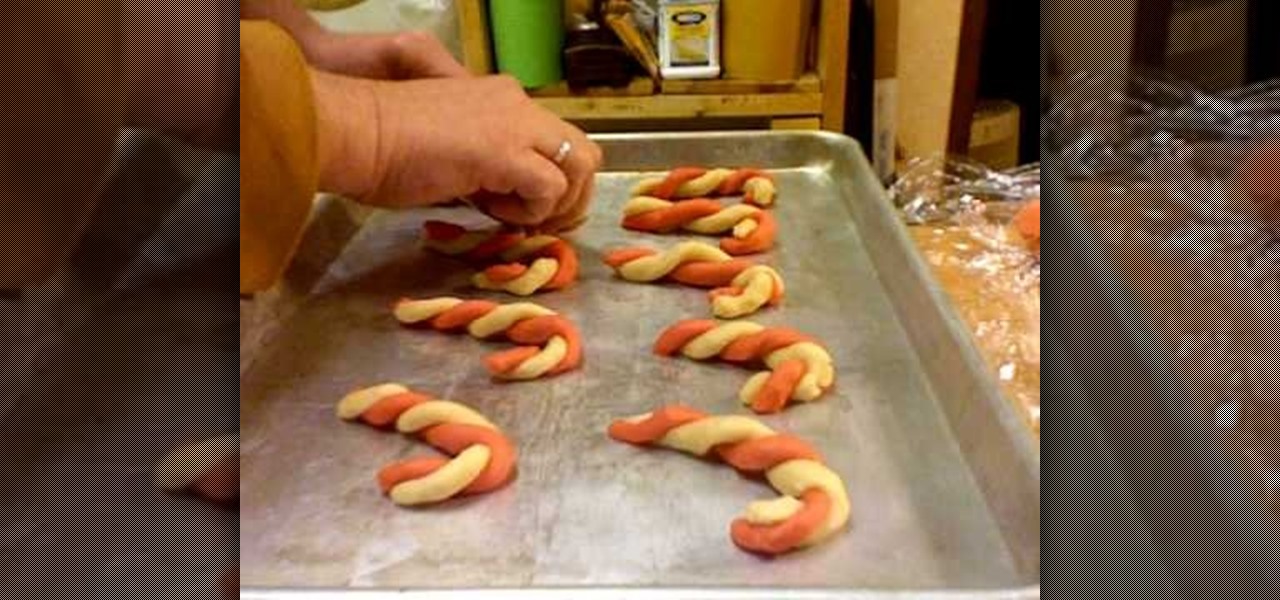
It's that time of year again! The air is a whole lot nipper, lights dance around sidewalks as you drive past shopping centers, and the scent of warm gingerbread and sweet cookies fills your nostrils when you enter your home. That's right, it's Christmas, and what better way to celebrate this festive time of year than with cookie making?
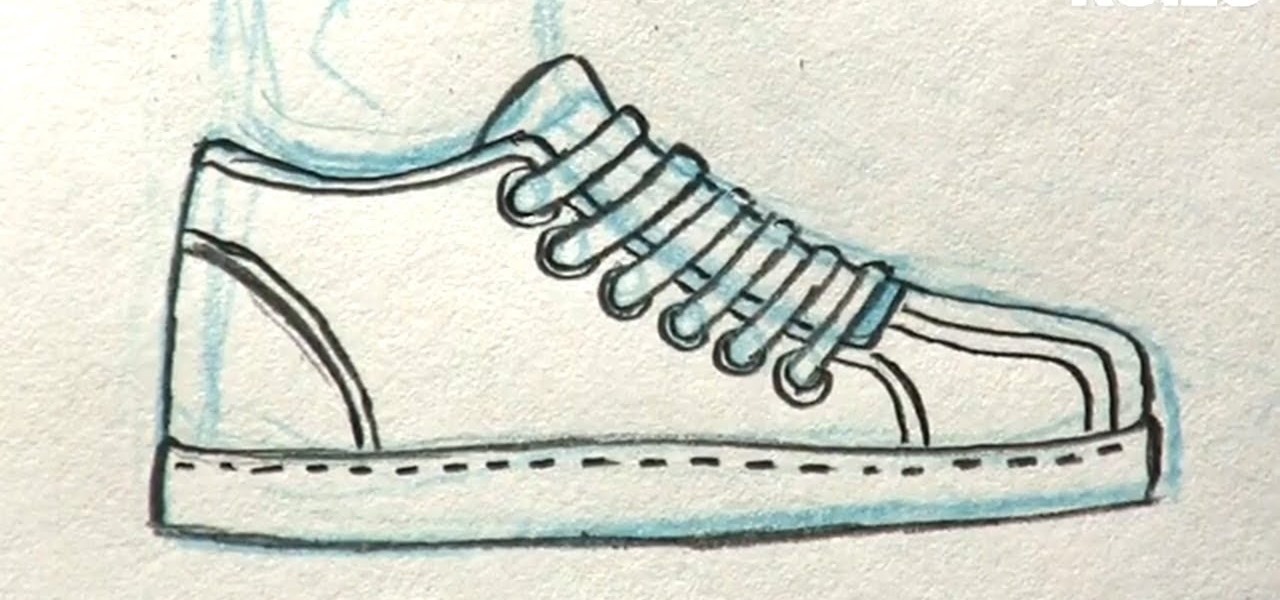
In this tutorial, we learn how to draw manga shoes. First, you want to sketch the basic shape of the foot. On top of this, you will draw a rough shoe shape with a different colored pencil. Next, draw in the details of where the laces are going to go, and where the lip of the shoe will be. Also draw in the soles and any other details you feel you need. Switch over to a black pencil to draw in darker details and add in shading throughout the drawing. When you are done, sign your name by your dr...
In this tutorial, we learn how to make cloth flowers. Start out by grabbing several different strips of fabric and folding it into a shape that makes a flower. After you do this, place a needle into the fabric so it doesn't come unraveled. After this, start to twist the fabric and then thread the needle through the strip. Now, pull the fabric up and it will scrunch up into a flower shape. Now, wrap this around a stick with a piece of fabric on it, that will become the middle of the flower. Wh...
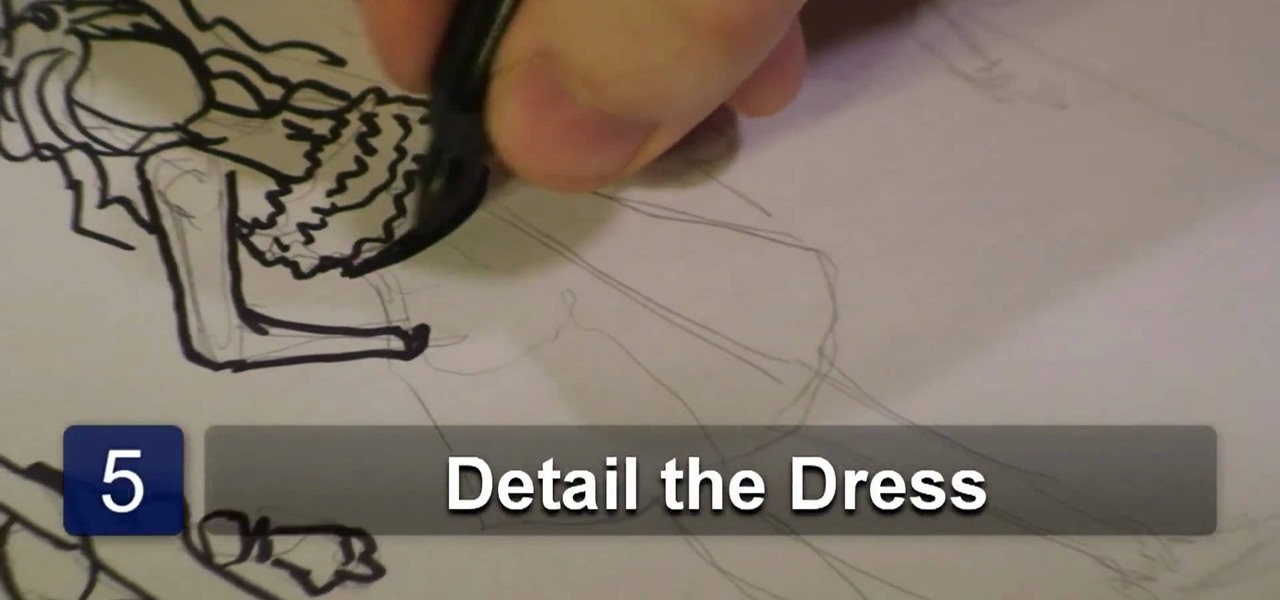
In this tutorial, we learn how to draw a variety of prom dresses. First, you will need to start out by drawing the dresses on different body shapes. Make dresses that are long, short, and knee-length. After this, use a marker to draw the outline of the body and the dress, then start to add in the pleats and the dress details. Add on scarves and other items to the different types of dresses, then continue doing this for the different types of dresses and body shapes. When you are done, draw in...
In this video, we learn to heat shrink a rear window tint. First, prep your window using soapy water. Next, rinse with car with a soapy cloth and spread on the lather. After this, let it dry and cut the film around the pattern. Next, create an anchor by dampening in an 'h' shape. Next, lay the window film down with the liner side up. Anchor the film onto the window along the 'h' shape. Make sure your fingers are vertical, then heat the film until the lines react. Then, smooth on with the hand...
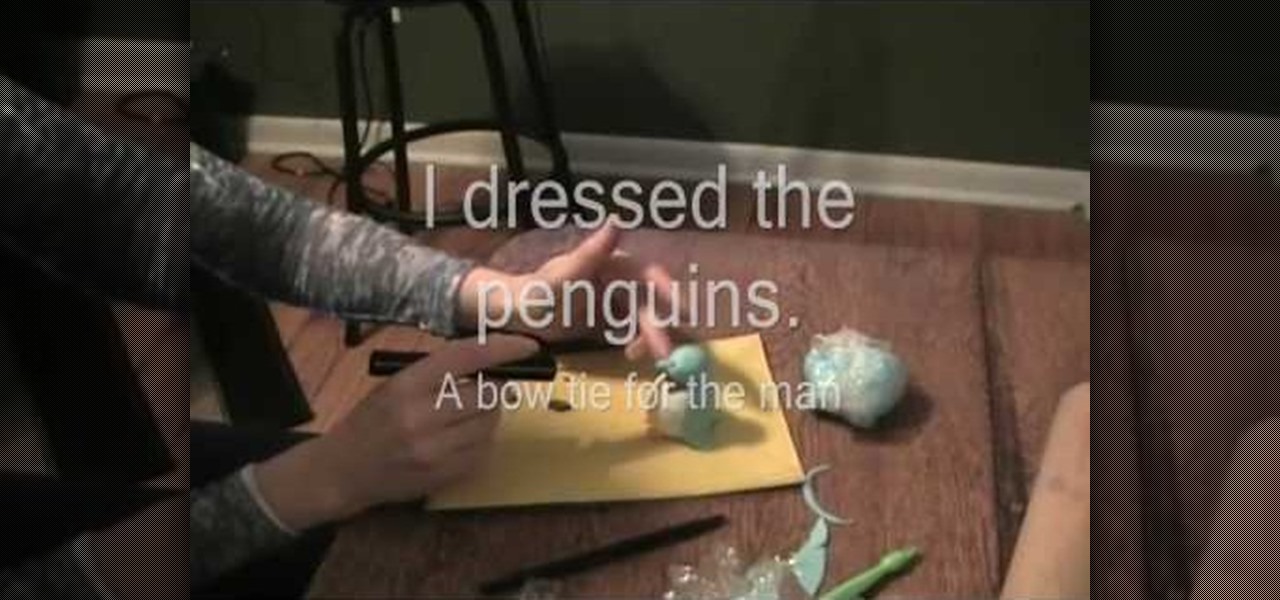
In this tutorial, we learn how to make an igloo and penguin cake. For this, you will start with colored fondant or colored gum paste. Next, you will shape your gum paste into the bodies of the little penguins. After this, make sure you make all the shapes for their eyes and beaks, as well as their feet. When you are finished with this, you can start your cake. To make it look like an igloo, you will place large marshmallows that have been cut up on top of it, then use coloring to make it look...
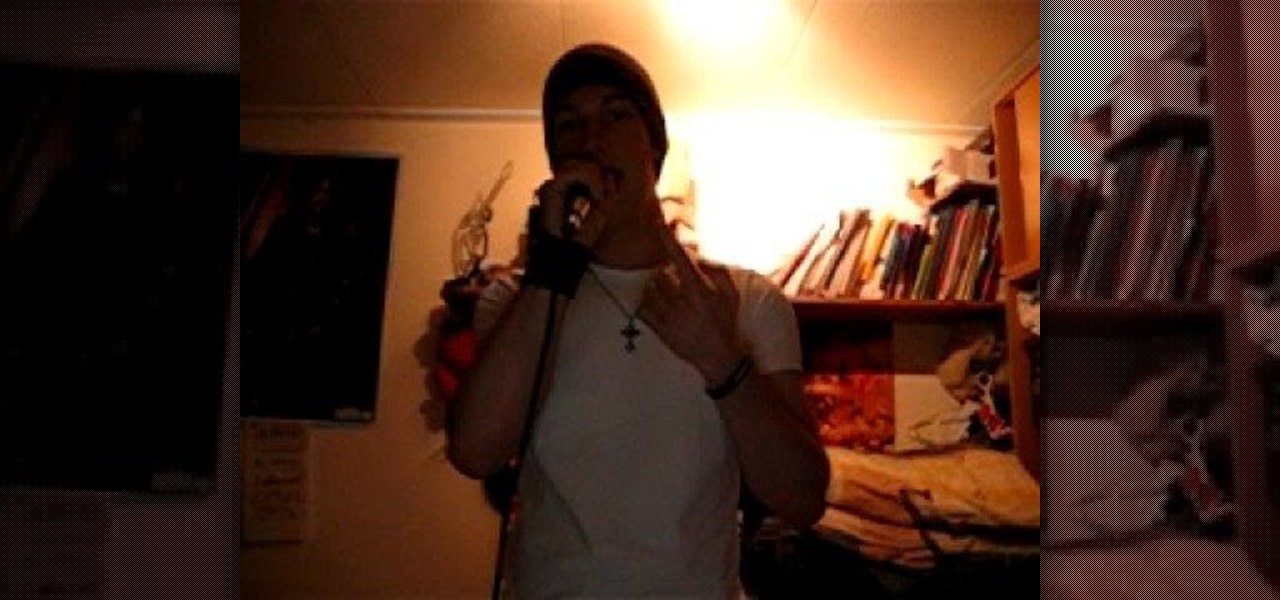
In this video, we learn how to do deep screams in metal singing. You will take a high note and add to it by pushing your throat. This is like doing the vocal fry method. After you keep practicing, this will become a guttural scream. Put your tongue on the roof of your mouth and shape your mouth into a fish shape. Let the air flow steadily and the noise will come out really deep and out of your guts. This may take you several days or weeks to do, but don't give up easily! Once you get the scre...
Everything is so much cuter - and tastier - in edible form. Take dogs, for instance. Whether you miniaturize them to top a cupcake or make them out of buttercream to top your cake, they becomes instruments of decoration and pleasure once they get adapted to cakes.
In this video tutorial, viewers learn how to draw Obi-Wan from Star Wars. Begin by drawing a circle for the head and rectangular shape for the jaw. Then draw a line 1/3 way across the circle. Draw the eyes on the line and the nose just underneath the line. Now draw 2 lines from the ends of the eyes to the rectangular shape. Use those lines as a guide to draw the length of the mouth. Then add the ears, eyebrows and beard. Now lightly draw the hair. Finish by coloring and shading the image. Thi...
In this tutorial, we learn how to make a paper football. First, take a piece of copy paper and fold 1/3 of the paper and crease it. Next, do this again until you reach the top of the paper, you should have three folds in total. Next, fold one side into a triangle shape, and then keep folding in until you get to the bottom of the paper. Once you reach the bottom, fold the excess paper into the pouch that you created when folding the triangle in. You will end up with a triangle shape. Now, you ...
In this tutorial, we learn how to make a bikini bottom. First, measure the widest part of your bottom area, then write this number down. Next, place your fabric where the measurement device just was, then mark where you want your underwear to fit. Mark this spot, then measure the lines out on the fabric. After this, use a pen or marker to mark the underwear shape. After this, cut out the shape of the underwear and pin all sides together. Now, sew the sides of the bottoms together, then flip t...
In this tutorial, we learn how to make a perfect paper football. First, fold the paper in half, length wise. Next, fold it again the same way and fold the crease. Now, rip a small section of the top part and discard. Now, fold the paper in the middle to make a sort of "l" shape. Then fold again so you have an arrow. Now, fold all the parts together so you have a diamond shape, then tuck the end arrow into the pouch you created to have an even smaller triangle. When finished, hold the paper wi...
In this tutorial, we learn how to make a paper cigarette from a cigarette foil. First, fold a piece of foil length wise, then flatten out the creases. After this, unfold the paper and tear it in half. Now, fold half of it in half again to make the stem of the flower and twist the top. Use the other half of the foil to make blossoms and flower petals. When you are finished shaping these, attach to the stem of the flower and shape more to make the flower look more realistic. Attach more leaves ...
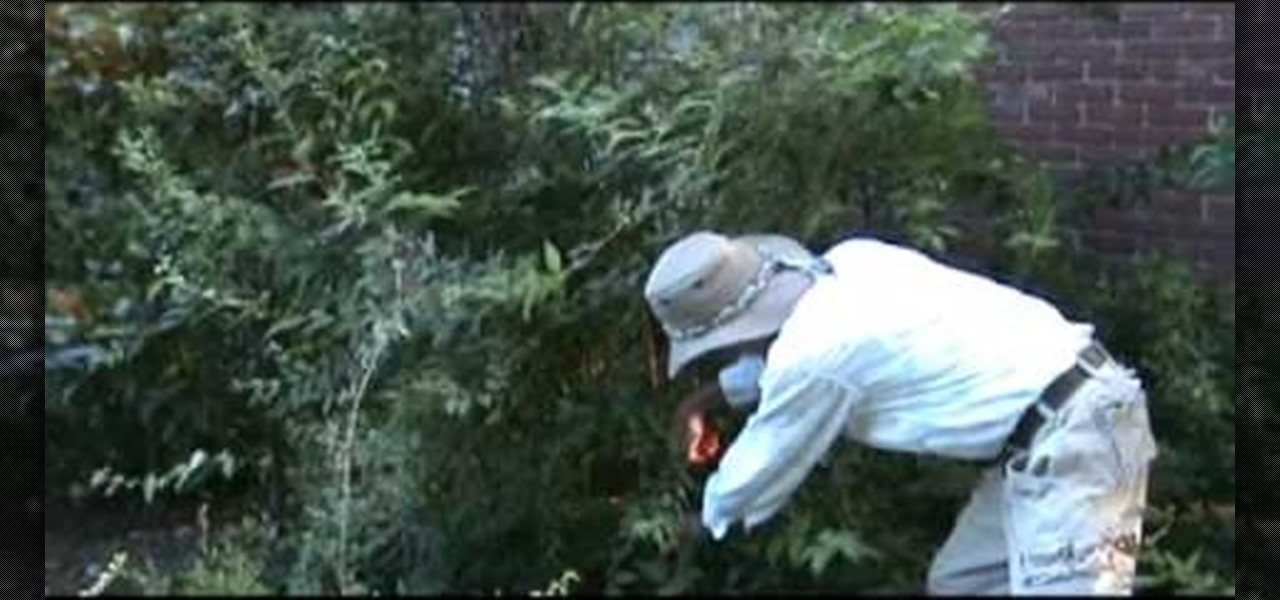
In this tutorial, we learn how to prune trees and shrubs in your garden. If you want to have a natural looking appearance to your plants, make sure you prune them often! A lot of plants will grow out of shape quickly, so make sure you trim them often. Don't square them off on top so your plant doesn't look fake and un-natural. To begin, you will want to take your tallest branches off first, from the bottom of the tree. Keep doing this until the very tall branches have been removed and you are...
In this tutorial, we learn how to make a paper flower using paper scraps. To make this, you will need: 3 pieces of small pink scrap paper, 1 piece of small green scrap paper, 1/16" brad, adhesive, hole punch, ink, and a sponge. First, you will draw one different size circle on the 3 sheets of pink paper. Next, draw leaves onto the green scrap paper. Now, start tearing the shapes out of the paper leaving no pencil showing. Crumple the paper up several times, then get your ink and put it on you...
In this video, we learn how to groom men's eyebrows with Aaron Marino. You will need: high quality tweezers, small scissors, fine tooth comb, and a pencil. First, use the pencil and place along the inside and outside of your eye to know where your eyebrow should start and stop. Now, take your tweezers and pluck the middle of your eyebrows, as well as the outside and underneath of the eyebrow. Next, take the comb and brush against the grain. Trim the hairs that come up at the top, making sure ...
In this Arts & Crafts video tutorial you will learn how to make a growing flower pot card. First you make a flower out of a tea bag. Then cut out a piece of paper in the shape of a flower pot. Now take a couple of sheets of 8x4 card of the same color. Score one card in half and fold it. From the other card cut out a piece equal to the size of an A5 card, which is 14.85 x 10 cms. Now glue the flower pot shaped paper on to this card. Now cut a long strip of the card, 30 x 3 cms and fold it in h...
In this tutorial, we learn how to do a feather stitch while embroidering. To begin, you want to place your finger right next to where you are sewing so you are making a loop shape and helping guide your needle as you are doing this. You will want to chain the loops together, making the thread look like feathers as you continue. There should be no lines that are straight, all should be looped by placing the needle in between each circle and pulling it into the loop shape. When you are finished...
In this video tutorial, viewers learn how to make a stencil. The materials needed for this project are: contact paper, scissors and a pencil. Begin by drawing the design, shape letter or number on the contact paper. Make sure to draw the stencil on the back of the paper and make it reversed. When finished drawing, carefully cut out the design. To use it, simply peel off the invisible paper and place it onto the surface of the artwork. Then trace over it. This video will benefit those viewers ...
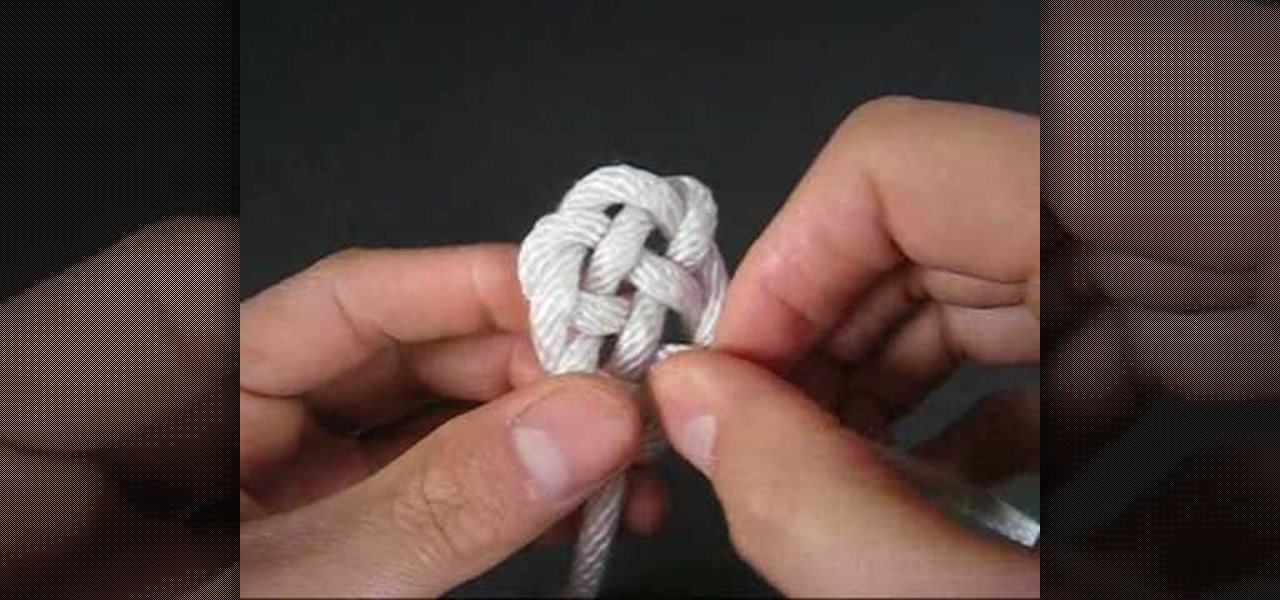
In order to create a Key Hole Weave Knot, you will need: rope or twine. Begin by making a loop. Then, make a second loop next to it. Cross the loops, placing one on top of the other. Weave a free end through the loops. Next, weave the other free end through the loop. Pull them both through carefully. Next, you'll need to shape your knot, by making sure that the spacing is even.
In this tutorial, we learn how to make a scrapbook shaker box at home. You will need: square card stock shape, another square card stock shape with a hole in the middle, and a piece of acrylic. First, place the acrylic along the piece of card stock with a hole on it and glue them down together on all four sides. Next, attach a journal entry to the center of the other card stock square. Now, line adhesive to the acrylic piece on three sides and stick the card stock to the adhesive. You can now...
In this tutorial, we learn how to make a paper snowflake. First, take a copy paper and fold a quarter of it over to the other edge. Next, cut off the excess paper so you have a triangle shape. Now, fold a corner to the next corner, and repeat so you have another triangle. You can now cut corners off so they are even and you have a rounded snowflake. Then, cut a triangle starting from your edge points that you just created. Now cut slits a quarter inch apart into the middle of the paper all th...