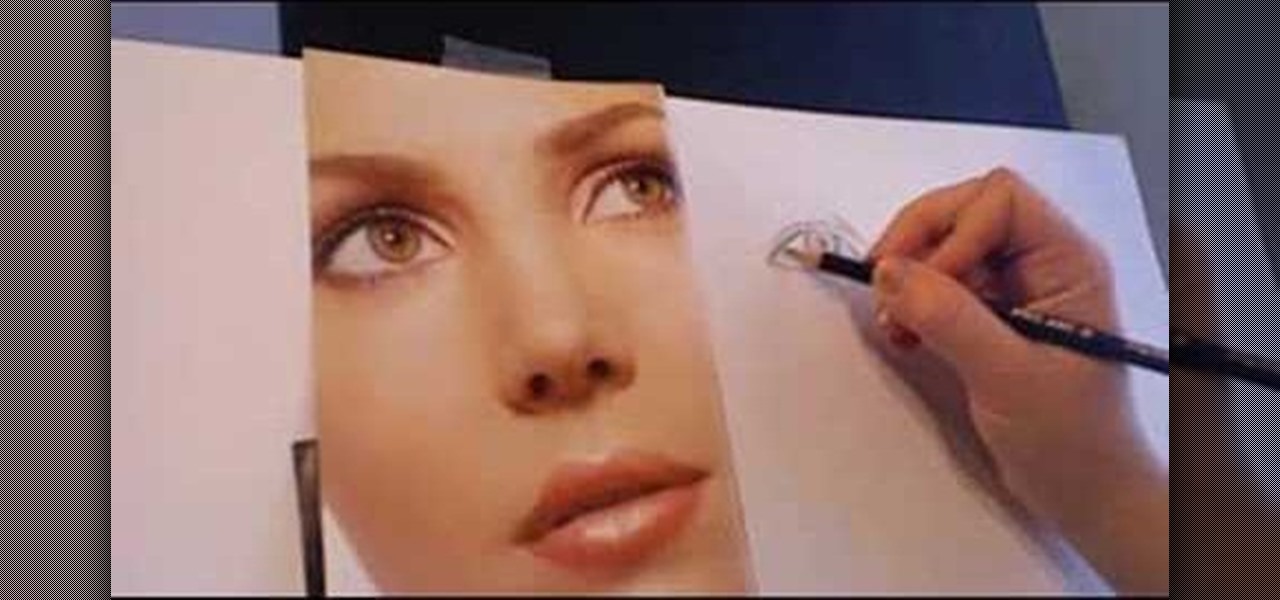
An unknown artist demonstrates step by step how to draw a realistic eye in this video. She first begins with lightly drawing the eyes shape, starting with the upper lid and gradually beginning to darken the line once she is satisfied with the shape an contour. She then draws the upper lid and continues on to the iris, pupil, and cornea. Then she works on shading the eye, drawing the lashes, and then using the eraser to remove any stray lines and whiten certain areas. Then, she begins drawing ...
This video shows you how to make a flexible mold using Amazing Molding Putty. You can make molds of just about anything that has the desired shape and texture you want.
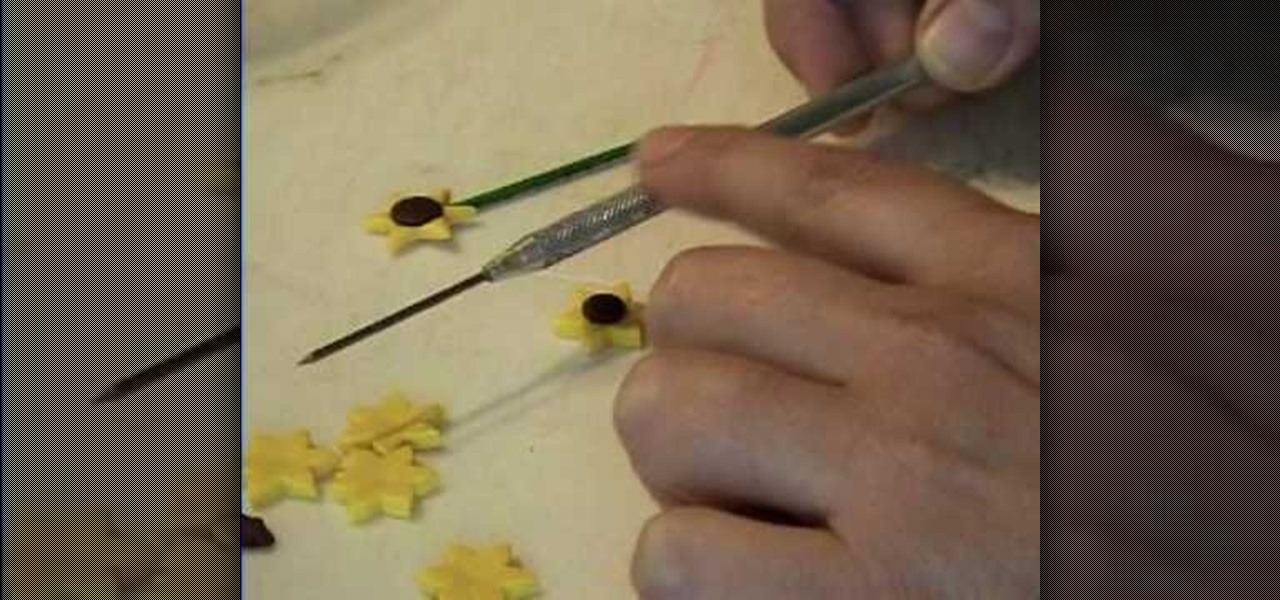
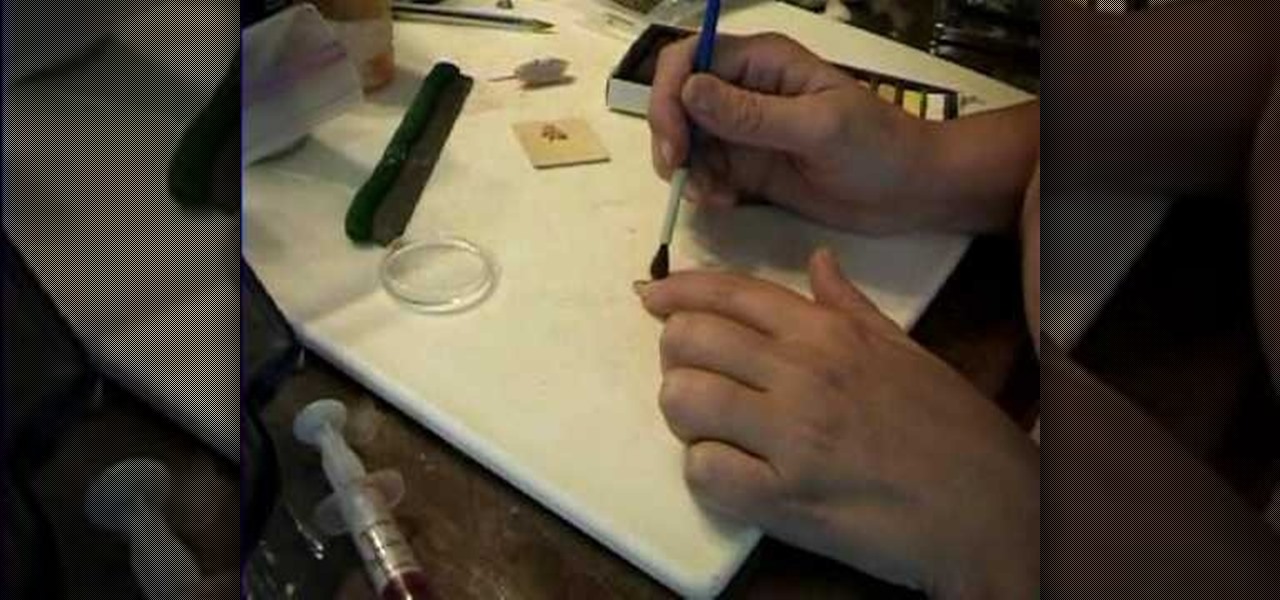
This video shows how to make a tiny sunflower from polymer clay. Start with some yellow clay and roll it out using a pasta machine using the number 1 setting on the pasta machine. Wilton cake decorating supplies makes a flower shaped cutter that is designed to cut pieces of fondant, but works well for polymer clay. Make some of the flower shapes and even out the cut edges. You can texturize the flower petals so they are not left completely smooth. Add a piece of brown clay to the middle of th...
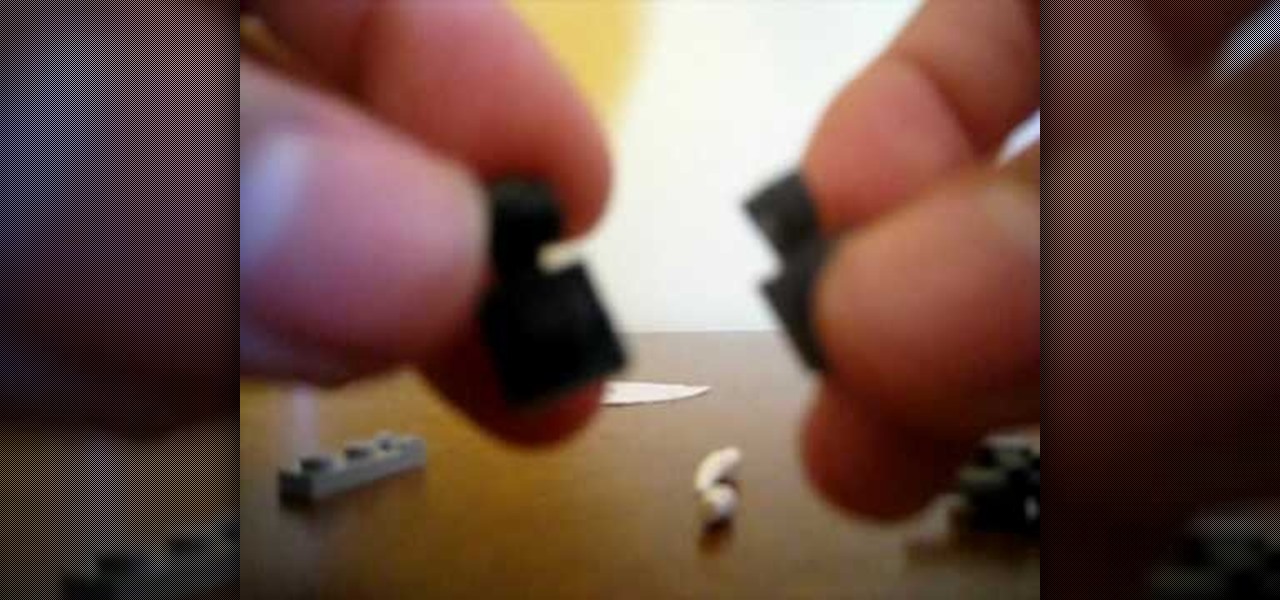
The girl in this video demonstrates the way of making a LEGO crossbow at home. She first shows you what all pieces that you require for the process. Then she asks you pick up the rod-shaped piece and stick it to the back of the spark piece. Then you have to put the two tiny pieces together as shown by her. Then she asks you to attach this piece to the stick and push it all the way to the end touching the spark piece. Then you have to stick the two horn-shaped pieces to the sides of another pi...
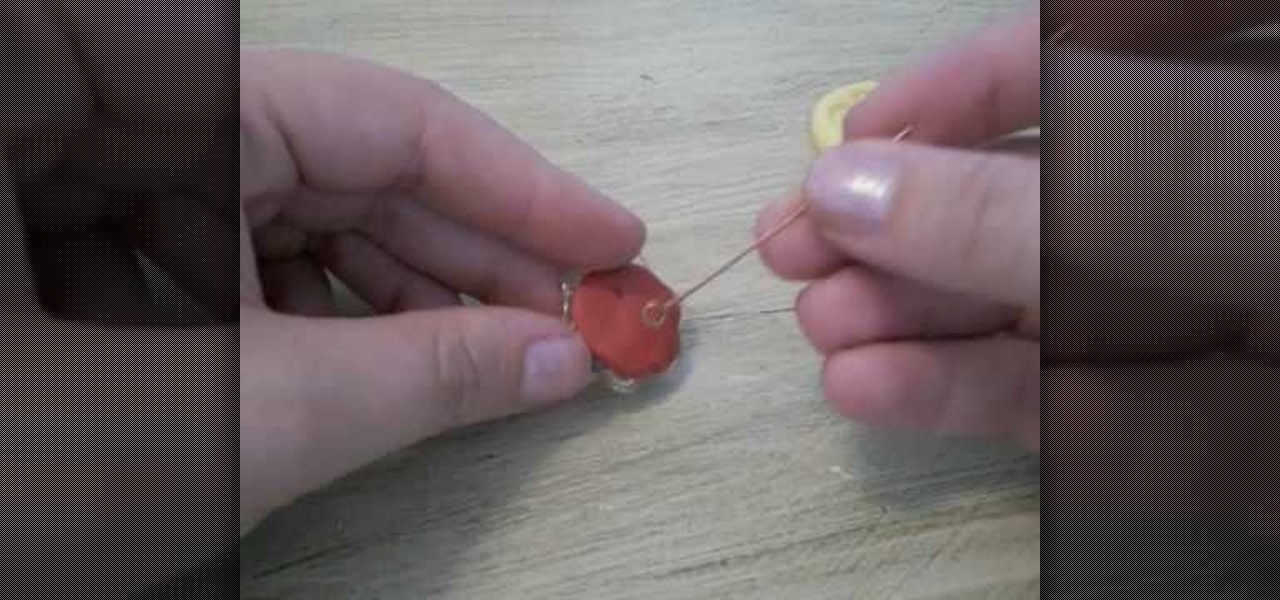
This video explains how to create a pair of Swarovski crystal earrings. You will need a tooth headpin, two pear-shaped crystals, two spacers, two diamond beads, and sterling silver ear hooks. First, slide the pear-shaped crystal onto the head pin. Follow with a spacer, a bead, then use a pair of pliers with a side-cutting edge to cut the wire and bend at a 90 degree angle. Use round-nose pliers to then create a circle at the end of the wire, then 'squash' a bit with the other pliers. Then ope...
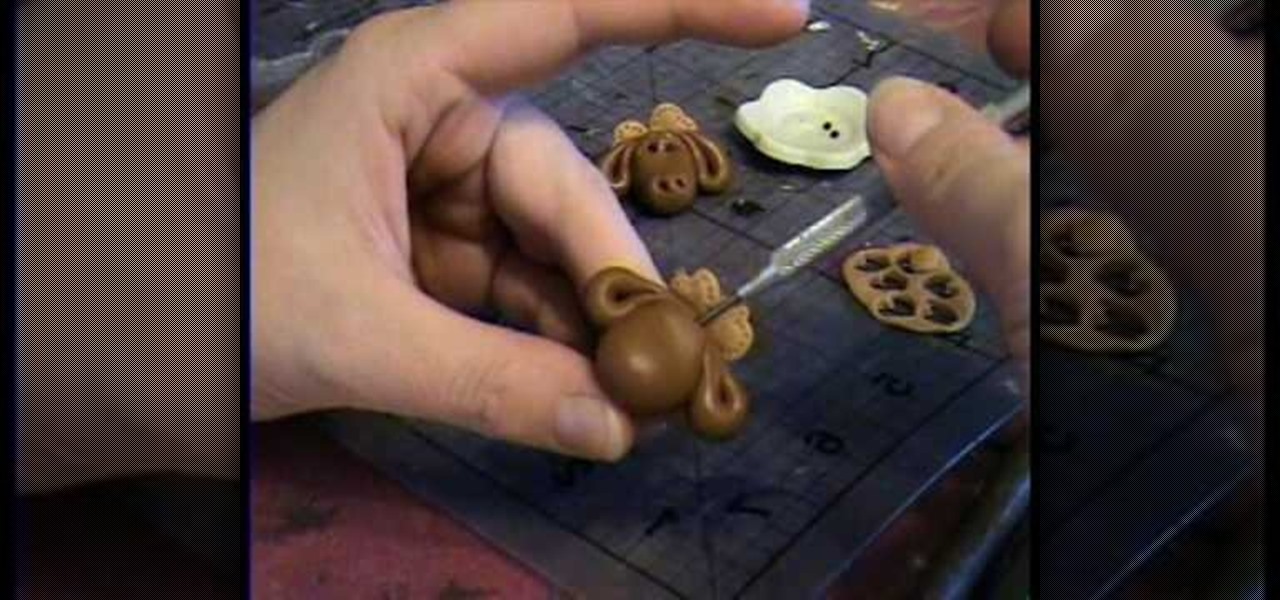
This video tutorial is going to show you how to make a Moose Bead from Polymer Clay by Garden of Imagination. You begin with clay and make a shape it like the head of the moose as shown in the video. Then take more clay and make the ears and attach them to the head. Now take lighter color clay, cut it out into heart shapes, poke around the edge with a pin, and attach them behind the head. Take a pin and make a hole at the top end of the head to make it a bead. Watch the video to finish the pr...

Garden of Imagination presents a video that teaches how to create a miniature pretzel for a dollhouse. First, she rolls polymer clay into a tiny snake-like roll. Then, she wraps the clay to form a pretzel shape. After she gets the shape she wants, she cuts the clay to make it even. Next, she retrieves chalk. She breaks up a little to dust the pretzel. She uses a dark yellow and brown to achieve a baked look. Then, she adds sea salt from her kitchen. Last, she instructs to bake the pretzel in ...
Garden of Imagination demonstrates how to make a miniature corn on the cob out of polymer clay. First, roll and flatten two small balls of green clay to make the corn husks. Make the husks pointed on both ends. Take a piece of yellow clay and roll it into a conical corn cob shape. Insert the corn on the cob into the texture piece and roll it to achieve the textured corn kernels. Wrap the corn on the cob between the two green husks. Make sure the husk leaves overlap in the front. Squeeze the c...
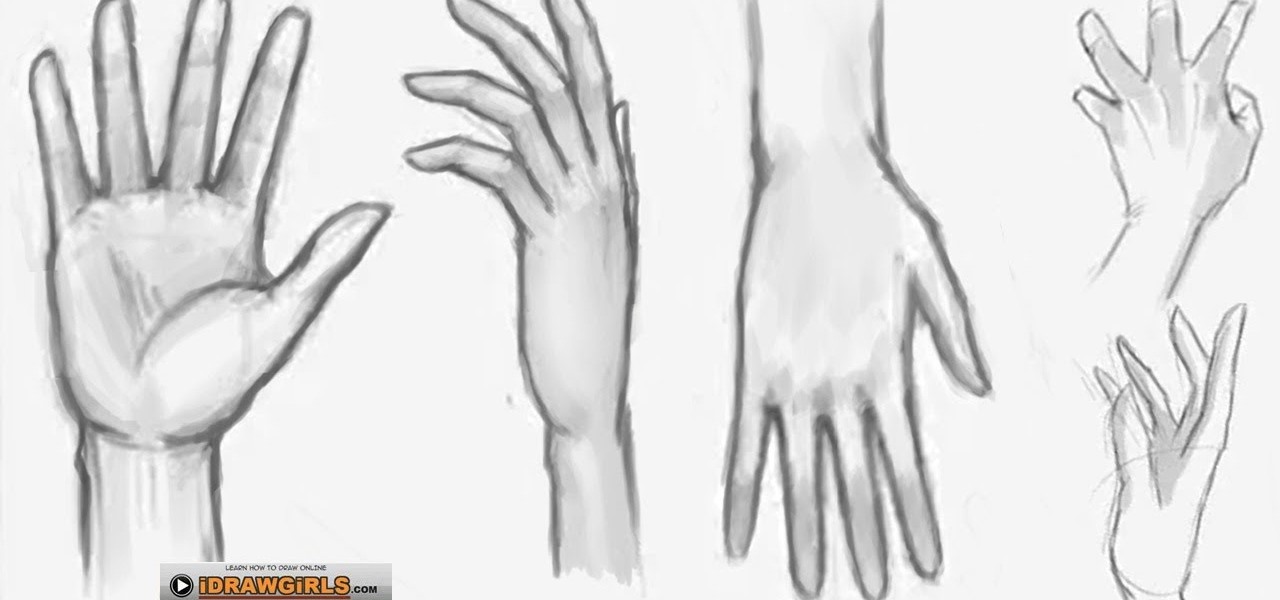
The video demonstrated clearly about how to draw and sketch the hand of a girl in an easy way. First the illustrator drew a rectangular circle in the plain window. Then he drew another rectangular shape close to the first and divided the second shape into two halves so that it will look like fingers.
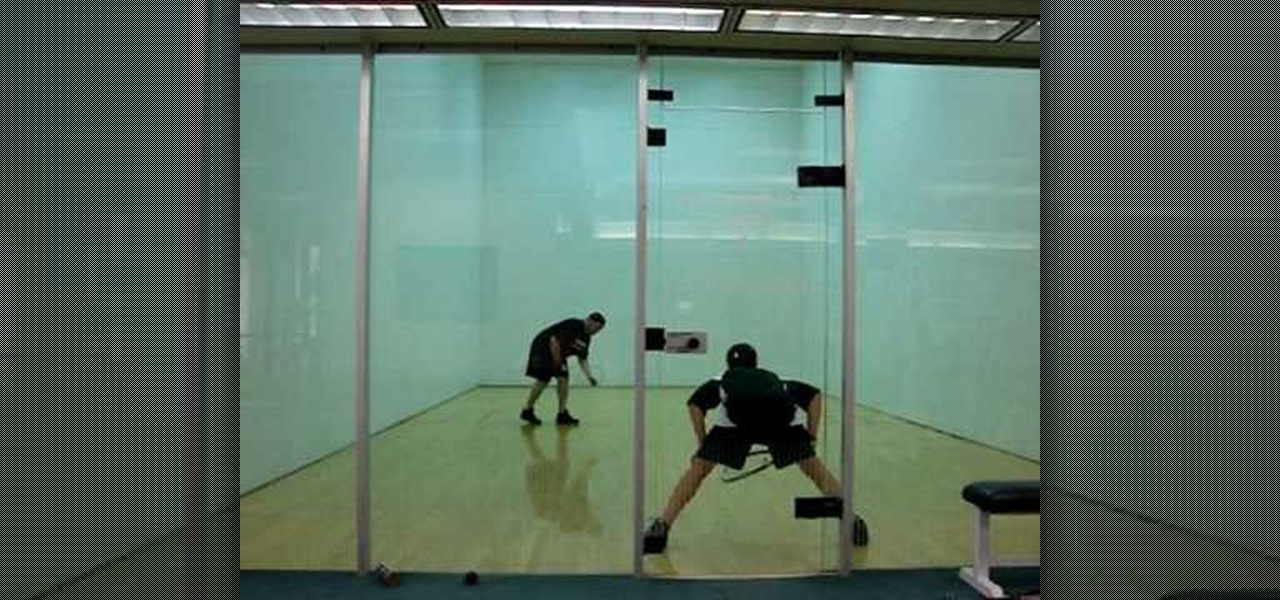
This video shows the viewer how be deceptive with their racket ball serve. Most players change the direction they will serve to by changing the alignment of their body or their contact point on the ball -some people even adjust the shape of their swing. This gives away the direction of the serve. This video suggests simply changing the point at which the ball is dropped. This allows the player to serve to both sides of the court with no obvious differences. This makes it harder for the oppone...
StudioMallory teaches you how to make a brass Sailor Moon tiara for cosplay. You will need a dremel with a grinding bit, a mechanical pencil, titanium covered scissors, two jewels, cardboard template and a piece of cheap metal. Trace the template on the metal using the pencil. Cut it using the scissors. Use goggles when using the dremel on the metal tiara. You have to grind it to make round corners. Now bend the metal in the shape you want. Use glue to apply the jewels. Once it's all dry, mak...
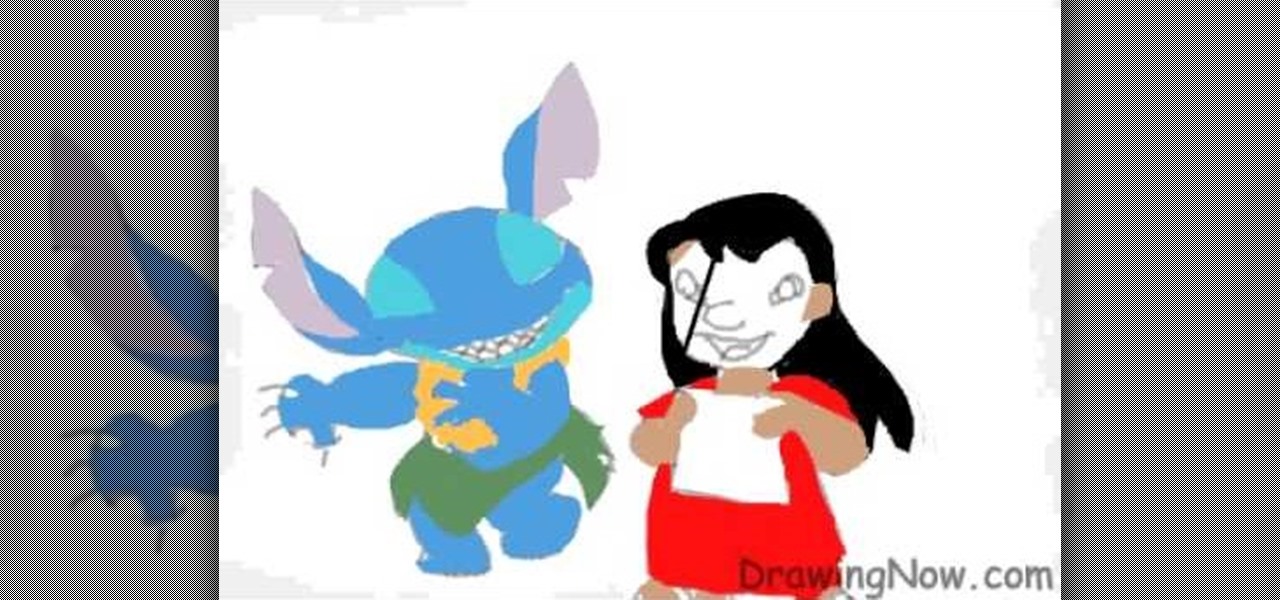
Begin by drawing an oval and attach two feathered shaped ears to head. Draw guidelines for the face. Draw the face and a marshmallow shaped torso. Add the legs and arms. Add the detail and start erasing the guidelines. Repeat the similar steps for Lilo. Once finished both characters, color them. Add a darker shade of the colors for shading. Outline the characters and add all the details. This video will benefit those viewers who enjoy drawing on the computer and would like to learn how to dra...
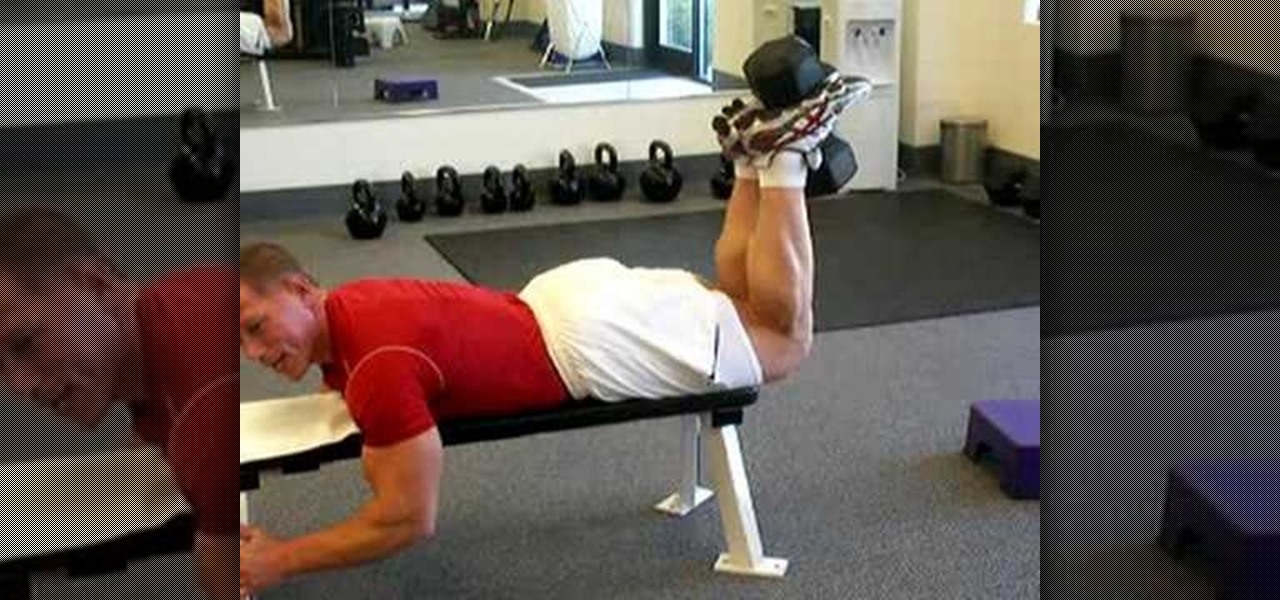
Fatloss LifeStyle shows you the best way to "blast those hammys!" Using a bench and a weight is all you need to shape and sculpt your legs to perfection. First, lay down on your stomach on a bench and position your ankles around a free weight. Make sure that you do not use a weight that is too heavy. Start light and build from there. Now using your hamstrings lift up the weight that is between your ankles slowly and controlled so that your body is level. Then slowly and controlled bring the w...
In this video tutorial, viewers learn how to peel tomato skin off. Before peeling the tomato skin, users will need to have a boiling pot of water. Begin by cutting a little X-shape onto the tomato. Then put the tomato into the boiling water. Let it boil for about 20 seconds. Then take out the tomato and peel it where you cut the X-shape. Peeling a tomato is not common and difficult to do without boiling. People may choose to peel tomatoes to make tomato pies, marinara sauce or stewed tomatoes...
The video shows you how to draw a Homer Simpson cartoon. Start off with a big circle and a smaller circle below. Draw two slightly diagonal lines to the sides, a slightly curved line below and two lines for the lower part of the head. Then add another circle on the left side of the smaller circle. Draw a small pickle shaped nose and an eyebrow above the left circle. Draw the ear just below the eye line. The hair is drawn above the ear, like an M shape. Draw the mouth and the lower lip and ext...
This video describes how to cut potatoes in a variety of ways for cooking. Cutting potatoes can be tricky because the regular shape of a potato causes them to roll. To avoid this problem, just cut a sliver off the side of the potato to flatten the bottom. Then proceed to cut the potato in the way that you originally planned to. The video then goes on to explain how to make perfect French fries by cutting the potato a certain way. To do so, start by cutting off the side of the potato to give y...
In this video tutorial viewers learn how to draw a rose on the computer. Begin this drawing with gray guidelines. The rose is cup shaped in the center with larger petals that unfurl on the sides. Use basic shapes for each petal and stick lines for the stem and leaves, the bud is a small circle on top. Now use an opaque black pencil line to draw out the rose in detail. Carefully put in the serrated edge for the leaves. Now draw the bud with fine sepals below it. This video is beneficial to vie...
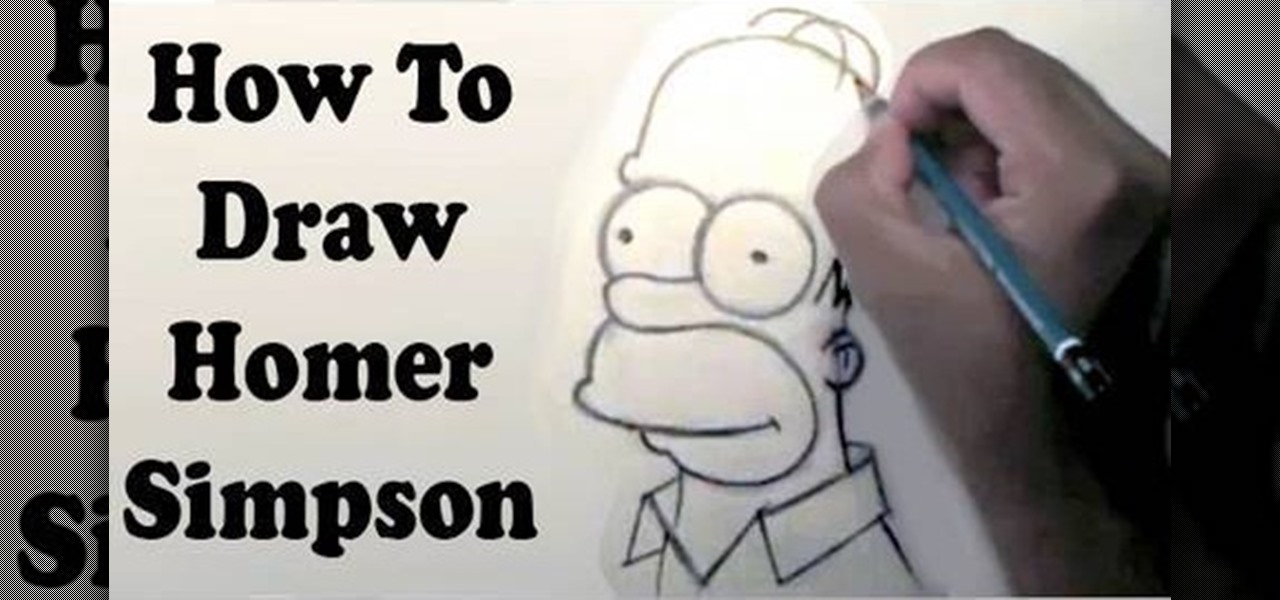
This silent video demonstrates visually how to draw a Homer Simpson character beginning with a series of simplistic shapes and lines. The artist begins by drawing two very basic circles for the eyes, then adds a curving line beneath to create the nose. The artist continues building on the image using the basic line and shape technique to create the full face image of the infamous cartoon character, and then, as a finishing touch, adds the collar of Homer Simpson's work shirt. This video provi...
Ilysa and Kira with Polymer Clay TV demonstrate how to make an incense burner out of clay. An incense burner is a great way to use up a lot of your scrap clay. You can also use molds, embellishments and pigments to create your incense burner. You can roll up your clay in a swirl to create the incense burner or use any other desired shape. You can also do pinch pot type shapes. To make an incense burner, you'll need a ball of scrap clay, a blade, and a rod. Use the rod to flatten pieces of a c...
This video starts with a little guitar riff and goes on to show you how to practice scales. Scales are key to learning your fretboard and making it easy to sight read. As a preface the presenter talks about cage chord theory and which scales go with it. The second question is about moveable scales and how to make the best use of scales to improvise. First, make a five day scale practice plan. Then memorize the scale shape. After that, use a metronome to practice with. Then move between the sc...
She begins by taking something she has molded with Amazing Mold Putty. She uses Magic Gloss resin which cures with UV light to fill the silicon mold and sprinkles some glitter onto the resin. She emphasizes that she's doing this indoors, because the resin will harden when exposed to light. She takes it outside to cure in the sunshine and says it will take about 15 minutes to cure. When it's done, she rolls a ball of Pardo clay. She pops the molded piece out. She presses the molded resin piece...
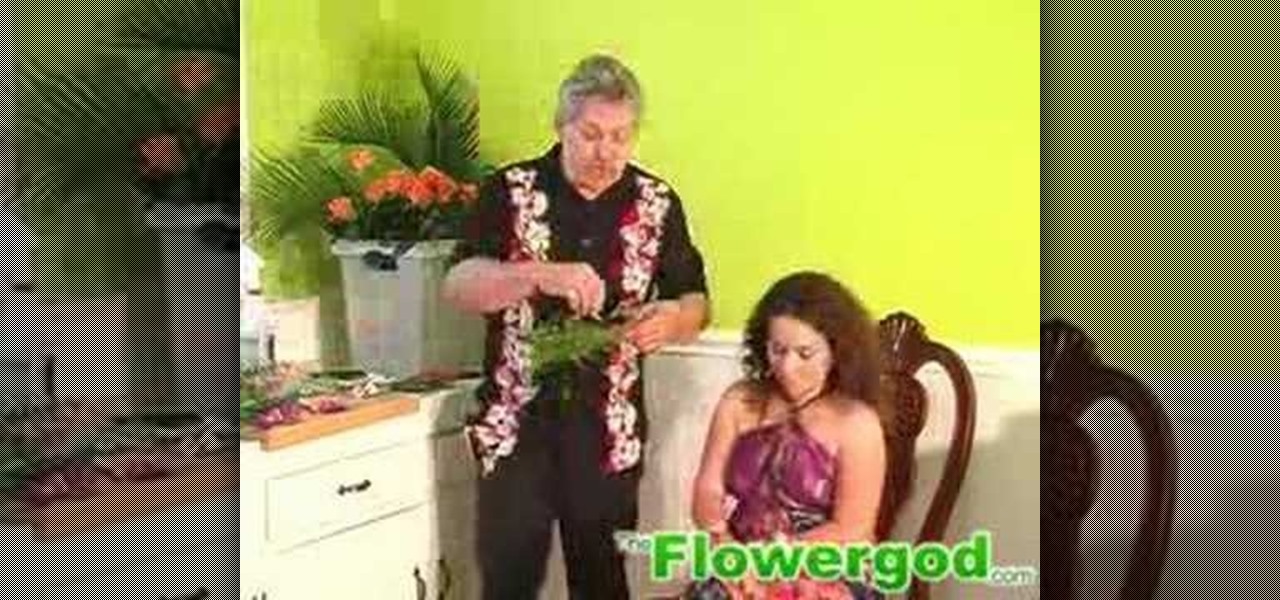
The Flowergod demonstrates how to create a sweet pea and rose halo for a wedding or a luau. First, find and shape a dual ring of wire into a halo. Ensure that the halo fits on the head of your subject. Then weave foliage into the halo, creating a nice green bed for the flowers. After the green foliage is woven into a ring, insert the sweet pea and rose flowers in between the wires of the halo. Shape the flowers and the foliage as needed as you are weaving it through the metal rings. In a few ...
This video gives you a detailed description on body fat. The first point made is that there is NO SUCH THING AS SPOT REDUCTION. The video goes on to tell you that some body shapes are determined genetically and that you yourself may exhibit a body like that of your parents. The video describes different body shapes as well, such as the apple, pear, etc. The video ends in saying that hormones may also cause weight gain in specific area such as the hips and abdomen. Overall, this video mainly t...
For some, including myself, drawing realistically detailed hands are almost the hardest part of a drawing. This video will demonstrate how to draw a human hand in detail (or maybe some other species, its up to you). The overall shaping is very important but make sure your dimensions are in tact, that can be the hardest part. After you have your shape you can start with the detailing work. Shadowing is always the best way to get the most realistic look. Pay attention to detail and you there yo...
Watch this video to learn how to draw Thomas the Train. 1) First start out with a circle, followed with a rectangle attached, to make a cyclinder
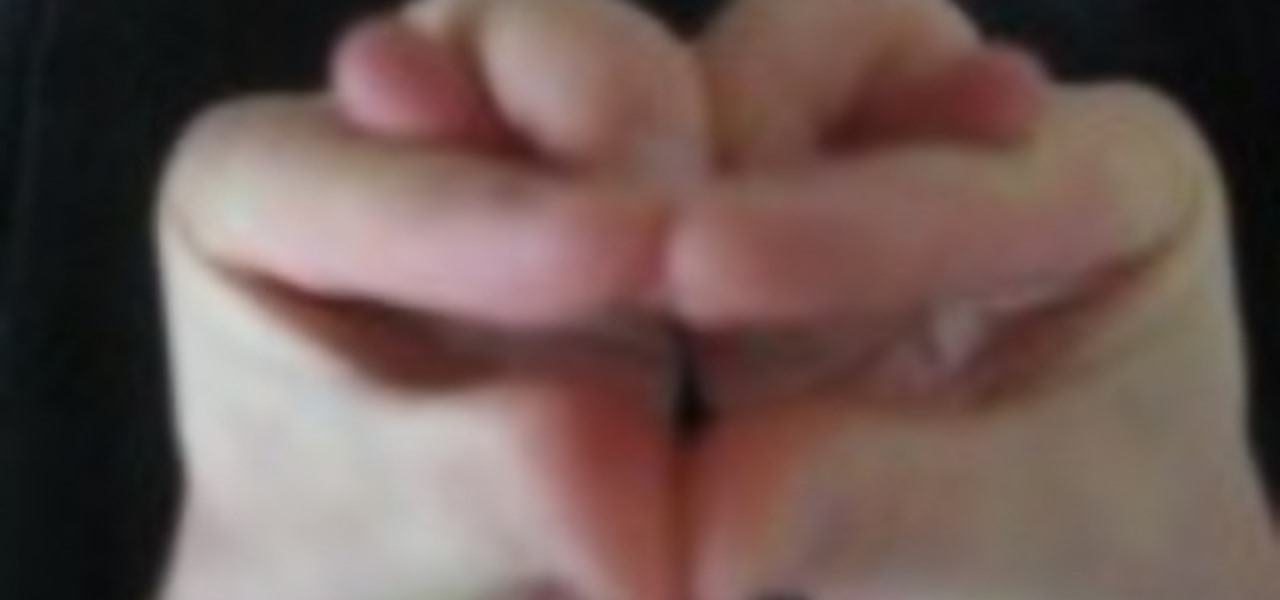
This short video shows how you can make up a frog shape with your hands. In order to make a frog by using your hands start by opening your hands in front of you, palms down. Then you have to cross your little fingers on each other. Repeat the same crossing of the next finger on both hands, The next step is to fold your middle fingers over the two smaller fingers you had crossed before. Finally move the thumb and the pointer fingers in a circle shape to form the mouth of the frog. By opening a...
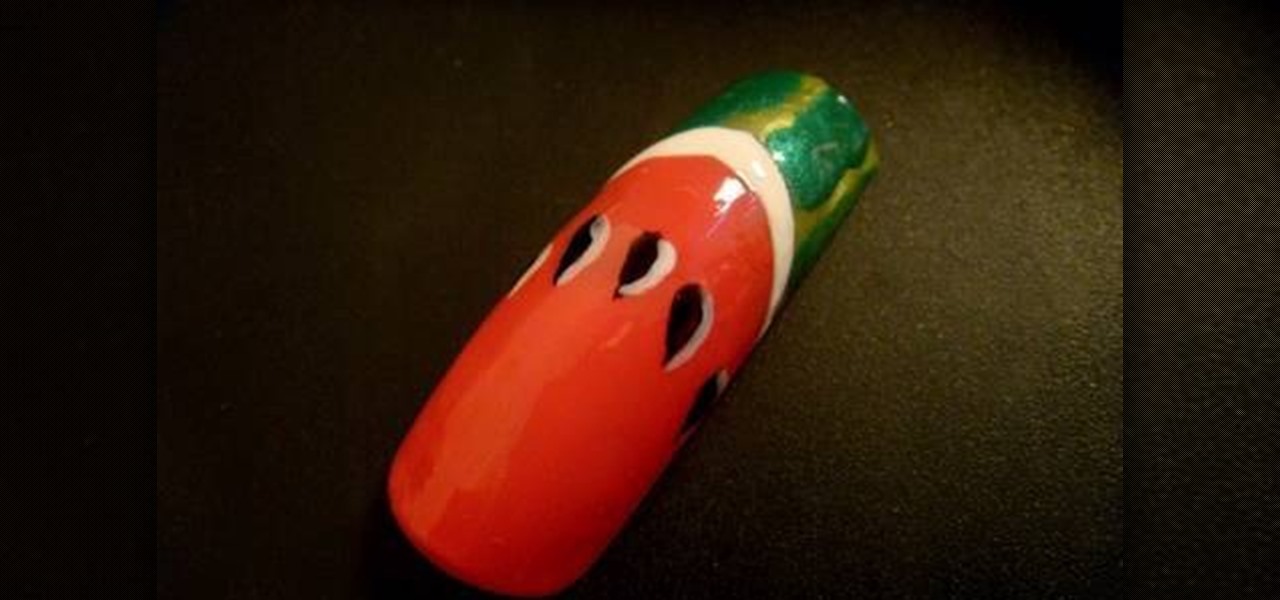
BeautifulYou TV presents how a watermelon nail art design is painted. The nail painting starts off with a white line drawn between the base and the tip of the fingernail. Pink is used to cover the base and light green for the section from the white line moving towards the fingernail tip. Streaks of dark green nail polish are then painted on the light green section to give the look of a watermelon. To decorate the watermelon with seeds, draw black tear-shaped designs on the pink section and cr...
Two cousins teach how to make the perfect origami rose Obtain a square sheet of paper, preferentially origami paper. 6X6 is the best size for the paper, but 15X15 will also be fine. If the paper is not square, measure the sides and cut the paper to make it a square. Fold in the square sheet of paper diagonally, corner to corner and make a crease. Unfold the paper. Fold the paper diagonally the other way and make another crease. Fold in the two flaps of one side in to get a triangle shape. The...
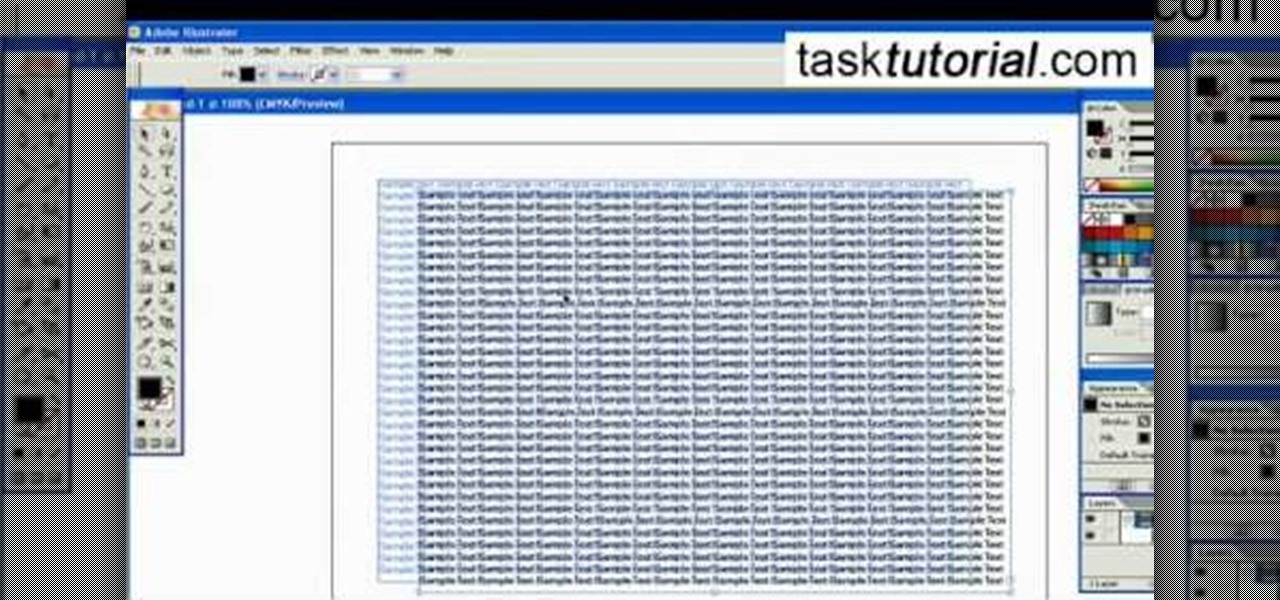
To create an added interest with text, learn how to wrap text around paths or shapes using Illustrator software. This video from Task Tutorial shows us each step involved with wrapping text around an oval as an example. However, any shape or path can be used to wrap text around that object. An object just needs to be placed on the page and then the "text wrap" command needs to be applied, and the wrapping will be done for you automatically. The Illustrator effect allows you to break up a page...
This video explains how to draw manga or anime noses. Draw a shaded triangle. The straight on nose is usually nothing more than a shadow. Decide where the light source is coming from and draw a black triangle on the half of the face that would be in shadow. In the example, the light is coming from the left side so the shadow is on the right side of the face. Draw a "J" shape. Noses in profile are a little more detailed, but still very simple. For the most part, they are curved "J" shapes plac...
Adobe After Affects is a great piece of software that allows you to make movie quality videos with great design and beautiful picture. If you want to know how to construct three dimensional objects, take a few minutes and watch this video! It takes you through simple, easy-to-follow steps on how to make three dimensional shapes and objects! It takes only 3 minutes to learn how, then you will be designing your own 3D things in seconds using After Effects! Make sure to listen closely. You need ...
Working on the inside requires great cardiovascular training, be prepared to train hard. These shots are effective against people who do not know how to defend themselves on the inside. If you are up against someone who is very smart at shots it is essential to know how to defend yourself from the inside. This is very basic and easy. Stand in basic boxing position: hands up, tucked in, not panicking, using the strength of your arms. It is pretty easy, you are in good shape if you can counter ...
Egg Bram teaches you how to create a cut text effect in Xara Extreme. Create a simple colored rectangle and add some text on top. Then select these two objects and go to Arrange - Combine Shapes - Subtract Shapes. Now the two objects have combined into one. Although the text appears to be white now, if you move another object underneath you will notice that the text is transparent. You can also add effects to this new objects, like a contour or a shadow.
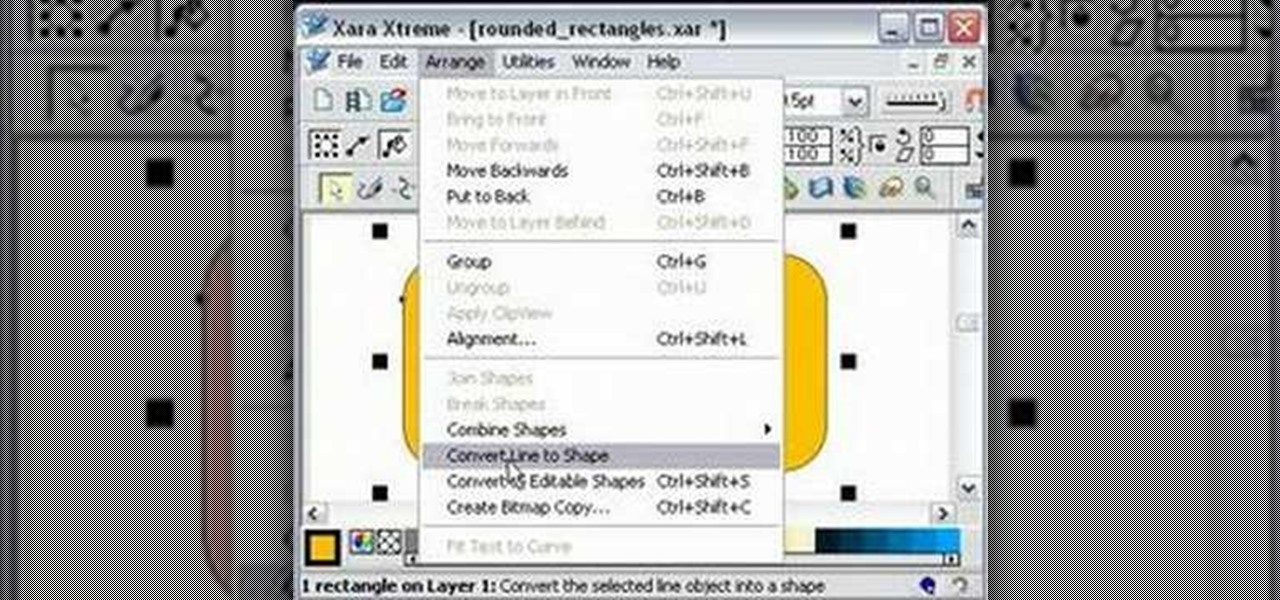
One must have often wondered how to create rectangles with smooth rounded corners. Open Xara Xtreme and create a rectangle on the stage. To change it to rounded corners, click on 'curved corners'. Then one can edit how much curve is required on the rectangle. If we scale the rectangle, then it will lose the curve path. So it should be converted to 'editable shapes'. This will maintain the curves, even if scaled from one angle. This will be helpful to create those party fliers.
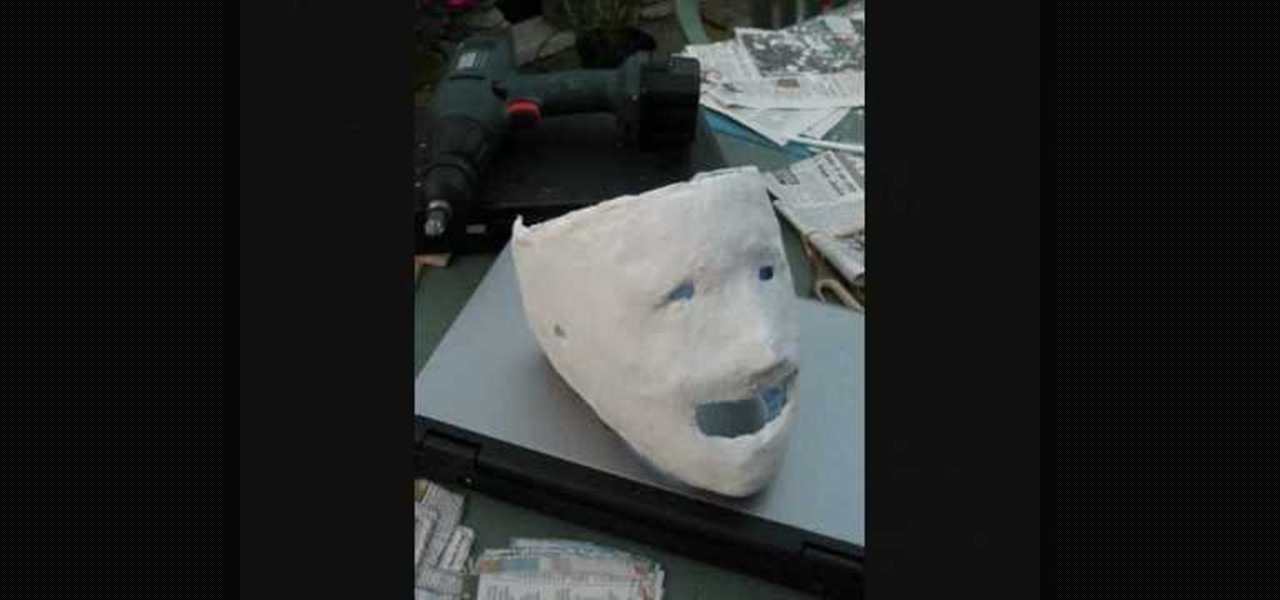
Will Wilks and Tom Couch demonstrate how to make a SlipKnot mask. You will need tights, newspaper, plaster of paris, paint and shaping tools such as knives. First, put the tights on your face. Then rip the newspaper into strips and have a friend apply it to your face with the plaster of paris. Wait for it to dry and then cut off the back of the tights to remove the mask from your face. Keep drying the mask overnight. Next, shape the mask to the desired form. You can use more plaster of paris....
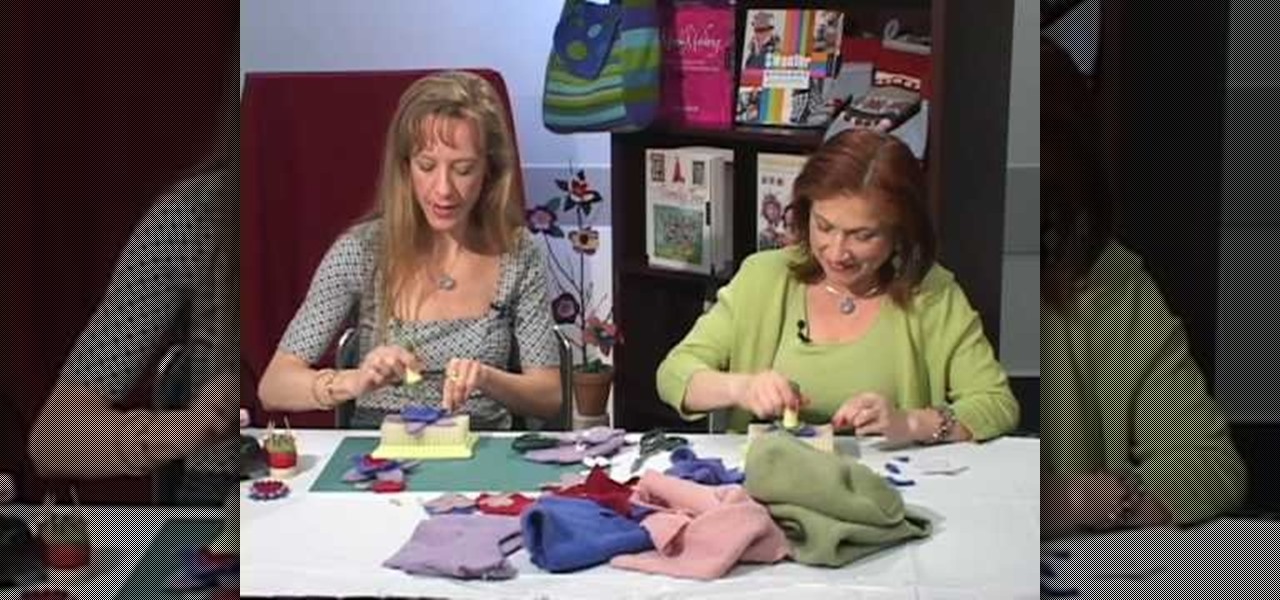
This video is basically about how to make felted flowers with Craftside. For making felted flower things we will need are assorted felt, assorted rhinestones (any size), embroidery floss (any color), a needle, some tacky glue and a pair of scissors. First of all cut out the shape of the flowers from the felt using the scissors. Try experimenting with different shapes and sizes for variety. Then stitch the detail on the petals using the embroidery floss. Use the backstitch for this; then glue ...
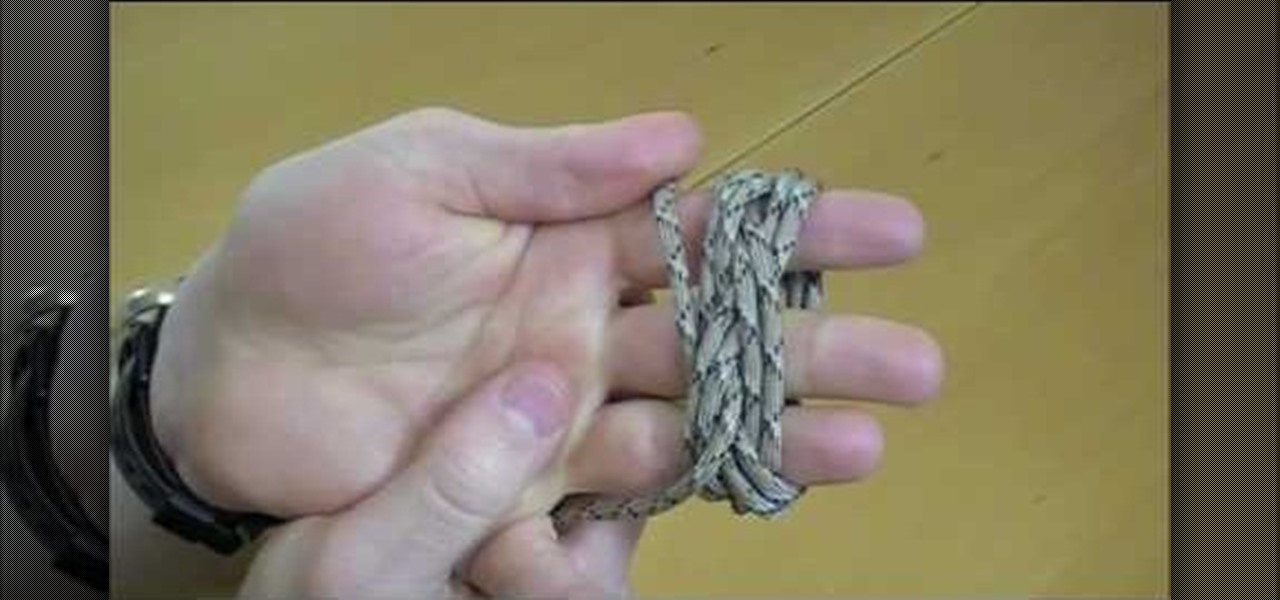
There are many different types of knots and each has its own purposes. This video of "Knot of the Week" features the Turk's Head knot. The video explains and demonstrates each step in tying this knot. This knot is generally used to tie around an object of cylinder shape, but it can be deformed for other shapes. By the end of this video, if the viewers follow the instructions correctly, they should be able to tie their very own Turk's Head knot.
Most paper snowflakes are not representative of the proper 6-sided shape of snowflakes. This tutorial will show you a method which will allow you to make a beautiful and symmetrical realistic six sided paper snowflake. You will need to start with a square piece of paper, which you will then fold over diagonally to make a triangle shape. Taking the inner edge towards yourself, you will then need to fold the paper over into thirds and cut off the excess on an angle. After this, proceed as you w...
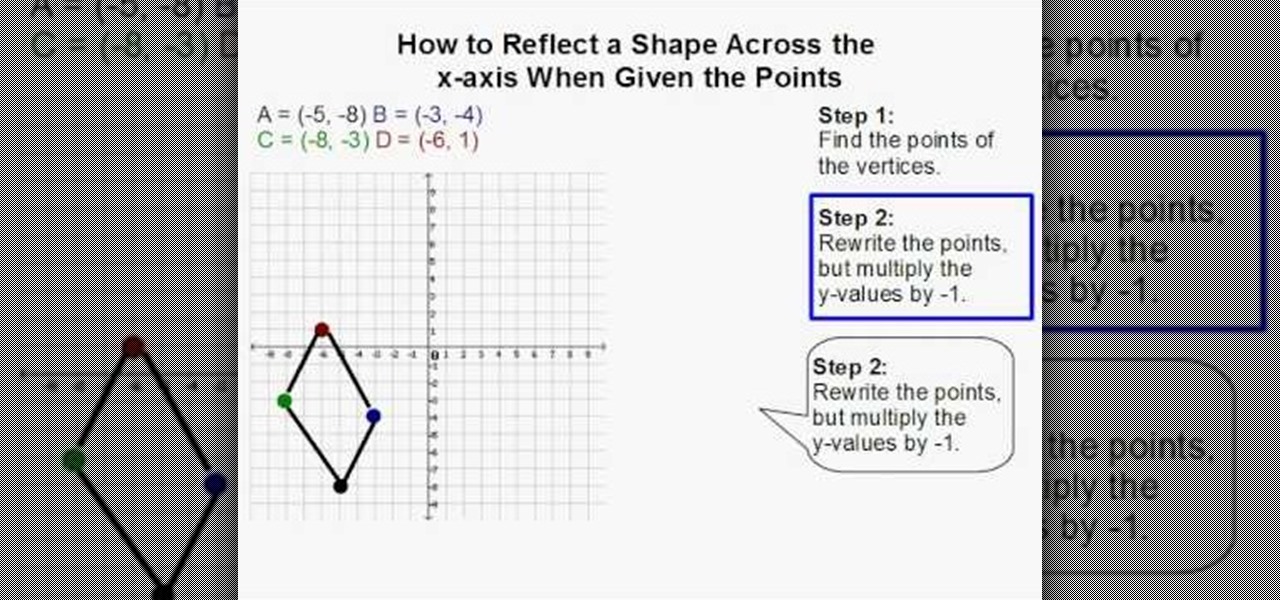
Watch this video to learn how to reflect a shape across the x-axis.
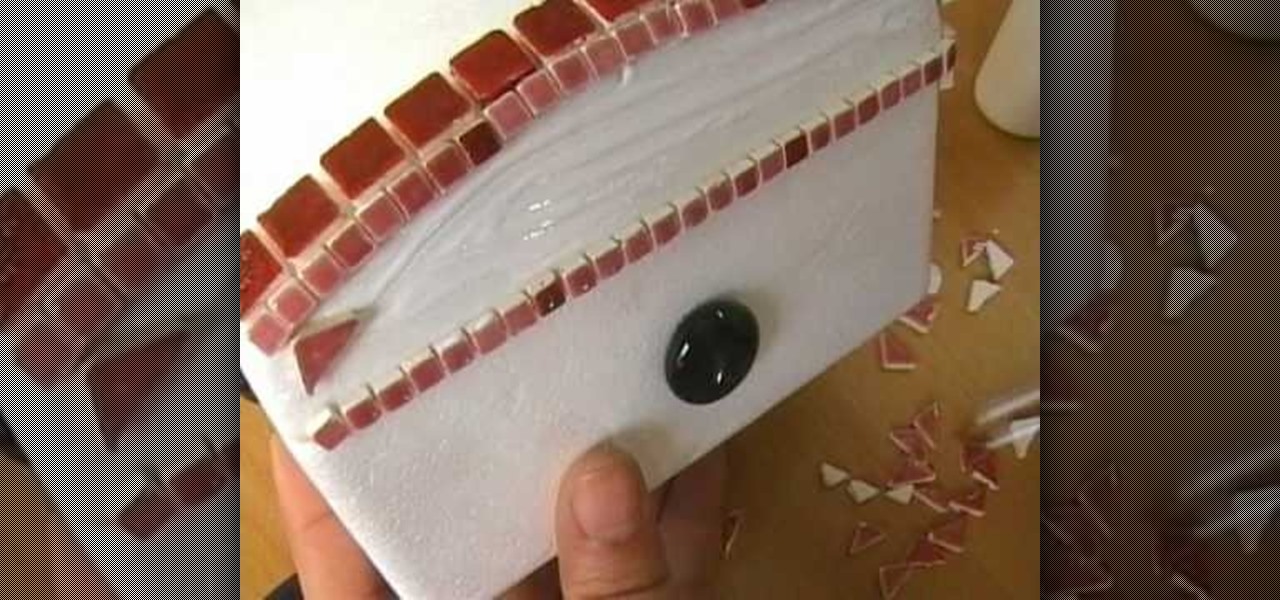
This video demonstrates making a mosaic jewelry box. A plain jewelry box is decorated using different shaped pieces of glass. First, round flat glass pieces are glued in the center of the top and sides. Then a ring of glue is put around the circle and rectangular pieces are glued around that. Square tiles are used around the top edge, and odd shaped pieces are used to fill in the rest of the surface area of the box. After it has dried for two hours, a glaze is applied to the entire box. This ...