"Harajuku" might sound slightly familiar to you - Gwen Stefani used the word to name her "Harajuku Girls" fashion and perfume line. But other than the cutesy little Japanese dancers she had during her tour and lots of bright clothing and makeup, what is a Harajuku girl exactly?
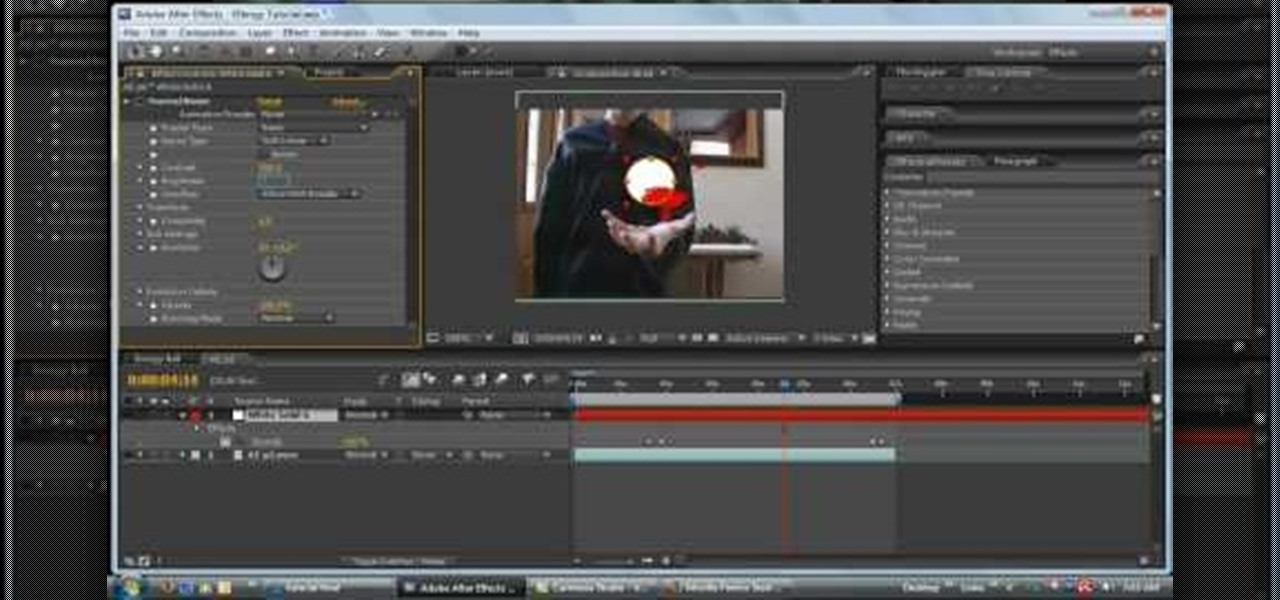
In this tutorial, we learn how to make an energy ball in Adobe After Effects. First, load a movie of someone pretending to hold an energy ball in their hands. After you do this, you will select a new setting and change the color. From here, you will select a round circle tool and add it where the hand looks like it's holding it. Then, change the effect to make the ball move around with the hand. After this, add the tracker to the hand and position it with the hand. After this, change the cont...
In this tutorial, we learn how to make a birthday cake in the shape of a purse. First, bake two round cakes and place them in the fridge. After this, cut off the edge of both the cakes that are the same size. Then, take some frosting and spread it onto the cake to adhere both together. Now, push the cakes together and have them stand up straight. Use the other pieces to make a mini cake and frost both cakes all over. Then, smooth out the frosting all over the surface. Now you can start to dec...

In this tutorial, we learn how to make your own high waisted skirt. First, you will need to sew the skirt on the sides. After this, you will need to cut some additional fabric that is the same color. Then, you will need to sew the waist of the skirt onto the skirt on the top. Once you have sewed this so there are no frays on the side or on the top, you can wear it! Make sure the fabric is all the same size all the way around. When finished, enjoy wearing this with a simple tank top or dress s...

In this tutorial, we learn how to make stencils in GIMP. Start with heads or faces if you are new to this. Then, use the rectangle tool to select the head. Then, go to image and fir canvas to selection. Now, remove the background by using the background tool. Once finished, go to colors, then threshold. The image should turn black and white. Turn the dial to the right, then turn it to the left to make it lighter and darker. Find the spot to where it shows detail but it's not distorted, then h...
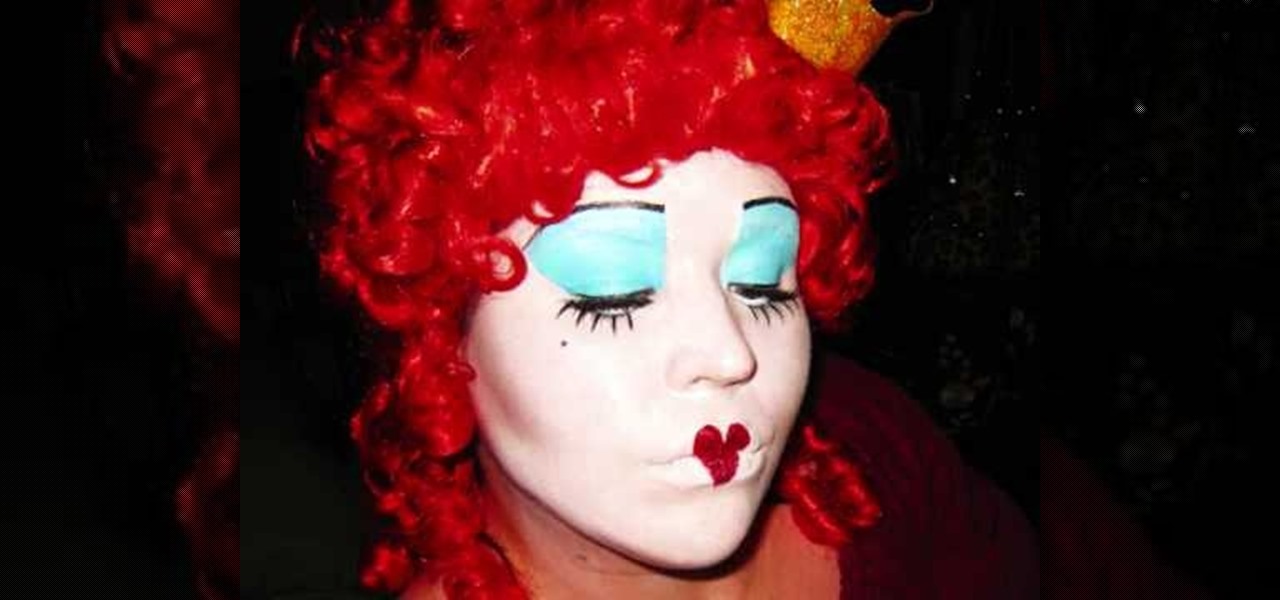
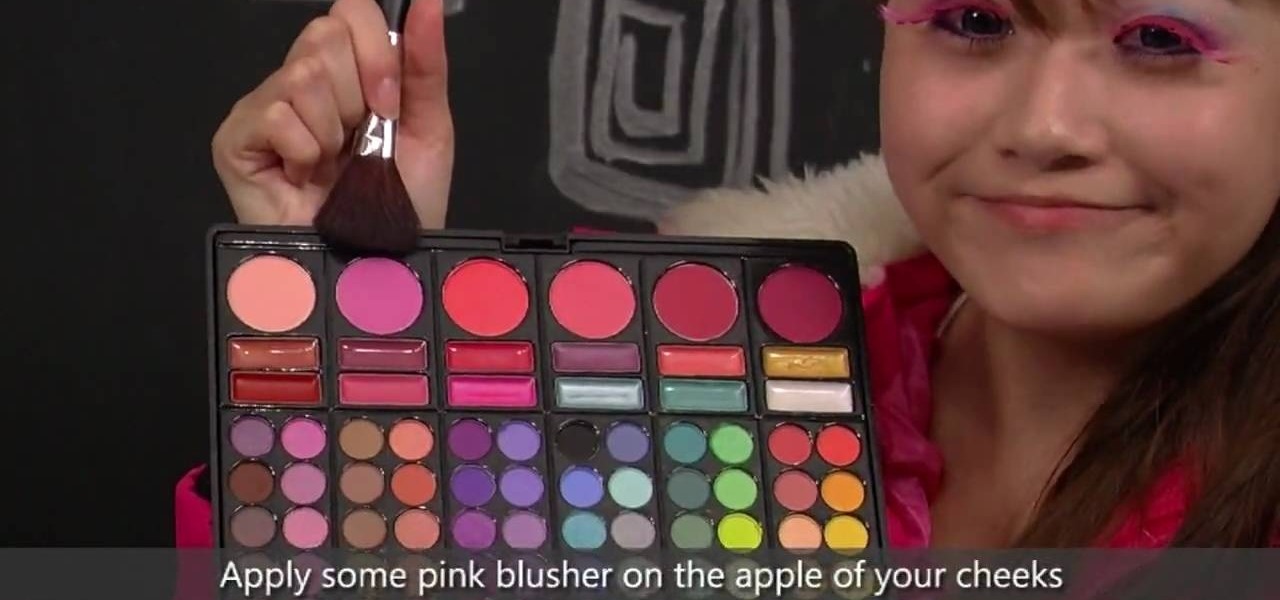
In this video we learn how to create Alice in Wonderland's Queen of Hearts makeup. First, color the face white with paint and then apply blue eyeshadow to both of the eyes going up and over the eyebrows. Paint in black where the blue stops to create a new brow at the top of the head. Then, draw on a red hear to your lips and apply glitter over it. After this, apply false lashes to the top of the eyes and on the bottom. Then, apply eyeliners and blush to the cheekbones. When finished, go out a...

In this tutorial, we learn how to create a double winged eyeliner look with Kim K. First, you will need to apply a medium toner color to your eye, then apply a brown to the crease and other edge. From here, use an eyeliner brush to apply liner at the lash line all the way in. Create the winged effect by dragging out the liner brush while it's damp. Apply liner on the bottom of the eye, then smear it with your finger. Use a smaller brush to create the wing from the bottom of the eye going up u...
In this video we learn how to apply a black & white masquerade mask with makeup. Start off by drawing on a white mask around your face with white eyeliner, filling it in. Then, apply white shadow over this to make it a matte finish. From here, draw lines coming out of the mask with the white eyeliner all around the mask. Color in around the lines with black and then blend them out gently towards the outer area of the face. Then, define the inner mask with black eyeshadow and apply false lashe...
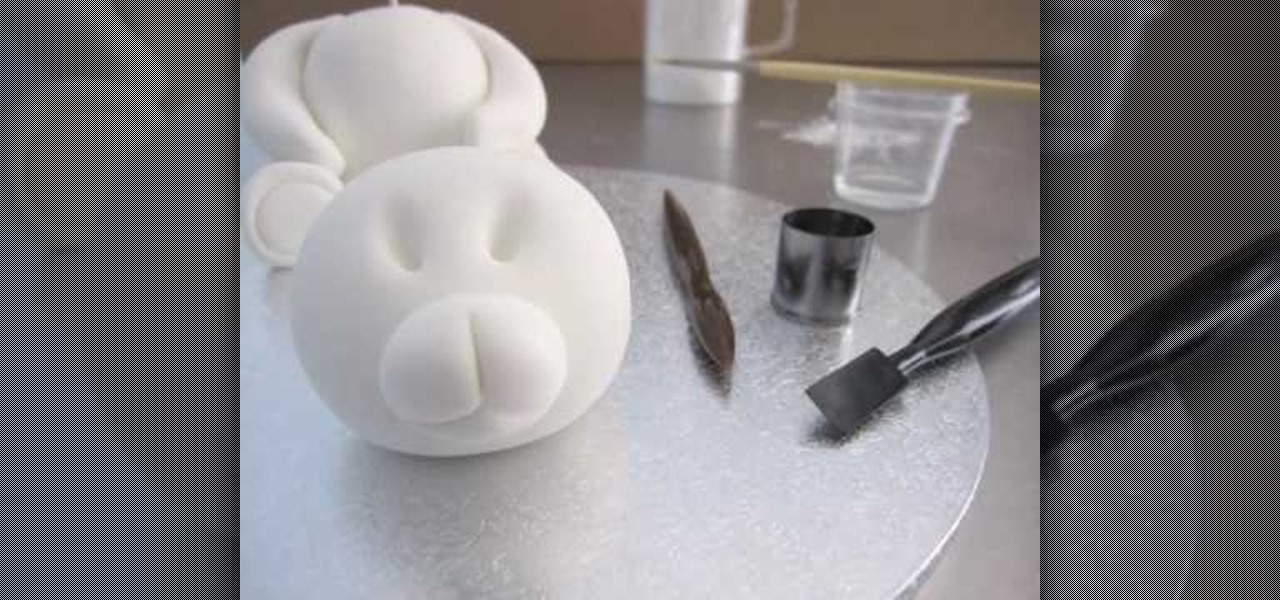
This little bear will look irresistably adorable wherever you happen to place him. Whether he's on a children's birthday cake or he's miniaturized for cupcakes, the fuzzy white bear will charm all.
In this video, we learn how to make a balloon basket. This will be a square anti-prism made of white balloons and pink balloons. But, you can change the color if you would like. Start out by creating large and small bubbles inside the first balloon. Then, tie this with the other balloon and connect them both together. After this, you will have the bottom of the basket. Create a bunch of bubbles connecting both of these and attach it to other bubbled balloons to create a large top above the ba...
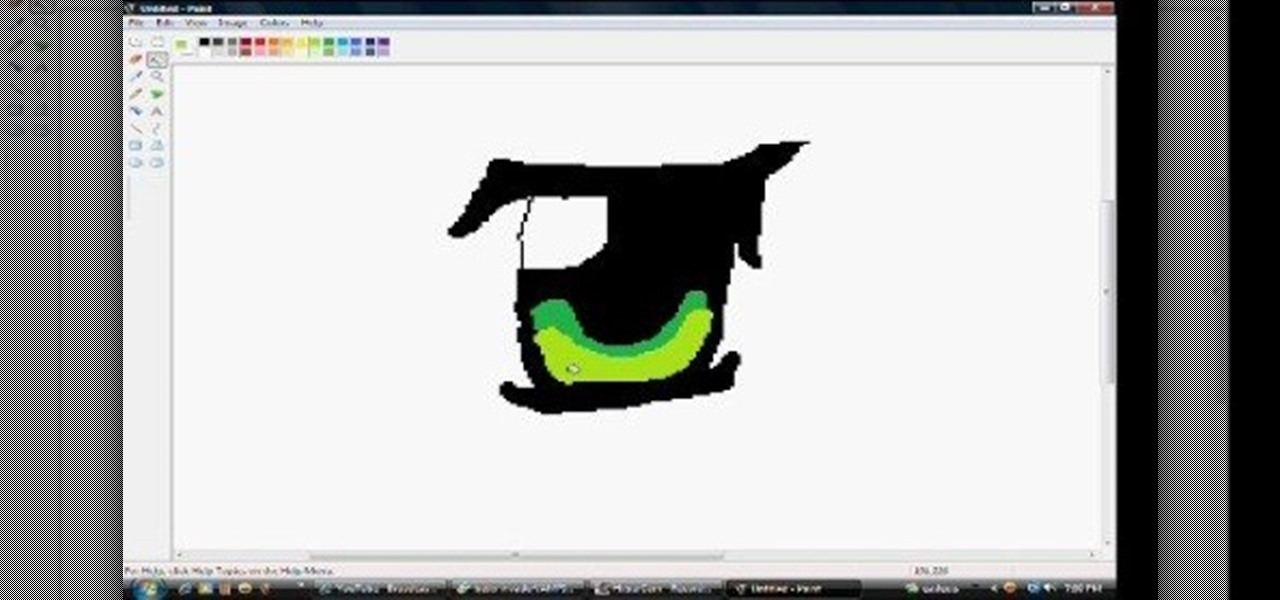
In this tutorial, we learn how to draw anime eyes in MS Paint. First, open up MS Paint and then grab a marker that is thick. From here, draw in a thick line that will be the top of the eye. Then, draw in the round area underneath the eye and the pupil inside of this. Draw in the bottom lash line of the eye, then start to add detail to the middle of the eye. Use the dark line to create a thicker line around the pupil, then fill the eye in with black. Leave a white part to make the eye look glo...
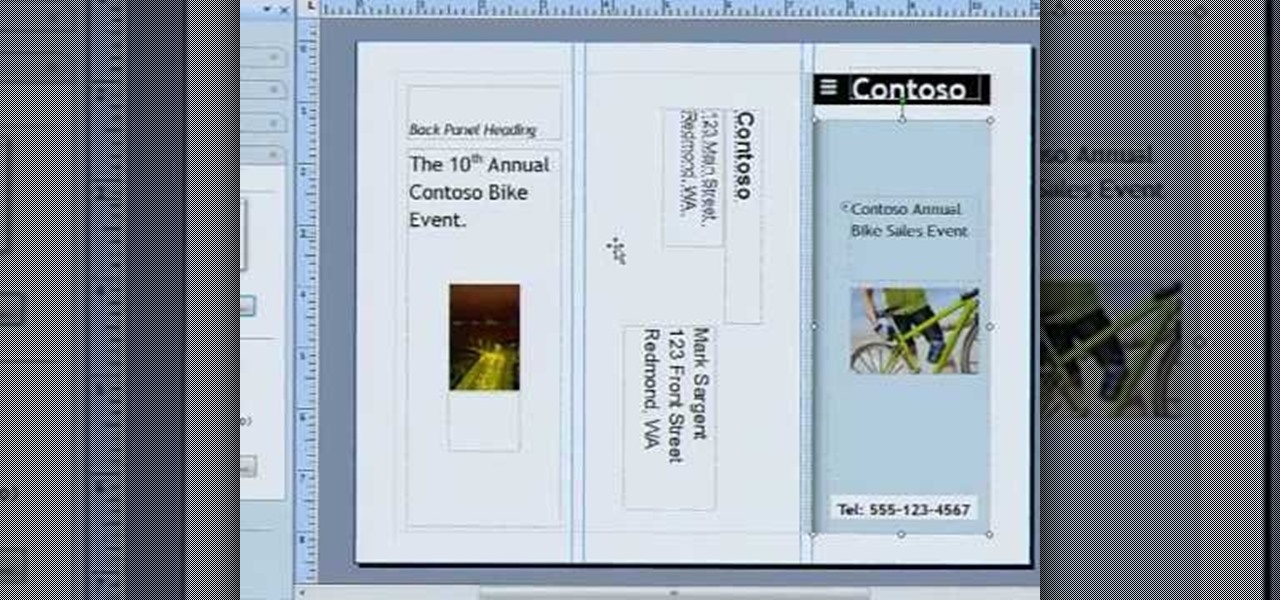
In this video, we learn how to create a brochure with Microsoft Publisher 2007. A brochure says a lot about your business, and you can make them yourself easily! Find the brochure templates first in the program. Choose a design and a color scheme along with the page size, font, and information you want to include. Once you do this, add in pictures and images to your template after clicking "create". Then, you can create a range of publications that adapt to different form functions. Click the...
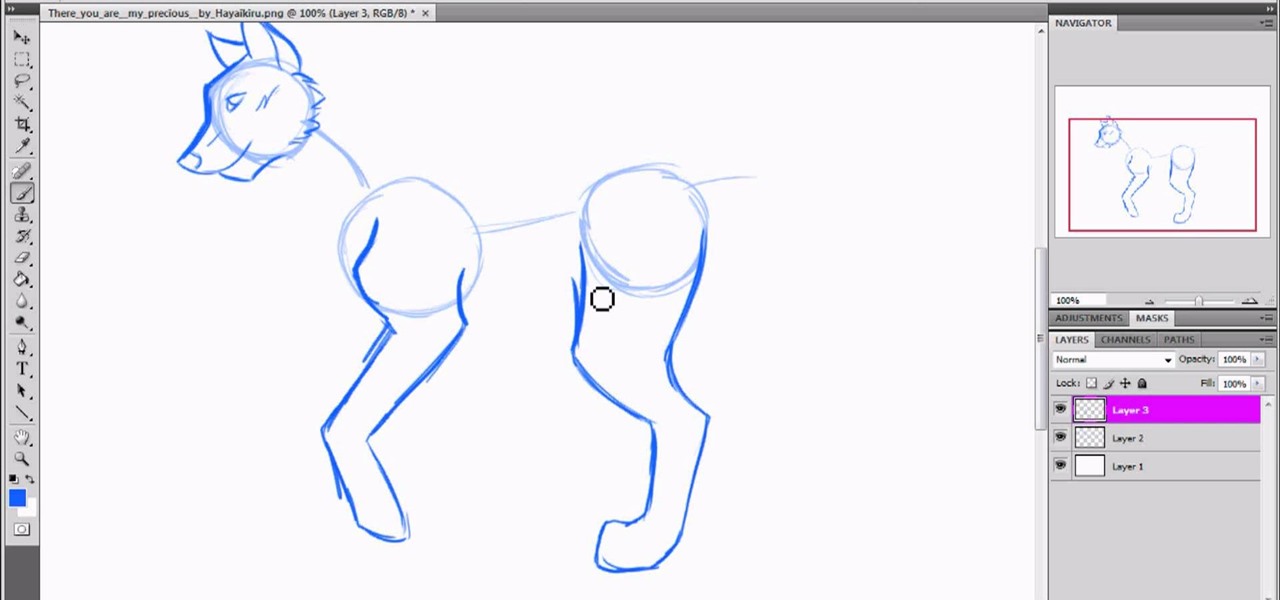
In this tutorial, we learn how to draw a wolf with basic guidelines. First, draw in circles from where the main sections of the wolf is. Now, draw a line connecting all of these and draw in the details of the face. Now, draw the back legs starting with the front leg and then the back leg. After this, draw in the stomach and the main part of the body. Erase the circles and background lines, then draw in the hair of the wolf and the stomach. Create a tail on the back, then add in the ears and t...
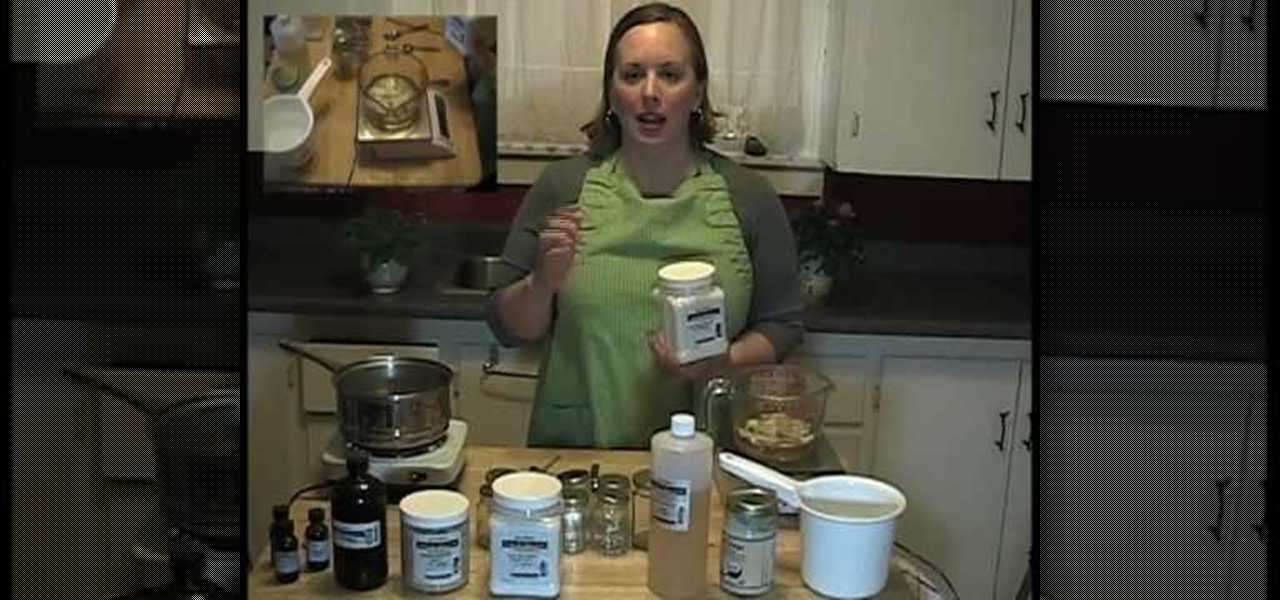
In this tutorial, we learn how to make whipped body butter. Making your own body butter can save you a lot of money versus paying for it at the store, and you can completely customize it! First, you will need to heat up generic body butter that has no smell to it. You will heat this up with some water and oils that have your favorite scent to them. Heat this over low heat in a glass container to prevent it from burning. Then, you will add in any colors that you would like to make it look diff...
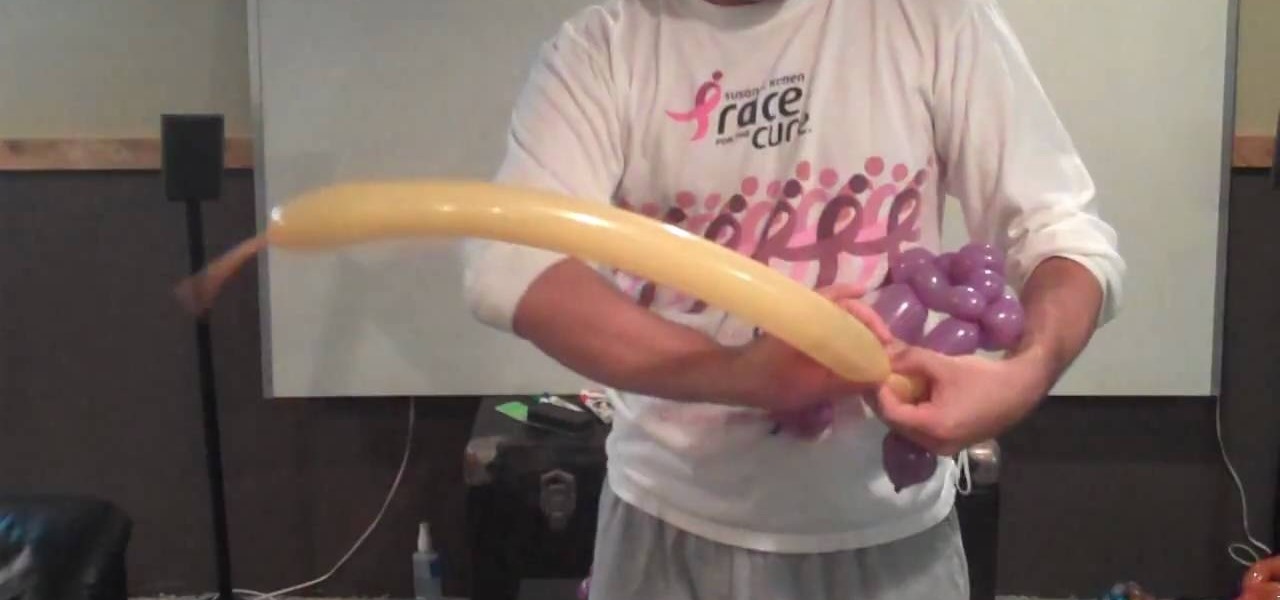
In this video we learn how to make a balloon monster truck. If you're new to creating balloon creatures, this may be a bit difficult for you so follow along. Start out with a tan colored balloon and a purple balloon. Twist these together to start creating the truck. You will be twisting many bubbles into both of the balloons so you need to make sure you keep space in the balloon for air. Once you finish this, you will twist four more brown balloons into circles on the sides to make the tires....
In this video we learn how to create advanced shadows in GIMP. First, create a new image that's 500x400. After this, create different layers on the page and use the shadow and gradient to create different colors. As you do this, you can you can add in a layer mask to create a deeper shadow inside the image. Use a larger brush to make the shadowing fuzzy and then use the shape tool to drag it out and make it larger. Practice playing with the different brushes and gradients and have fun creatin...
In this tutorial, we learn how to apply red eyeshadow with glitter eyeliner for a party. Start by applying a red shadow all over the eye, out into the outer corner of your eyes. Next, add a black color to the outer edge of the eye and blend in with the red in the crease of the eye so there are no hard edges. From here, apply a pink and white shadow underneath the eyebrow to create a highlight. Next, you will take a glitter eyeliner and apply it to your upper lash line, then take a small brush...
In this tutorial, we learn how to draw a fairly realistic eye. Start with a pen and draw a wispy line for the eye, like a football shape. Then, you will draw the pupil inside the eyes and the ring around it. Draw in lines around the pupil and the eye to show where the colors and shades of the eye come into play. Then, shade in the entire eye lightly. From here, darken up the upper lash and create a create on the eye. Then, make the eyelid crease on the bottom of the eye and add in the inner c...
In this video, we learn how to make an easy paper rose. First, punch out three flowers with a paper punch from your favorite color of paper. Then, add contact ink to the edges of the flowers along the petals. Next, you will cut out two of the petals from the flowers and then glue half of the leftover scraps. Make this into a cone and then do this on the other pieces of flowers. Bend out the petals and curl them, then glue all of the petals together. Once finished, add on a green stem and then...
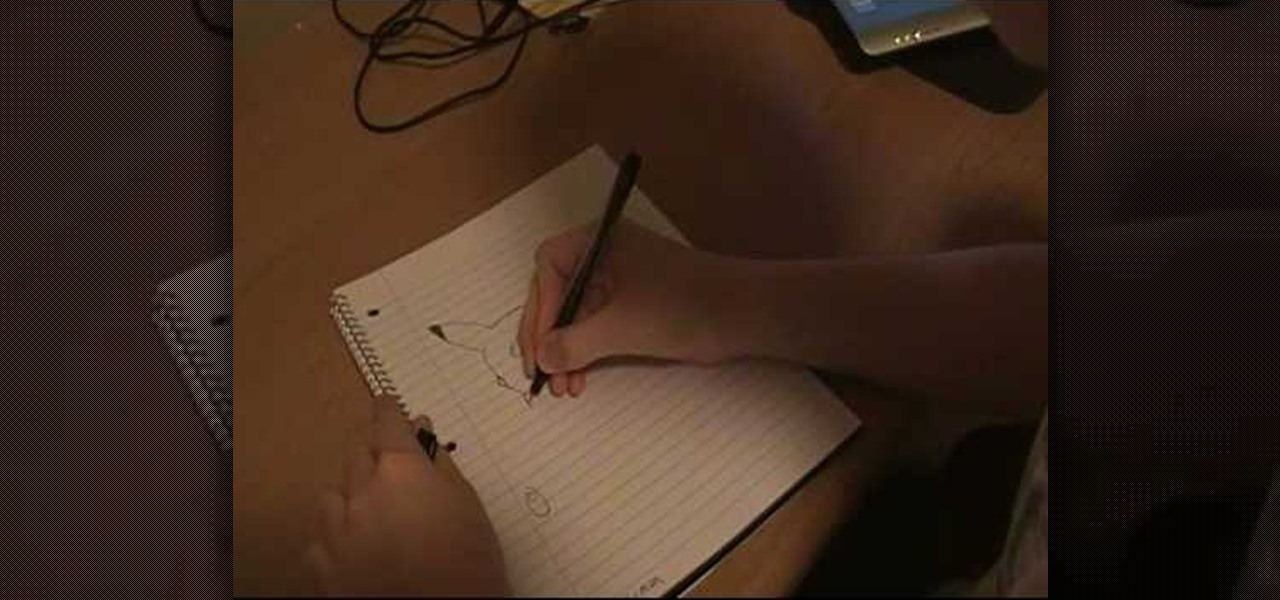
In this video we learn how to draw Pikachu from Pokemon. First, draw the ears and the top of the head. After this, create the sides of the head and color in the tops of the ears. Draw in circles for the eyes and then draw in the nose, cheeks, and smile. Continue on to draw the rest of the body and the details of the chin of the character. Add in the details for the side of the body and then add in shading and body lines wherever possible. When you are finished, share this with others and be a...
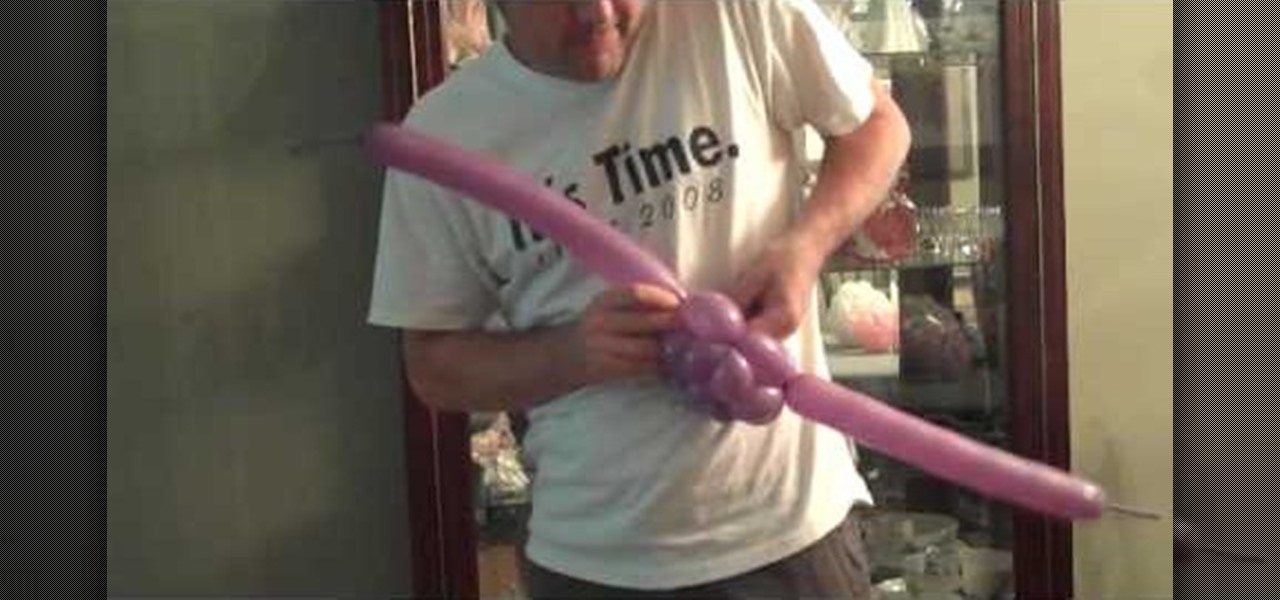
In this video, we learn how to make an Oscar award out of balloons. First, you will need to grab some gold colored balloons and have a slight idea on how to make balloon animals since this is an intermediate practice. To make this Oscar award, you will need a total of 260 balloons. Start out by making the base of the balloon and then work your way into baking the middle and the top. As you go, you will need to twist many of the balloon into each other and learn the techniques for blowing thes...
In this video we learn how to make a decorative paper rose. First, take a piece of paper and cut several heart shapes out of it, making them different sizes. Once these are cut out, curl the edge over with a toothpick, pencil, or by hand. Set these aside, then use a grab a green sheet of paper. Roll the edge of the paper up and then cut the rest of the paper from it. Create a leaf in this and then tape it all around. Now, twist this tightly and place the curled ends of the heart shapes away f...
In this tutorial, we learn how to make a small recipe card box. First, you will need to grab any color of card stock that is 8.5" by 11". You will also need a scoring tool, scissors and adhesive. After this, you will need to score your card stock in all the different areas to make the correct measurements. When finished, fold up the box using the score lines to fold along the sides. Then, take another piece of card stock and score it to use and folds inside of the box to separate different se...
In this tutorial, we learn how to make a simple spiky pi–ata. First, you will need to blow up a balloon and grab some pieces of newspaper. After this, cut out pieces of the newspaper then use paste to stick them onto the balloon. Make a thick wall of this newspaper throughout the entire balloon. After this, add the spiky parts of the pi–ata and then allow it to dry. Once finished, paint the entire pi–ata the colors you would like. When the paint is done drying, fill the pi–ata with candy and ...
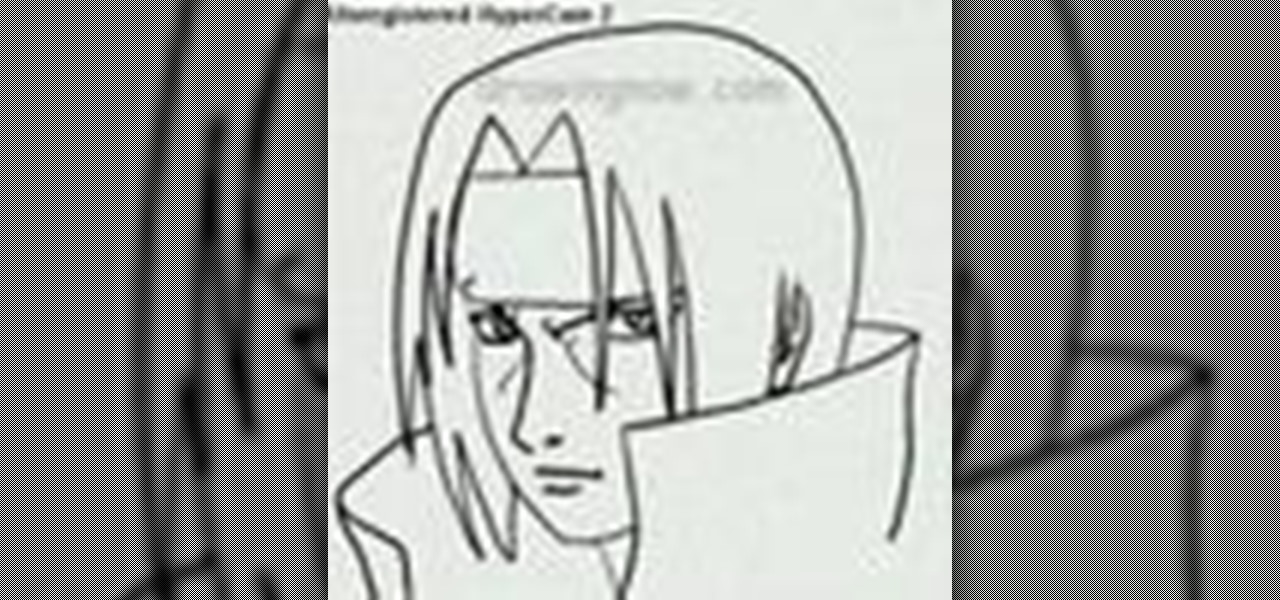
In this tutorial, we learn how to draw Orochimaru. Start with drawing a circle for the head, then draw lines crossing the circle to use as a measurement of where the features of the face will be. After this, draw in the eyes, nose, nostrils, mouth, and eyebrows. Next, draw in the neck and the shoulders for the body. Once finished with this, draw in the hair surrounding the face, then erase the back lines from the drawing because you won't need them any longer. To finish, add in details to the...
In this tutorial, we learn how to draw manga bodies. Start out by drawing circles for the body. These circles will start at the head, then go to the shoulders, arms, stomach, hips, knees, and ankles. After you do this, draw lines to connect them all together and make out the basic shape of the body. Now star to use a bolder line to create the realistic outline of the body. When you're finished with this, you will be able to do the fun part. You can fill in these spaces with color and lines to...
In this tutorial, we learn how to draw Sango and Kilala. Start out by drawing a circle and reference lines for the head, then draw a stick for the body and draw a half circle going off the bottom of the page. Then, draw circles on the upper body to create the hands and draw fingers coming off of those. Now, draw in the neck and the clothing that is on the character. Erase the background lines, then all in the features of the face and the hair around the head. Also make sure to draw on the ear...
In this tutorial, we learn how to optimize a PDF document in Adobe Acrobat 9 Pro. This will adjust the size of the PDF to better adjust your need and work flow. Fire, go to file and then go to properties, then you will be able to see what size the file is. If you would like to change this, go to the PDF Optimizer, which has an "audit space usage" button. From here, you can change the compatibility level and also change the compression and the color bitmap resolution. After you are done editin...
In this tutorial, we learn how to draw Electivire from PokŽmon. Start out with a very sharp pencil and lightly draw the outline of the body of the character. After this, use a firmer hand to draw a darker line on the outline of the body, then start to add in details of the face and the rest of the character. Next, draw the details on the body to give it more of a personality and make it look more realistic. Continue to draw on the rest of the body parts, using lines and shading where appropri...
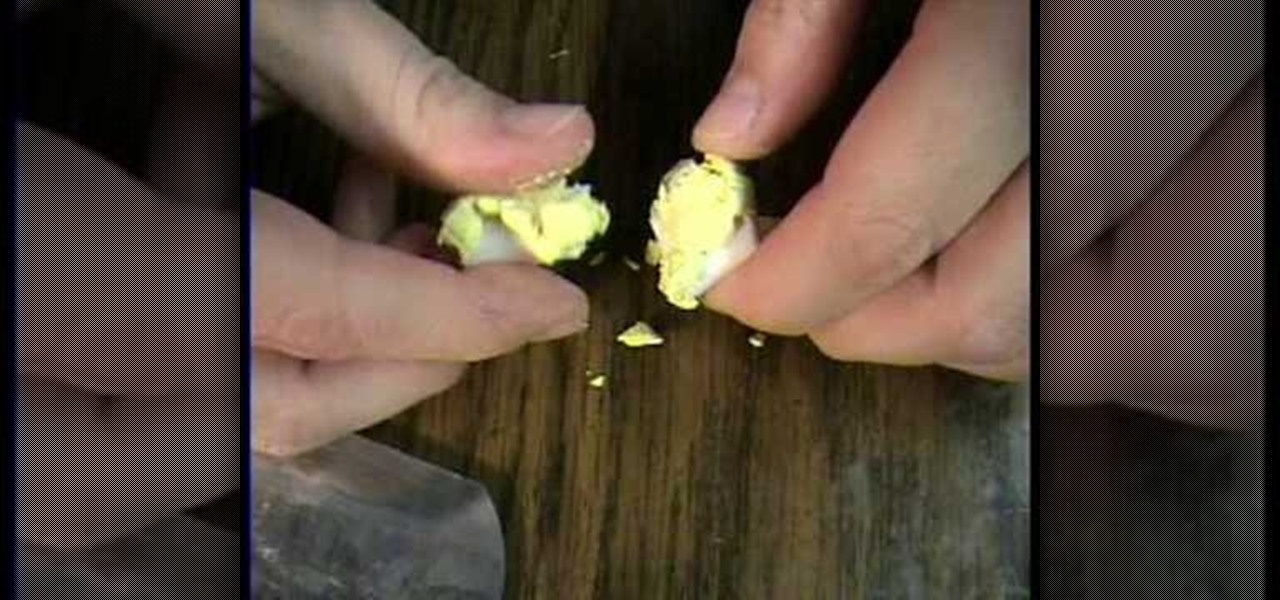
In this tutorial, we learn how to make rock candy with ease. First, add 2 cups of pure sugar to boiling water. After this, stir in flavoring and food coloring then stir the mixture until it's thick. After this, remove from heat and let it cool. Then, pour in cooled water to the mixture and dip a skewer into the mixture, then roll around in sugar and place back into the jar using a paperclip to hold it on the top. You should see rock candy form in around 2-3 hours. Let the skewer sit for longe...
In this tutorial, we learn how to draw Itachi. First, draw your reference lines on the head so you know where to place the features of the face. Draw in the eyes, adjusting them so they are more towards the left of the face than the right. After this, draw in the bridge of the nose and the nose, as well as features of the cheeks. Next, draw in the nostrils and the mouth, as well as eyebrows and creases around the eyes. After this, draw in ears on the side of the head, then start to draw in th...
This video tutorial is in the Fine Art category which will show you how to fashion a wallet from duct tape. For this you will need an X-acto knife, duct tape of any color and a tape measure. Rip off a piece of tape about 10 inches long and place it sticky side up. Rip off another piece of same length and place it on the 1st piece face down but, covering only half of the tape as shown in the video. Fold down the 1st piece on top of the 2nd so that you will have only one half piece of sticky ex...
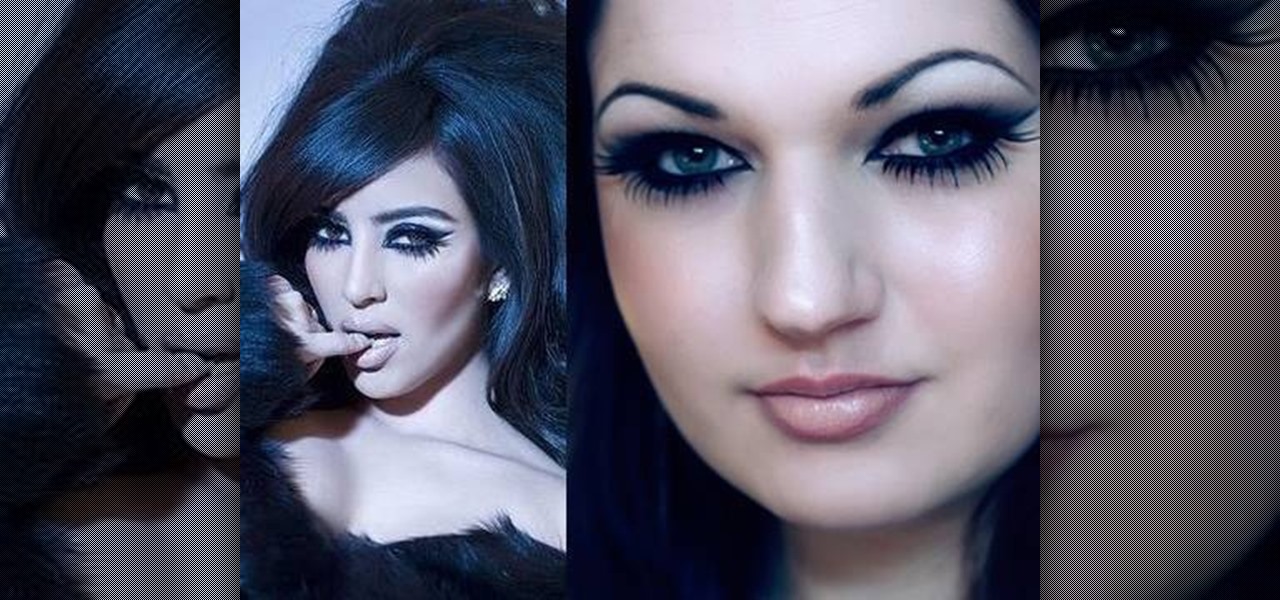
In this tutorial, we learn how to create a Kim Kardashian-inspired cat eye makeup look. Start by using a nude color eyeshadow on the eyes and tape to create an edge on the outer corner of the eye. After you do this, apply a white shadow underneath the eyebrows to create a highlight. Now, take a gray eyeshadow and apply it to the entire eye up until you reach the crease. Blend this out to the corner of the eye. Then, take a thick black eyeliner and apply it to the upper eye, creating a cat eye...
In this tutorial, we learn how to draw a basic dragon. Start off by drawing the head of the dragon, then draw the neck and the rest of the body in a simple outline. Use circles throughout the body of the character to create a large body that looks realistic. Next, draw in details of the body of the character and the fur that is on the outside of it as well. Draw in the claws on the feet and the lines along the body to create a more realistic look. As you continue, erase any background lines a...
In this tutorial, we learn how to draw Ino Yamanaka. Start off by drawing the head, drawing lines in the center to use as reference points. After this, draw the rest of the body, including the hands, torso, and neck. Now start to draw in all of the details. Draw the eyes evenly apart, then add in frown lines, a mouth, eyebrows, and any other details of the face to make it complete. Next, start to erase the reference lines and draw in the hair of the character. Draw around your basic outline t...
In this tutorial, we learn how to draw Johnny. Start off by drawing Johnny's head, then draw a stick for his body, arms, and legs. Once finished, draw an outline over this body to create the shape. Next, draw in the hair for him and then draw his eyes in. Next, draw in the hands and arms, then a knife in his hand as well. Erase any background lines that you have drawn, then shadow and add more lines to the entire drawing. Once you have done this, add in his eyebrows and any other details to f...
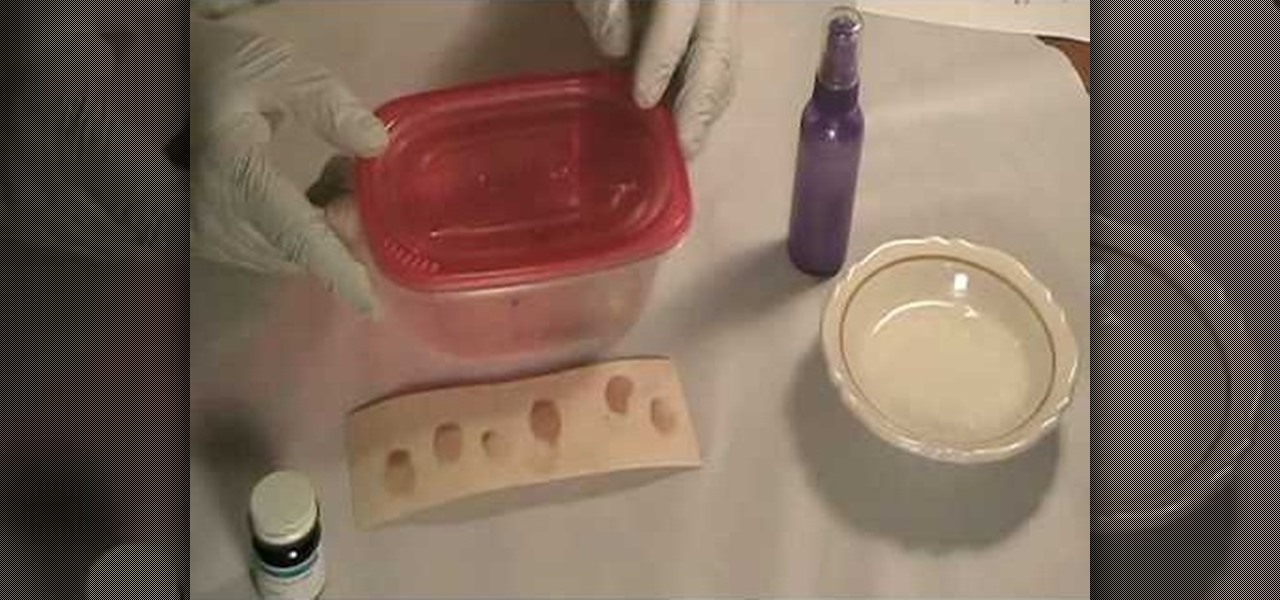
In this tutorial, we learn how to reveal latent fingerprints on paper & other surfaces. The item you will need to do this is crystal iodine and plastic sheeting to protect your work surface. Place your specimen into a plastic container with the iodine, then put the top on and let sit, placing your hand under to warm it up. Within a few minutes you will see a violet color vaporizing in the container. When finished, you will be able to take out your specimen and see the fingerprints that are al...
In this tutorial, we learn how to draw Rock Lee. First draw a circle for the head, making a chin underneath and using lines to reference where the facial features will go. After this, draw eyes that are slightly aligned to the left hand side of the face. The right eye should be larger than the left, both off center. Then, draw two dots for the nose and a "u" shape for the mouth. After this, draw a larger circle around the head and then draw in angry eyebrows above the eyes. Start to erase the...
In this video, we learn how to finish a crochet never ending granny square. There is a spiral effect happening in this, because there is no place that is stopping, it's going in a continual circle. To finish one of these, you will see that the corners should be perfect. But, you will need to choose one corner to finish it off at. Go across, then choose a side to stop at. Then, chain over and double crochet in. When you come across with another color, you can weave in the end so that you can't...
In this tutorial, we learn how to soften polymer clay. If you have crumbly clay and you want it to be soft, then you can make it softer easily. Now, take the clay and break it up into small pieces. Then mush this together with some translucent clay that is softer. Work this together with a jar or put it through a pasta machine. When you do this, it should be pretty soft and the air pockets should be removed. Continue to work the clay until it is all one color and it is really soft, then you c...