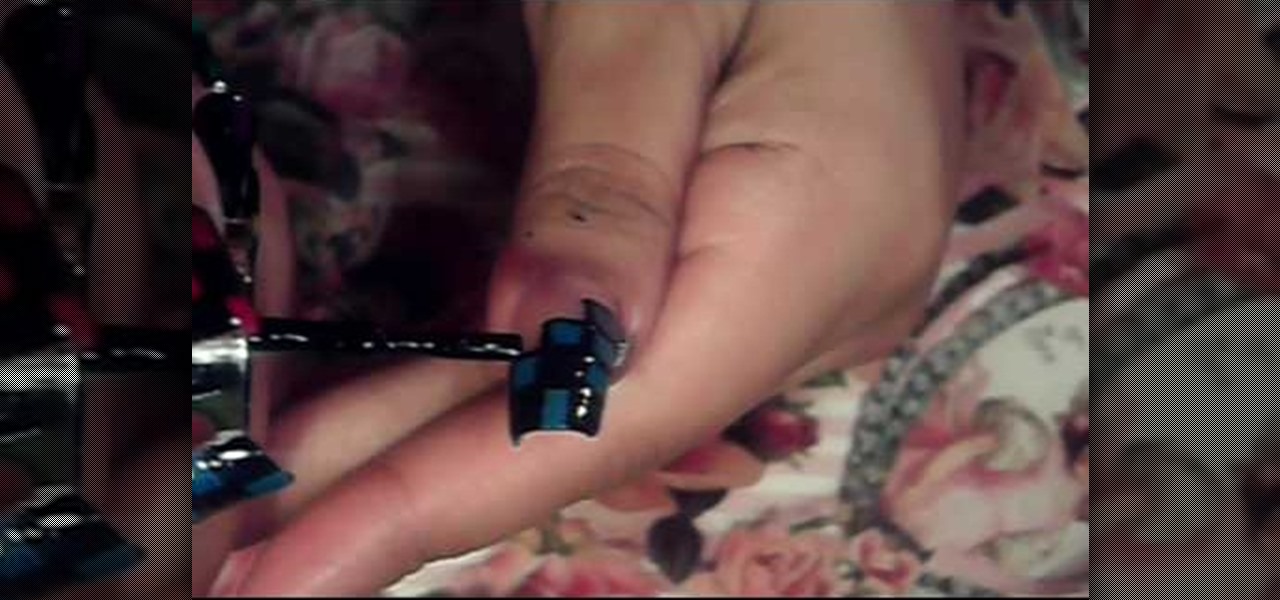
Love4Nails teaches how to paint your nails using green polish. Start by using a lighter color. In this case, she uses white. She then side swipes the nail using dark green. Start from a corner at the bottom of your nail and using a swirling motion paint to the top. Next, she uses nail art polish in black to outline the side of her nail that's been painted in green. Creating a "V" she outlines the other side of the nail. She then uses a gold striper polish inside the "V." Use dotting paper and...
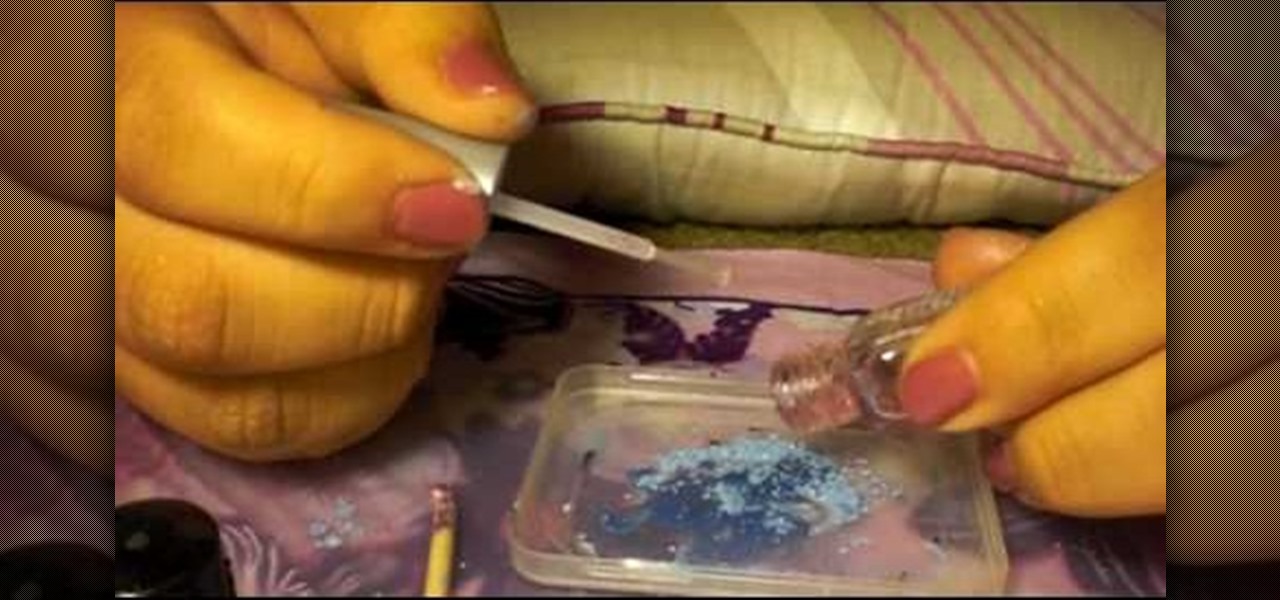
Try making your own nail polish with old eye shadow you don't use anymore or perhaps they are old and you don't want to throw them away.You will need a clear coat nail polish, pigments such as eye shadow or NYX pigments. Put a little pigment on a plastic lid and pour clear coat onto eye shadow. Use more clear coat than pigment. Mix thoroughly and brush on nails. If you like the color and want to keep it, take an index card and fold into a cone like shape. Put bottom of cone into the nail poli...

In this how-to video, you will learn how to draw Ned Flanders from The Simpsons. First, start off with the basic outline of the body. Use simple shapes for this. Next, fill in the eyes, hair, nose, mustache, ears, and mouth of the figure. From there, you can move on to the details of the clothing such as the collar and cuffs of the sweater. Finish with the shoes and the fingers on the hand. The basic outline is finished. Now, go in and erase the simple shapes from the drawing and fill in more...
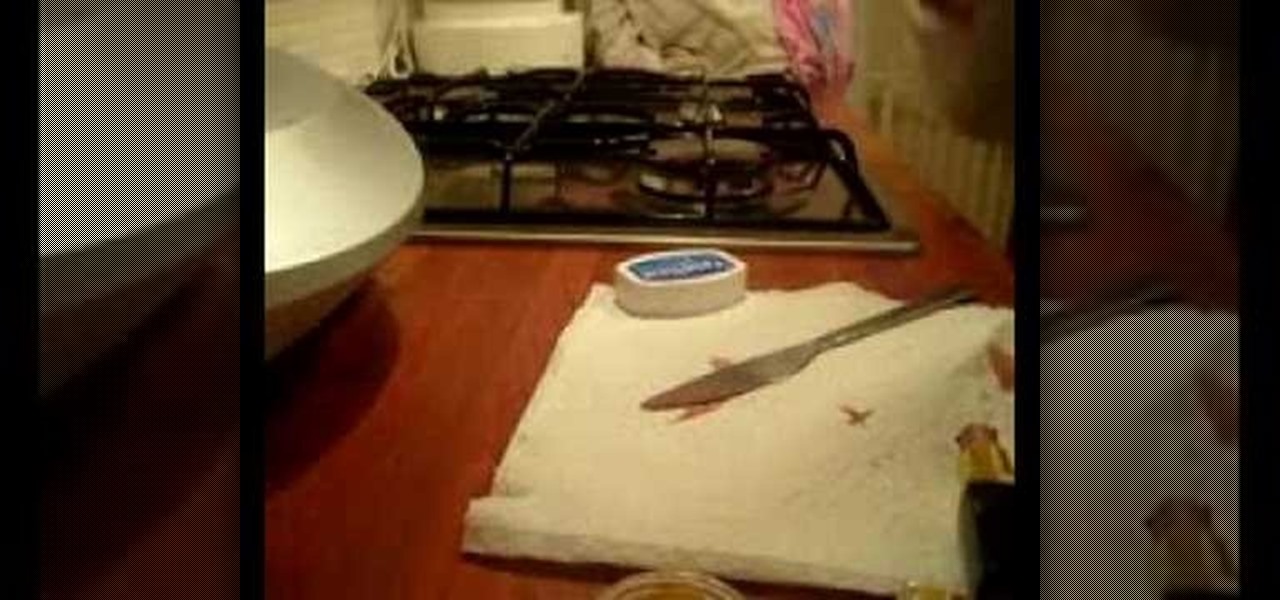
This video demonstrates how to make lip balm. For ingredients you need petroleum jelly and lipstick. For tools you need a large metal spoon, a teaspoon, a knife and a small jar. Take a couple of teaspoons of petroleum jelly on the large spoon. Cut off a bit of the lipstick and add it to the large spoon. Turn on a gas stove to the lowest setting. Hold the large spoonful of ingredients over the low flames. Use the knife to carefully mix the petroleum jelly and lipstick together in the spoon ove...
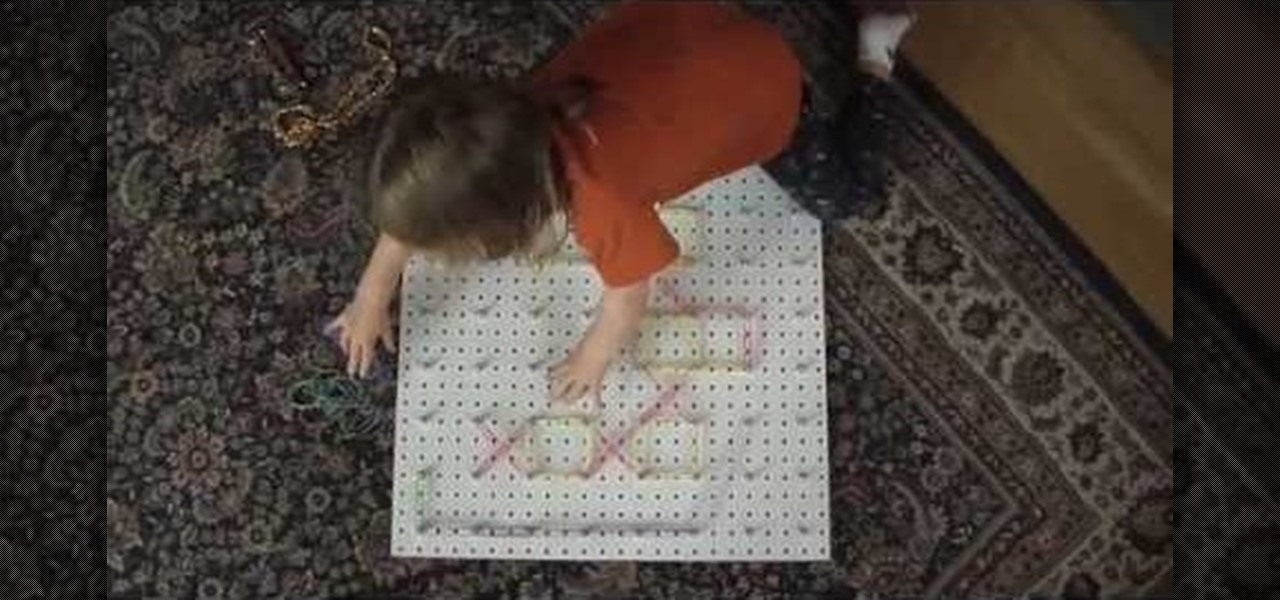
Geoboards are fun tools to teach your child the basic concepts of shapes and how they work in math; any kid would love a gigantic one! Firstly, you need to obtain a pegboard (what they hang merchandise on in hardware and similar stores). They usually come in 4x8' sheets, so you may need to ask an employee to cut one into fourths for you. The fourth piece should have 64 holes in 8 rows of 8, which means you need 64 nuts and bolts to make the board. Assembly is a no-brainer; you and your kids s...

In this how-to video, you will learn how to identify and control problems with Ash and Golden Rain Trees. If there are discolorations in the tree branch, there may be a few problems. If you see a severe orange color, this will damage the tree. You can paint the tree with a white paint to avoid this problem. Pruning cuts that have been executed poorly will also cause discoloration and rot. If the leaves have tip burn, this may mean that the air is dry and arid. If twigs on Junipers look dirty ...

In this video, Mr. G demonstrates how to draw a wintery snowflake. You will need a plain pencil, or a blue and black colored pencil for this drawing. Start by writing your name and the date on a white sheet of paper. Then, begin lightly drawing the base of your snowflake. After you have drawn your base, Mr. G will show you how to make the lines darker to form the shape of your snowflake. Then, you will learn how to detail your snowflake by drawing small triangles inside the basic shape that y...
This video is about how to paint your nails with a colorful checker art design. The first thing that you will have to do is to apply the hydrating base coat on your nail. After putting the hydrating base coat on your nail, get a piece of paper for you to place the black nail polish. After placing the black nail polish on the paper, use the dotting tool and place a series of zigzags on the nail. The next step is to fill in the zigzags depending on the color you want. After filling in, make a s...
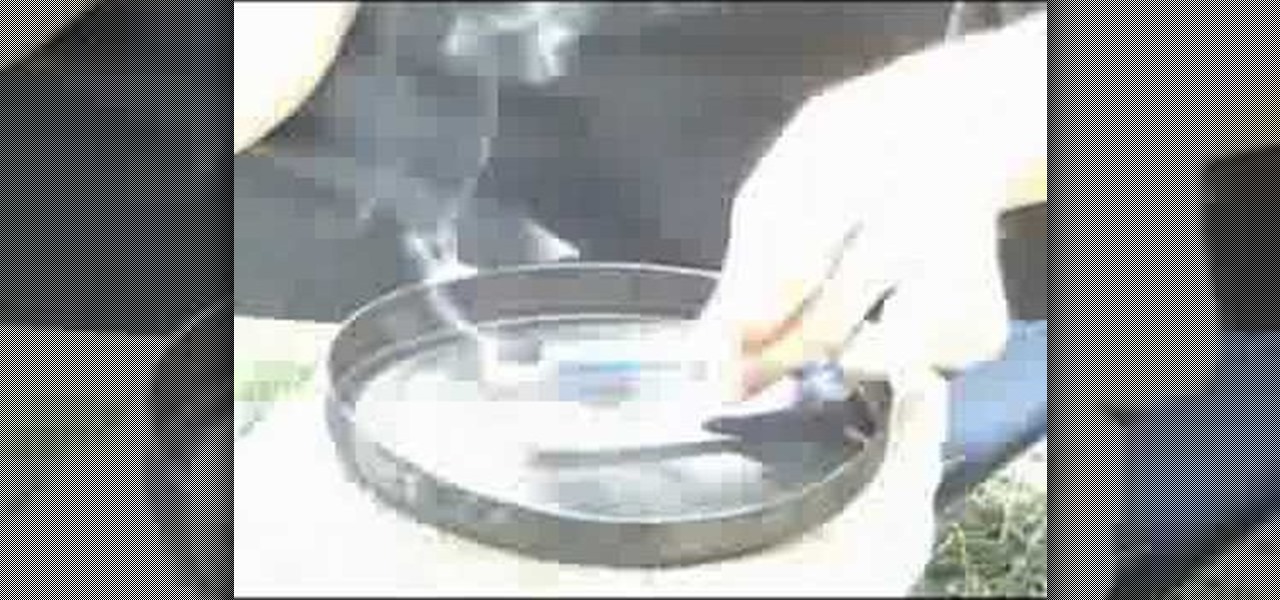
This video shows you how to collect color to create jailhouse tats. First, set down a metal pan. In that pan, place a blue, plastic, disposable razor. It is best to try and do this outside or in a well ventilated area so you don't breathe in a lot of the fumes. Next, hold a large piece of glass over the burning razor. As you hold the glass you'll see it collects the smoke. Once you feel you have enough, and you should see a large black circle in the middle of the glass, blow out the razor so ...
Make a kid-friendly cake for Halloween this year. Kraft teaches you how to make one "monster" of a cake, sure to top and snacks acquired during trick or treat. This howling good treat will keep your guests guessing, because it only "looks" like a cake. Watch the Kraft Kitchens Expert create this easy and delicious surprise. Get the full recipe at Kraft Foods.
To make mini cupcake earrings first take a piece of sculpey and make a cylinder. Make vertical indentations around the cylinder, similar to those an the edge of a quarter. this forms the bottom of the cupcake. Next take another small piece of sculpy and role it into a line like a piece of yarn. starting at the edge of the top of your cylinder coil the line of sculpy around the edge and up, similar to a piece of novelty poop. this forms the cupcake. stick a earring finding through the top of t...
This video explains how to convert fractions to decimals by providing a good example. 1. To better explain the notion draw a box divided into sections to represent the 1 whole. 2. In this example the fraction used is 7/10. So, you have to color in 7 out of the 10 sections that make up the box. 3. To make the conversion to a decimal is now even simpler. Since not all the boxes are shaded the number must be less than 1, so start by writing 0. 4. The next step is to check the number of boxes you...
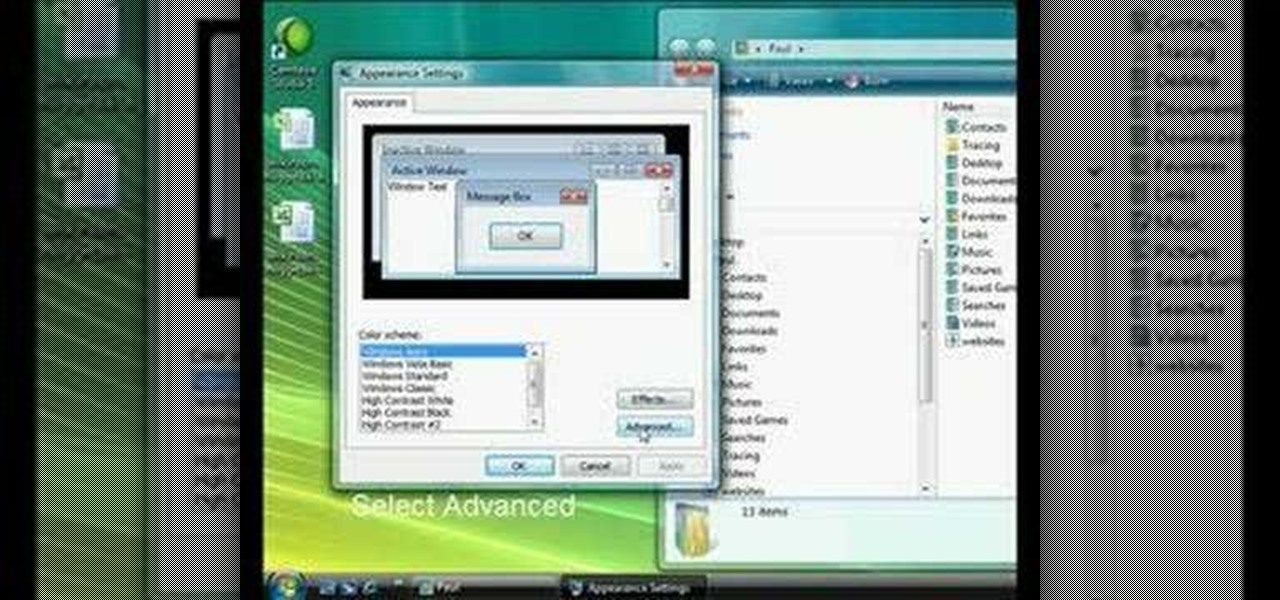
Customizing Window Vista's glass borders is relatively simple. In order to expand the borders, right click and choose properties, then choose appearance. Scroll down and click on 'open classic appearance properties'. Under Windows Aero, choose advanced settings, and click on desktop and choose border padding. You can then increase the size to your choosing and click 'ok' and 'apply'. After a few short seconds, you will notice that your borders are fatter than they were before! You can also us...
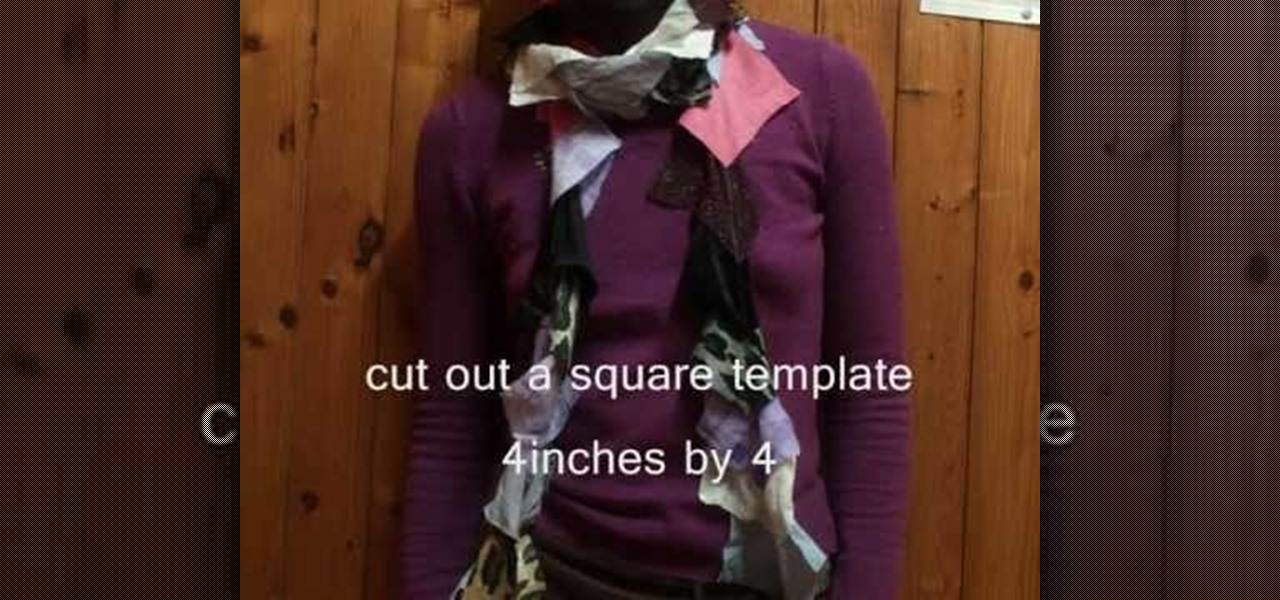
Chantelle Fashion demonstrates how to make a lucky scrap scarf. First, cut out a four inch by four inch square template. Gather all of your fabric scraps and put them in a bag. Close your eyes, think thoughts of luck and pick out a color. Use the template to cut the scrap fabric into a square. Repeat the process until you have between 60 to 70 squares. Keep the squares in the order you picked them. Layer the squares on top of each other, pinning them together. Then, sew the scarf straight dow...
This is a video demonstrating how to make a cute and cool hair band scarf. Take a scarf. You can use any material, including a ready made scarf from another outfit, or a ribbon. Hold the scarf in the middle and make a bow. Pull the bow until both sides are even. Lay the bow on the top of your head with the scarf tails hanging down. Tuck the tails behind your ears. Tie the scarf into a knot on the back of your neck. Adjust the angle of the bow on your head. It is good because it gives you opti...
The artist begins by sketching house the outline of the face and body using a pencil. Then he begins to form the eyes, nose, hair and ears, and applies a gray mask to the face which is then covered by the tan coloring of the woman. The lower body is applied with a lighter mask which is converted to the white furry coating of the coat. The drawing is then smoothened out showing us the main features of the realistic woman. Using the software and computer graphics that he uses, the hair, eyes, a...
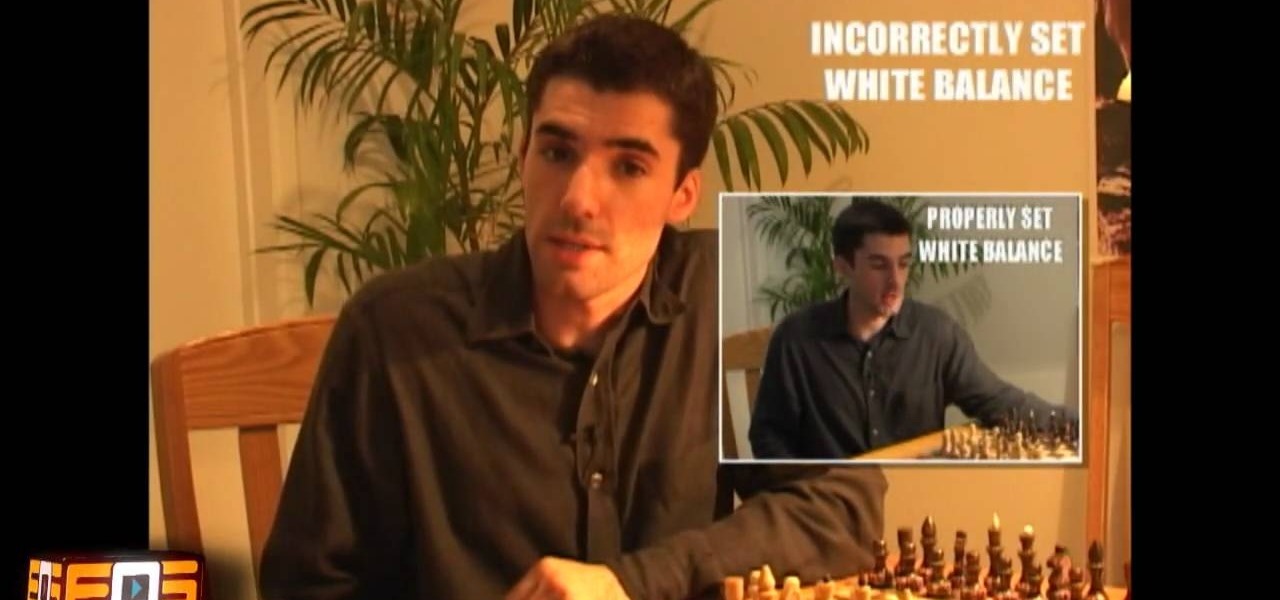
When a scene is filmed, problems can occur in the final outcome of a scene if the white balance is not set correctly. If the white balance is off, a scene may look too orange, blue, or the color is just off in general. This video tutorial shows how to set the correct white balance on your video camera. White balance is what the camera considers to be white. Most cameras have white balance presets for both indoor and outdoor. This is because the light we perceive will vary depending on whether...
This video details how to draw a penguin that is skiing downhill. You start off by drawing the eyes in an oval shape, and drawing a line cutting them in half for the eyelids. Don't forget dots for eyes! Following that, you draw the penguin's mouth and the top half of the body, including the flipper. You will next draw the ski poles and the lower half of the body. Of course, in order to ski the penguin will need two feet, and two skis so you should probably draw those too. You can now add deta...
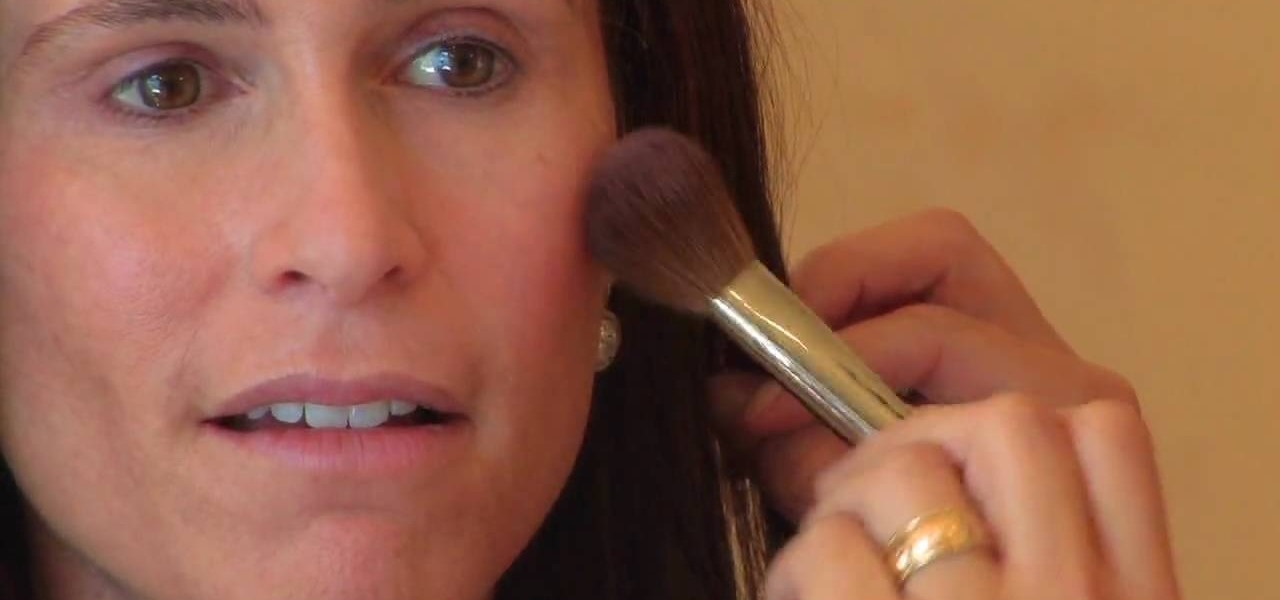
In this video tutorial, viewers learn how to apply blush on the face for a natural look. Begin by selecting the color that you want. Now take the brush and dab the brush to get some powder on the tip. Then lightly tap it to remove any excess powder. Begin on the apple of the cheek as you bring down small strokes. Apply the blush with a circular motion. Do this lightly and hold back any hair that is near the face. This video will benefit those viewers who are interested in beauty and fashion, ...
Follow this video to learn how to use copper push-fit fittings to connect piping. 1. Sometimes we connect pipes by means of push-fit fittings which are not very appealing to look at since they are of a different color and material and so do not match with the pipe. However a good alternative is to choose copper push-fit fittings rather than plastic ones. Copper push-fit fittings would be similar to the pipe itself. 2. Open the pipe and ensure that it is clean before fixing the fitting by simp...
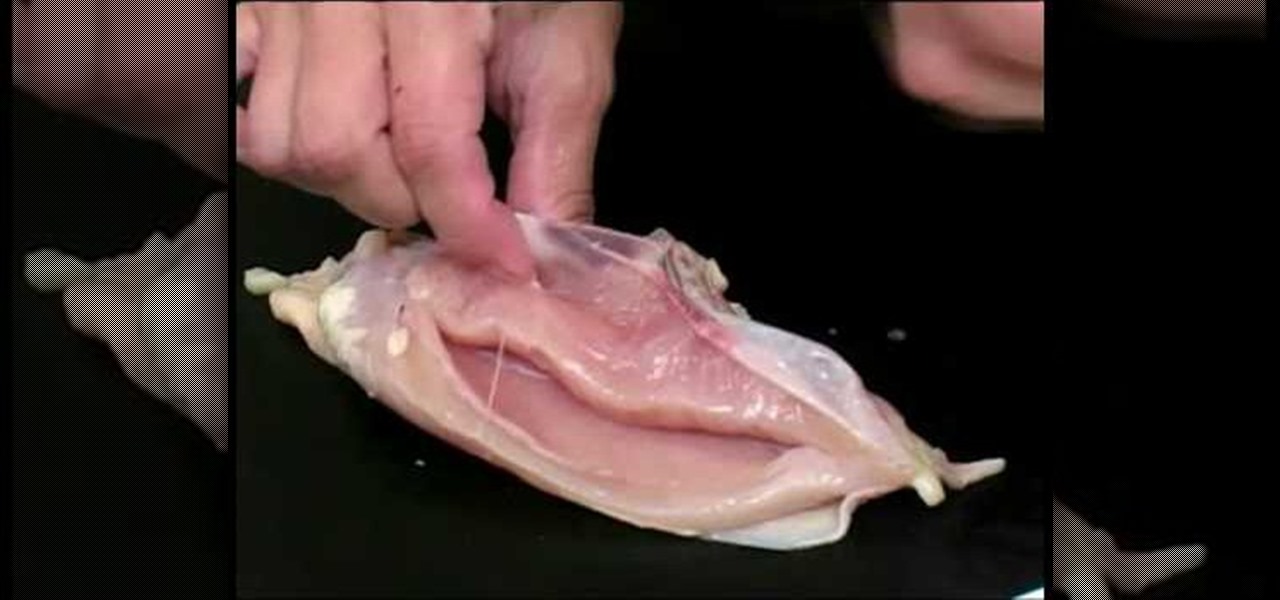
In this video it is demonstrated how to remove tenderloins from chicken breast. The tenderloin runs just beneath the breast bone it is a really nice and sweet piece of meat. It is white in color. To remove it take a chicken breast and flip it over so that you can see the breastbone. Then take a knife (or you can do it with your finger as well) and just cut across the breastbone. It is attached by a tendon so if you cut the tendon, the tenderloin comes out very easily. This is a simple way to ...
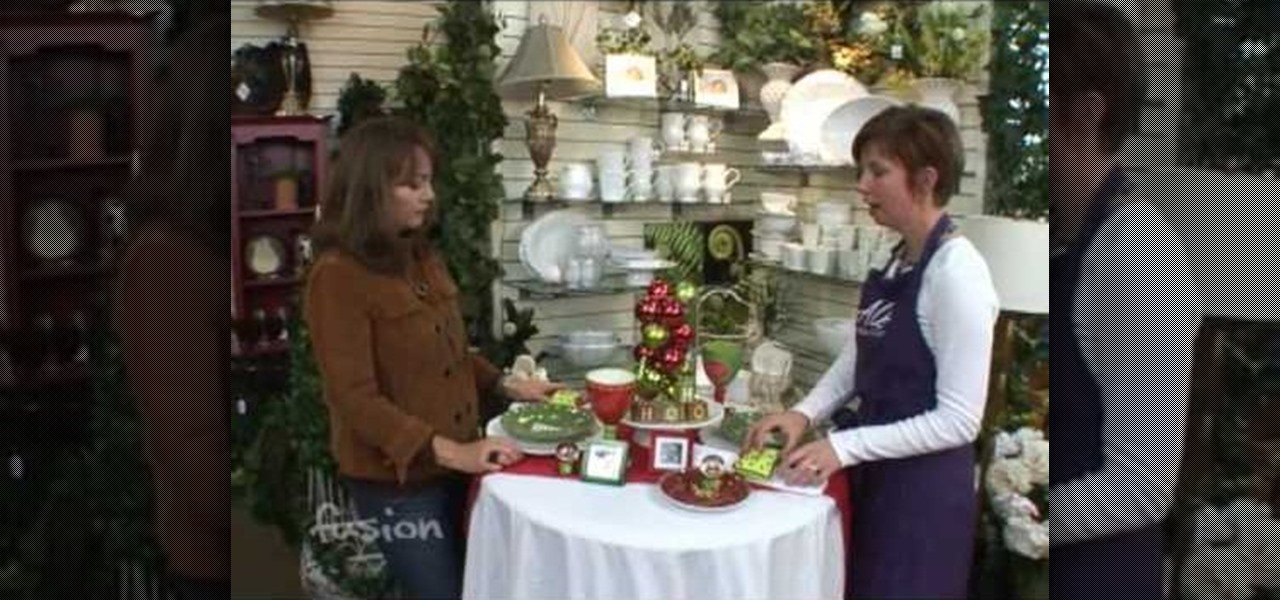
This video helps the holiday table settings add a fun and colorful theme to each holiday. Using white plates and table cloths, along with clear glass settings, will help to bring out the colors and details of the decorative additions to the table. Having scented candles or other types of fragrances will highlight and compliment the holiday table theme you have set. The table decorations you will see don't need to match, they only need to flow in with the theme you have arranged. This video wi...
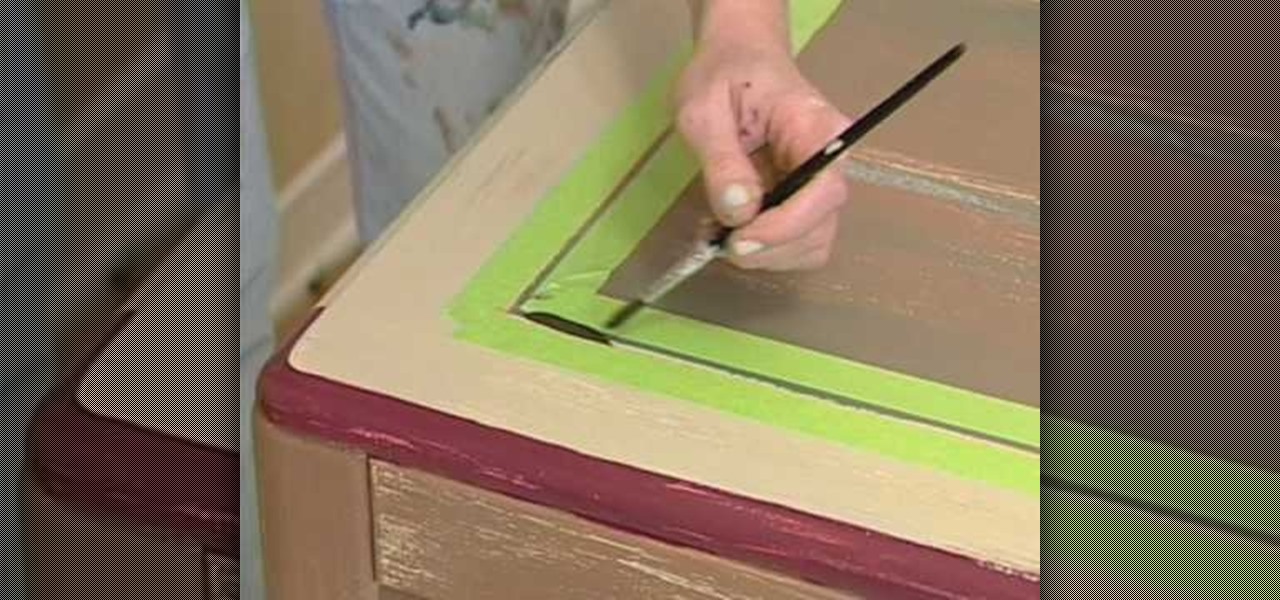
Using an antique distressing paint finish technique on furniture is a good way to revive a piece of furniture that other wise might just be discarded. This video is part of a series of videos taking viewers through the process of distressing furniture and focuses on accent technique. You’ll want to accent the select parts of the furniture you want to accentuate that distressed look. Our expert recommends painting the edges of this table. You’ll want to pick a complimentary color and when you ...
This video is a tutorial video. This video is showing the viewer how to change the visualize on their Playstation 3. He shows a step by step guide on how to get to the visualizer on your Playstation and he shows what the play station should look like if you are following the steps correctly. He shows the features that you can manipulate on the visualizer. He shows how you can change the color and change the overall look of the visualizer. He explains how the Playstation is easy to manipulate ...
This video shows us a fun science project to do with our kids; it teaches us how to make flubber out of glue and cornstarch. In one container pour a small amount of liquid starch. You can find this in most laundry aisles in the store. Next in another container, pour in an equal amount of white school glue. Mix the two together by pouring the liquid starch into the glue. If the mix is real sticky, add more starch and if it is real runny, add more glue. To color your flubber you can dab it over...
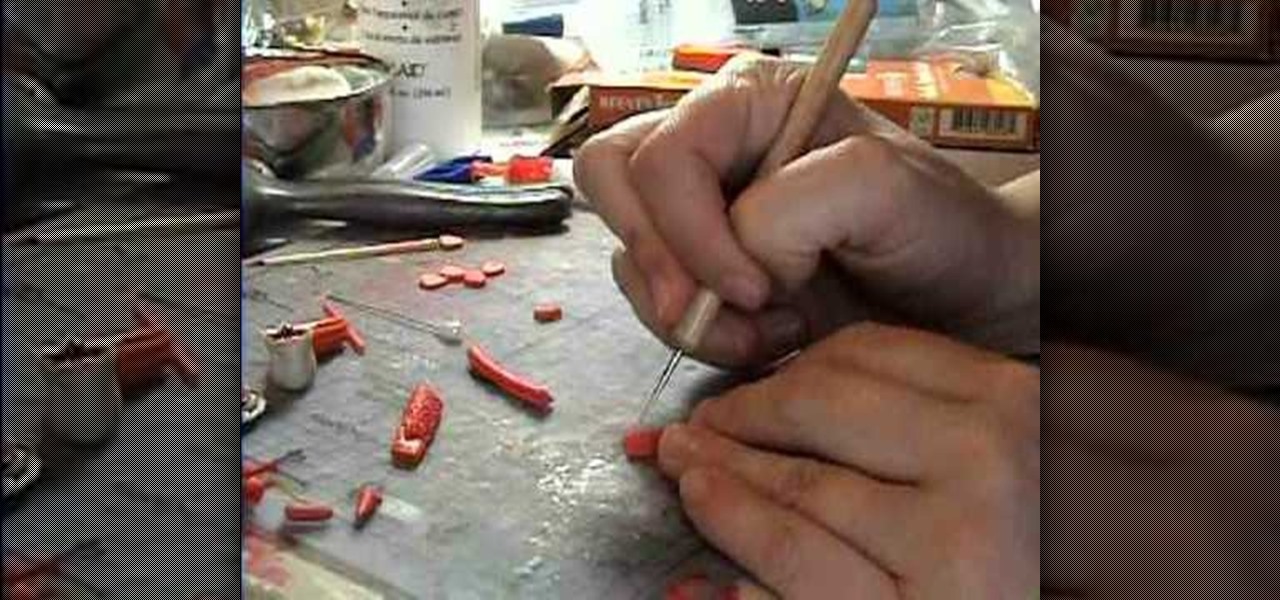
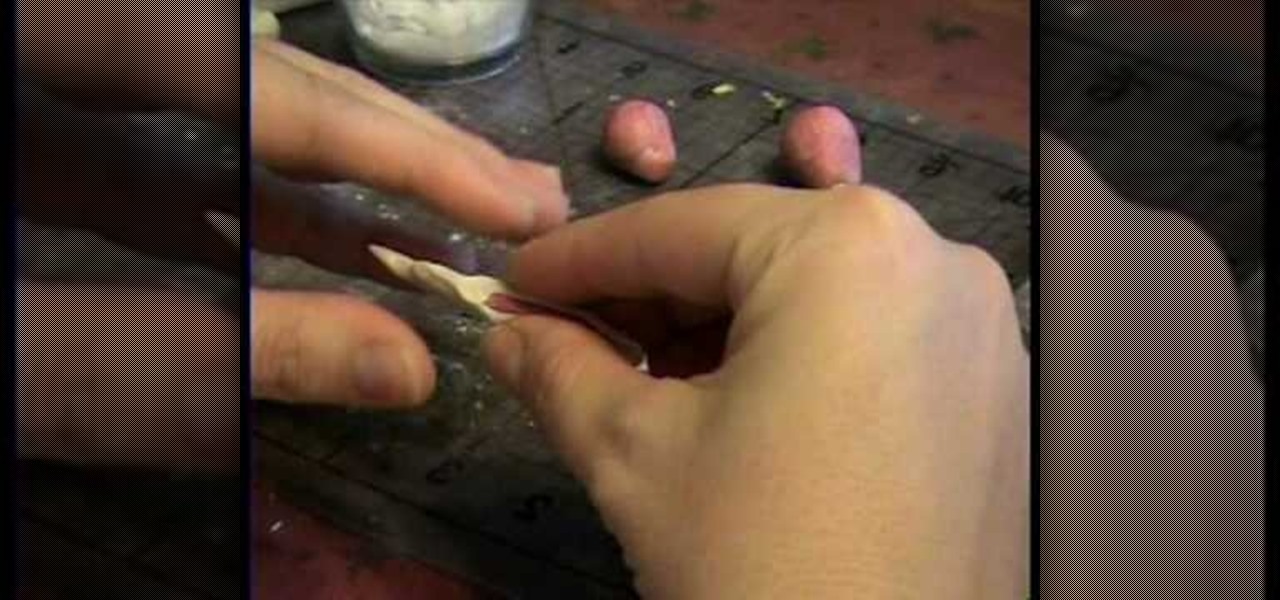
This video is about how exactly to make a mini strawberry cane. Strawberry canes are sliced into small individual slices to look like tiny little strawberry slices. This how to video is made by Garden of Imagination. This cane is made using many different colors or polymer clay. Making a strawberry cane is much more time consuming than many other canes. You can use these strawberry slices for things such as a mini cake for doll houses. These pieces are normally glazed when on a final project....
If you need to wear a tuxedo vest, measuring is something that does not have to be spot-on. It will be adjustable at the neck and waist area. Most vests are offered on a small, medium, large, and extra large range. The chest and overarm measurement that's taken for your jacket might effect the girth or size of the vest, but this shouldn't be much of a problem since its adjustable. Whether or not its a full-back may also effect the fit. Children's sizes are measured on the same basis and can b...
American Girl Doll earrings are easy to make and here's how we can do it. First, find some sticky-sided jewels (they usually come on a sheet) at any regular craft store. Then you are going to need a roll of what is called zots-they are little blue dots found at any scrapbooking store. Place the sticky side of the jewel down onto the blue dot, lift, and now the zot is connected to the jewel. You can then stick these directly onto the doll's ears and you have American Doll earrings! You can mak...
This video shows you how to make a flexible mold using Amazing Molding Putty. You can make molds of just about anything that has the desired shape and texture you want.
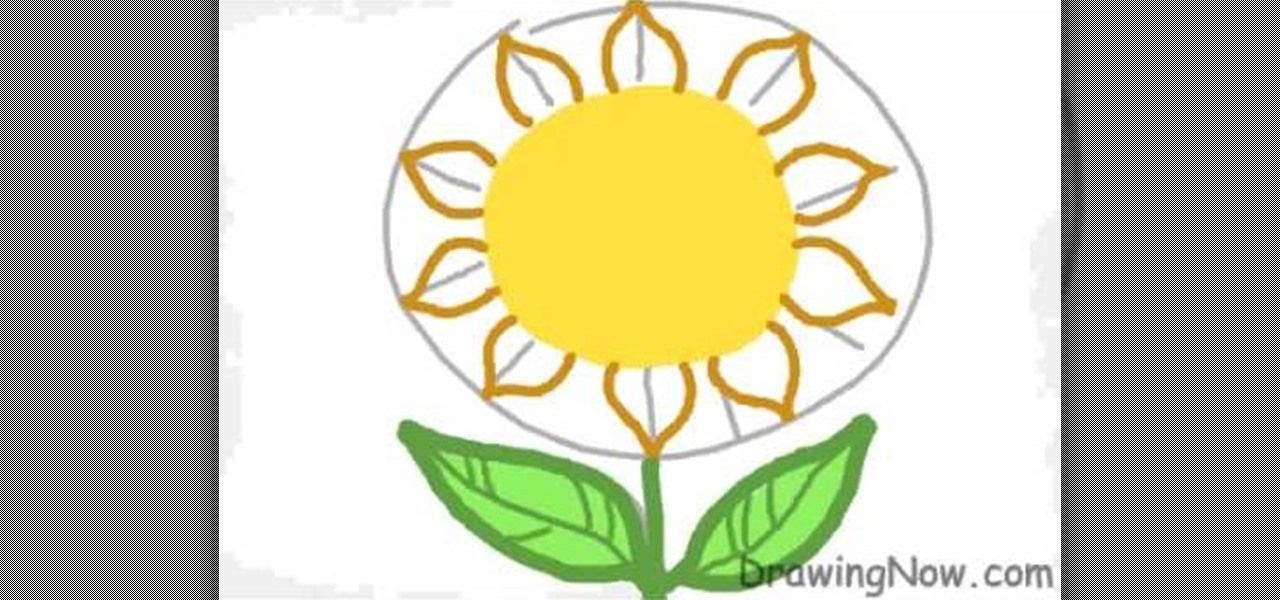
In this video you will learn how to Draw a Sunflower. The artist starts with a rough sketch, then the details, followed by coloring and shading. The sunflower is more of a cartoon like sunflower with eyes and blush marks. The picture takes about 2 minutes to complete if following the artist correctly however you can always pause the video or fast forward in order to catch-up or speed ahead. The picture doesn't include any backgrounds of any sort however it shows the sunflower which takes up a...
This video teaches you a simple and easy way to make corn dollies. For those of you that don't know, corn dollies are the homes for the spirits of corn that have lost their homes during the harvest. The spirits will live in the doll throughout the winter and will be returned to the fields the forthcoming spring. To make these you will need corn husks, Sharpies, a pair of scissors, and ribbons of your desired color. These corn dollies are a fun project for kids and will be sure to help create ...
This video demonstrates how to draw a fairy quickly and easily. We are taken through a simple step by step process that begins with the simple drawing of several geometric shapes. Using these shapes as a guide we are shown how you can quickly flesh out the distinct shape of a fairy by rounding off edges and adding small details here and there. We are also shown how drawing the hands should not be a daunting task as you are given a simple example to follow. There are several examples of minute...
Terri Sproul shows how to use a really cool technique to make an embellishment for a card. You first need to find a roll of aluminum that is self adhesive. Work on the back of the aluminum, the side with the adhesive. Use a stamp to lay out your design on the back, by stamping the image on the back. Then you must trace the outside of the image. Use alcohol inks to add color to the aluminum. Then she cuts the image out with her scissors. Then she uses a glue dot to place the piece on a card sh...
This video shows how to create mini decorated Christmas cookies using polymer clay. They are about the right size for a dollhouse. She shows the process of cutting the clay out in both colors, using a star stencil for the cookie shape and also the frosting. Make sure to have the frosting piece be a little bit smaller than the cookie so that it appears to be sitting on top. She also shows how to place the decorative silver pieces onto the clay. She explains how long to bake these pieces, and a...
You might have known that you can dye your hair with Kool-Aid. Well, you can and it's super easy! With this three part tutorial, learn exactly how to bypass the expensive salon hair coloring products and dye your hair with Kool-Aid.
This video shows how to make a miniature ham out of polymer clay, for use in a dollhouse. The instructor begins by taking red and white clay and mixing it to get the color wanted for the meat of the ham. A small, hardened pink piece is then wrapped in a white piece, making the bone with the marrow inside. This is then pressed inside the meat and made to extend out of one end, completing the ham. The process is demonstrated in detail, making it easy to follow along and make your own miniature ...
The video starts with a fresh Rib-Eye. The presenter stresses the need for the steak to have a deep red color. Prepare the oven by turning on the broiler to 500 degrees with the top rack as close as possible to the broiler. Lay a pan or foil on the lower rack to catch any drippings. The presenter seasons the steak with pepper, salt and a little olive oil and then puts it in the oven. The steak cooks for five minutes on each side. The presenter then takes the steak out and lets it rest for abo...
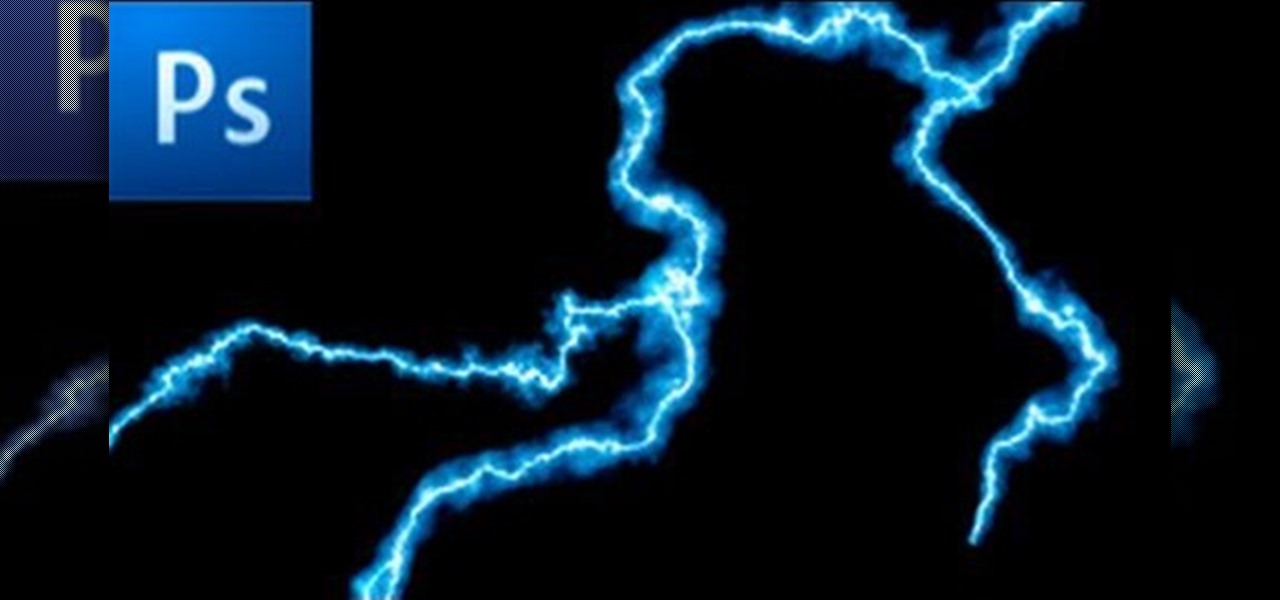
This is a tutorial showing how to make a lightening effect on Photoshop. First click on the gradient tools and then click on the colors. Check to see if there is black on one side and white on the other, if there is then click the ok button. Then hold the shift key while dragging the mouse across the screen. This will make a black to white gradient effect on the screen. After that, click on the filter button at the top of the screen, then click render, and then difference clouds. After the cl...
First of all to make a glass you need to find a bottle, preferably a gallery glass bottle. Take off the top lid from its pointed top. Clean this cap and if you put it inverted it appears just like a miniature glass. The tutor advises to use empty bottles' caps for making the glasses. You can also add a little ice into the glass (for making ice in glass the tutor suggests watching her other video on YouTube site). Now paint yellow color in the inside of the glass. This shall appear like that t...
In this video tutorial, viewers learn how to make a reflective text in Adobe Fireworks CS3/CS4. Adobe Fireworks a bitmap and vector graphics editor. Begin by opening Fireworks and create a new project. Create your text and then duplicate it. Align the duplicated text under the original and flip it vertically. Click on the color and select Fill Options. Select Gradient and keep the second option at Linear. Drag the opacity on the left to zero and the right to 100. This video will benefit those...