Love taking pictures with your phone on the go? Many people do, especially because it's difficult carrying around a bulky camera everywhere they go. But how do you transfer these images to your computer, where you can store them for future use or for Facebook photo albums?
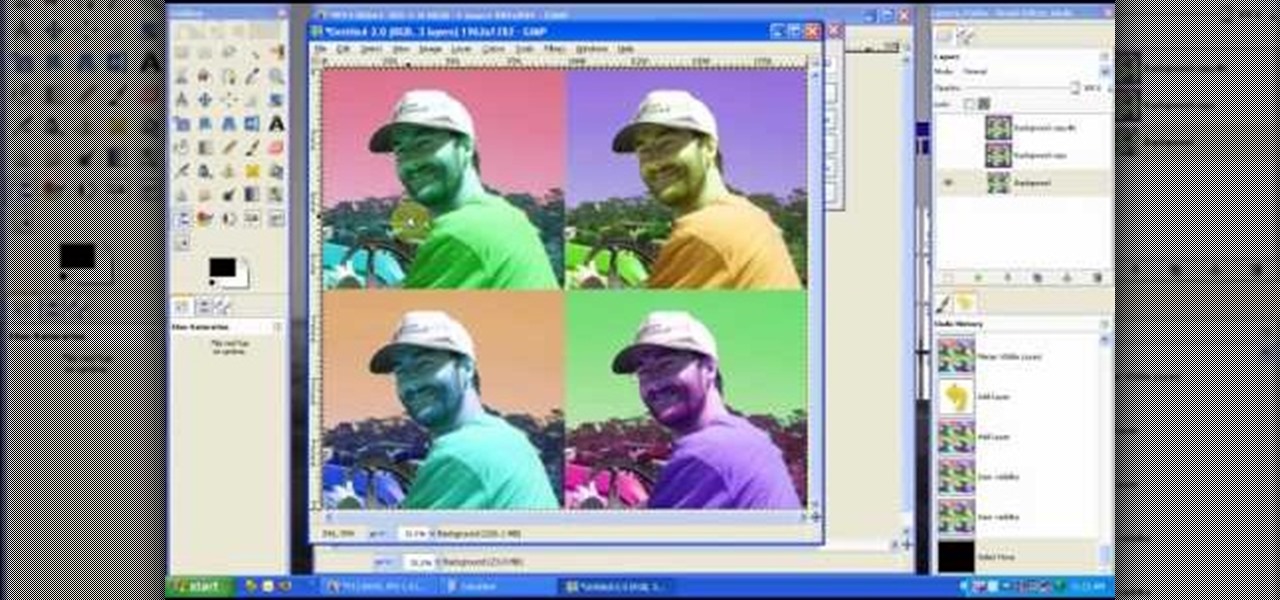
In this tutorial, we learn how to create a Warhol effect in GIMP. First, you will need to take your image and open it up in GIMP. After this, you will need to resize this so that four of these fit into one square next to each other. From here, create a new layer and then layer it to size. After this, change the hue and saturation of the photos. Then, change the lightness and make it any color you like. Then, do the same for the other photos in different layers. Save this when finished, then y...
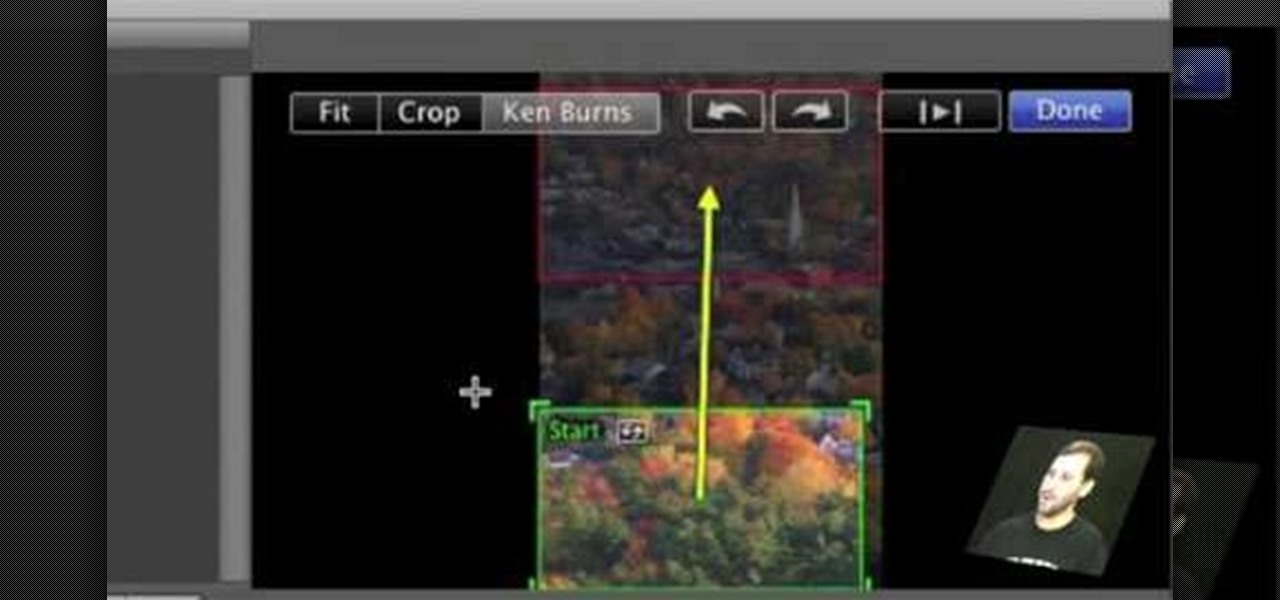
First open up the image by clicking on photo button or just drag the image from finder to the project area. Now click on the crop button or just press the c button, you will see a green and a red area in your picture. Now set the red area to where you want to zoom in and green area to where you want to start your zooming. Now set the green and red area in the picture as showing in the video and play it, you will see that the picture is zooming to where the red area was set. Now change the ima...
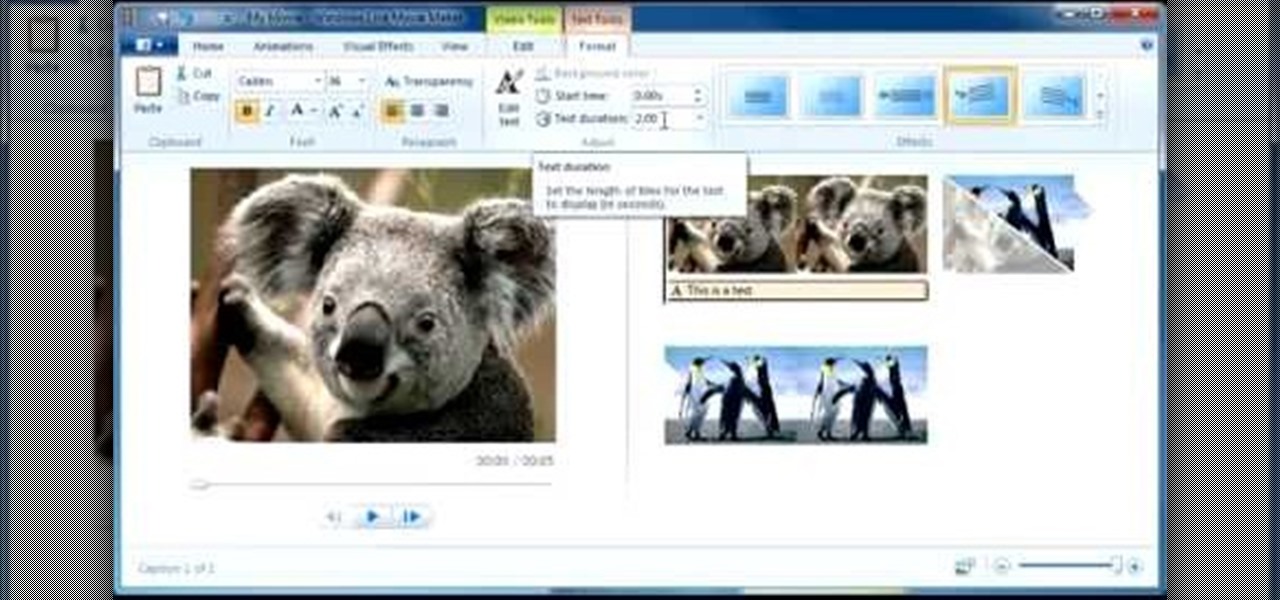
In this tutorial, we learn how to use Windows Live Movie Maker. First, open up Windows Movie Maker then find the section of the software where you can upload your photos or videos. You can also drag your media into the empty white box that's on the screen. After you have uploaded your videos and photos, you will be able to edit them by splitting or trimming them how you would like. After this, you can add visual effects to the media by clicking the appropriate tab. You can also insert animati...

This video tutorial is in the software category where Kerry Garrison will show you how to use vignettes with Adobe Photoshop Lightroom. By this you can remove the dark corners in a photo created by some zoom lenses. Select the photo, kick in the vignettes and fade out the corners focusing on the main subject matter. For this, select 'lens correction' on the right hand side and with the help of the sliders apply the vignettes. You have the choice of applying either a light or a dark vignette. ...

Yanik Chauvin teaches us how to safely pack photo equipment for travel in this tutorial. First, remember to have good insurance on all your equipment, just in case something does break. To pack your things, use a backpack that is specifically made for cameras. Also, arrange for the lens not to be attached to the body of the camera while traveling. If you have to have it attached, make sure there is something under your lens to protect it from any additional shock. If you don't have a backpack...

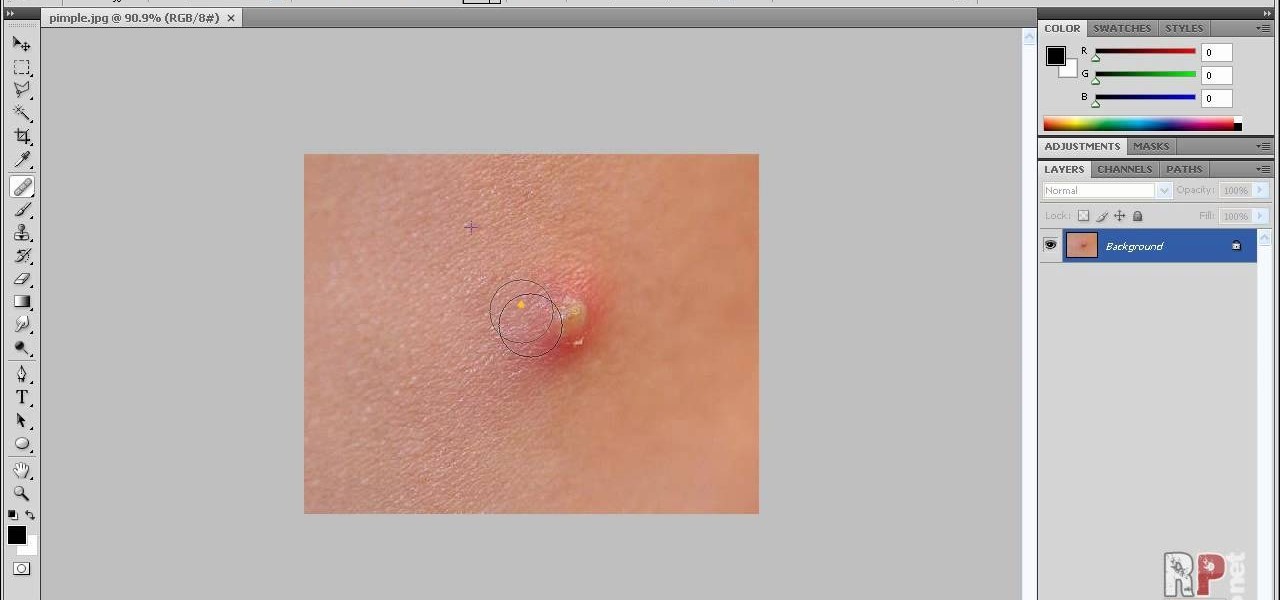
Your photos should show how you as you normally look and not, notably, as you looked that particular day when you had that huge pimple. Learn how to remove pimples and other blemishes when working in Adobe Photoshop CS4. Whether you're new to Adobe's popular graphic editing program or a seasoned design professional looking to better acquaint yourself with the new features and functions of this particular iteration of the application, you're sure to benefit from this free software tutorial. Fo...
See all the steps required to make this nifty photo album, which can be used as a picture greeting card or a simple scrapbook for yourself. Despite its complicated look, it's really not that hard to make. This stunning star album card can be made up as cards including many messages, pics, stamps, etc., or they can be made up as miniature scrapbook albums — especially great for kids after a special day out. It's good for a series of "happy" photos to cheat someone who needs "get well" messages.
This video in the Software category will show you how to remove pimples and wrinkles in Photoshop. Yanik from Yanik’s photo school presents this video. Select the photo you want to work on. First you duplicate the layer by ctrl+J or select from the dropdown menu. You start off with removing those pimples that you want to remove completely. Select the spot healing or the regular healing brush. Yanik prefers the regular healing brush. Also choose a small brush size. To select a source point, ho...
In this video tutorial, viewers learn how to use the vanishing point filter in Adobe Photoshop. Begin by selecting the image you want with rectangular marking tool. Then hold Control and C to copy it. Now go to your 3D shape. Press on Filter and select Vanishing Point. Click on one of the corners and drag to each corner. Hold Control and drag it down to create another selection. Now paste the photo by hold Control and V. Then drag the photo to the selected shape area. This video will benefit ...
Everyone should enjoy great memories from vacations for years to follow. Taking beautiful photographs is a wonderful way to document extraordinary experiences, other counties, different cultures, stunning landscapes, jaw-dropping architecture and more. Tap into your passion for photography on your next holiday vacation and capture a moment in time with help from this four-part photography tutorial on how to enhance your holiday photos. In this three-part video tutorial, take your photos from ...
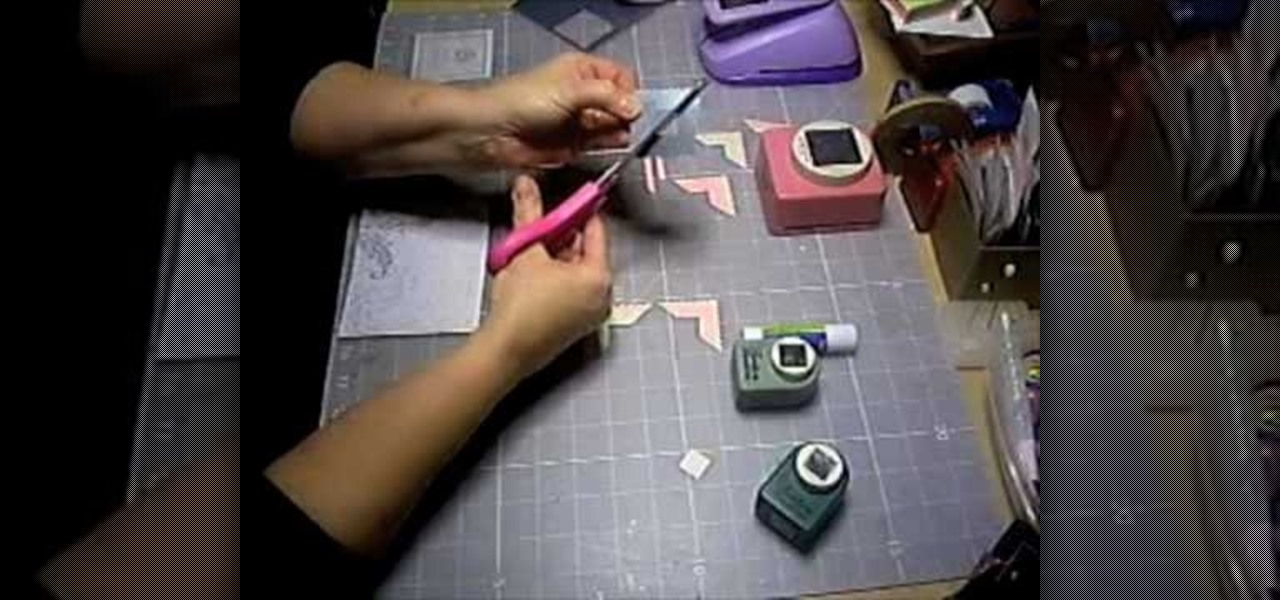
This video shows Joanne McKenzie working at her table talking about making her oversized/giant photo corners for her paper cutting projects. Using an assortment of different sized and colored punches, she explains how to use the punches, saying the smaller one is the better one to start with. She talks about using the next size up and then centering the paper to be cut from corner to corner and layering the different cut out corners for decoration. Very clear and professional.
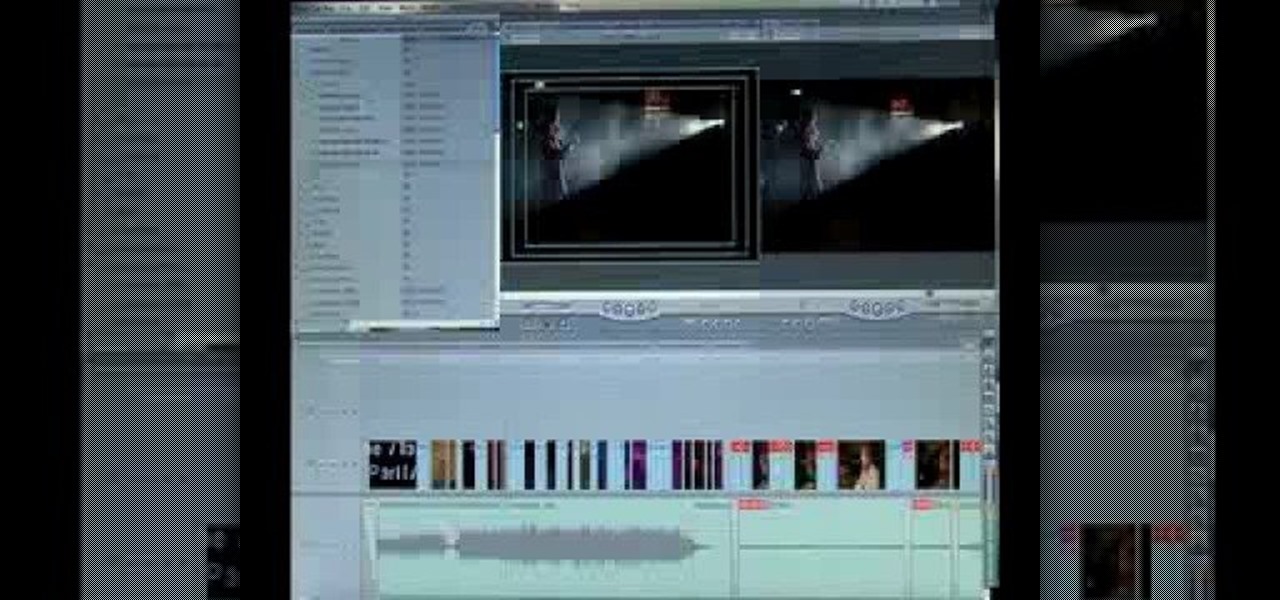
Forgot to take a few production stills on set? No problem, work with what you have... the actual video footage. See how to get photos from video with iMovie or Final Cut Pro 6.
New to Apple's Aperture 2? Aperture 2 offers photographers a streamlined way to speed through edits, make essential adjustments, and deliver photos online and in print.
Watch this video tutorial to see how to make a named couple centerpiece with tea lights. This names couple centerpiece can be either for a couple's engagement or a wedding ceremony. This centerpiece will be accented with romantic tea lights in glass holders. Just watch this party arrangement lesson.
Need to shoot a product with a white background? Well, taking photos with a white backdrop can be tricky if your subject is white also. Watch this behind the scenes photography video to see how to photograph a white product with a white background. This style of shoot is quite standard for eshops which need product photos with a white background. It takes a couple flashes and a goo camera to get it down, just watch and see for yourself.
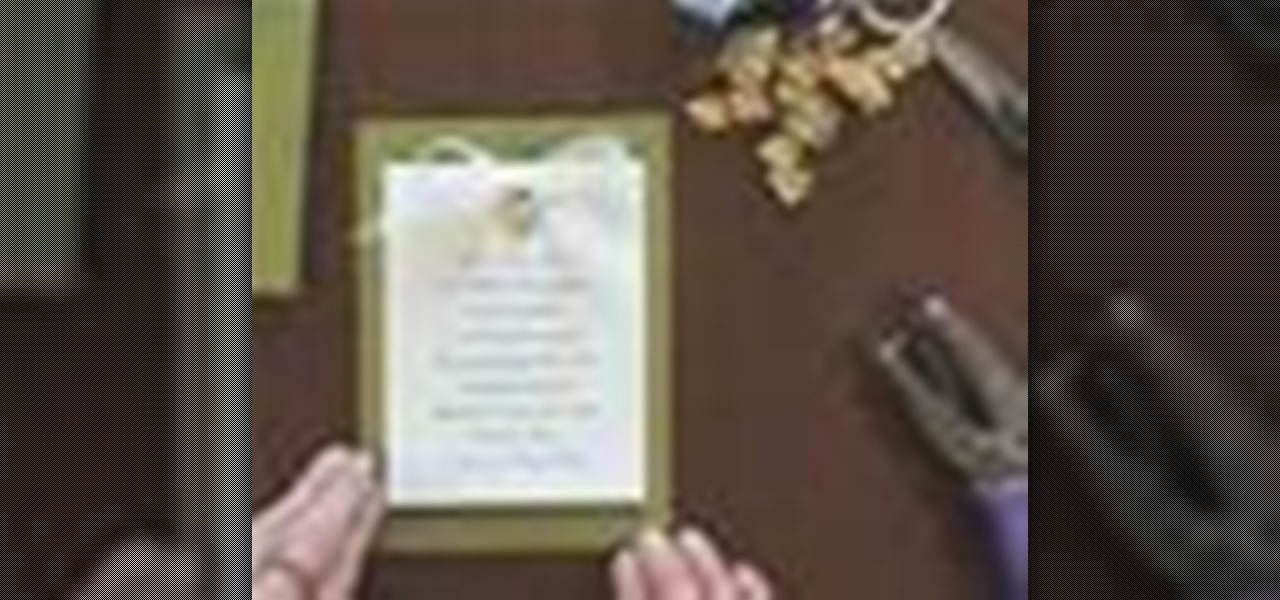
Step by step instructions on how to make unique wedding invitations with sheer bows and metal charms.
Step by step instructions on how to make unique wedding invitations with decorative brad paper fasteners.
If you're playing Gears of War 3 and happen to visit the Mercy map, be sure to listen in for the bells. When you hear them, you'll be able to see a picture of Dom appear. But the easter egg doesn't end there. If you shoot the picture you'll hear a soundbyte of Dom crying.
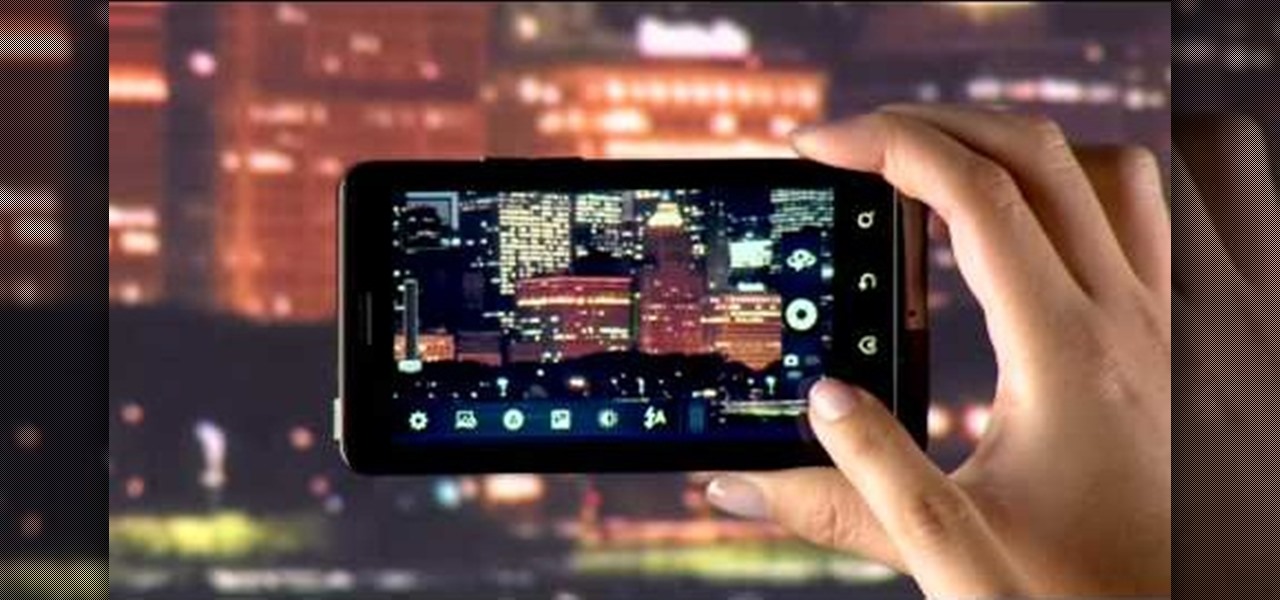
Verizon Wireless's latest Android smartphone the Motorola Droid Bionic, has an 8 MP built-in camera that takes great pictures with the built in Camera app on the Android Gingerbread OS. This Motorola guide will walk you through the process of taking pictures, as well as sharing them to Facebook, Twitter, Picasa, or via text message.
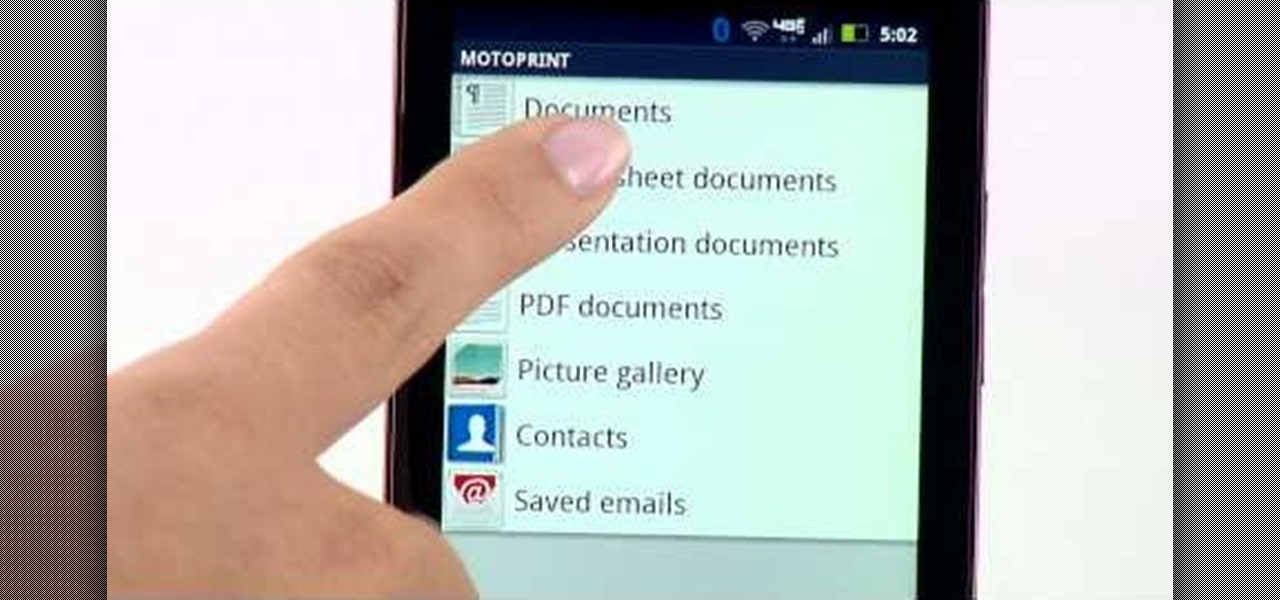
Motorola's Droid Bionic has several Android apps built into the device that allow you to speed up your workflow. For example, with the MotoPrint app you can print from the Verizon Wireless smartphone to a printer. With it, you can print everything from photos, PDF's, documents, or emails directly from your Bionic.
Create crazy looking images by 'unzipping' a person or object using Adobe Illustrator to create the zipper and then adding it to an image in Adobe Photoshop. Your tools in Illustrator will be the basic shape tool, the brush pallet, and a transform filter. In Photoshop you'll need to use the select, puppet warp, and paintbrush tools.
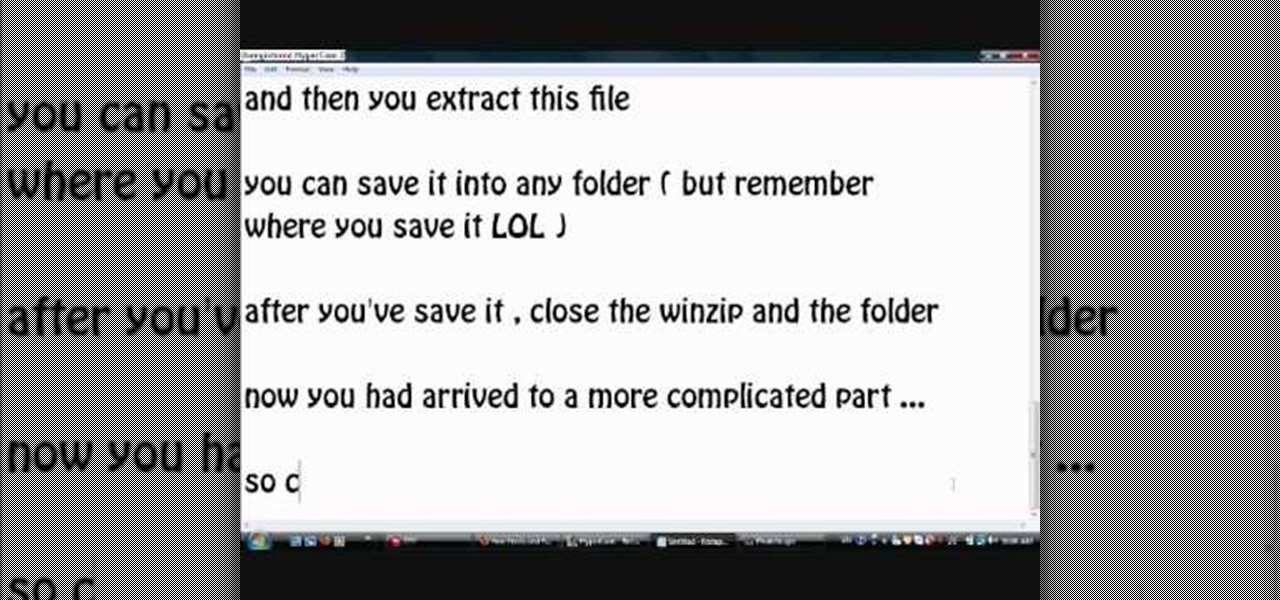
Photoscape is a piece of free, photo editing software to use instead of more costly programs such as Photoshop. The program is pretty cool but you may want to install more fonts than what it comes with. If so, check out this video and you'll find out how to get it done. You'll need a zip program like winzip or winrar and you'll of course need Photoscape which you can get here.
The flash is one of the most useful camera accessories you can have, but they also have a tendency to ruin perfectly good pictures, especially with digital cameras. This video will show you how to take shots with great depth and dimension even with a digital camera and flash by setting the flash length manually.
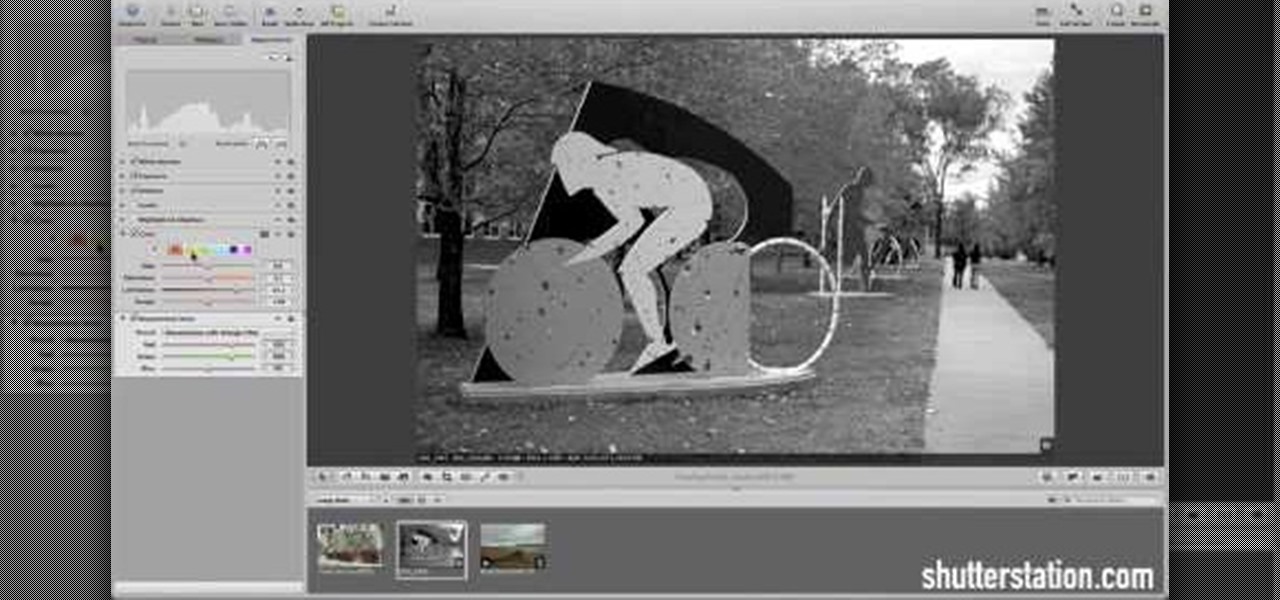
Learn how to desaturate your photos by turning them into black and white with the grayscale mode in Adobe Photoshop CS5. Whether you're new to Adobe's popular raster graphics editor or a seasoned designer looking to better acquaint yourself with the new features and functions of the latest iteration of the application, you're sure to benefit from this free software tutorial. For more information, watch this video guide.
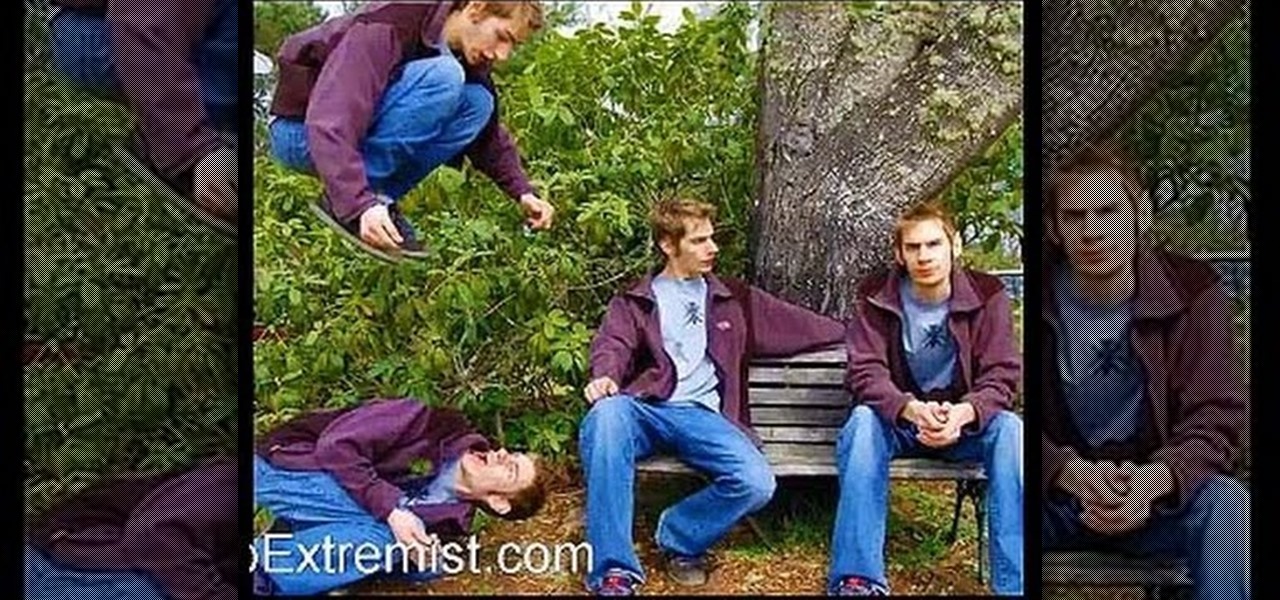
Multiplicity photography is a type of photography where you take multiple images of the same subject in different parts of the same frame, then combine them digitally to create a photo with multiple different images of the same person, animal, or object in the same setting. This is also called sequence photography when it's used in sports. This video will show you how to do it with a digital camera and Photoshop, creating amazingly cool-looking results.
Most people refer to "long press" as "touch and hold", but no matter which way you say it, it's an awesome feature for Android cell phones. Long pressing lets you get more information, download photos from the web, edit pictures and more! Watch as Google teaches you about long pressing, a nifty feature that reveals additional functionality on your Android-powered phone.
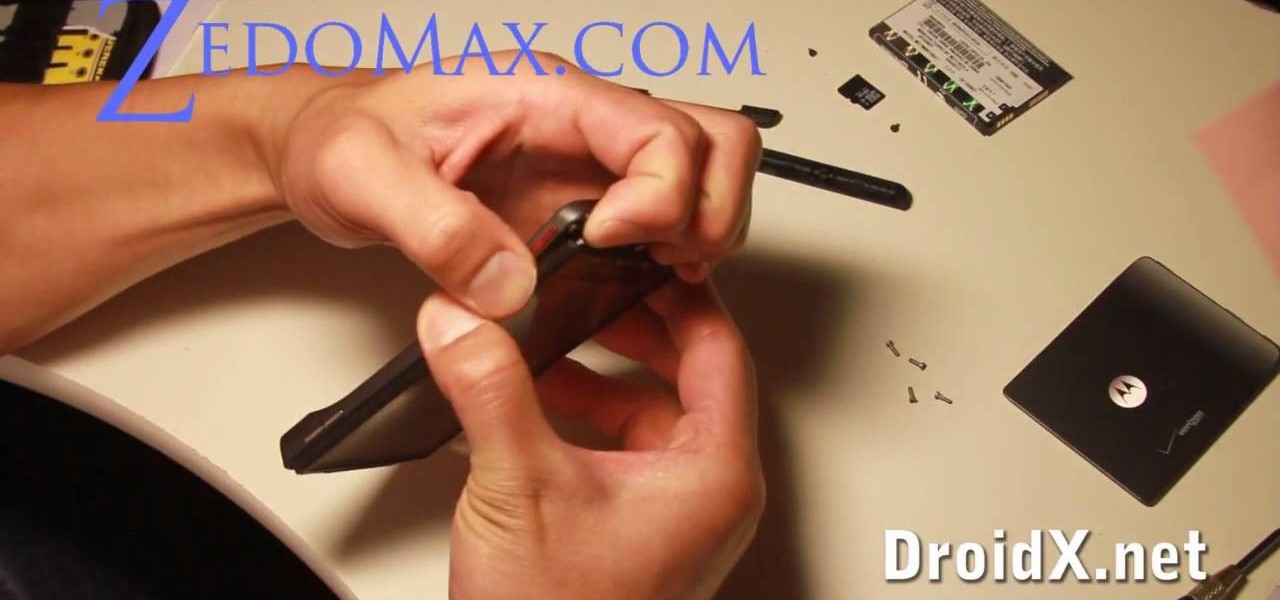
If you can't wait to see what's inside your new Motorola Droid X mobile device from Verizon Wireless, this video will show you the complete dissection process. Just because the Droid X is new, doesn't mean that the cell phone isn't prone to damage or minor repairs, like the touchscreen. Watch to learn the whole Droid X disassembly, and you can get step-by-step text and photo instructions at DroidX.net.
In this tutorial, learn how to turn an ordinary sunny day into a snowy scene in using Blender. You will get a step by step on adding white snow to your photo or drawing, as well as other realistic aspects like tire tracks and footprints. Follow along and get started. Even if you live in the middle of the dessert, you will be able to see what your neighborhood would look like under a blanket of winter.
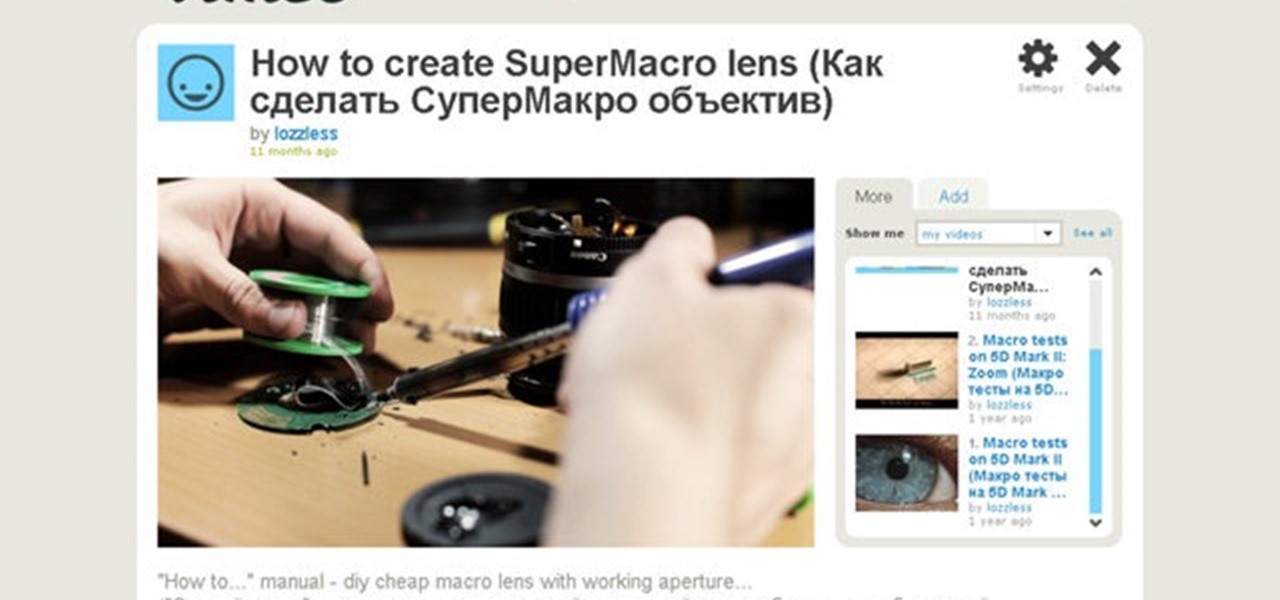
In this video, learn how to take apart any old lenses you may have a fuse them together into the ultimate SuperMacro lens. This absolutely gorgeous tutorial will show you, step by step, exactly how to create this fantastic eye piece and take incredible photos with it.
One of the advantages of an iPad over, say, an iPhone is that you've ample space with which to display and manipulate complex documents. As such, it's a natural fit for Apple's popular spreadsheet application, Numbers. In this video guide from Apple, you'll learn how work with tables, charts, formulas, photos and graphics using the Numbers app on your own iPad.
Proud of the progress you've made in FarmVille? Take a photo within the game, and share it directly with all your friends!
PixelPerfect teaches you everything you need to know about being a digital artist. Learn tips and tricks to turn your regular vacation photos into works of art worthy of museums.
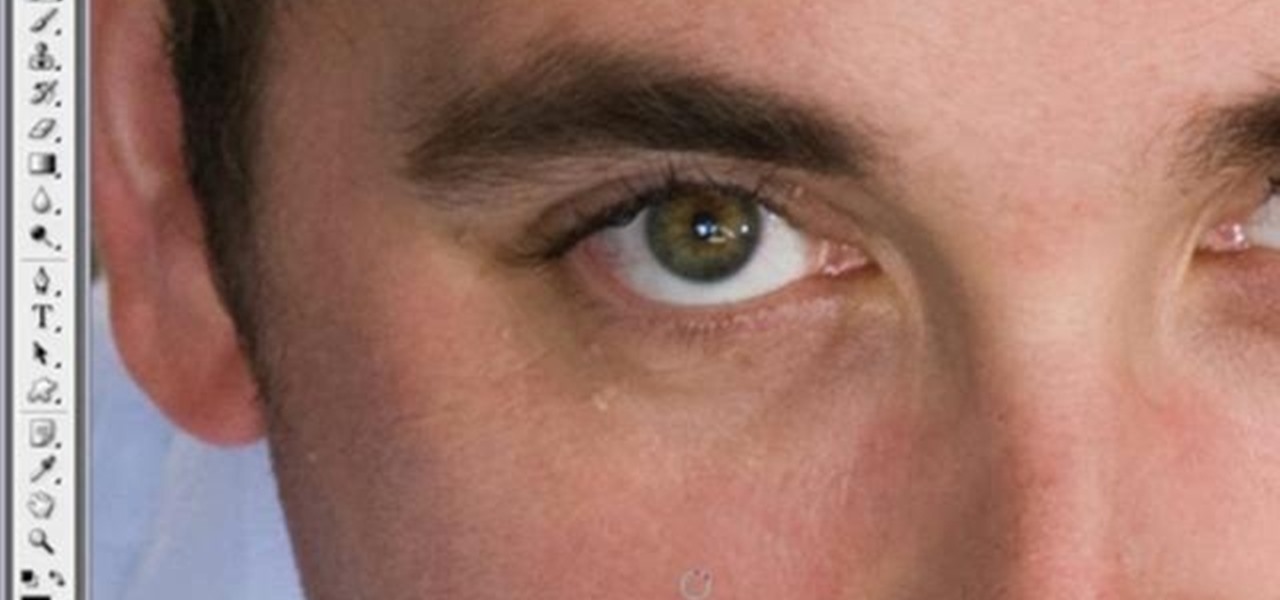
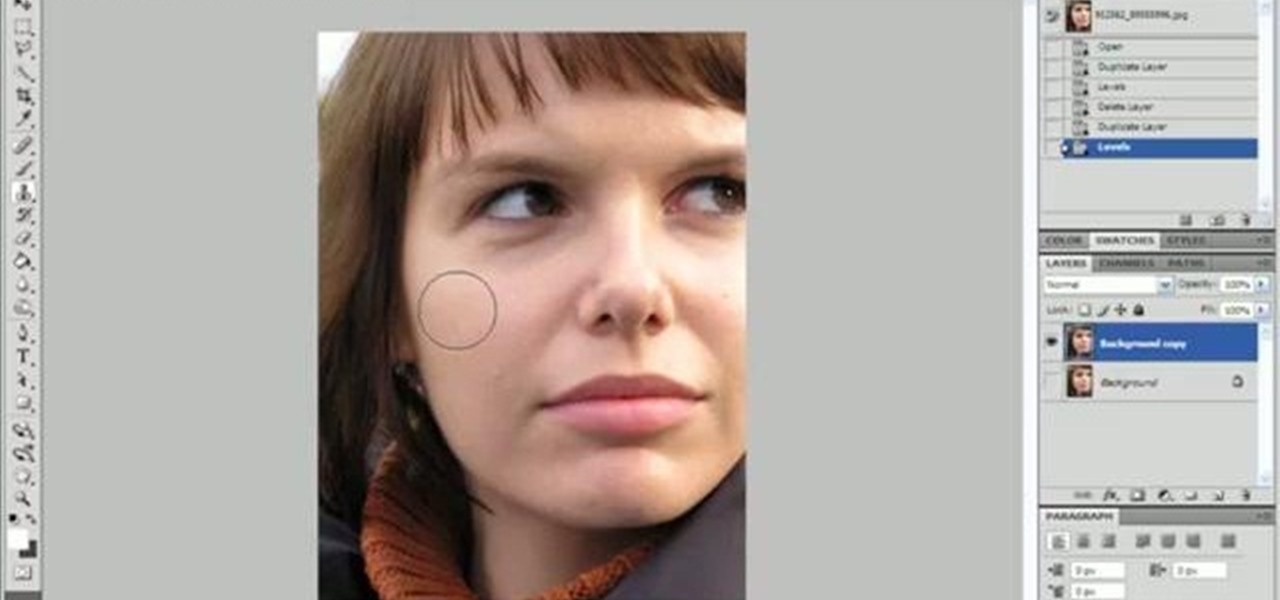
Michelle H. has this great Photoshop tutorial on how to retouch skin. See exactly how to perform some simple skin retouching in Photoshop. Sometimes it's a necessity to change your photos… because of some bad acne perhaps. This is very detailed. Great for Photoshop newbies.
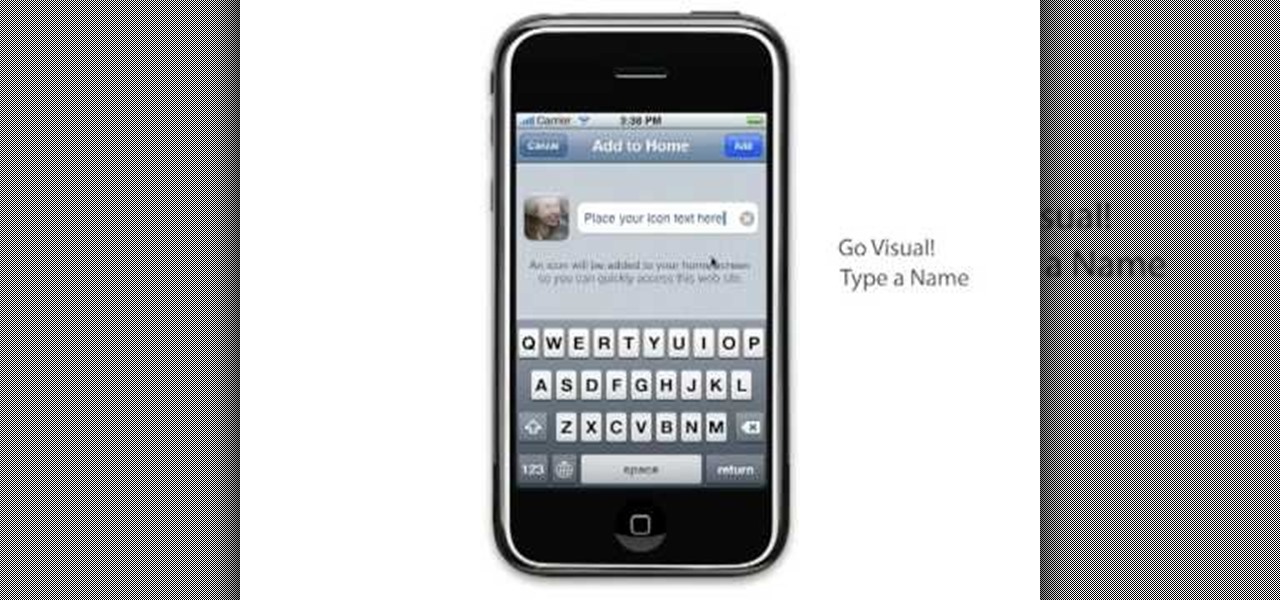
Learn to setup a visual dial icon on your iphone. This one click application allows you to call anyone in your directory by clicking on a photo of them on your phones desktop.
Want to take an ordinary flatbed scanner and turn it into a camera (that takes some pretty wild photos)? You can and, with the help of this video tutorial from MAKE, you will. For detailed, but simple, step-by-step instructions on assembling your own flatbed scanner camera, take a look at this how-to video!
Aperture's loupe tool is a powerful magnifier that lets you zoom portions of an image from 50% to 1600% to quickly check focus or view details in a photo.
Aperture's extensible architecture supports third-party export plug-ins that make it easy to export your photos directly to various web publishing sites, print service providers, and other software applications. You can find many of these plug-ins on www.apple.com.
In this episode of Pixel Perfect, Bert shows us how to create flowing water and a photo-realistic splash effect in Photoshop. Perfect for a water fall or other water features, you'll be able to use these flowing water and splash effects in many Photoshop works of art.
If you've ever wanted to make smoke using Photoshop you'll be able to watch this software tutorial and find out how. This smoke effect won't help your movie career but it will help you create cool photos.