

How To: Get Unlimited (Almost Free) Video Game Rentals from GameStop
Get Money First you need to find a way to get 60 dollars or less, depending on what game you are going to choose to rent.

Get Money First you need to find a way to get 60 dollars or less, depending on what game you are going to choose to rent.
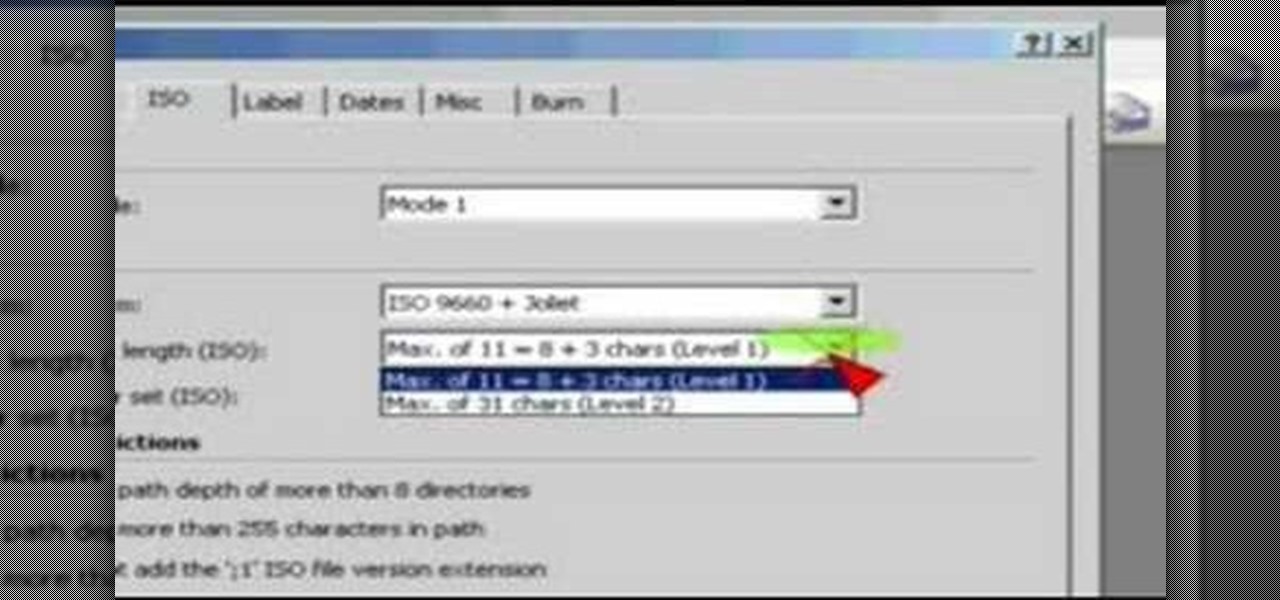
This video uses Nero Burning ROM. First you must open Nero. Then choose Burning ROM. Scroll down to the CD-ROM(BOOT) icon. Click it. From there you choose you ISO image. To do this just browse and navigate to the correct directory where your ISO image is stored. From there be sure to set the emulations to No Emulations and change your available sectors to 4. Next change to the ISO tab. Be sure that it is set to run ISO+Juliet and that the max characters are set for Level 1. Next choose the La...

No matter how hot it gets in your home this summer, you can bet that it’s even hotter in your attic. All that heat in your attic gets transferred to the ceiling below, which will in turn heat the interior of your house.
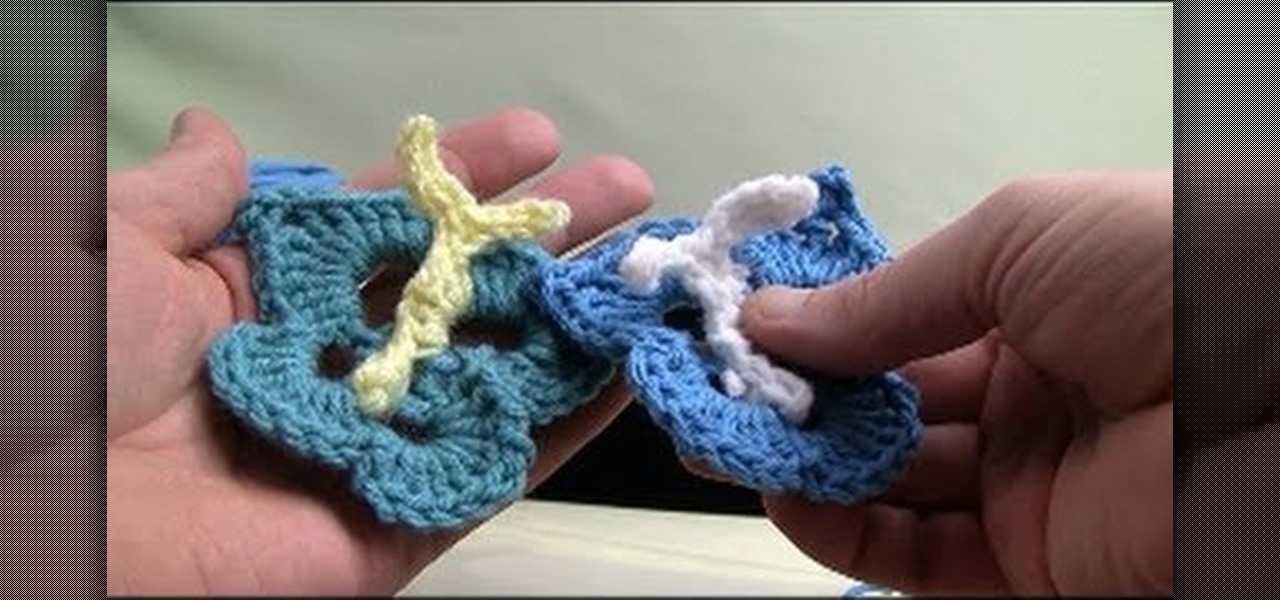
Just because it's spring doesn't mean you have to forego wreaths! This tutorial shows you how to crochet leaves, butterflies, daffodils and flower buds to assemble into a spring wreath. Since this is for spring, choose pastel colors for your yarn.
Spring is officially wedding season, so chances are that you're invited to a coupling of two families or may even be holding a lavish wedding yourself. Whether you're going to be a bridesmaid or will be choosing your bridesmaids soon, make sure they look elegant and polished by creating this makeup look.

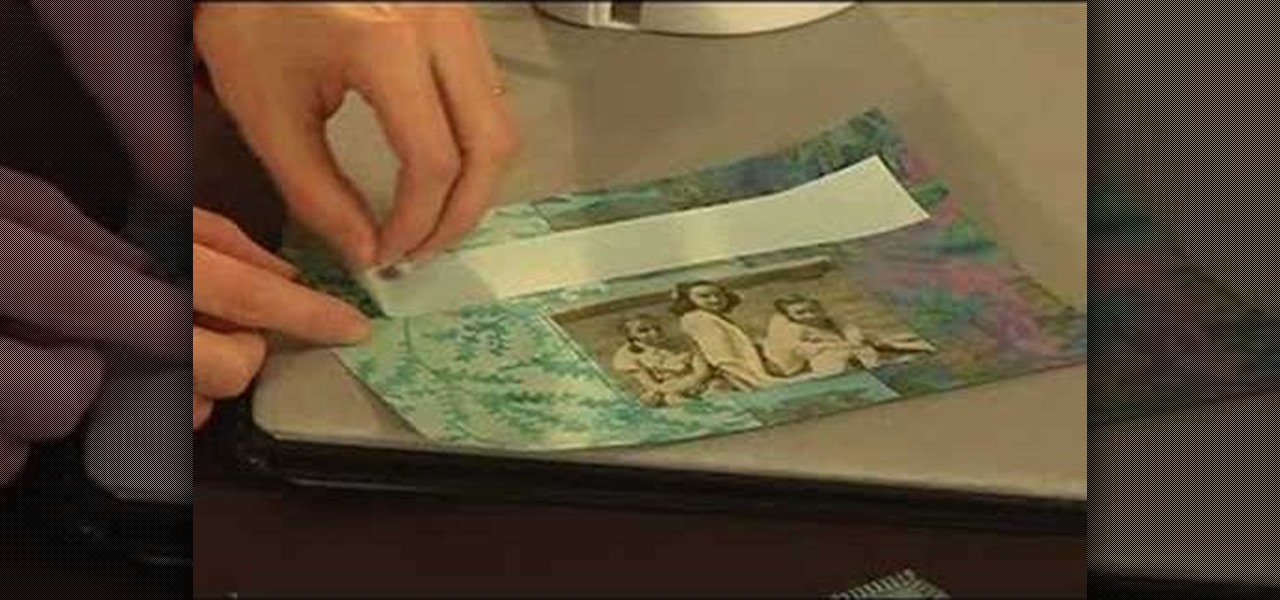
In this tutorial, we learn how to make a family photo album from digital photos. iPhoto from Apple has a ton of different options for you to make a great photo album. You can first start out with loading these on your computer and then creating them into a book. After this, you can choose the borders and text that you want to include in this, then drag the pictures in. After this, you can add in captions for each of the photos and then design the layouts of the different pages. After this, yo...

In this tutorial, we learn how to use GPS and maps on the Nokia N97. From the home screen press the menu key. Then, scroll down and tap the maps icon. After this, tap yes to go online. You can now navigate around the map by using your finger and you can zoom in and out by using the zoom icon. This icon is on the left hand side of the screen. To search for an address, tap the search icon and then tap address or places to choose where you want to go. You will then be shows the GPS and have dire...

In this video we learn how to make a phone call with the Nokia N97. First, go to the main screen on your phone, then tap the dialer icon. From here, you will see a keypad with numbers on it. Enter in the phone number that you want to call, then press on the call key. The phone will then start dialing the number you chose. To hang up, press the end key. You can also call out from the contacts menu, by simply selecting the person you want to call, then pressing the call icon on your phone and u...
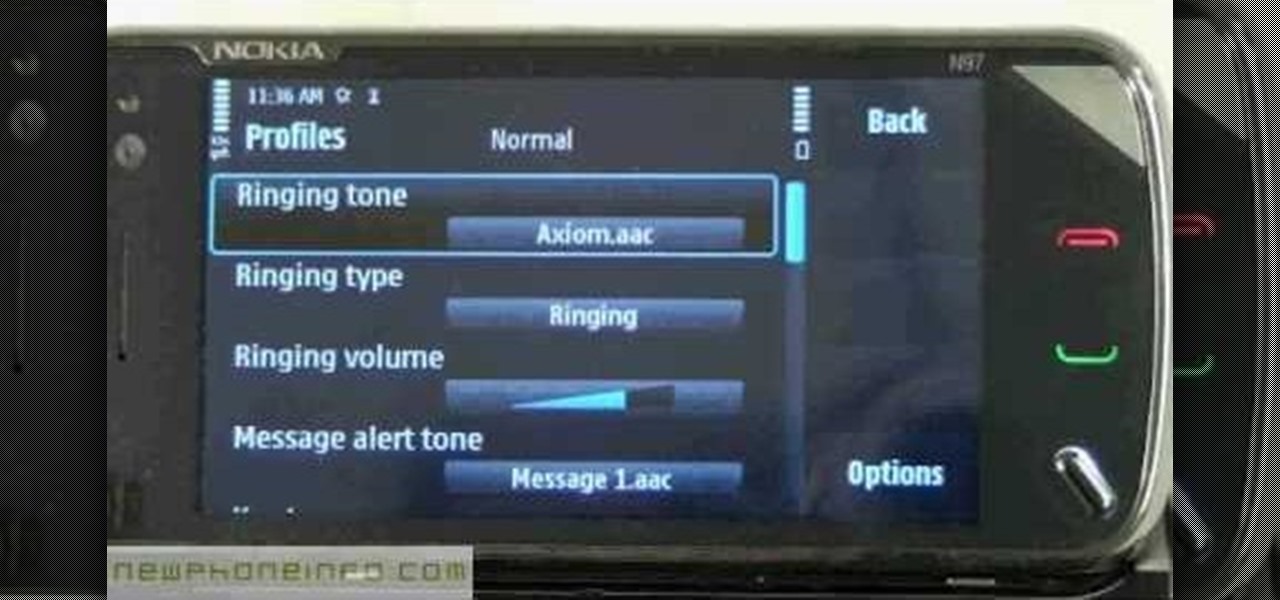
In this tutorial, we learn how to change ringtones on the Nokia N97. From the main menu, you will first tap the menu key. After this, scroll down the menu list and tap on the settings menu. From here, tap on profiles and then tap normal. After this, tap on 'customize' and then tap on the ringing tone option. From here, you can choose which tone you want to play when someone calls your phone. Once finished, select the song and then return back to the ringtone menu. If you're finished, go back ...
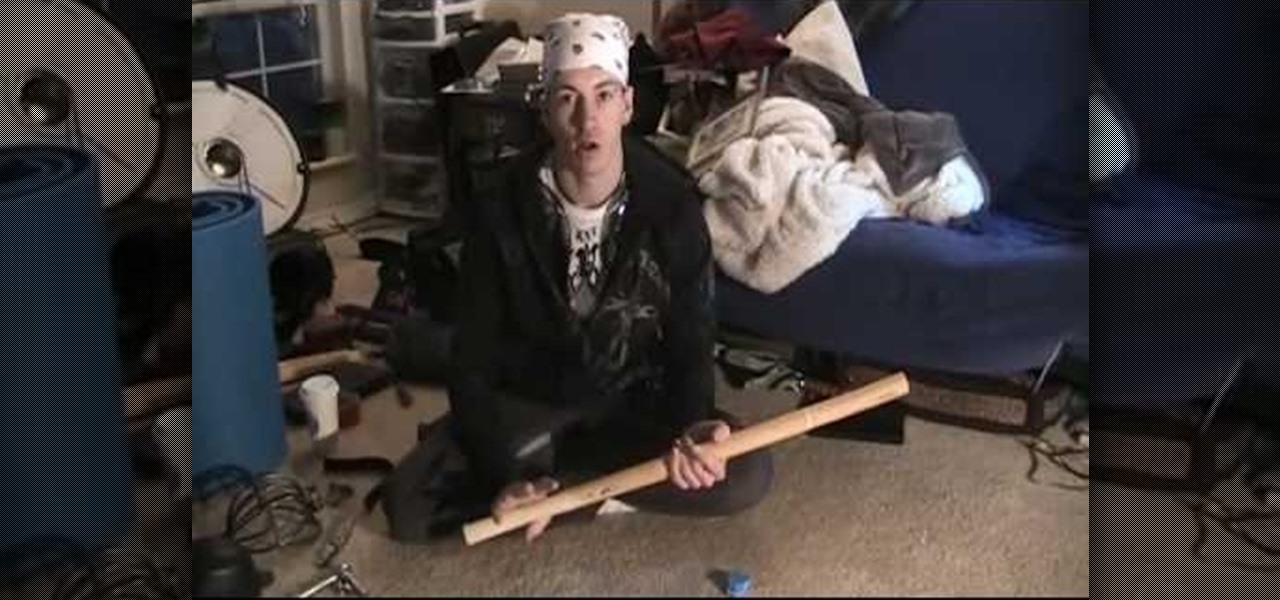
This tutorial shows you how to make a sword according to the rules of the Society for Creative Anachronism. You'll need to choose the right kind of stick, two different colors of duct tape, camp foam for the thrusting tip and some leather to accessorize.
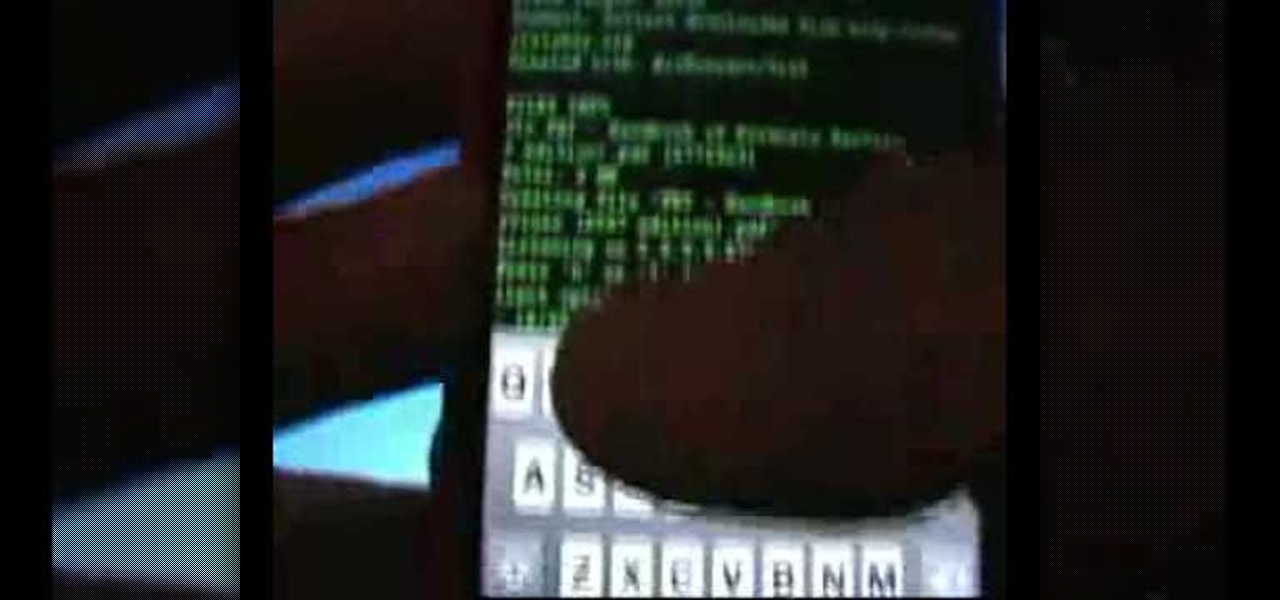
In this video, we learn how to download torrents on the iPhone 2.0 or 2.1. Before you do this, you will need: Cydia, Mobile Terminal, C Torrent, Safari Download Plug-in, and Mobile Finder. to start, you will first go to a torrent site and find the torrent that you want to download. Then, click on the download torrent button. From here, you will see a warning appear on the screen. Choose to download this and then go to your Mobile Finder. Find where you saved the torrent to. Then, hit the home...
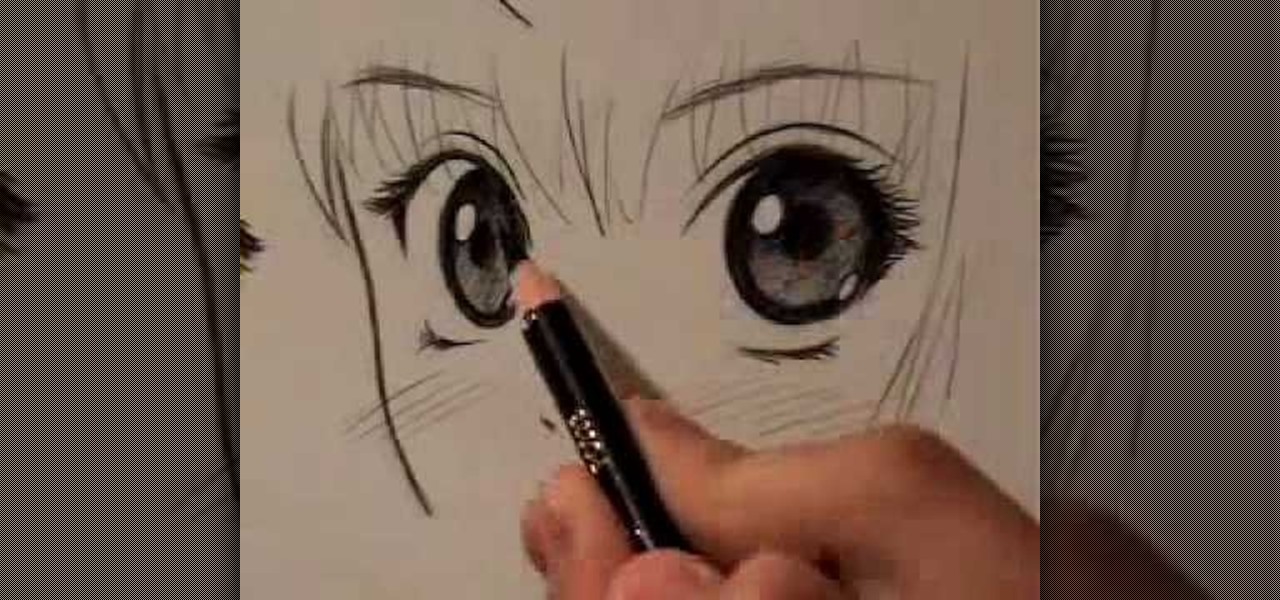
In this video, we learn how to draw manga eyes in 4 different ways. The first one is a wide eyed look where you will draw large eye and then create the pupil towards the top of the eye. Draw in the lids and the top and bottom of the eye high around it. Then, for a female eye, you will need to draw in a large eye as well. But, with these you will draw in the lashes of the eyes on both the top and the bottom. For smaller eyes, you can draw them tall but make them thinner. Crosshatch the eyes to...
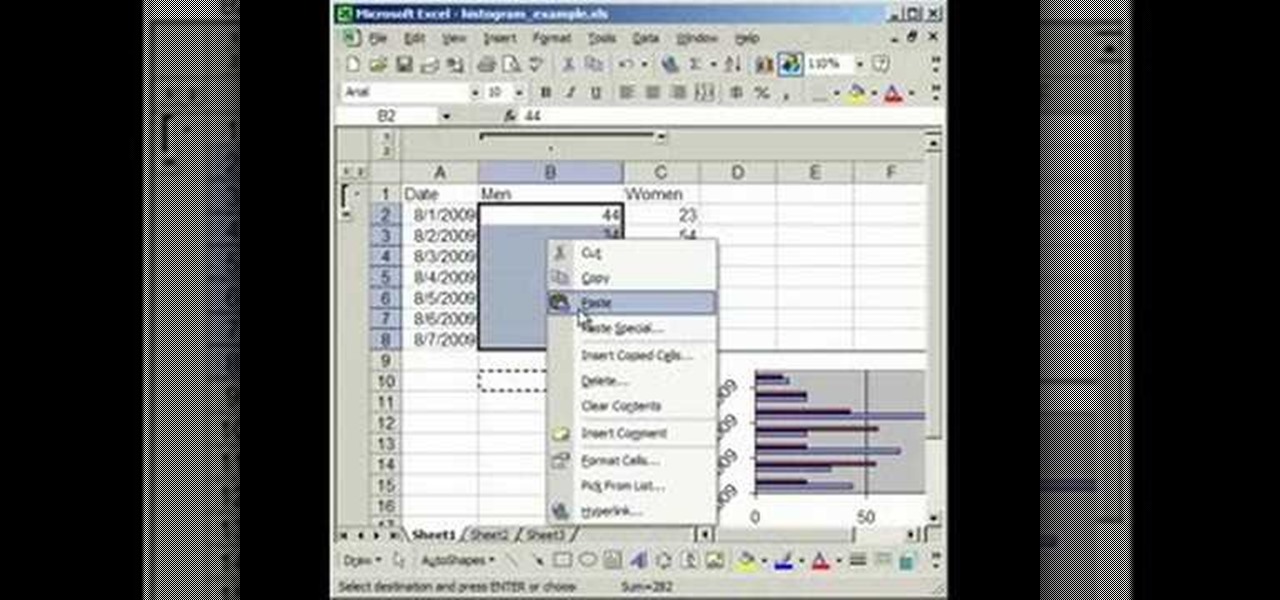
In this tutorial, we learn how to make a histogram chart in Excel. To create a vertical histogram, you will enter in data to the chart. Then, highlight all of the data and go to "insert", "chart", then choose a regular column chart. Grab a regular 2D column and then make sure your values are correct. Then, right click and go to "chart options", then take the legend off. Now, make these columns all touch each other by right clicking over the columns and formatting them. Go to "options" then ch...
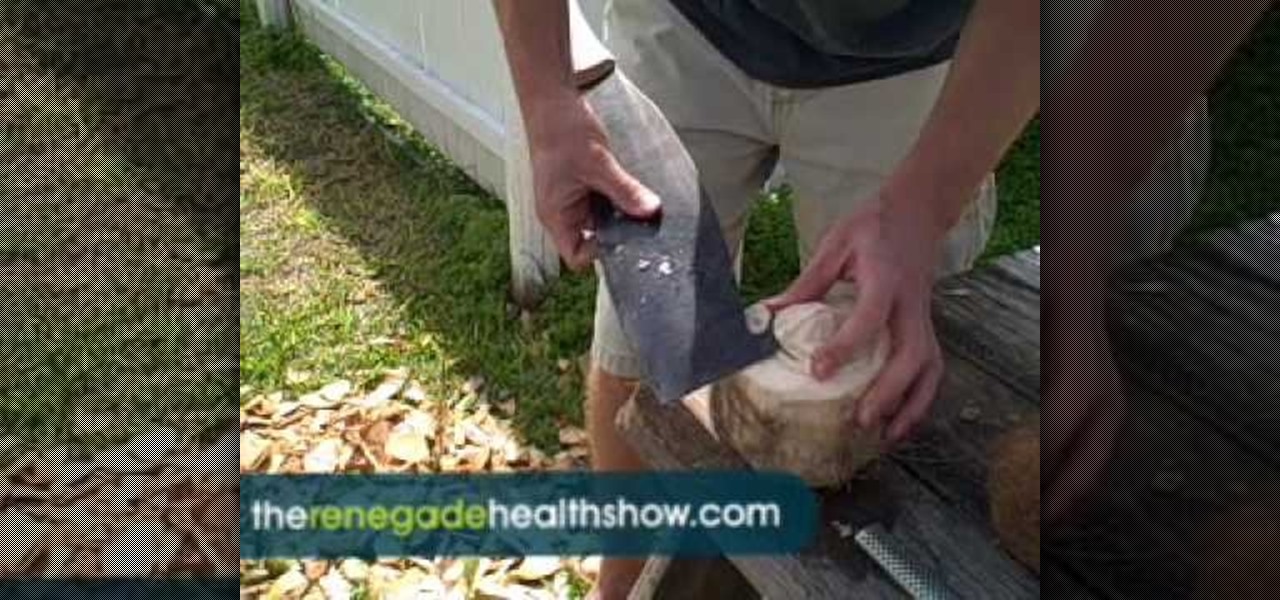
In this tutorial, we learn how to open a variety of coconuts. These fruits can be extremely difficult to open up, but it can be done. First, you will need to have a very large and sharp knife and all of your types of coconuts. To open them up, you will need to first crack the skin of the coconut with the sharp knife. On other coconuts, you can simply use the knife to cut the outer skin off to get to the milk that is in the middle. Whichever way you choose, just make sure you have a very sharp...
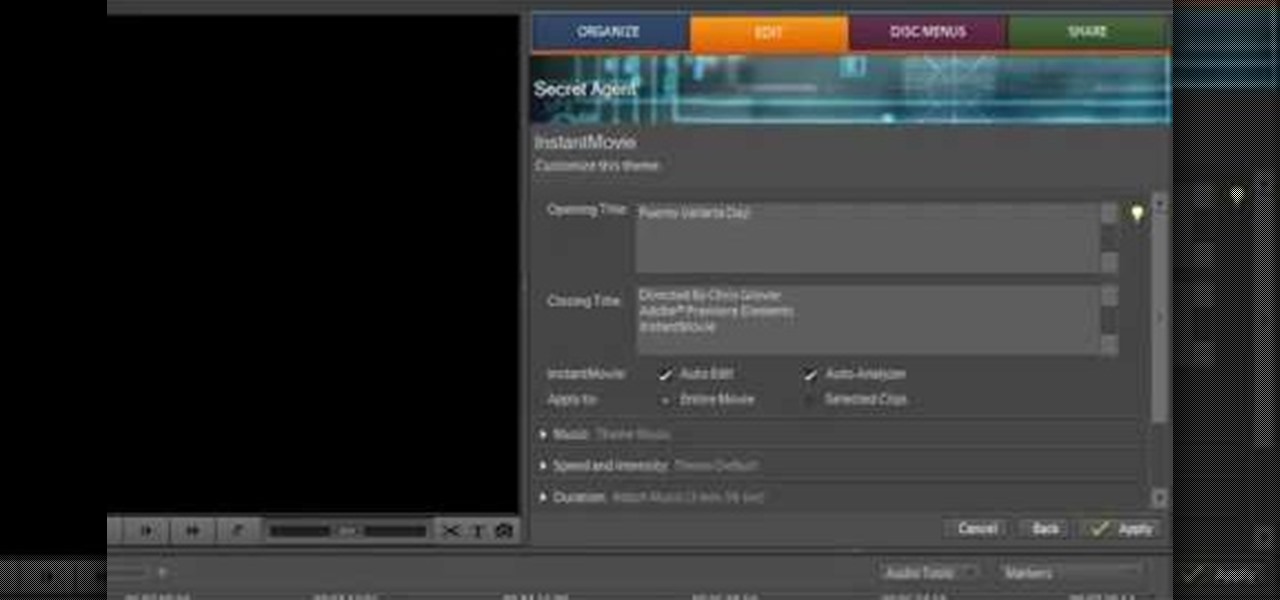
In this video we learn how to use Premiere Elements 8 Instant Movie. Once you open the program, you will be able to open up a clip and it will add in all the movie action for you. Go to the tasks panel and then go to the organize and media buttons. You can then choose clips that you want for your movie. Then, click the instant movie button with templates that you can apply to your movie. Click on a thumbnail to get a preview for each of the different options. Then, go to "edit" to change the ...
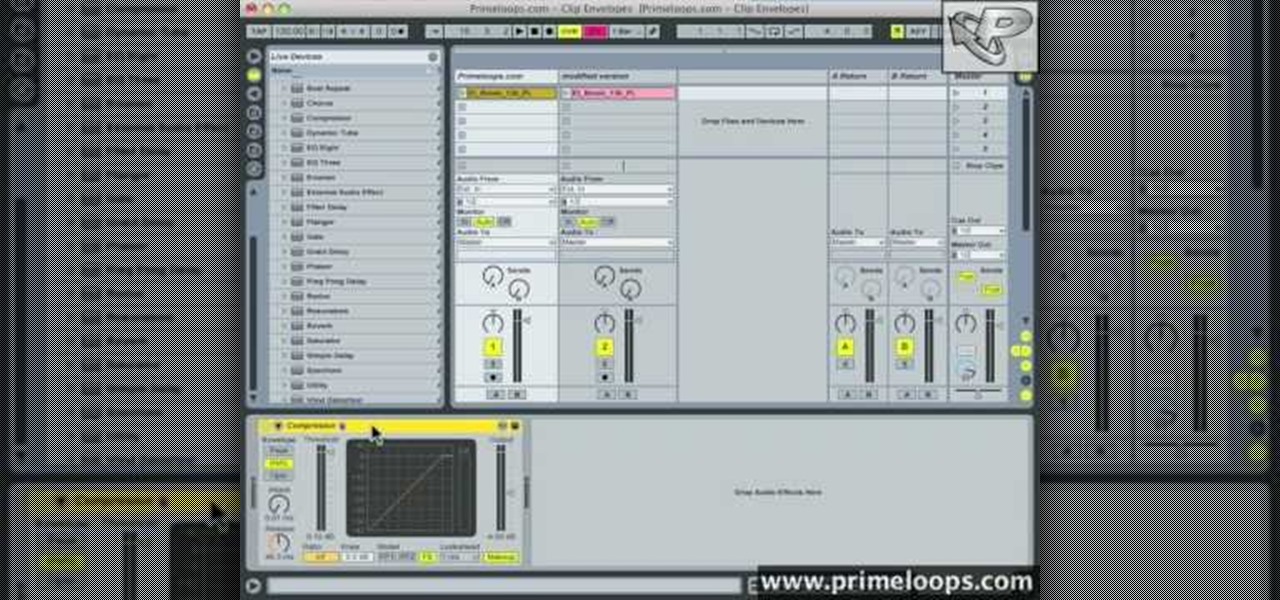
In this tutorial, we learn how to use clip envelope modulation in Ableton. This allows you to change parameters over time. You can access this by selecting your audio clip, then hitting the "E" button in the lower left hand corner. Now, you will see the envelope section where you will be presented with drop down menus. These will allow you to choose parameters and modify the tuning or position. This is an easy way to do extreme tuning changes in your audio. Continue to play around with the cl...
In this video, we learn how to enhance the audio in your Camtasia Studio 5 videos. First, set your video to 640x480 and then choose the option to zoom yourself. Now, click the zoom in button to zoom in on the time line with your audio. Then, right click the audio and go to "audio enhancement". Once here, click the first option under background noise removal, then click the remove background noise button. Now, when you play back your audio, you will hear a huge difference in what you just play...
In this video, we learn how to make a lariat necklace. First, cut your wire so it's 20" long. Then, make a loop at one of the ends and attach a small chain to it. After this, put on the crimp bead and make a loop through the bead. Once finished, take your pliers and clamp it down. Now attach your chosen beads to the wire until you reach the end where the chain is. After this, cut out three pieces of wire and attach them together in a slight v shape. After this, apply beads to them, then tie t...

There's no better way to warm up after a nippy fall day outdoors than by taking a bite into a delicious slice of tender and moist roast beef. Served with a side of green beans and mashed potatoes it truly is an incomparable comfort food and one we will never get tired of.
You can create an image gallery of any directory on your file system with Konqueror. If you are a KDE user and you need to see the images in any directory, but if there are any other stuffs beside images in that directory then you will see that stuffs too. So if you do not want this, you need to click on tools in Konqueror menu and choose "create image gallery" for the current directory. There will be many options like folder, look etc. so set your options as you like and click on create, it ...
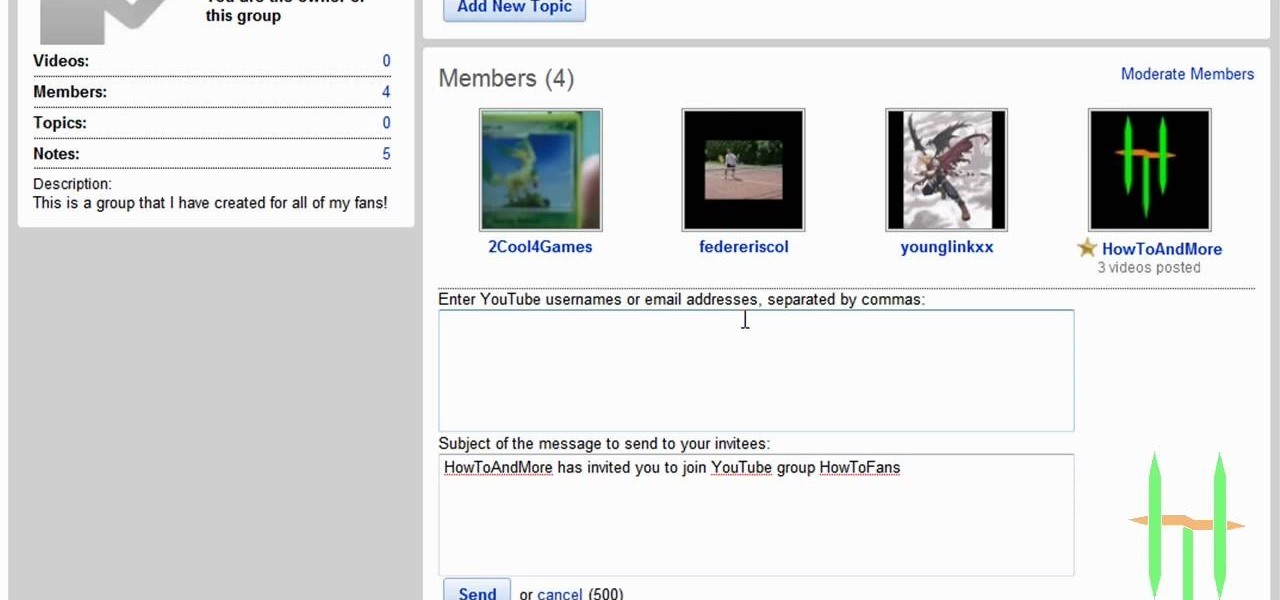
You can make and manage a YouTube group. So first thing you need to do that is to open up your web browser and go to YouTube. Now sign in and go to your account, choose groups in more section. Now to make a group you have to click on create a group. Now fill up the fields like group name, tags etc. and click on create group. Now click on groups under your modules tab and click save changes. Now you need to click on group in your channel to manage it. Now there you can manage your group like a...

In this video, we learn how to customize slideshows with titles using iMovie. First, find the photos that you want to add. Then, right click on one of the photos and then choose "show file". Now you will have a selection of all the photos that have the same search name. Drag these pictures into iMovie, then wait for the program to finish loading. When it's loaded, you will have the picture in a slideshow. You can add in any effect you would like to the pictures, or just leave them normal. Whe...
If you haven't figured it out by now, a foundation that matches your skin tone and skin type perfectly may not work at all for your friend, and vice versa. When it comes to makeup, customization is your best friend.
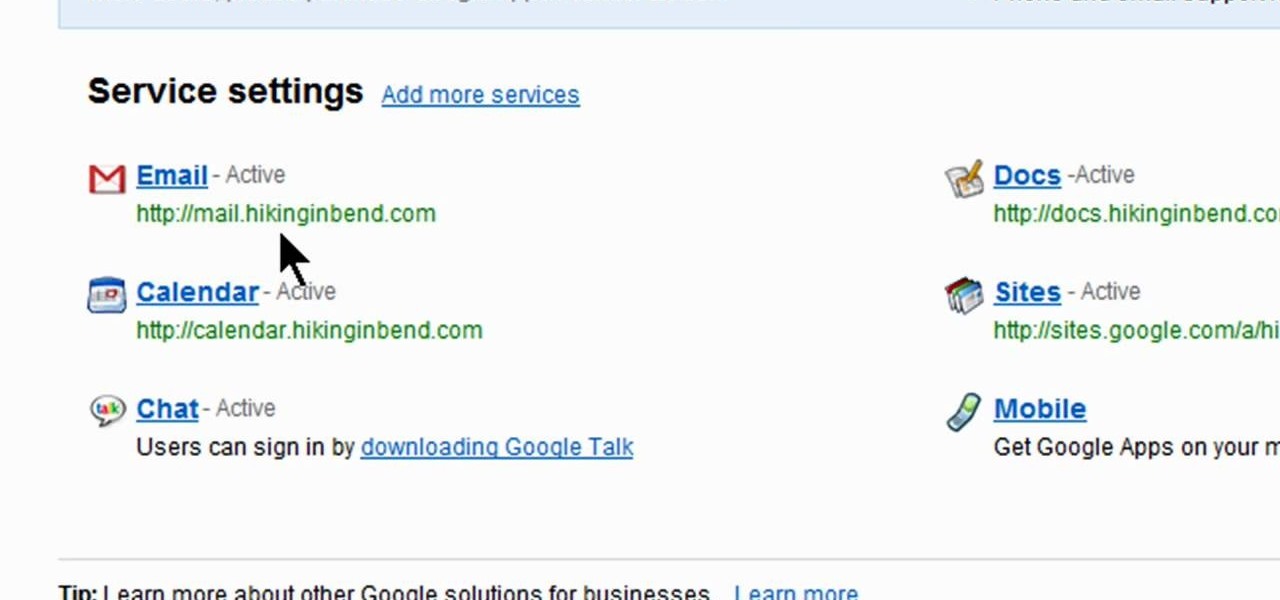
In this video, we learn how to get a new domain name from Google. First, go to the Google domain website and search for a domain name that you want. After this, check the availability of it, then continue to register it. Once you get the registration page, enter in your information and pay for the service. After you do this, you will get to choose your e-mail preferences, then finish your purchase. There will be a link to retrieve your purchase at the end, then you will create your first admi...
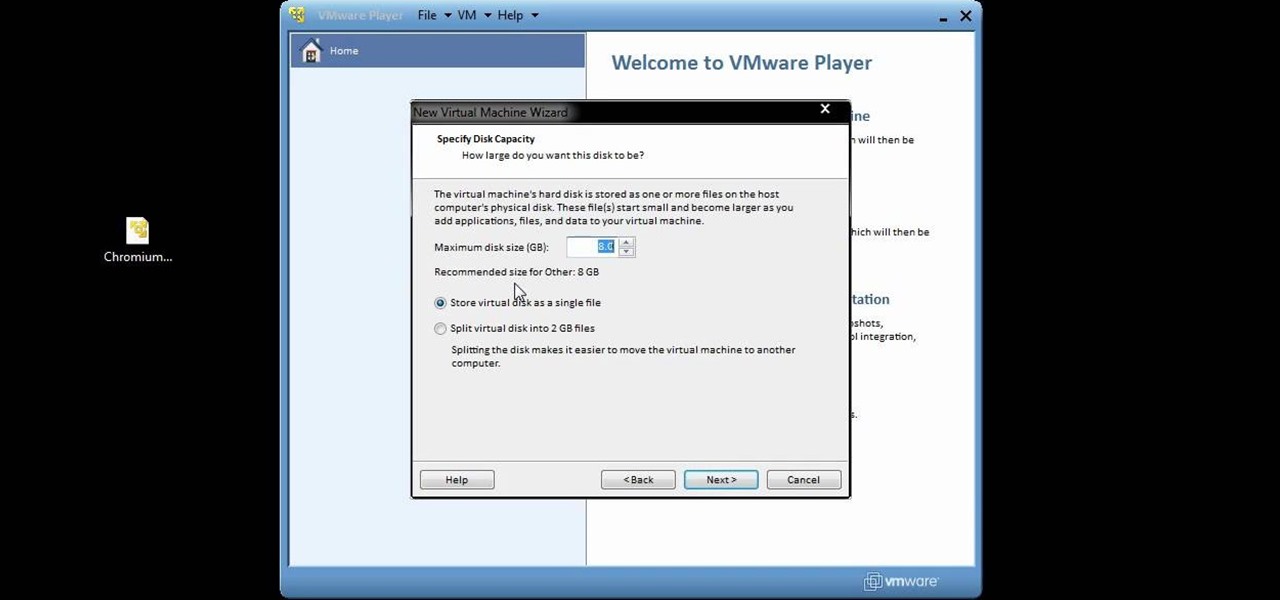
You can setup Chromium OS in a virtual machine. So first go to the download site for Chromium OS and VMWare download for the VMWare Player. Now run the VMWare Player and click on "create a new virtual machine" and select "i will install the operating system later" and click next and then next.
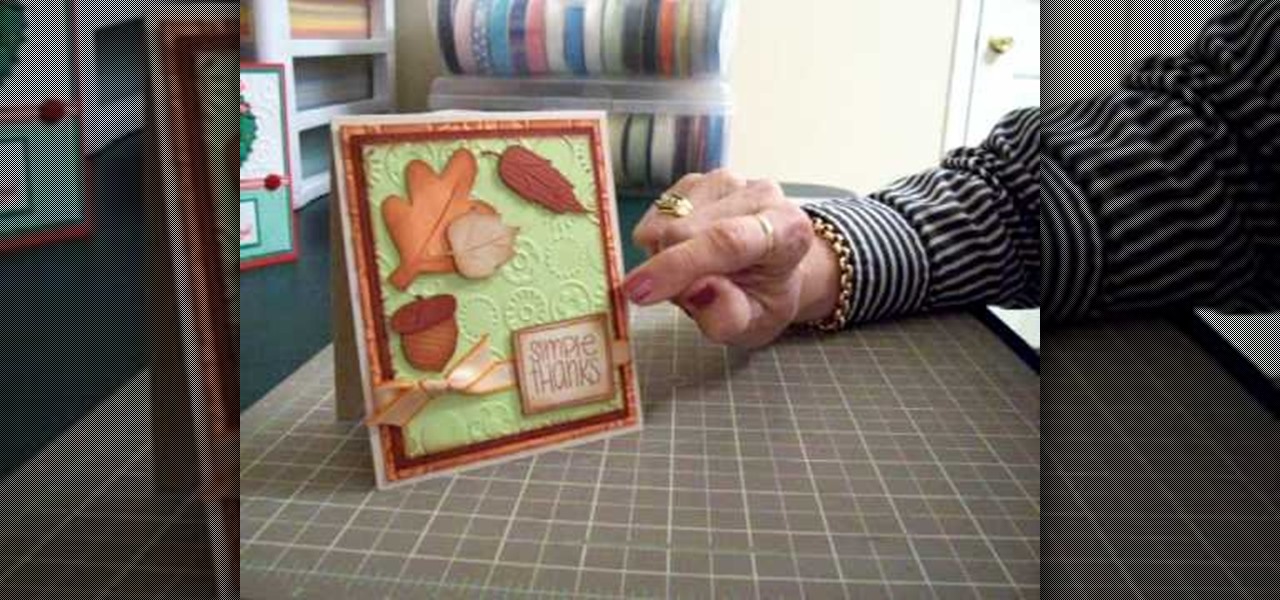
In this video, we learn how to make a thank you card using Cricut Doodle Charms and SYI. The card can be the size you choose. Layer orange, green, and brown mats, running the green and orange through the Cuttlebug using blue dots to give it texture. After this, ink around the edges with brown so the embossing shows up. Use the Cricut to cut the leaves and an acorn, using the Doodle Charms cartridge for one of the leaves cut at 2 1/4". You can also use the Stretch Your Imagination cartridge fo...
Snails are such cool cats. While we humans labor the day away in a whirlwind of errands and obligations, snails take their time wherever they choose to go. As such, we can learn a bit about taking it easy and relaxing from these small wisdom bearers.

To do a David Zanthor card trick, you can use any variant of numbers of cards. You just need to decide in advance the variant you want.
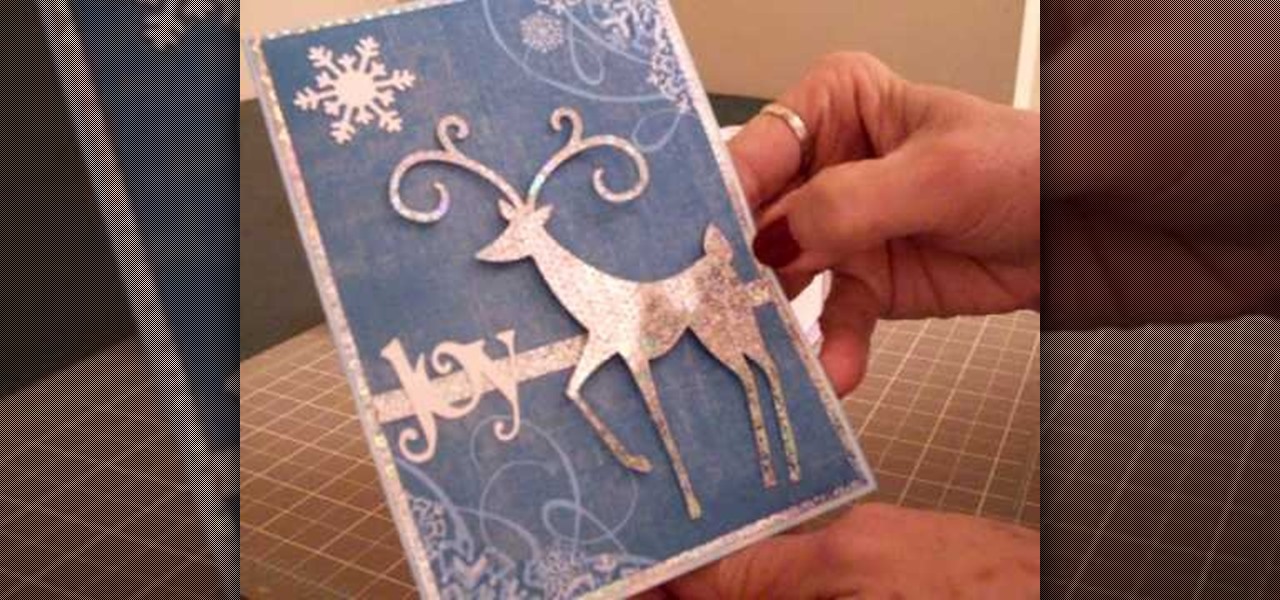
In this Arts & Crafts video tutorial you will learn how to make a Christmas card using Cricut Winter Woodland. The card is 4 1/2 x 6 1/4 inches and it has a picture of a deer and the word "Joy". On page 56 you will find the picture of a deer. Cut it out at 4 1/2 inches and the word "Joy" is on page 78. Cut it out at 1 1/4 inch. Use the snow flake punch to cut out a snow flake. From "The Winter Matstack" choose a paper that has some snowflakes on it. Then you can cut out thin strips of some or...

In order to make the side step Christmas card, using Cricut, you will need the following: card stock, cutter/trimmer, adhesive, rhinestone, ribbon, and a bone folder.
In this video, we learn how to create a free Weebly website. First, type a title in that you want for your website. After this, you will be brought to a new page where you can change the elements and designs. The design can easily be changed until you find one that works for you. After this, you can start to customize the template that you have chose and add in new paragraphs, columns, pictures, and more. Next, you can change the pages and add in links and more information. Adjust the setting...
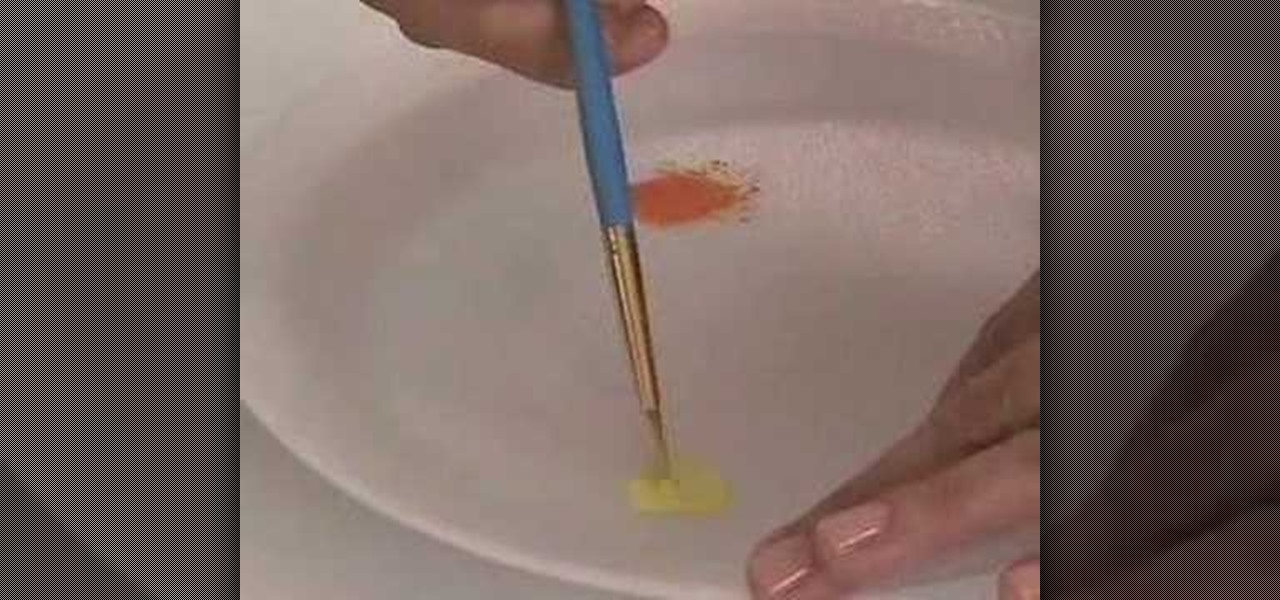
In this Arts & Crafts video tutorial you will learn how to use the cross stitch 'n paint technique. It combines simple back stitching and water color painting. Most of the materials are found in your kitchen. You will need wax paper, paper towels, and a plate to use as your paint palette, some water colors and paint brushes. After choosing your design, back stitch the outline on the fabric. Place the white paper towel over the wax paper and spread the stitched fabric over it. Now you are read...

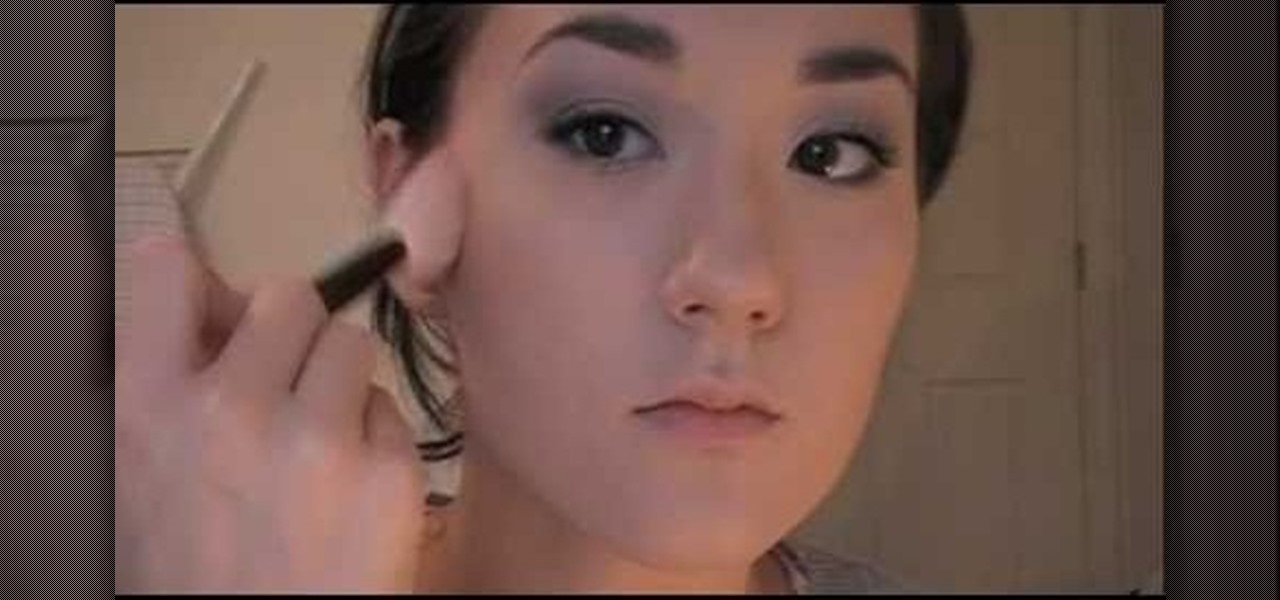
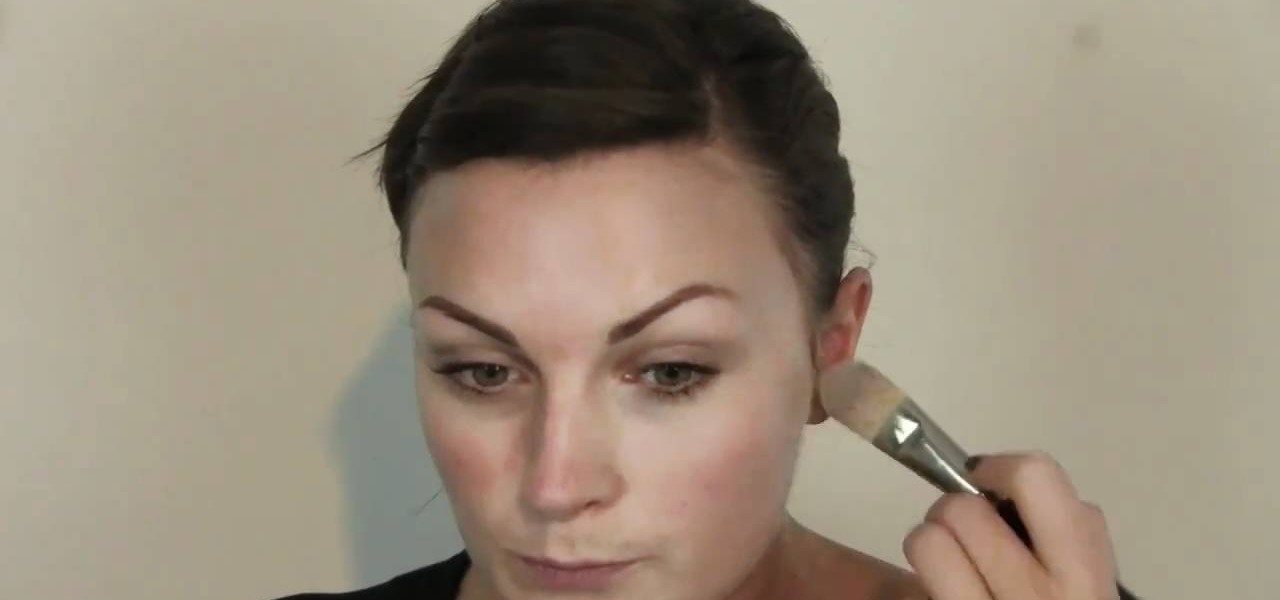
In this video, we learn how to apply and blend eyeshadow. First, you want to start by adding a primer to your eyelids. Now, use a large brush to brush a light shadow onto your entire eyelid. After this, use a smaller brush to brush a lighter shadow onto the inner crease of your eye and underneath the eyebrow. After this, use a brush to apply a dark shadow to the outer crease of the eye, then blend with the lighter shade. Next, paint a darker color on the outer v of the eye and continue to ble...

In this video, we learn how to make January thank you notes with Stampin' Up. First, you want to choose what you want your notes to say. You can use a small card stock that is 3" x 3". Then, use a border hole punch and apply it on in different colors you prefer. After this, you will want to stamp on a message that says thank you in black on the front of the card. Next, you can lay a heart punch out on top of the card to give it more personality. You can also place the heart on first and let t...

In this tutorial, we learn how to make a glue in and glaze jewelry ring. First, grab a blank ring that has a spot on the top to place a picture. It can have a jewel on it, just pop the jewel out. After this, choose an image from collage art papers, then cut it out. When done with this, place the image inside of the top of the ring and push it down with pliers. After this, place a clothing pin around the ring bottom to hold it in place, then grab you DG3 gel and add it to the top of the image....

Smarties are the all-inclusive candy. With every color of the rainbow, it allows kids and sugar-addicted adult folks alike the powerful option of choosing between eating the Red or Green flavor, or Blue for those days when we're feeling down (that's why we're eating the candy in the first place, right?).
In this tutorial, we learn how to create fiber art journal pages with Elin Waterston. First, think about the theme of your book then layout what theme you want for your book. This will carry out through your entire book, so choose something that works. Stick text onto the fabric, then add stitching to help the fabrics to stay together. This journal is a fun project to do by yourself or with other artists. Make sure you unify your book with the subject and take your time in making the theme ti...
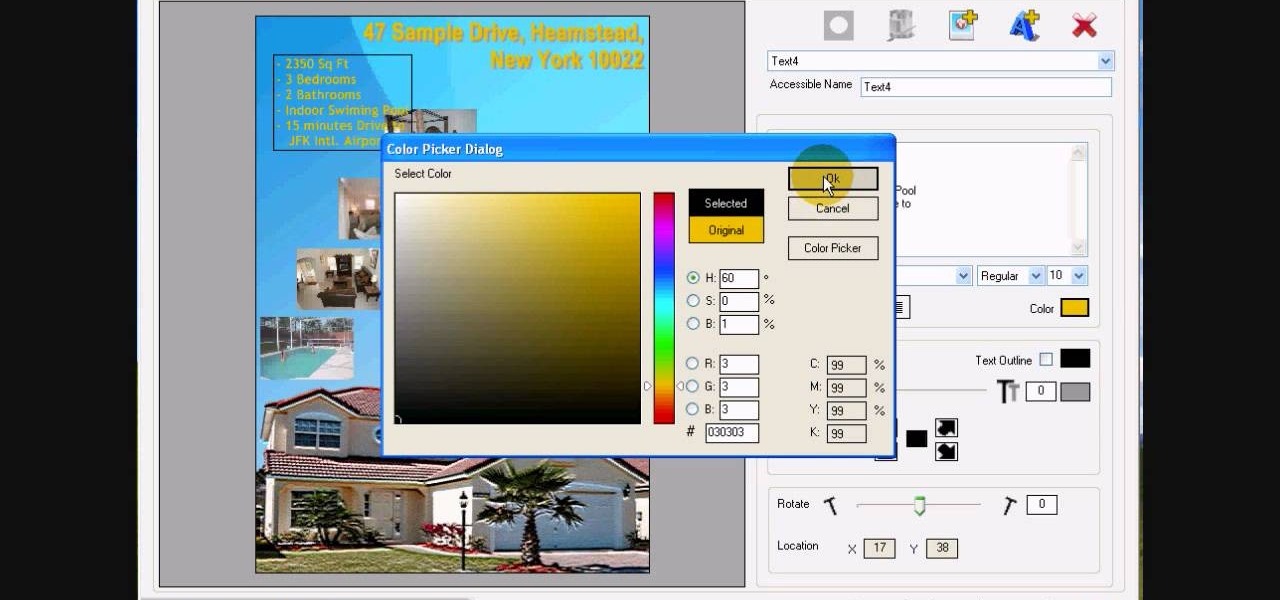
In this tutorial, we learn how to design custom flyers using Easy Flyer Creator. First, start a new deign in the software, then delete all graphics so the page is blank. Next, add in a background to the flyer and resize it to fit onto the entire page. Now, right click on the picture and choose 'set as background'. Now, add another picture on the page, then move it to your desired location to fit on the bottom of the page. After this, you can edit the picture further, if needed. When you are d...
In this tutorial, we learn how to map network driers from a remote server. First, go to run on your start menu, then type in the id address or server name for what you want to access and press enter. Now, right click on the folder you want to map and click on map network drives. Choose any letter you want from the drop down menu, then click next to the "reconnect on logon" text. Click on the finish button, then open your newly mapped network drive from your computer. You can do this for any s...
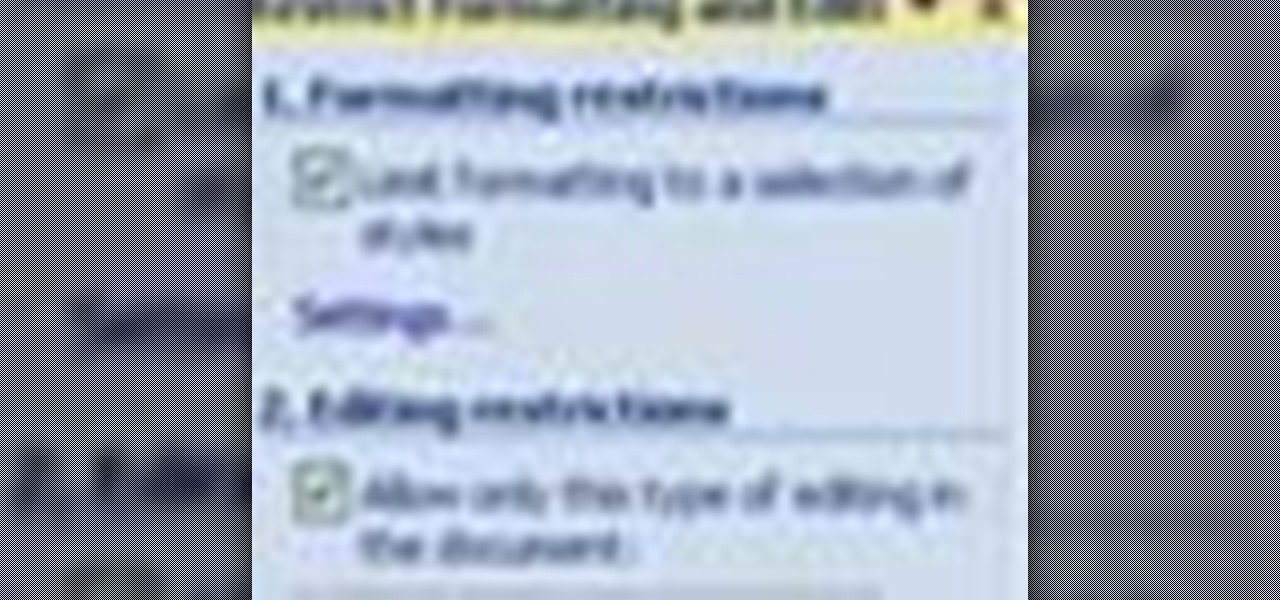
In this tutorial, we learn how to prevent edits or changed in documents in MS Word 2007. Start by going to the review tab, then click on protect documents. Then, click restrict formatting and adjust the different settings. Click on the check marks to choose what types of settings you want to restrict from being changed. This can make it impossible for anyone else to edit the pages except for the original author. You can also make an enforcing protection password so only the document creator c...